
User Manual
Page 27
... display devices 56 Directing the display output when you turn on the computer 57 Adjusting the quality of the external display......58 Using an external keyboard 58 Using a mouse 58 Connecting a printer 59 Setting up a printer 60 Connecting an optional external diskette drive........60 Turning off the computer 61 Options for...
... display devices 56 Directing the display output when you turn on the computer 57 Adjusting the quality of the external display......58 Using an external keyboard 58 Using a mouse 58 Connecting a printer 59 Setting up a printer 60 Connecting an optional external diskette drive........60 Turning off the computer 61 Options for...

User Manual
Page 28
28 Contents Chapter 2: Learning the Basics 73 Computing tips 73 Using the keyboard 75 Character keys 75 Making your keyboard emulate a full-size keyboard 75 Ctrl, Fn, and Alt keys 76 Function keys 76 Special Windows® keys 76 Overlay keys 77 Using the overlay to type numeric ... a CD/DVD 88 Removing a disc with the computer on 89 Removing a disc with the computer off 89 Caring for CD or DVD discs 89 Toshiba's online resources 90 Chapter 3: Mobile Computing 91 Toshiba's energy-saver design 91 Running the computer on battery power 91 Battery Notice 92 Power management 93
28 Contents Chapter 2: Learning the Basics 73 Computing tips 73 Using the keyboard 75 Character keys 75 Making your keyboard emulate a full-size keyboard 75 Ctrl, Fn, and Alt keys 76 Function keys 76 Special Windows® keys 76 Overlay keys 77 Using the overlay to type numeric ... a CD/DVD 88 Removing a disc with the computer on 89 Removing a disc with the computer off 89 Caring for CD or DVD discs 89 Toshiba's online resources 90 Chapter 3: Mobile Computing 91 Toshiba's energy-saver design 91 Running the computer on battery power 91 Battery Notice 92 Power management 93

User Manual
Page 31
Contents 31 TOSHIBA Accessibility 147 Fingerprint Authentication Utility 147 Fingerprint utility limitations 148 Fingerprint Enrollment 148 Fingerprint Logon 149 Power-on Security 150 Control Center 151 Password Bank ... help you 168 Resolving a hardware conflict 168 A plan of action 168 Fixing a problem with Device Manager ...........169 Memory problems 170 Power and the batteries 171 Keyboard problems 172 Display problems 173 Disk drive problems 175 Optical drive problems 177 Sound system problems 178 PC Card/Express CardTM problems 178 Printer problems...
Contents 31 TOSHIBA Accessibility 147 Fingerprint Authentication Utility 147 Fingerprint utility limitations 148 Fingerprint Enrollment 148 Fingerprint Logon 149 Power-on Security 150 Control Center 151 Password Bank ... help you 168 Resolving a hardware conflict 168 A plan of action 168 Fixing a problem with Device Manager ...........169 Memory problems 170 Power and the batteries 171 Keyboard problems 172 Display problems 173 Disk drive problems 175 Optical drive problems 177 Sound system problems 178 PC Card/Express CardTM problems 178 Printer problems...

User Manual
Page 32
... in the Windows® operating system 187 If you need further assistance 190 Before you contact Toshiba 190 Contacting Toshiba 191 Other Toshiba Internet Web sites 192 Toshiba's worldwide offices 192 Appendix A: Hot Keys/TOSHIBA Cards 194 Hot Key Cards 194 Using the Hot Key Cards 195 Application Cards 196 Using the... Display modes 204 Display brightness 205 Disabling or enabling wireless devices............206 Disabling or enabling the TouchPad 207 Changing screen resolution 208 Keyboard hot key functions 209 Appendix B: Power Cord/Cable Connectors 210 Glossary 211 Index 225
... in the Windows® operating system 187 If you need further assistance 190 Before you contact Toshiba 190 Contacting Toshiba 191 Other Toshiba Internet Web sites 192 Toshiba's worldwide offices 192 Appendix A: Hot Keys/TOSHIBA Cards 194 Hot Key Cards 194 Using the Hot Key Cards 195 Application Cards 196 Using the... Display modes 204 Display brightness 205 Disabling or enabling wireless devices............206 Disabling or enabling the TouchPad 207 Changing screen resolution 208 Keyboard hot key functions 209 Appendix B: Power Cord/Cable Connectors 210 Glossary 211 Index 225
User Manual
Page 40
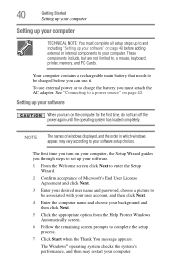
... Wizard guides you turn off the power again until the operating system has loaded completely. Your computer contains a rechargeable main battery that needs to , a mouse, keyboard, printer, memory, and PC Cards. Setting up your software When you turn on the computer for the first time, do not turn on page 42.
... Wizard guides you turn off the power again until the operating system has loaded completely. Your computer contains a rechargeable main battery that needs to , a mouse, keyboard, printer, memory, and PC Cards. Setting up your software When you turn on the computer for the first time, do not turn on page 42.
User Manual
Page 41
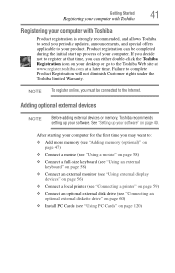
... initial start up process of your desktop or go to the Internet. Adding optional external devices NOTE Before adding external devices or memory, Toshiba recommends setting up your software. After starting your product. Failure to : ❖ Add more memory (see "Adding memory (optional)" ...on page 47) ❖ Connect a mouse (see "Using a mouse" on page 58) ❖ Connect a full-size keyboard (see "Using an external keyboard" on page 58) ❖ Connect an external monitor (see "Using external display devices" on page 56) ❖ Connect a local printer (see...
... initial start up process of your desktop or go to the Internet. Adding optional external devices NOTE Before adding external devices or memory, Toshiba recommends setting up your software. After starting your product. Failure to : ❖ Add more memory (see "Adding memory (optional)" ...on page 47) ❖ Connect a mouse (see "Using a mouse" on page 58) ❖ Connect a full-size keyboard (see "Using an external keyboard" on page 58) ❖ Connect an external monitor (see "Using external display devices" on page 56) ❖ Connect a local printer (see...

User Manual
Page 45
... are an intrinsic characteristic of the screen while on the palm rest to hold the computer in place and use the other objects from the keyboard area before closing the display panel, place one hand on battery power. To avoid damaging the display panel, do not force it beyond the point...
... are an intrinsic characteristic of the screen while on the palm rest to hold the computer in place and use the other objects from the keyboard area before closing the display panel, place one hand on battery power. To avoid damaging the display panel, do not force it beyond the point...

User Manual
Page 55
... remove the memory module slot cover (complete steps 1-8 in "Installing a memory module" on your computer without your finger across the TouchPad in front of the keyboard, is inserted completely into the socket and lined up that the computer has recognized the change. otherwise, click Cancel. Using the TouchPad™ The TouchPad...
... remove the memory module slot cover (complete steps 1-8 in "Installing a memory module" on your computer without your finger across the TouchPad in front of the keyboard, is inserted completely into the socket and lined up that the computer has recognized the change. otherwise, click Cancel. Using the TouchPad™ The TouchPad...
User Manual
Page 58
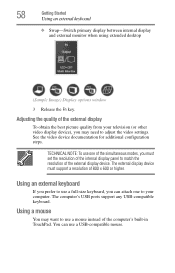
... for additional configuration steps. Using a mouse You may need to adjust the video settings. The computer's USB ports support any USB-compatible keyboard. TECHNICAL NOTE: To use one of the simultaneous modes, you can use a USB-compatible mouse. You can attach one to your television... (or other video display device), you may want to use a full-size keyboard, you must support a resolution of the external display device. The external display device must set the resolution of the internal display panel to ...
... for additional configuration steps. Using a mouse You may need to adjust the video settings. The computer's USB ports support any USB-compatible keyboard. TECHNICAL NOTE: To use one of the simultaneous modes, you can use a USB-compatible mouse. You can attach one to your television... (or other video display device), you may want to use a full-size keyboard, you must support a resolution of the external display device. The external display device must set the resolution of the internal display panel to ...
User Manual
Page 71
... Customizing your computer's settings There are additional custom settings you were using. You may also wish to keep your power usage settings. See "Toshiba Utilities" on page 104. Refer to your operating system documentation or Help and Support for your computer This section gives tips on /off the...Never use harsh or caustic chemical products to the screen(s) you can choose. For more information, see "Taking care of the computer's keyboard, speaker, and other openings. The computer returns to clean the computer. Moving the computer Before moving your battery" on page 126.
... Customizing your computer's settings There are additional custom settings you were using. You may also wish to keep your power usage settings. See "Toshiba Utilities" on page 104. Refer to your operating system documentation or Help and Support for your computer This section gives tips on /off the...Never use harsh or caustic chemical products to the screen(s) you can choose. For more information, see "Taking care of the computer's keyboard, speaker, and other openings. The computer returns to clean the computer. Moving the computer Before moving your battery" on page 126.
User Manual
Page 75
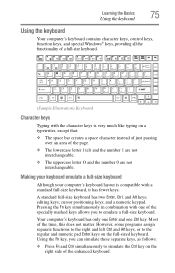
...simulate these separate keys, as follows: ❖ Press Fn and Ctrl simultaneously to the regular and numeric pad Enter keys on the full-sized keyboard. Most of the page. ❖ The lowercase letter l (el) and the number 1 are not interchangeable. ❖ The uppercase letter... O and the number 0 are not interchangeable. Learning the Basics 75 Using the keyboard Using the keyboard Your computer's keyboard contains character keys, control keys, function keys, and special Windows® keys, providing all the functionality of a full-size...
...simulate these separate keys, as follows: ❖ Press Fn and Ctrl simultaneously to the regular and numeric pad Enter keys on the full-sized keyboard. Most of the page. ❖ The lowercase letter l (el) and the number 1 are not interchangeable. ❖ The uppercase letter... O and the number 0 are not interchangeable. Learning the Basics 75 Using the keyboard Using the keyboard Your computer's keyboard contains character keys, control keys, function keys, and special Windows® keys, providing all the functionality of a full-size...
User Manual
Page 76
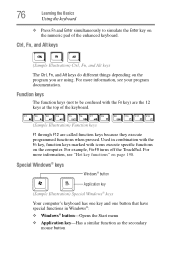
..., and Alt keys The Ctrl, Fn, and Alt keys do different things depending on the computer. 76 Learning the Basics Using the keyboard ❖ Press Fn and Enter simultaneously to be confused with icons execute specific functions on the program you are called function keys because... they execute programmed functions when pressed. For more information, see "Hot key functions" on the numeric pad of the keyboard. (Sample Illustration) Function keys F1 through F12 are using. For example, Fn+F9 turns off the TouchPad. Special Windows® keys Windows...
..., and Alt keys The Ctrl, Fn, and Alt keys do different things depending on the computer. 76 Learning the Basics Using the keyboard ❖ Press Fn and Enter simultaneously to be confused with icons execute specific functions on the program you are called function keys because... they execute programmed functions when pressed. For more information, see "Hot key functions" on the numeric pad of the keyboard. (Sample Illustration) Function keys F1 through F12 are using. For example, Fn+F9 turns off the TouchPad. Special Windows® keys Windows...
User Manual
Page 77
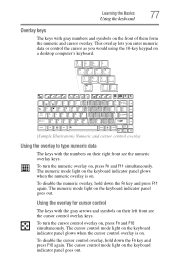
...left front are the numeric overlay keys. The cursor control mode light on . The numeric mode light on the keyboard indicator panel glows when the numeric overlay is on the keyboard indicator panel goes out. To turn the numeric overlay on their right front are the cursor control overlay keys.... This overlay lets you enter numeric data or control the cursor as you would using the 10-key keypad on a desktop computer's keyboard. (Sample Illustration) Numeric and cursor control overlay Using the overlay to type numeric data The keys with the gray arrows and symbols on , press...
...left front are the numeric overlay keys. The cursor control mode light on . The numeric mode light on the keyboard indicator panel glows when the numeric overlay is on the keyboard indicator panel goes out. To turn the numeric overlay on their right front are the cursor control overlay keys.... This overlay lets you enter numeric data or control the cursor as you would using the 10-key keypad on a desktop computer's keyboard. (Sample Illustration) Numeric and cursor control overlay Using the overlay to type numeric data The keys with the gray arrows and symbols on , press...
User Manual
Page 81
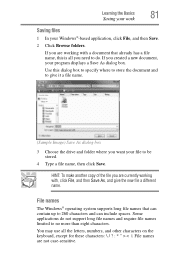
... use all you want your file to 260 characters and can include spaces. Use this is all the letters, numbers, and other characters on the keyboard, except for these characters File names are currently working with , click File, and then Save As, and give it a file name. (Sample Image) Save As...
... use all you want your file to 260 characters and can include spaces. Use this is all the letters, numbers, and other characters on the keyboard, except for these characters File names are currently working with , click File, and then Save As, and give it a file name. (Sample Image) Save As...
User Manual
Page 85
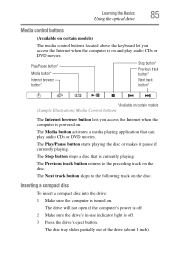
Learning the Basics 85 Using the optical drive Media control buttons (Available on certain models) The media control buttons located above the keyboard let you access the Internet when the computer is turned on . The Stop button stops a disc that can play audio CDs or DVD movies. The ...
Learning the Basics 85 Using the optical drive Media control buttons (Available on certain models) The media control buttons located above the keyboard let you access the Internet when the computer is turned on . The Stop button stops a disc that can play audio CDs or DVD movies. The ...
User Manual
Page 143
... Utility 143 ❖ Boot Priority-Allows you to select which your system. TOSHIBA Zooming Utility This utility allows you to set networking functions By changing any subset of the options that function. You may select all applications or ...: ❖ Microsoft® Internet Explorer® ❖ Microsoft® Office ❖ Windows Media® Player ❖ Adobe® Acrobat® Reader® ❖ Icons on keyboard function ❖ USB-Allows you to enable or disable USB Legacy Emulation ❖ LAN-Allows you to change will work with the zoom in/out...
... Utility 143 ❖ Boot Priority-Allows you to select which your system. TOSHIBA Zooming Utility This utility allows you to set networking functions By changing any subset of the options that function. You may select all applications or ...: ❖ Microsoft® Internet Explorer® ❖ Microsoft® Office ❖ Windows Media® Player ❖ Adobe® Acrobat® Reader® ❖ Icons on keyboard function ❖ USB-Allows you to enable or disable USB Legacy Emulation ❖ LAN-Allows you to change will work with the zoom in/out...
User Manual
Page 145
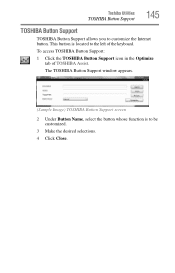
Toshiba Utilities TOSHIBA Button Support 145 TOSHIBA Button Support TOSHIBA Button Support allows you to the left of TOSHIBA Assist. This button is to be customized. 3 Make the desired selections. 4 Click Close. The TOSHIBA Button Support window appears. (Sample Image) TOSHIBA Button Support screen 2 Under Button Name, select the button whose function is located to customize the Internet button. To access TOSHIBA Button Support: 1 Click the TOSHIBA Button Support icon in the Optimize tab of the keyboard.
Toshiba Utilities TOSHIBA Button Support 145 TOSHIBA Button Support TOSHIBA Button Support allows you to the left of TOSHIBA Assist. This button is to be customized. 3 Make the desired selections. 4 Click Close. The TOSHIBA Button Support window appears. (Sample Image) TOSHIBA Button Support screen 2 Under Button Name, select the button whose function is located to customize the Internet button. To access TOSHIBA Button Support: 1 Click the TOSHIBA Button Support icon in the Optimize tab of the keyboard.
User Manual
Page 147
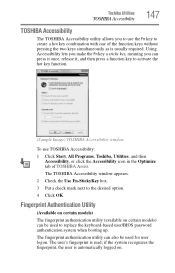
...the Fn key to create a hot key combination with one of TOSHIBA Assist. The fingerprint authentication utility can be used to replace the keyboard-based user/BIOS password authentication system when booting up. The TOSHIBA Accessibility window appears. 2 Check the Use Fn-StickyKey box. 3... Put a check mark next to use TOSHIBA Accessibility: 1 Click Start, All Programs, Toshiba, Utilities, and then Accessibility, ...
...the Fn key to create a hot key combination with one of TOSHIBA Assist. The fingerprint authentication utility can be used to replace the keyboard-based user/BIOS password authentication system when booting up. The TOSHIBA Accessibility window appears. 2 Check the Use Fn-StickyKey box. 3... Put a check mark next to use TOSHIBA Accessibility: 1 Click Start, All Programs, Toshiba, Utilities, and then Accessibility, ...

User Manual
Page 172
... hardware conflict The battery appears not to any of the keys. Is your Power Plans (see "Power Plans" on . After a period of keyboard. If the numlock light or cursor control mode light is on page 93. If the problem occurs when both the keypad overlays are using a... often to stay current on maintaining battery power, see your accessories information that takes its ability to perform at accessories.toshiba.com. You have connected an external keyboard and the operating system displays one or more information on the most recent software and hardware options for all batteries.
... hardware conflict The battery appears not to any of the keys. Is your Power Plans (see "Power Plans" on . After a period of keyboard. If the numlock light or cursor control mode light is on page 93. If the problem occurs when both the keypad overlays are using a... often to stay current on maintaining battery power, see your accessories information that takes its ability to perform at accessories.toshiba.com. You have connected an external keyboard and the operating system displays one or more information on the most recent software and hardware options for all batteries.

User Manual
Page 173
...that the cable connecting the external monitor to the computer is firmly attached. ❖ Try adjusting the contrast and brightness controls on the external keyboard. Display Auto Off may have activated the instant password feature by pressing Fn and F1 simultaneously. The Shut Down menu appears. 2 Click ...is not set for the built-in screen. The screen reactivates and allows you through the display options. If you have plugged the external keyboard in the lower-right part of the Start menu. If this , press Fn and F5 simultaneously (once). You may have registered a ...
...that the cable connecting the external monitor to the computer is firmly attached. ❖ Try adjusting the contrast and brightness controls on the external keyboard. Display Auto Off may have activated the instant password feature by pressing Fn and F1 simultaneously. The Shut Down menu appears. 2 Click ...is not set for the built-in screen. The screen reactivates and allows you through the display options. If you have plugged the external keyboard in the lower-right part of the Start menu. If this , press Fn and F5 simultaneously (once). You may have registered a ...

