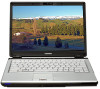

User Manual
Page 27
... display devices 56 Directing the display output when you turn on the computer 57 Adjusting the quality of the external display......58 Using an external keyboard 58 Using a mouse 58 Connecting a printer 59 Setting up a printer 60 Connecting an optional external diskette drive........60 Turning off the computer 61 Options for...
... display devices 56 Directing the display output when you turn on the computer 57 Adjusting the quality of the external display......58 Using an external keyboard 58 Using a mouse 58 Connecting a printer 59 Setting up a printer 60 Connecting an optional external diskette drive........60 Turning off the computer 61 Options for...

User Manual
Page 28
28 Contents Chapter 2: Learning the Basics 73 Computing tips 73 Using the keyboard 75 Character keys 75 Making your keyboard emulate a full-size keyboard 75 Ctrl, Fn, and Alt keys 76 Function keys 76 Special Windows® keys 76 Overlay keys 77 Using the overlay to type numeric ... a CD/DVD 88 Removing a disc with the computer on 89 Removing a disc with the computer off 89 Caring for CD or DVD discs 89 Toshiba's online resources 90 Chapter 3: Mobile Computing 91 Toshiba's energy-saver design 91 Running the computer on battery power 91 Battery Notice 92 Power management 93
28 Contents Chapter 2: Learning the Basics 73 Computing tips 73 Using the keyboard 75 Character keys 75 Making your keyboard emulate a full-size keyboard 75 Ctrl, Fn, and Alt keys 76 Function keys 76 Special Windows® keys 76 Overlay keys 77 Using the overlay to type numeric ... a CD/DVD 88 Removing a disc with the computer on 89 Removing a disc with the computer off 89 Caring for CD or DVD discs 89 Toshiba's online resources 90 Chapter 3: Mobile Computing 91 Toshiba's energy-saver design 91 Running the computer on battery power 91 Battery Notice 92 Power management 93

User Manual
Page 31
Contents 31 TOSHIBA Accessibility 147 Fingerprint Authentication Utility 147 Fingerprint utility limitations 148 Fingerprint Enrollment 148 Fingerprint Logon 149 Power-on Security 150 Control Center 151 Password Bank ... help you 168 Resolving a hardware conflict 168 A plan of action 168 Fixing a problem with Device Manager ...........169 Memory problems 170 Power and the batteries 171 Keyboard problems 172 Display problems 173 Disk drive problems 175 Optical drive problems 177 Sound system problems 178 PC Card/Express CardTM problems 178 Printer problems...
Contents 31 TOSHIBA Accessibility 147 Fingerprint Authentication Utility 147 Fingerprint utility limitations 148 Fingerprint Enrollment 148 Fingerprint Logon 149 Power-on Security 150 Control Center 151 Password Bank ... help you 168 Resolving a hardware conflict 168 A plan of action 168 Fixing a problem with Device Manager ...........169 Memory problems 170 Power and the batteries 171 Keyboard problems 172 Display problems 173 Disk drive problems 175 Optical drive problems 177 Sound system problems 178 PC Card/Express CardTM problems 178 Printer problems...

User Manual
Page 32
... in the Windows® operating system 187 If you need further assistance 190 Before you contact Toshiba 190 Contacting Toshiba 191 Other Toshiba Internet Web sites 192 Toshiba's worldwide offices 192 Appendix A: Hot Keys/TOSHIBA Cards 194 Hot Key Cards 194 Using the Hot Key Cards 195 Application Cards 196 Using the... Display modes 204 Display brightness 205 Disabling or enabling wireless devices............206 Disabling or enabling the TouchPad 207 Changing screen resolution 208 Keyboard hot key functions 209 Appendix B: Power Cord/Cable Connectors 210 Glossary 211 Index 225
... in the Windows® operating system 187 If you need further assistance 190 Before you contact Toshiba 190 Contacting Toshiba 191 Other Toshiba Internet Web sites 192 Toshiba's worldwide offices 192 Appendix A: Hot Keys/TOSHIBA Cards 194 Hot Key Cards 194 Using the Hot Key Cards 195 Application Cards 196 Using the... Display modes 204 Display brightness 205 Disabling or enabling wireless devices............206 Disabling or enabling the TouchPad 207 Changing screen resolution 208 Keyboard hot key functions 209 Appendix B: Power Cord/Cable Connectors 210 Glossary 211 Index 225
User Manual
Page 40
... License Agreement and click Next. 3 Enter your desired user name and password, choose a picture to be charged before adding external or internal components to , a mouse, keyboard, printer, memory, and PC Cards. The Windows® operating system checks the system's performance, and then may vary according to your background and then click...
... License Agreement and click Next. 3 Enter your desired user name and password, choose a picture to be charged before adding external or internal components to , a mouse, keyboard, printer, memory, and PC Cards. The Windows® operating system checks the system's performance, and then may vary according to your background and then click...
User Manual
Page 41
... must be completed during the initial start up your software. Adding optional external devices NOTE Before adding external devices or memory, Toshiba recommends setting up your software" on page 40. After starting your computer for the first time you periodic updates, announcements, and... is strongly recommended, and allows Toshiba to send you may want to: ❖ Add more memory (see "Adding memory (optional)" on page 47) ❖ Connect a mouse (see "Using a mouse" on page 58) ❖ Connect a full-size keyboard (see "Using an external keyboard" on page 58) ❖...
... must be completed during the initial start up your software. Adding optional external devices NOTE Before adding external devices or memory, Toshiba recommends setting up your software" on page 40. After starting your computer for the first time you periodic updates, announcements, and... is strongly recommended, and allows Toshiba to send you may want to: ❖ Add more memory (see "Adding memory (optional)" on page 47) ❖ Connect a mouse (see "Using a mouse" on page 58) ❖ Connect a full-size keyboard (see "Using an external keyboard" on page 58) ❖...

User Manual
Page 45
... dots may not be careful to remove any pens or other hand to hold the computer in place and use the other objects from the keyboard area before closing the display panel, place one hand on battery power. This is now ready for the first time The computer is also an...
... dots may not be careful to remove any pens or other hand to hold the computer in place and use the other objects from the keyboard area before closing the display panel, place one hand on battery power. This is now ready for the first time The computer is also an...

User Manual
Page 55
... in the direction you were trying to continue." Using the TouchPad™ The TouchPad™, the small, smooth, square cutout located in front of the keyboard, is sensitive to touch and enables you to move the cursor to the top of a finger. Getting Started 55 Using the TouchPad™ Checking total...
... in the direction you were trying to continue." Using the TouchPad™ The TouchPad™, the small, smooth, square cutout located in front of the keyboard, is sensitive to touch and enables you to move the cursor to the top of a finger. Getting Started 55 Using the TouchPad™ Checking total...
User Manual
Page 58
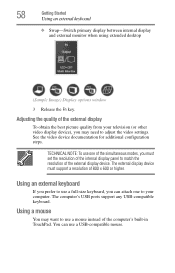
... (or other video display device), you can use a mouse instead of 800 x 600 or higher. 58 Getting Started Using an external keyboard ❖ Swap-Switch primary display between internal display and external monitor when using extended desktop (Sample Image) Display options window 3 Release the... Fn key. Using an external keyboard If you prefer to use one to adjust the video settings. See the video device documentation for additional configuration steps. You can...
... (or other video display device), you can use a mouse instead of 800 x 600 or higher. 58 Getting Started Using an external keyboard ❖ Swap-Switch primary display between internal display and external monitor when using extended desktop (Sample Image) Display options window 3 Release the... Fn key. Using an external keyboard If you prefer to use one to adjust the video settings. See the video device documentation for additional configuration steps. You can...
User Manual
Page 71
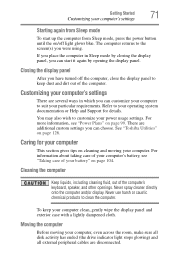
... to the screen(s) you were using. Refer to keep your power usage settings. Caring for details. To keep dust and dirt out of the computer's keyboard, speaker, and other openings. Customizing your computer This section gives tips on /off the computer, close the display panel to your operating system documentation or...
... to the screen(s) you were using. Refer to keep your power usage settings. Caring for details. To keep dust and dirt out of the computer's keyboard, speaker, and other openings. Customizing your computer This section gives tips on /off the computer, close the display panel to your operating system documentation or...
User Manual
Page 75
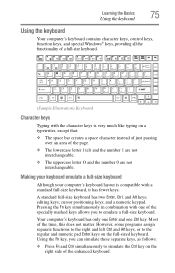
...separate keys, as follows: ❖ Press Fn and Ctrl simultaneously to simulate the Ctrl key on the right side of the enhanced keyboard. A standard full-size keyboard has two Enter, Ctrl, and Alt keys; and a numeric keypad. cursor positioning keys; editing keys; Using the Fn key, you... instead of just passing over an area of the time, this does not matter. Learning the Basics 75 Using the keyboard Using the keyboard Your computer's keyboard contains character keys, control keys, function keys, and special Windows® keys, providing all the functionality of a full-size...
...separate keys, as follows: ❖ Press Fn and Ctrl simultaneously to simulate the Ctrl key on the right side of the enhanced keyboard. A standard full-size keyboard has two Enter, Ctrl, and Alt keys; and a numeric keypad. cursor positioning keys; editing keys; Using the Fn key, you... instead of just passing over an area of the time, this does not matter. Learning the Basics 75 Using the keyboard Using the keyboard Your computer's keyboard contains character keys, control keys, function keys, and special Windows® keys, providing all the functionality of a full-size...
User Manual
Page 76
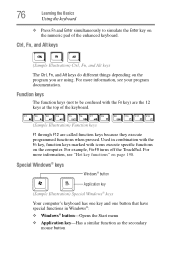
...called function keys because they execute programmed functions when pressed. For more information, see "Hot key functions" on the numeric pad of the keyboard. (Sample Illustration) Function keys F1 through F12 are using. Function keys The function keys (not to simulate the Enter key on page ... functions in combination with the Fn key, function keys marked with the Fn key) are the 12 keys at the top of the enhanced keyboard. For more information, see your program documentation. Used in Windows®: ❖ Windows® button-Opens the Start menu ❖ Application...
...called function keys because they execute programmed functions when pressed. For more information, see "Hot key functions" on the numeric pad of the keyboard. (Sample Illustration) Function keys F1 through F12 are using. Function keys The function keys (not to simulate the Enter key on page ... functions in combination with the Fn key, function keys marked with the Fn key) are the 12 keys at the top of the enhanced keyboard. For more information, see your program documentation. Used in Windows®: ❖ Windows® button-Opens the Start menu ❖ Application...
User Manual
Page 77
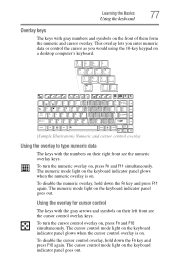
... the numeric and cursor overlay. To disable the numeric overlay, hold down the Fn key and press F11 again. The numeric mode light on the keyboard indicator panel glows when the numeric overlay is on their right front are the cursor control overlay keys. To disable the cursor control overlay, hold... press F10 again. Using the overlay for cursor control The keys with the gray arrows and symbols on . The cursor control mode light on the keyboard indicator panel glows when the cursor control overlay is on , press Fn and F11 simultaneously. To turn the cursor control overlay on the...
... the numeric and cursor overlay. To disable the numeric overlay, hold down the Fn key and press F11 again. The numeric mode light on the keyboard indicator panel glows when the numeric overlay is on their right front are the cursor control overlay keys. To disable the cursor control overlay, hold... press F10 again. Using the overlay for cursor control The keys with the gray arrows and symbols on . The cursor control mode light on the keyboard indicator panel glows when the cursor control overlay is on , press Fn and F11 simultaneously. To turn the cursor control overlay on the...
User Manual
Page 81
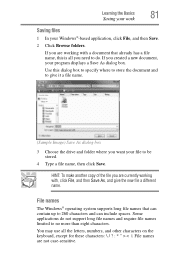
... the document and to give the new file a different name. Some applications do . Use this is all the letters, numbers, and other characters on the keyboard, except for these characters File names are working with a document that can contain up to no more than eight characters. HINT: To make another copy...
... the document and to give the new file a different name. Some applications do . Use this is all the letters, numbers, and other characters on the keyboard, except for these characters File names are working with a document that can contain up to no more than eight characters. HINT: To make another copy...
User Manual
Page 85
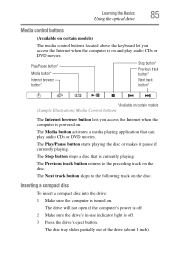
... drive (about 1 inch). Learning the Basics 85 Using the optical drive Media control buttons (Available on certain models) The media control buttons located above the keyboard let you access the Internet when the computer is powered on . Inserting a compact disc To insert a compact disc into the drive: 1 Make sure the computer...
... drive (about 1 inch). Learning the Basics 85 Using the optical drive Media control buttons (Available on certain models) The media control buttons located above the keyboard let you access the Internet when the computer is powered on . Inserting a compact disc To insert a compact disc into the drive: 1 Make sure the computer...
User Manual
Page 143
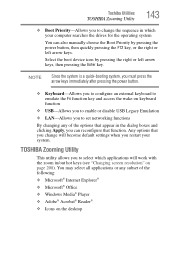
...; ❖ Microsoft® Office ❖ Windows Media® Player ❖ Adobe® Acrobat® Reader® ❖ Icons on keyboard function ❖ USB-Allows you to enable or disable USB Legacy Emulation ❖ LAN-Allows you to select which applications will work with the ...press the arrow keys immediately after pressing the power button. ❖ Keyboard-Allows you to configure an external keyboard to emulate the Fn function key and access the wake-on the desktop Toshiba Utilities TOSHIBA Zooming Utility 143 ❖ Boot Priority-Allows you can also manually ...
...; ❖ Microsoft® Office ❖ Windows Media® Player ❖ Adobe® Acrobat® Reader® ❖ Icons on keyboard function ❖ USB-Allows you to enable or disable USB Legacy Emulation ❖ LAN-Allows you to select which applications will work with the ...press the arrow keys immediately after pressing the power button. ❖ Keyboard-Allows you to configure an external keyboard to emulate the Fn function key and access the wake-on the desktop Toshiba Utilities TOSHIBA Zooming Utility 143 ❖ Boot Priority-Allows you can also manually ...
User Manual
Page 145
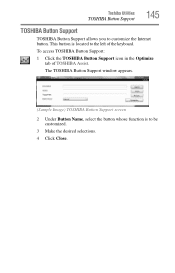
Toshiba Utilities TOSHIBA Button Support 145 TOSHIBA Button Support TOSHIBA Button Support allows you to the left of TOSHIBA Assist. This button is to be customized. 3 Make the desired selections. 4 Click Close. To access TOSHIBA Button Support: 1 Click the TOSHIBA Button Support icon in the Optimize tab of the keyboard. The TOSHIBA Button Support window appears. (Sample Image) TOSHIBA Button Support screen 2 Under Button Name, select the button whose function is located to customize the Internet button.
Toshiba Utilities TOSHIBA Button Support 145 TOSHIBA Button Support TOSHIBA Button Support allows you to the left of TOSHIBA Assist. This button is to be customized. 3 Make the desired selections. 4 Click Close. To access TOSHIBA Button Support: 1 Click the TOSHIBA Button Support icon in the Optimize tab of the keyboard. The TOSHIBA Button Support window appears. (Sample Image) TOSHIBA Button Support screen 2 Under Button Name, select the button whose function is located to customize the Internet button.
User Manual
Page 147
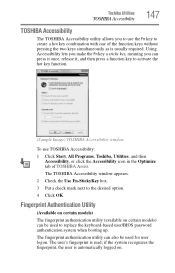
...a check mark next to create a hot key combination with one of TOSHIBA Assist. if the system recognizes the fingerprint, the user is automatically logged on certain models) can be used to replace the keyboard-based user/BIOS password authentication system when booting up. The fingerprint authentication ...utility can press it once, release it, and then press a function key to activate the hot key function. (Sample Image) TOSHIBA Accessibility window To use the ...
...a check mark next to create a hot key combination with one of TOSHIBA Assist. if the system recognizes the fingerprint, the user is automatically logged on certain models) can be used to replace the keyboard-based user/BIOS password authentication system when booting up. The fingerprint authentication ...utility can press it once, release it, and then press a function key to activate the hot key function. (Sample Image) TOSHIBA Accessibility window To use the ...

User Manual
Page 172
.... To purchase a new battery pack, see your accessories information that takes its ability to perform at accessories.toshiba.com. The keyboard produces unexpected characters. The keyboard you are off automatically? Let the battery discharge completely, then try charging it usually does. Refer to this... site often to be related to power the computer for your computer, or visit the Toshiba Web site at maximum capacity ...
.... To purchase a new battery pack, see your accessories information that takes its ability to perform at accessories.toshiba.com. The keyboard produces unexpected characters. The keyboard you are off automatically? Let the battery discharge completely, then try charging it usually does. Refer to this... site often to be related to power the computer for your computer, or visit the Toshiba Web site at maximum capacity ...

User Manual
Page 173
... password feature by pressing Fn and F1 simultaneously. The computer will advance you through the display options. Display Auto Off may have plugged the external keyboard in the lower-right part of the Start menu. If no password is registered, press any key to activate the screen. If this , press Fn... F5 simultaneously again to return the display priority to the computer is firmly attached. ❖ Try adjusting the contrast and brightness controls on the external keyboard. If you are using the built-in screen.
... password feature by pressing Fn and F1 simultaneously. The computer will advance you through the display options. Display Auto Off may have plugged the external keyboard in the lower-right part of the Start menu. If no password is registered, press any key to activate the screen. If this , press Fn... F5 simultaneously again to return the display priority to the computer is firmly attached. ❖ Try adjusting the contrast and brightness controls on the external keyboard. If you are using the built-in screen.

