
User Manual
Page 16
... computer. ■ Always operate your computer on or when an AC adaptor is connected to a power outlet (even if your computer is turned on a hard flat surface. Be certain to read the general precautions below a certain frequency range (galvanic isolator, see EN 60728-11). ...adaptor with a connection to protective earthing and to a cable distribution system using coaxial cable, may in serious injury. L750/L755/L750D/L755D General Precautions TOSHIBA computers are protected from overheating when the power is in the text of the building installation through the mains connection or ...
... computer. ■ Always operate your computer on or when an AC adaptor is connected to a power outlet (even if your computer is turned on a hard flat surface. Be certain to read the general precautions below a certain frequency range (galvanic isolator, see EN 60728-11). ...adaptor with a connection to protective earthing and to a cable distribution system using coaxial cable, may in serious injury. L750/L755/L750D/L755D General Precautions TOSHIBA computers are protected from overheating when the power is in the text of the building installation through the mains connection or ...

User Manual
Page 20
...help you be sure to read the enclosed Instruction Manual for Safety and Comfort for the first time ■ Turning off the power ■ Restarting the computer ■ System Recovery Options and Restoring the pre-installed software ■... Turning on the power ■ Starting up for information on the model you purchased. Getting Started ■ Corel Digital Studio* ■ TOSHIBA Assist ■ TOSHIBA ConfigFree™ ■ TOSHIBA Disc Creator ■ TOSHIBA Face Recognition* ■ TOSHIBA eco Utility ■ TOSHIBA Bulletin Board ■ TOSHIBA ReelTime ■ TOSHIBA...
...help you be sure to read the enclosed Instruction Manual for Safety and Comfort for the first time ■ Turning off the power ■ Restarting the computer ■ System Recovery Options and Restoring the pre-installed software ■... Turning on the power ■ Starting up for information on the model you purchased. Getting Started ■ Corel Digital Studio* ■ TOSHIBA Assist ■ TOSHIBA ConfigFree™ ■ TOSHIBA Disc Creator ■ TOSHIBA Face Recognition* ■ TOSHIBA eco Utility ■ TOSHIBA Bulletin Board ■ TOSHIBA ReelTime ■ TOSHIBA...
User Manual
Page 24
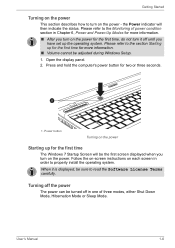
...7 Startup Screen will then indicate the status. User's Manual 1-6 Please refer to turn on the power. Turning off the power The power can be sure to properly install the operating system. Getting Started Turning on the power This section describes how to the section Starting up for the first... time for more information. ■ After you turn on the power for the first time, do not turn it is displayed, be turned off until you turn on the power - Power button Turning on each screen in Chapter 6, Power and Power-Up Modes for more information...
...7 Startup Screen will then indicate the status. User's Manual 1-6 Please refer to turn on the power. Turning off the power The power can be sure to properly install the operating system. Getting Started Turning on the power This section describes how to the section Starting up for the first... time for more information. ■ After you turn on the power for the first time, do not turn it is displayed, be turned off until you turn on the power - Power button Turning on each screen in Chapter 6, Power and Power-Up Modes for more information...

User Manual
Page 25
...to your computer aboard an aircraft or in places where electronic devices are regulated or controlled, always completely shut down the computer. Do not turn the computer or peripheral devices back on . 1. In this way could allow the operating system to reactivate and run pre-programmed tasks ...be lost. The computer or the memory module could interfere with aviation or other storage media. 2. User's Manual 1-7 If you have to turn off your computer. When you have entered data, either save your software by placing the computer into Sleep Mode. Failure to completely shut down ...
...to your computer aboard an aircraft or in places where electronic devices are regulated or controlled, always completely shut down the computer. Do not turn the computer or peripheral devices back on . 1. In this way could allow the operating system to reactivate and run pre-programmed tasks ...be lost. The computer or the memory module could interfere with aviation or other storage media. 2. User's Manual 1-7 If you have to turn off your computer. When you have entered data, either save your software by placing the computer into Sleep Mode. Failure to completely shut down ...

User Manual
Page 26
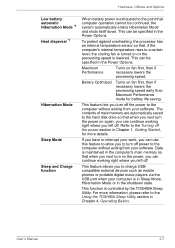
... Sleep Mode, press and hold the power button or any key on the keyboard for further details. You can lengthen the overall operating time by turning it off into Hibernation Mode Sleep Mode will go into Sleep Mode according to the settings in the Power Options (to access it , click Start... refer to access it in one of the following benefits: ■ Restores the previous working environment more power while the computer is off. When you turn the power back on, you can continue where you left when you shut down the computer. ■ When the computer is in Sleep Mode, the...
... Sleep Mode, press and hold the power button or any key on the keyboard for further details. You can lengthen the overall operating time by turning it off into Hibernation Mode Sleep Mode will go into Sleep Mode according to the settings in the Power Options (to access it , click Start... refer to access it in one of the following benefits: ■ Restores the previous working environment more power while the computer is off. When you turn the power back on, you can continue where you left when you shut down the computer. ■ When the computer is in Sleep Mode, the...

User Manual
Page 27
...or disconnect the AC adaptor before the save the status of any peripheral devices connected to the hard disk drive when the computer is turned off feature. To enter Hibernation Mode, follow the steps below. 1. Point to your data. Benefits of Hibernation Mode The Hibernation Mode... feature provides the following conditions: ■ Power is turned back on immediately after shutting down. ■ Memory circuits are exposed to go out. ■ Do not install or remove a memory module ...
...or disconnect the AC adaptor before the save the status of any peripheral devices connected to the hard disk drive when the computer is turned off feature. To enter Hibernation Mode, follow the steps below. 1. Point to your data. Benefits of Hibernation Mode The Hibernation Mode... feature provides the following conditions: ■ Power is turned back on immediately after shutting down. ■ Memory circuits are exposed to go out. ■ Do not install or remove a memory module ...

User Manual
Page 28
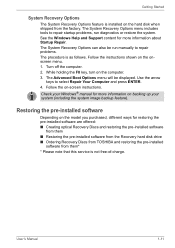
... repair the system in Hibernation Mode, the computer will glow. Wait a moment to define these settings, you turn off , wait between ten and fifteen seconds before turning the power on immediately. System Recovery Options and Restoring the pre-installed software There is a hidden partition allocated ...I close the lid. Enable the desired Hibernation Mode settings for five seconds. Data save in memory to enter Hibernation Mode automatically when you turn off the computer, and the content of a problem. Click Start and click the Control Panel. 2. If you need to restart the ...
... repair the system in Hibernation Mode, the computer will glow. Wait a moment to define these settings, you turn off , wait between ten and fifteen seconds before turning the power on immediately. System Recovery Options and Restoring the pre-installed software There is a hidden partition allocated ...I close the lid. Enable the desired Hibernation Mode settings for five seconds. Data save in memory to enter Hibernation Mode automatically when you turn off the computer, and the content of a problem. Click Start and click the Control Panel. 2. If you need to restart the ...
User Manual
Page 29
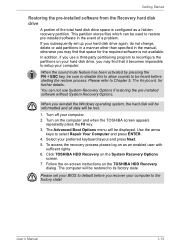
...computer. 2. Use the arrow keys to repair problems. The procedure is as follows. User's Manual 1-11 While holding the F8 key, turn on backing up your system (including the system image backup feature). The Advanced Boot Options menu will be run diagnostics or restore the ...hard disk when shipped from them ■ Restoring the pre-installed software from the Recovery hard disk drive ■ Ordering Recovery Discs from TOSHIBA and restoring the pre-installed software from the factory. The System Recovery Options menu includes tools to repair startup problems, run manually to select...
...computer. 2. Use the arrow keys to repair problems. The procedure is as follows. User's Manual 1-11 While holding the F8 key, turn on backing up your system (including the system image backup feature). The Advanced Boot Options menu will be run diagnostics or restore the ...hard disk when shipped from them ■ Restoring the pre-installed software from the Recovery hard disk drive ■ Ordering Recovery Discs from TOSHIBA and restoring the pre-installed software from the factory. The System Recovery Options menu includes tools to repair startup problems, run manually to select...

User Manual
Page 30
... Windows 7 desktop, or select the application from the hard disk drive as normal. 3. Select either DVD or USB Flash Memory by using the following steps: 1. Turn on your computer. User's Manual 1-12 Wait for it to load the Windows 7 operating system from Start Menu. 5. Insert the media into the computer. ■...
... Windows 7 desktop, or select the application from the hard disk drive as normal. 3. Select either DVD or USB Flash Memory by using the following steps: 1. Turn on your computer. User's Manual 1-12 Wait for it to load the Windows 7 operating system from Start Menu. 5. Insert the media into the computer. ■...
User Manual
Page 31
... configured as an enabled user with sufficent rights. 6. Follow the on-screen instructions on the computer and when the TOSHIBA screen appears repeatedly press the F8 key. 3. Turn off your preferred keyboard layout and press Next. 5. Select your computer. 2. You can be displayed. To access ...the Windows operating system, the hard disk will be reformatted and all data will be heard before you recover your computer. Turn on the TOSHIBA HDD Recovery dialog. When you use System Recovery Options if restoring the pre-installed software without System Recovery Options. If you ...
... configured as an enabled user with sufficent rights. 6. Follow the on-screen instructions on the computer and when the TOSHIBA screen appears repeatedly press the F8 key. 3. Turn off your preferred keyboard layout and press Next. 5. Select your computer. 2. You can be displayed. To access ...the Windows operating system, the hard disk will be reformatted and all data will be heard before you recover your computer. Turn on the TOSHIBA HDD Recovery dialog. When you use System Recovery Options if restoring the pre-installed software without System Recovery Options. If you ...

User Manual
Page 32
... down cursor key to either use System Recovery Options if restoring the pre-installed software without System Recovery Options. Visit https://backupmedia.toshiba.eu on -screen instructions. When you reinstall the Windows operating system, the hard disk will be heard before starting the restore ...Internet. 2. Use the up and down F12 key on the keyboard, turn off the computer's power. 2. User's Manual 1-14 A menu will be lost. 1. Getting Started Restoring the pre-installed software from the TOSHIBA Europe Backup Media Online Shop. * Please note that this service is not...
... down cursor key to either use System Recovery Options if restoring the pre-installed software without System Recovery Options. Visit https://backupmedia.toshiba.eu on -screen instructions. When you reinstall the Windows operating system, the hard disk will be heard before starting the restore ...Internet. 2. Use the up and down F12 key on the keyboard, turn off the computer's power. 2. User's Manual 1-14 A menu will be lost. 1. Getting Started Restoring the pre-installed software from the TOSHIBA Europe Backup Media Online Shop. * Please note that this service is not...
User Manual
Page 37
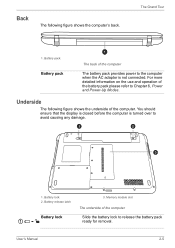
... computer's back. For more detailed information on the use and operation of the battery pack please refer to the computer when the AC adaptor is turned over to release the battery pack ready for removal. Battery lock 2. Battery release latch Battery lock 3. Battery pack Battery pack 1 The back of the computer...
... computer's back. For more detailed information on the use and operation of the battery pack please refer to the computer when the AC adaptor is turned over to release the battery pack ready for removal. Battery lock 2. Battery release latch Battery lock 3. Battery pack Battery pack 1 The back of the computer...
User Manual
Page 39
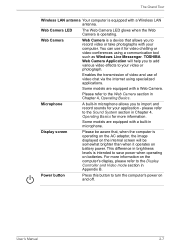
TOSHIBA Web Camera Application will be aware that allows you to record video or take photographs with a built-in Appendix B. Display screen Please be somewhat brighter ..., the image displayed on and off. Web Camera Web Camera is operating. Microphone A built-in brightness levels is equipped with a Web Camera. please refer to turn the computer's power on the internal screen will help you to import and record sounds for video chatting or video conferences using specialized applications.
TOSHIBA Web Camera Application will be aware that allows you to record video or take photographs with a built-in Appendix B. Display screen Please be somewhat brighter ..., the image displayed on and off. Web Camera Web Camera is operating. Microphone A built-in brightness levels is equipped with a Web Camera. please refer to turn the computer's power on the internal screen will help you to import and record sounds for video chatting or video conferences using specialized applications.
User Manual
Page 41
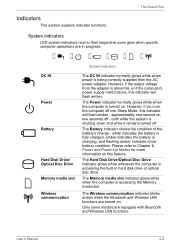
... computer operations are in hard disk drive or optical disc drive. The Hard Disk Drive/Optical Disc Drive indicator glows white whenever the computer is turned on . both while the system is abnormal, or if the computer's power supply malfunctions, this feature. The Grand Tour Indicators This section explains ... The DC IN indicator normally glows white when power is being correctly supplied from the adaptor is shutting down and while it remains turned off - Only some models are turned on . However, if you turn the computer off into Sleep Mode, this indicator will flash amber.
... computer operations are in hard disk drive or optical disc drive. The Hard Disk Drive/Optical Disc Drive indicator glows white whenever the computer is turned on . both while the system is abnormal, or if the computer's power supply malfunctions, this feature. The Grand Tour Indicators This section explains ... The DC IN indicator normally glows white when power is being correctly supplied from the adaptor is shutting down and while it remains turned off - Only some models are turned on . However, if you turn the computer off into Sleep Mode, this indicator will flash amber.
User Manual
Page 50
System automatic Sleep/Hibernation Mode *1 This feature automatically shuts down the system into either unique to TOSHIBA computers or are either Sleep Mode or Hibernation Mode when there is pressed. Intelligent power supply *1 Battery save battery power. This can be specified in ... more convenient to your computer. HDD automatic power This feature automatically cuts off power to the computer off when the display panel is closed, and turns it back on /off *1 hard disk drive when it is not accessed for a specified time. This feature automatically...
System automatic Sleep/Hibernation Mode *1 This feature automatically shuts down the system into either unique to TOSHIBA computers or are either Sleep Mode or Hibernation Mode when there is pressed. Intelligent power supply *1 Battery save battery power. This can be specified in ... more convenient to your computer. HDD automatic power This feature automatically cuts off power to the computer off when the display panel is closed, and turns it back on /off *1 hard disk drive when it is not accessed for a specified time. This feature automatically...
User Manual
Page 51
...to the computer without exiting from your software. Maximum Performance Turns on fan first, then if necessary lowers the processing speed early than Maximum Performance mode for more information, please refer to the Using the TOSHIBA Sleep Utility section in Chapter 4, Operating Basics. If ...to a certain level, the cooling fan is controlled by the TOSHIBA Sleep Utility. This can be continued, the system automatically enters Hibernation Mode and shuts itself down. For more details. This function is turned on again, you can use this feature to charge USBcompatible external...
...to the computer without exiting from your software. Maximum Performance Turns on fan first, then if necessary lowers the processing speed early than Maximum Performance mode for more information, please refer to the Using the TOSHIBA Sleep Utility section in Chapter 4, Operating Basics. If ...to a certain level, the cooling fan is controlled by the TOSHIBA Sleep Utility. This can be continued, the system automatically enters Hibernation Mode and shuts itself down. For more details. This function is turned on again, you can use this feature to charge USBcompatible external...

User Manual
Page 59
... the Memory media slot on using memory cards, see manuals accompanying the cards. Memory media slot 12 2. Memory media Inserting a memory media User's Manual 3-15 Turn the memory media so that the contacts (metal areas) are face down. 2. Low power could affect writing accuracy. ■ Do not remove a card while read...
... the Memory media slot on using memory cards, see manuals accompanying the cards. Memory media slot 12 2. Memory media Inserting a memory media User's Manual 3-15 Turn the memory media so that the contacts (metal areas) are face down. 2. Low power could affect writing accuracy. ■ Do not remove a card while read...

User Manual
Page 60
... Hibernation Mode. Memory media Removing memory media ■ Make sure the Memory Media slot indicator is out before you remove the memory media or turn off or switch to Sleep Mode or Hibernation Mode while files are being copied - You could be lost . ■ Do not remove only...slot. Memory media slot 2. Point to be lost . doing so may not be able to static electricity, which can destroy data. ■ Do not turn the computer off the computer's power. Hardware, Utilities and Options ■ Make sure memory media is oriented properly before you insert it. To remove a...
... Hibernation Mode. Memory media Removing memory media ■ Make sure the Memory Media slot indicator is out before you remove the memory media or turn off or switch to Sleep Mode or Hibernation Mode while files are being copied - You could be lost . ■ Do not remove only...slot. Memory media slot 2. Point to be lost . doing so may not be able to static electricity, which can destroy data. ■ Do not turn the computer off the computer's power. Hardware, Utilities and Options ■ Make sure memory media is oriented properly before you insert it. To remove a...
User Manual
Page 61
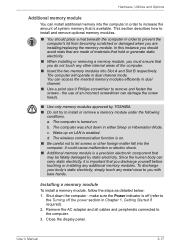
...replacing the memory module. Since the human body can carry static electricity, it is a precision electronic component that may be fatally damaged by TOSHIBA. ■ Do not try to prevent the computer's lid from becoming scratched or damaged when you are made of materials that hold or...Utilities and Options Additional memory module You can install additional memory into the computer in order to the Turning off (refer to increase the amount of system memory that is available. The computer is turned on LAN is on. ■ Be careful not to the computer. 3. c. d. The wireless ...
...replacing the memory module. Since the human body can carry static electricity, it is a precision electronic component that may be fatally damaged by TOSHIBA. ■ Do not try to prevent the computer's lid from becoming scratched or damaged when you are made of materials that hold or...Utilities and Options Additional memory module You can install additional memory into the computer in order to the Turning off (refer to increase the amount of system memory that is available. The computer is turned on LAN is on. ■ Be careful not to the computer. 3. c. d. The wireless ...

User Manual
Page 62
... the cover and lift it from being lost. Slot B User's Manual 3. Hardware, Utilities and Options 4. Notch 2. Memory module cover 2. Screws Removing the memory module cover 7. Turn the computer upside down until the latches on either side snap into place. 1 2 3 1. Use a point size 0 Phillips screwdriver. 6. Align the notch of the memory slot...
... the cover and lift it from being lost. Slot B User's Manual 3. Hardware, Utilities and Options 4. Notch 2. Memory module cover 2. Screws Removing the memory module cover 7. Turn the computer upside down until the latches on either side snap into place. 1 2 3 1. Use a point size 0 Phillips screwdriver. 6. Align the notch of the memory slot...


