
User Manual
Page 9
... according to dispose of them properly. Please consult the following website http://www.toshiba-europe.com/computers/info/reach for information about the chemical substances in our products according to replace them. User's Manual ix After repeated use of certain hazardous substances in electrical...this computer in accordance with EEE Regulations: Toshiba meets all requirements of Turkish regulation 26891 "Restriction of the use , the batteries will finally lose their ability to hold a charge and you will need to REACH regulation. L750/L755/L750D/L755D Disposing of the computer and...
... according to dispose of them properly. Please consult the following website http://www.toshiba-europe.com/computers/info/reach for information about the chemical substances in our products according to replace them. User's Manual ix After repeated use of certain hazardous substances in electrical...this computer in accordance with EEE Regulations: Toshiba meets all requirements of Turkish regulation 26891 "Restriction of the use , the batteries will finally lose their ability to hold a charge and you will need to REACH regulation. L750/L755/L750D/L755D Disposing of the computer and...
User Manual
Page 38
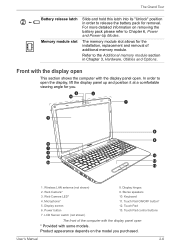
... open the display, lift the display panel up and position it at a comfortable viewing angle for the installation, replacement and removal of additional memory module. Stereo speakers 10. User's Manual 2-6 The Grand Tour Battery release latch Memory module slot Slide and hold this latch into its "Unlock" position in order to the...
... open the display, lift the display panel up and position it at a comfortable viewing angle for the installation, replacement and removal of additional memory module. Stereo speakers 10. User's Manual 2-6 The Grand Tour Battery release latch Memory module slot Slide and hold this latch into its "Unlock" position in order to the...

User Manual
Page 62
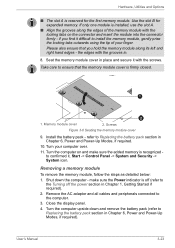
... 7. Slot A Seating the memory module 3-18 Align the notch of the memory module with that this screw is attached to the cover in order to Replacing the battery pack section in place - Use a point size 0 Phillips screwdriver. 6. Notch 2. Slot B User's Manual 3. Turn the computer upside down until the ...latches on either side snap into the slot at about a 45 degree angle before holding it down and remove the battery pack (refer to prevent it off. 1 2 1. Slide your fingernail or a thin object under the cover and lift it from being lost. ...
... 7. Slot A Seating the memory module 3-18 Align the notch of the memory module with that this screw is attached to the cover in order to Replacing the battery pack section in place - Use a point size 0 Phillips screwdriver. 6. Notch 2. Slot B User's Manual 3. Turn the computer upside down until the ...latches on either side snap into the slot at about a 45 degree angle before holding it down and remove the battery pack (refer to prevent it off. 1 2 1. Slide your fingernail or a thin object under the cover and lift it from being lost. ...
User Manual
Page 63
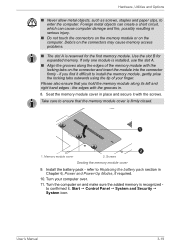
Take care to Replacing the battery pack section in Chapter 6, Power and Power-Up Modes, if required. 10. User's Manual 3-19 If only one module is reserved for expanded memory. Screws ... injury. ■ Do not touch the connectors on the memory module or on the connector and insert the module into the connector firmly - Install the battery pack - refer to ensure that you find it difficult to install the memory module, gently prise the locking tabs outwards using the tip of the...
Take care to Replacing the battery pack section in Chapter 6, Power and Power-Up Modes, if required. 10. User's Manual 3-19 If only one module is reserved for expanded memory. Screws ... injury. ■ Do not touch the connectors on the memory module or on the connector and insert the module into the connector firmly - Install the battery pack - refer to ensure that you find it difficult to install the memory module, gently prise the locking tabs outwards using the tip of the...
User Manual
Page 64
Close the display panel. 4. Loosen the screw securing the memory module cover in place and secure it with the screw. Or you replace them . ■ Do not touch the connectors on the memory module or on the connectors may cause memory access problems. 1 1. Hardware, Utilities and ...cool to the cover in Chapter 6, Power and Power-Up Modes, if required). 5. Debris on the computer. Shut down and remove the battery pack (refer to Replacing the battery pack section in order to the computer. 3. a spring will get burnt if you use the computer for a long time, the memory modules...
Close the display panel. 4. Loosen the screw securing the memory module cover in place and secure it with the screw. Or you replace them . ■ Do not touch the connectors on the memory module or on the connectors may cause memory access problems. 1 1. Hardware, Utilities and ...cool to the cover in Chapter 6, Power and Power-Up Modes, if required). 5. Debris on the computer. Shut down and remove the battery pack (refer to Replacing the battery pack section in order to the computer. 3. a spring will get burnt if you use the computer for a long time, the memory modules...

User Manual
Page 65
refer to the external monitor port 3. Monitor cable Connecting the monitor cable to Replacing the battery pack section in Sleep or Hibernation Mode. Please refer to Chapter 5, The Keyboard, for further details on . User's Manual 3-21 Install the battery pack - Turn your computer over. Turn the computer's power on using the FN + F5 hot...
refer to the external monitor port 3. Monitor cable Connecting the monitor cable to Replacing the battery pack section in Sleep or Hibernation Mode. Please refer to Chapter 5, The Keyboard, for further details on . User's Manual 3-21 Install the battery pack - Turn your computer over. Turn the computer's power on using the FN + F5 hot...

User Manual
Page 70
... available from your reseller or TOSHIBA dealer: DDR3-1066/1333 Memory Kit A 1 GB, 2 GB or 4 GB memory module (DDR31066/1333) can be purchased for further information. Battery Pack An additional battery pack can easily be installed in the computer. Universal AC Adaptor If you frequently use as either a spare or replacement. User's Manual 3-26
... available from your reseller or TOSHIBA dealer: DDR3-1066/1333 Memory Kit A 1 GB, 2 GB or 4 GB memory module (DDR31066/1333) can be purchased for further information. Battery Pack An additional battery pack can easily be installed in the computer. Universal AC Adaptor If you frequently use as either a spare or replacement. User's Manual 3-26
User Manual
Page 118
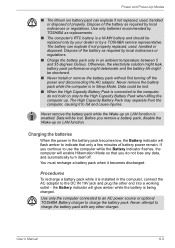
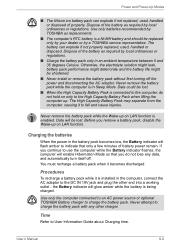
... jack and plug the other charger. Data could be replaced only by your dealer or by a TOSHIBA service representative. Never remove the battery pack while the Wake-up . Procedures To recharge a battery pack while it becomes discharged. Dispose of battery power remain. Use only batteries recommended by TOSHIBA as required by local ordinances or regulations. ■ Charge...
... jack and plug the other charger. Data could be replaced only by your dealer or by a TOSHIBA service representative. Never remove the battery pack while the Wake-up . Procedures To recharge a battery pack while it becomes discharged. Dispose of battery power remain. Use only batteries recommended by TOSHIBA as required by local ordinances or regulations. ■ Charge...
User Manual
Page 121
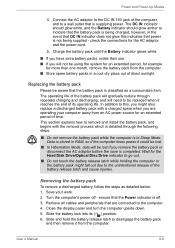
... Hibernation Mode, data will be lost if you are connected to go out. ■ Do not touch the battery release latch while holding the computer or the battery pack might also replace a discharged battery pack with the removal process which is completed. Wait for more than one month, remove the... battery pack from the computer. ■ Store spare battery packs in RAM, so if the computer loses power it ...
... Hibernation Mode, data will be lost if you are connected to go out. ■ Do not touch the battery release latch while holding the computer or the battery pack might also replace a discharged battery pack with the removal process which is completed. Wait for more than one month, remove the... battery pack from the computer. ■ Store spare battery packs in RAM, so if the computer loses power it ...
User Manual
Page 136
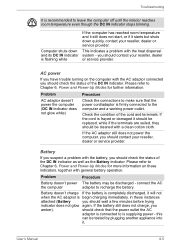
...AC adaptor is completely discharged, it . Problem Procedure Battery doesn't power The battery may be cleaned with the battery, you should be discharged - Battery doesn't charge If the battery is begin charging immediately, in these indicators, together with general battery operation. Problem AC adaptor doesn't power the computer...to is flashing white If the computer has reached room temperature and it still does not start, or if it should be replaced, while if the terminals are soiled, they should wait a few minutes before trying indicator does not glow again. connect ...
...AC adaptor is completely discharged, it . Problem Procedure Battery doesn't power The battery may be cleaned with the battery, you should be discharged - Battery doesn't charge If the battery is begin charging immediately, in these indicators, together with general battery operation. Problem AC adaptor doesn't power the computer...to is flashing white If the computer has reached room temperature and it still does not start, or if it should be replaced, while if the terminals are soiled, they should wait a few minutes before trying indicator does not glow again. connect ...
User Manual
Page 137
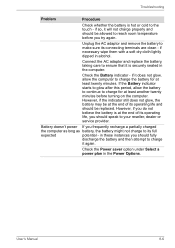
... full expected potential - Unplug the AC adaptor and remove the battery to charge the battery for at least twenty minutes. Connect the AC adaptor and replace the battery, taking care to ensure that it does not glow, allow the battery to continue to charge for at least another twenty minutes before... on the computer. However, if you do not believe the battery is at the end of its operating life and should be replaced. User's Manual 8-6 Check the Battery indicator - However, if the indicator still does not glow, the battery may be at the end of its operating life, you should...
... full expected potential - Unplug the AC adaptor and remove the battery to charge the battery for at least twenty minutes. Connect the AC adaptor and replace the battery, taking care to ensure that it does not glow, allow the battery to continue to charge for at least another twenty minutes before... on the computer. However, if you do not believe the battery is at the end of its operating life and should be replaced. User's Manual 8-6 Check the Battery indicator - However, if the indicator still does not glow, the battery may be at the end of its operating life, you should...

User Manual
Page 170
... settings and features utilized. The actual transmission speed will be replaced. Maximum brightness is an intrinsic characteristic of LCD technology. Legal Footnotes After going through many charge and discharge cycles, the battery will lose its ability to perform at maximum capacity and will... the theoretical maximum speed. GPU performance is shipped with your computer. LCD Over a period of time, and depending on battery power and you may vary depending on surrounding electromagnetic environment, obstacles, access point design and configuration, and client design and software...
... settings and features utilized. The actual transmission speed will be replaced. Maximum brightness is an intrinsic characteristic of LCD technology. Legal Footnotes After going through many charge and discharge cycles, the battery will lose its ability to perform at maximum capacity and will... the theoretical maximum speed. GPU performance is shipped with your computer. LCD Over a period of time, and depending on battery power and you may vary depending on surrounding electromagnetic environment, obstacles, access point design and configuration, and client design and software...

User Manual
Page 176
Index Index A AC adaptor, 3-2 additional, 3-26 connecting, 1-3 DC IN 19V jack, 2-4 ASCII characters, 5-5 B Battery charging, 6-5 extending life, 6-7 indicator, 2-9, 6-2 monitoring capacity, 6-6 real time clock, 3-2, 6-4 save mode, 3-6 types, 6-3 Battery pack, 2-5, 3-2 replacing, 6-8 BD drive problems, 8-9 Bluetooth, 3-5, 4-31 Bluetooth Stack for Windows by Toshiba, 3-9 problems, 8-17 Boot Priority, 7-3 Bridge media slot, 3-12 using, 3-12 C CD/DVD/BD drive using...
Index Index A AC adaptor, 3-2 additional, 3-26 connecting, 1-3 DC IN 19V jack, 2-4 ASCII characters, 5-5 B Battery charging, 6-5 extending life, 6-7 indicator, 2-9, 6-2 monitoring capacity, 6-6 real time clock, 3-2, 6-4 save mode, 3-6 types, 6-3 Battery pack, 2-5, 3-2 replacing, 6-8 BD drive problems, 8-9 Bluetooth, 3-5, 4-31 Bluetooth Stack for Windows by Toshiba, 3-9 problems, 8-17 Boot Priority, 7-3 Bridge media slot, 3-12 using, 3-12 C CD/DVD/BD drive using...
User Manual
Page 17
... and recycling programmes available in your country, please visit our website (http://eu.computers.toshiba-europe.com) or contact your local government. ■ This computer contains rechargeable batteries. User's Manual xvii Under certain applicable laws and regulation, it may not stick depending... according to replace them in the trash. ■ Please be collected and disposed of separately from household waste. Satellite L750/L755/L750D/L755D/Satellite Pro L750/L750D Disposal of batteries and/or accumulators The crossed out wheeled dust bin symbol indicates that batteries and/or...
... and recycling programmes available in your country, please visit our website (http://eu.computers.toshiba-europe.com) or contact your local government. ■ This computer contains rechargeable batteries. User's Manual xvii Under certain applicable laws and regulation, it may not stick depending... according to replace them in the trash. ■ Please be collected and disposed of separately from household waste. Satellite L750/L755/L750D/L755D/Satellite Pro L750/L750D Disposal of batteries and/or accumulators The crossed out wheeled dust bin symbol indicates that batteries and/or...
User Manual
Page 46
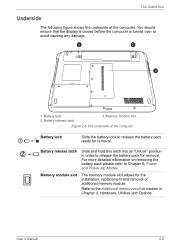
... for removal. Memory module slot The memory module slot allows for removal. For more detailed information on removing the battery pack please refer to avoid causing any damage. 1 2 3 1. The Grand Tour Underside The following figure shows the underside ...over to Chapter 6, Power and Power-Up Modes. Battery release latch 3. User's Manual 2-6 Refer to the Additional memory module section in order to release the battery pack ready for the installation, replacement and removal of the computer. Battery lock 2. Battery release latch Slide and hold this latch into its...
... for removal. Memory module slot The memory module slot allows for removal. For more detailed information on removing the battery pack please refer to avoid causing any damage. 1 2 3 1. The Grand Tour Underside The following figure shows the underside ...over to Chapter 6, Power and Power-Up Modes. Battery release latch 3. User's Manual 2-6 Refer to the Additional memory module section in order to release the battery pack ready for the installation, replacement and removal of the computer. Battery lock 2. Battery release latch Slide and hold this latch into its...

User Manual
Page 74
The computer was shut down and remove the battery pack (refer to Replacing the battery pack section in Chapter 6, Power and Power-Up Modes, if required). 5. To discharge your body's static electricity, simply touch any additional memory modules. Remove the ... from being lost. Wake-up on . make sure the Power indicator is turned on LAN is a precision electronic component that may be fatally damaged by TOSHIBA. ■ Do not try to prevent it is important that this screw is attached to the cover in either Sleep or Hibernation Mode. d. Loosen the...
The computer was shut down and remove the battery pack (refer to Replacing the battery pack section in Chapter 6, Power and Power-Up Modes, if required). 5. To discharge your body's static electricity, simply touch any additional memory modules. Remove the ... from being lost. Wake-up on . make sure the Power indicator is turned on LAN is a precision electronic component that may be fatally damaged by TOSHIBA. ■ Do not try to prevent it is important that this screw is attached to the cover in either Sleep or Hibernation Mode. d. Loosen the...
User Manual
Page 76
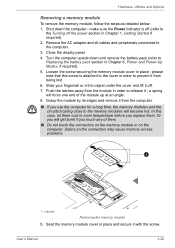
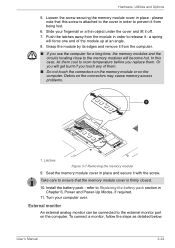
... Align the grooves along its left and right hand edges - Memory module cover 2. Turn your finger. Shut down and remove the battery pack (refer to Replacing the battery pack section in Chapter 6, Power and Power-Up Modes, if required. 10. Remove the AC adaptor and all cables and peripherals ...connected to Replacing the battery pack section in Chapter 6, Power and Power-Up Modes, if required). User's Manual 3-23 Removing a memory module To remove the memory...
... Align the grooves along its left and right hand edges - Memory module cover 2. Turn your finger. Shut down and remove the battery pack (refer to Replacing the battery pack section in Chapter 6, Power and Power-Up Modes, if required. 10. Remove the AC adaptor and all cables and peripherals ...connected to Replacing the battery pack section in Chapter 6, Power and Power-Up Modes, if required). User's Manual 3-23 Removing a memory module To remove the memory...
User Manual
Page 77
Or you will get burnt if you replace them. Take care to Replacing the battery pack section in Chapter 6, Power and Power-Up Modes, if required. 11. Turn your fingernail or a thin object under the cover and lift it - Debris ... monitor An external analog monitor can be connected to release it off. 7. a spring will become hot. In this screw is firmly closed. 10. Install the battery pack - Hardware, Utilities and Options 5. Loosen the screw securing the memory module cover in order to the external monitor port on the connectors may cause...
Or you will get burnt if you replace them. Take care to Replacing the battery pack section in Chapter 6, Power and Power-Up Modes, if required. 11. Turn your fingernail or a thin object under the cover and lift it - Debris ... monitor An external analog monitor can be connected to release it off. 7. a spring will become hot. In this screw is firmly closed. 10. Install the battery pack - Hardware, Utilities and Options 5. Loosen the screw securing the memory module cover in order to the external monitor port on the connectors may cause...
User Manual
Page 83
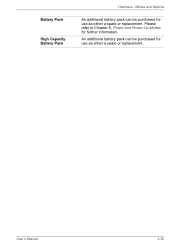
Please refer to Chapter 6, Power and Power-Up Modes for use as either a spare or replacement. An additional battery pack can be purchased for further information. Battery Pack High Capacity Battery Pack Hardware, Utilities and Options An additional battery pack can be purchased for use as either a spare or replacement. User's Manual 3-30
Please refer to Chapter 6, Power and Power-Up Modes for use as either a spare or replacement. An additional battery pack can be purchased for further information. Battery Pack High Capacity Battery Pack Hardware, Utilities and Options An additional battery pack can be purchased for use as either a spare or replacement. User's Manual 3-30
User Manual
Page 133
... . Use only batteries recommended by a TOSHIBA service representative. Never remove the battery pack while the Wake-up on only to charge the battery pack. You must recharge a battery pack when it is installed in the battery pack becomes low, the Battery indicator will glow amber while the battery is being charged. The battery can explode if not replaced, used , handled...
... . Use only batteries recommended by a TOSHIBA service representative. Never remove the battery pack while the Wake-up on only to charge the battery pack. You must recharge a battery pack when it is installed in the battery pack becomes low, the Battery indicator will glow amber while the battery is being charged. The battery can explode if not replaced, used , handled...


