User Guide
Page 31
Contents 31 Turning on the power 50 Setting up your software 50 Registering your computer with Toshiba 51 Adding optional external devices 51 Adding memory (optional 52 Installing a memory module 52 Removing a memory module 59 Checking total memory 62 Recovering the Internal ... or projector 86 Directing the display output when you turn on the computer 86 Adjusting the quality of the external display......87 Using an external keyboard 87 Using a mouse 87
Contents 31 Turning on the power 50 Setting up your software 50 Registering your computer with Toshiba 51 Adding optional external devices 51 Adding memory (optional 52 Installing a memory module 52 Removing a memory module 59 Checking total memory 62 Recovering the Internal ... or projector 86 Directing the display output when you turn on the computer 86 Adjusting the quality of the external display......87 Using an external keyboard 87 Using a mouse 87
User Guide
Page 32
... the computer 100 Moving the computer 101 Using a computer lock 101 Chapter 2: Learning the Basics 102 Computing tips 102 Using the keyboard 103 Character keys 104 Making your keyboard emulate a full-size keyboard 104 Ctrl, Fn, and Alt keys 105 Function keys 105 Special Windows® keys 105 Overlay keys 106 Starting a program...
... the computer 100 Moving the computer 101 Using a computer lock 101 Chapter 2: Learning the Basics 102 Computing tips 102 Using the keyboard 103 Character keys 104 Making your keyboard emulate a full-size keyboard 104 Ctrl, Fn, and Alt keys 105 Function keys 105 Special Windows® keys 105 Overlay keys 106 Starting a program...
User Guide
Page 35
... operating system can help you 175 Fixing a problem with Device Manager 176 Checking device properties 176 Memory problems 177 Power and the batteries 177 Keyboard problems 179 Display problems 179 Disk or storage drive problems 181 Error-checking 181 Optical disc drive problems 182 Sound system problems 185 Printer problems... habits 189 Data and system configuration backup in the Windows® operating system 190 If you need further assistance 194 Before you contact Toshiba 194 Contacting Toshiba 195 Other Toshiba Internet Web sites 195 Toshiba's worldwide offices 196
... operating system can help you 175 Fixing a problem with Device Manager 176 Checking device properties 176 Memory problems 177 Power and the batteries 177 Keyboard problems 179 Display problems 179 Disk or storage drive problems 181 Error-checking 181 Optical disc drive problems 182 Sound system problems 185 Printer problems... habits 189 Data and system configuration backup in the Windows® operating system 190 If you need further assistance 194 Before you contact Toshiba 194 Contacting Toshiba 195 Other Toshiba Internet Web sites 195 Toshiba's worldwide offices 196
User Guide
Page 36
36 Contents Appendix A: Hot Keys/TOSHIBA Cards 198 Hot Key Cards 198 Using the Hot Key Cards 199 Hot key functions 199 Volume Mute 200 Lock (Instant security 201 Power plan 202 Sleep mode 203 Hibernation mode 204 Output (Display switch 205 Display brightness 206 Disabling or enabling wireless devices............207 Disabling or enabling the touch pad 208 Zoom (Display resolution 209 Keyboard hot key functions 210 Appendix B: Power Cord/Cable Connectors 211 Glossary 212 Index 227
36 Contents Appendix A: Hot Keys/TOSHIBA Cards 198 Hot Key Cards 198 Using the Hot Key Cards 199 Hot key functions 199 Volume Mute 200 Lock (Instant security 201 Power plan 202 Sleep mode 203 Hibernation mode 204 Output (Display switch 205 Display brightness 206 Disabling or enabling wireless devices............207 Disabling or enabling the touch pad 208 Zoom (Display resolution 209 Keyboard hot key functions 210 Appendix B: Power Cord/Cable Connectors 211 Glossary 212 Index 227
User Guide
Page 45
... following: ❖ Never cover your computer or AC adaptor with your computer on a carpet or other soft material can use external power or to , a mouse, keyboard, printer, and memory. These components include, but are protected from overheating when the power is turned on or when an AC adaptor is connected to...
... following: ❖ Never cover your computer or AC adaptor with your computer on a carpet or other soft material can use external power or to , a mouse, keyboard, printer, and memory. These components include, but are protected from overheating when the power is turned on or when an AC adaptor is connected to...
User Guide
Page 49
... hand on the palm rest to hold the computer in place and use the other hand to remove any pens or other objects from the keyboard area before closing the display panel. Your display contains an extremely large number of thin-film transistors (TFT) and is also an intrinsic characteristic of...
... hand on the palm rest to hold the computer in place and use the other hand to remove any pens or other objects from the keyboard area before closing the display panel. Your display contains an extremely large number of thin-film transistors (TFT) and is also an intrinsic characteristic of...
User Guide
Page 51
... memory (optional)" on page 52) ❖ Connect a mouse (see "Using a mouse" on page 87) ❖ Connect an external keyboard (see "Using an external keyboard" on page 87) ❖ Connect an external monitor (see "Using external display devices" on page 85) ❖ Connect a local printer... (see "Connecting a printer" on page 50. After starting your product. Failure to complete Product Registration will not diminish Customer rights under the Toshiba...
... memory (optional)" on page 52) ❖ Connect a mouse (see "Using a mouse" on page 87) ❖ Connect an external keyboard (see "Using an external keyboard" on page 87) ❖ Connect an external monitor (see "Using external display devices" on page 85) ❖ Connect a local printer... (see "Connecting a printer" on page 50. After starting your product. Failure to complete Product Registration will not diminish Customer rights under the Toshiba...
User Guide
Page 77
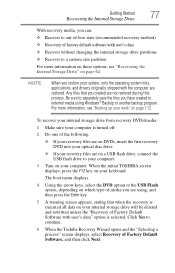
... screen appears, stating that you created are not restored during this process. When the initial TOSHIBA screen displays, press the F12 key on your computer. Click Yes to continue. 6 When the Toshiba Recovery Wizard opens and the "Selecting a process" screen displays, select Recovery of Factory Default...backup program. The boot menu displays. 4 Using the arrow keys, select the DVD option or the USB Flash option, depending on your keyboard. Getting Started 77 Recovering the Internal Storage Drive With recovery media, you can: ❖ Recover to out-of-box state (recommended ...
... screen appears, stating that you created are not restored during this process. When the initial TOSHIBA screen displays, press the F12 key on your computer. Click Yes to continue. 6 When the Toshiba Recovery Wizard opens and the "Selecting a process" screen displays, select Recovery of Factory Default...backup program. The boot menu displays. 4 Using the arrow keys, select the DVD option or the USB Flash option, depending on your keyboard. Getting Started 77 Recovering the Internal Storage Drive With recovery media, you can: ❖ Recover to out-of-box state (recommended ...

User Guide
Page 81
... enable the following features may need to be enabled before they can use the touch pad (the small, touch-sensitive area in front of the keyboard) and the adjacent control buttons to: ❖ Move the pointer on the screen ❖ Select an item on the screen ❖ Open or activate an... associated control buttons Refer to your computer. You can be used. Using the touch pad Getting Started 81 Using the touch pad NOTE Some of Toshiba Assist.
... enable the following features may need to be enabled before they can use the touch pad (the small, touch-sensitive area in front of the keyboard) and the adjacent control buttons to: ❖ Move the pointer on the screen ❖ Select an item on the screen ❖ Open or activate an... associated control buttons Refer to your computer. You can be used. Using the touch pad Getting Started 81 Using the touch pad NOTE Some of Toshiba Assist.
User Guide
Page 87
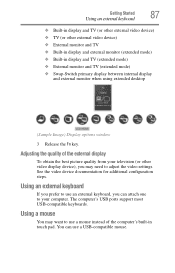
...external monitor (extended mode) ❖ Built-in touch pad. The computer's USB ports support most USB-compatible keyboards. See the video device documentation for additional configuration steps. Getting Started 87 Using an external keyboard ❖ Built-in display and TV (or other external video device) ❖ TV (or other video... between internal display and external monitor when using extended desktop (Sample Image) Display options window 3 Release the Fn key. Using an external keyboard If you prefer to use an external keyboard, you may want to adjust the video settings.
...external monitor (extended mode) ❖ Built-in touch pad. The computer's USB ports support most USB-compatible keyboards. See the video device documentation for additional configuration steps. Getting Started 87 Using an external keyboard ❖ Built-in display and TV (or other external video device) ❖ TV (or other video... between internal display and external monitor when using extended desktop (Sample Image) Display options window 3 Release the Fn key. Using an external keyboard If you prefer to use an external keyboard, you may want to adjust the video settings.
User Guide
Page 100
... computer. Closing the display panel After you were using. Refer to keep your power usage settings. To keep dust and dirt out of the computer's keyboard, speaker, and other openings. Cleaning the computer Keep liquids, including cleaning fluid, out of the computer. 100 Getting Started Customizing your computer's settings Starting again...
... computer. Closing the display panel After you were using. Refer to keep your power usage settings. To keep dust and dirt out of the computer's keyboard, speaker, and other openings. Cleaning the computer Keep liquids, including cleaning fluid, out of the computer. 100 Getting Started Customizing your computer's settings Starting again...
User Guide
Page 103
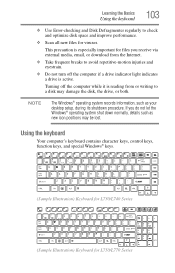
... or writing to a disk may be lost. Using the keyboard Your computer's keyboard contains character keys, control keys, function keys, and special Windows® keys. (Sample Illustration) Keyboard for L730/L740 Series (Sample Illustration) Keyboard for viruses. This precaution is especially important for files you...system records information, such as new icon positions may damage the disk, the drive, or both. Learning the Basics Using the keyboard 103 ❖ Use Error-checking and Disk Defragmenter regularly to check and optimize disk space and improve performance. ❖ Scan ...
... or writing to a disk may be lost. Using the keyboard Your computer's keyboard contains character keys, control keys, function keys, and special Windows® keys. (Sample Illustration) Keyboard for L730/L740 Series (Sample Illustration) Keyboard for viruses. This precaution is especially important for files you...system records information, such as new icon positions may damage the disk, the drive, or both. Learning the Basics Using the keyboard 103 ❖ Use Error-checking and Disk Defragmenter regularly to check and optimize disk space and improve performance. ❖ Scan ...
User Guide
Page 104
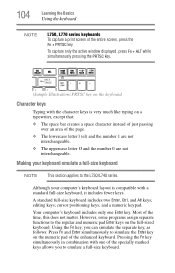
... a space character instead of just passing over an area of the enhanced keyboard. Pressing the Fn key simultaneously in combination with a standard full-size keyboard, it includes fewer keys. A standard full-size keyboard includes two Enter, Ctrl, and Alt keys; Most of the entire screen... the number 0 are not interchangeable. cursor positioning keys; However, some programs assign separate functions to emulate a full-size keyboard. To capture only the active window displayed, press Fn + ALT while simultaneously pressing the PRTSC key. (Sample Illustration) PRTSC key on the...
... a space character instead of just passing over an area of the enhanced keyboard. Pressing the Fn key simultaneously in combination with a standard full-size keyboard, it includes fewer keys. A standard full-size keyboard includes two Enter, Ctrl, and Alt keys; Most of the entire screen... the number 0 are not interchangeable. cursor positioning keys; However, some programs assign separate functions to emulate a full-size keyboard. To capture only the active window displayed, press Fn + ALT while simultaneously pressing the PRTSC key. (Sample Illustration) PRTSC key on the...

User Guide
Page 105
...have special functions in combination with the Fn key, function keys marked with the Fn key) are the 12 keys at the top of the keyboard. (Sample Illustration) Function keys F1 through F12 are using. For more information, see your program documentation. Function keys The function keys (not ...on the program you are called function keys because they execute programmed functions when pressed. Ctrl, Fn, and Alt keys Learning the Basics Using the keyboard 105 (Sample Illustration) Ctrl, Fn, and Alt keys The Ctrl, Fn, and Alt keys do different things depending on the computer. For more...
...have special functions in combination with the Fn key, function keys marked with the Fn key) are the 12 keys at the top of the keyboard. (Sample Illustration) Function keys F1 through F12 are using. For more information, see your program documentation. Function keys The function keys (not ...on the program you are called function keys because they execute programmed functions when pressed. Ctrl, Fn, and Alt keys Learning the Basics Using the keyboard 105 (Sample Illustration) Ctrl, Fn, and Alt keys The Ctrl, Fn, and Alt keys do different things depending on the computer. For more...
User Guide
Page 106
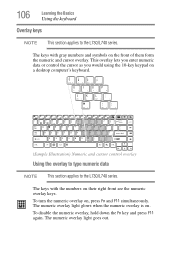
106 Learning the Basics Using the keyboard Overlay keys NOTE This section applies to the L730/L740 series. The numeric overlay light glows when the numeric overlay is on , press Fn and ... on the front of them form the numeric and cursor overlay. To turn the numeric overlay on . The keys with the numbers on a desktop computer's keyboard. (Sample Illustration) Numeric and cursor control overlay Using the overlay to type numeric data NOTE This section applies to the L730/L740 series. The numeric...
106 Learning the Basics Using the keyboard Overlay keys NOTE This section applies to the L730/L740 series. The numeric overlay light glows when the numeric overlay is on , press Fn and ... on the front of them form the numeric and cursor overlay. To turn the numeric overlay on . The keys with the numbers on a desktop computer's keyboard. (Sample Illustration) Numeric and cursor control overlay Using the overlay to type numeric data NOTE This section applies to the L730/L740 series. The numeric...
User Guide
Page 110
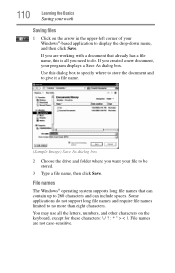
... Windows®-based application to be stored. 3 Type a file name, then click Save. 110 Learning the Basics Saving your work Saving files 1 Click on the keyboard, except for these characters File names are working with a document that can include spaces. Some applications do . You may use all you want your program...
... Windows®-based application to be stored. 3 Type a file name, then click Save. 110 Learning the Basics Saving your work Saving files 1 Click on the keyboard, except for these characters File names are working with a document that can include spaces. Some applications do . You may use all you want your program...
User Guide
Page 114
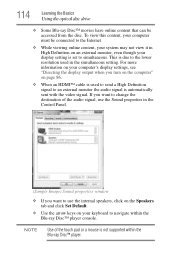
... ❖ If you want to use the internal speakers, click on the Speakers tab and click Set Default. ❖ Use the arrow keys on your keyboard to navigate within the Blu-ray Disc™ player. 114 Learning the Basics Using the optical disc drive ❖ Some Blu-ray Disc™ movies...
... ❖ If you want to use the internal speakers, click on the Speakers tab and click Set Default. ❖ Use the arrow keys on your keyboard to navigate within the Blu-ray Disc™ player. 114 Learning the Basics Using the optical disc drive ❖ Some Blu-ray Disc™ movies...
User Guide
Page 161
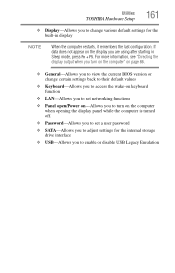
Utilities TOSHIBA Hardware Setup 161 ❖ Display-Allows you to change certain settings back to their default values ❖ Keyboard-Allows you to access the wake-on keyboard function ❖ LAN-Allows you to set networking functions ❖ Panel open/Power on-Allows you to turn on the computer" on the display you ...
Utilities TOSHIBA Hardware Setup 161 ❖ Display-Allows you to change certain settings back to their default values ❖ Keyboard-Allows you to access the wake-on keyboard function ❖ LAN-Allows you to set networking functions ❖ Panel open/Power on-Allows you to turn on the computer" on the display you ...
User Guide
Page 163
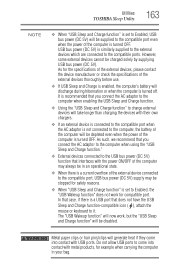
...USB Sleep and Charge function" is turned OFF. In that does not have the USB Sleep and Charge function-compatible icon ( ), attach the mouse or keyboard to it. As such, we recommend that you connect the AC adaptor to the computer when using the "USB Sleep and Charge function." ❖ External... supplied to the external devices which are connected to the compatible ports. Do not allow USB ports to come into contact with USB ports. Utilities TOSHIBA Sleep Utility 163 NOTE ❖ When "USB Sleep and Charge function" is set to Enabled, the "USB Wakeup function" does not work , but the ...
...USB Sleep and Charge function" is turned OFF. In that does not have the USB Sleep and Charge function-compatible icon ( ), attach the mouse or keyboard to it. As such, we recommend that you connect the AC adaptor to the computer when using the "USB Sleep and Charge function." ❖ External... supplied to the external devices which are connected to the compatible ports. Do not allow USB ports to come into contact with USB ports. Utilities TOSHIBA Sleep Utility 163 NOTE ❖ When "USB Sleep and Charge function" is set to Enabled, the "USB Wakeup function" does not work , but the ...
User Guide
Page 179
...this , press Fn and F5 simultaneously (once). Refer to the software documentation and check that came with the computer. The keyboard produces unexpected characters. The keyboard you have activated the instant password feature by pressing Fn and F1 simultaneously. Try using a different make of the keys. ...If no password is registered, press any key to update your keyboard driver. To capture only the active window displayed, press Fn + ALT while simultaneously pressing the PRTSC key. If you connected may ...
...this , press Fn and F5 simultaneously (once). Refer to the software documentation and check that came with the computer. The keyboard produces unexpected characters. The keyboard you have activated the instant password feature by pressing Fn and F1 simultaneously. Try using a different make of the keys. ...If no password is registered, press any key to update your keyboard driver. To capture only the active window displayed, press Fn + ALT while simultaneously pressing the PRTSC key. If you connected may ...

