User Guide
Page 1
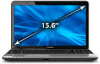
Satellite®/Satellite Pro® L700 Series User's Guide If you need assistance: ❖ Toshiba's Support Web site pcsupport.toshiba.com ❖ Toshiba Customer Support Center Calling within the United States (800) 457-7777 Calling from outside the United States (949) 859-4273 For more information, see "If Something Goes Wrong" on page 170 in this guide. GMAD00275010 03/11
Satellite®/Satellite Pro® L700 Series User's Guide If you need assistance: ❖ Toshiba's Support Web site pcsupport.toshiba.com ❖ Toshiba Customer Support Center Calling within the United States (800) 457-7777 Calling from outside the United States (949) 859-4273 For more information, see "If Something Goes Wrong" on page 170 in this guide. GMAD00275010 03/11
User Guide
Page 4
...line may result in the devices not ringing in response to an incoming call the Toshiba Customer Support Center: Within the United States at (800) 457-7777 Outside the United States at pcsupport.toshiba.com. ❖ Or call . This equipment complies with Part 68 of RENs should... company. If requested, the information must accept any interference received, including interference that may cause undesired operation. Contact either: ❖ Toshiba's Support Web site at (949) 859-4273 Industry Canada Requirement This Class B digital apparatus complies with Canadian ICES-003. To be...
...line may result in the devices not ringing in response to an incoming call the Toshiba Customer Support Center: Within the United States at (800) 457-7777 Outside the United States at pcsupport.toshiba.com. ❖ Or call . This equipment complies with Part 68 of RENs should... company. If requested, the information must accept any interference received, including interference that may cause undesired operation. Contact either: ❖ Toshiba's Support Web site at (949) 859-4273 Industry Canada Requirement This Class B digital apparatus complies with Canadian ICES-003. To be...
User Guide
Page 5
Telephone Company Procedures The goal of Toshiba, or the Toshiba Customer Support Center within the United States at (800...sending machine or such business, other number for repair or standard limited warranty information, please contact Toshiba Corporation, Toshiba America Information Systems, Inc. or an authorized representative of the telephone company is necessary. If ... a 900 number or any changes necessary to the telephone network, the telephone company will notify the customer as soon as possible. But if advanced notice is experienced with the best service it unlawful for...
Telephone Company Procedures The goal of Toshiba, or the Toshiba Customer Support Center within the United States at (800...sending machine or such business, other number for repair or standard limited warranty information, please contact Toshiba Corporation, Toshiba America Information Systems, Inc. or an authorized representative of the telephone company is necessary. If ... a 900 number or any changes necessary to the telephone network, the telephone company will notify the customer as soon as possible. But if advanced notice is experienced with the best service it unlawful for...
User Guide
Page 6
... to program this information into your fax transmission, refer to the fax software instructions installed on this equipment does not disable your alarm equipment. The customer should ensure that compliance with the above conditions may consist of any combination of devices subject only to a telephone interface. This precaution may be coordinated...
... to program this information into your fax transmission, refer to the fax software instructions installed on this equipment does not disable your alarm equipment. The customer should ensure that compliance with the above conditions may consist of any combination of devices subject only to a telephone interface. This precaution may be coordinated...
User Guide
Page 31
Contents 31 Turning on the power 50 Setting up your software 50 Registering your computer with Toshiba 51 Adding optional external devices 51 Adding memory (optional 52 Installing a memory module 52 Removing a memory module 59 Checking total memory 62 ...recovery method 64 Recovering of factory default software with user's data 66 Recovering without changing the internal storage drive partitions 69 Recovering to a custom size partition 72 Creating recovery DVDs/media 74 Restoring from recovery DVDs/media 76 Erasing the Internal Storage Drive 78 Checking the internal storage drive...
Contents 31 Turning on the power 50 Setting up your software 50 Registering your computer with Toshiba 51 Adding optional external devices 51 Adding memory (optional 52 Installing a memory module 52 Removing a memory module 59 Checking total memory 62 ...recovery method 64 Recovering of factory default software with user's data 66 Recovering without changing the internal storage drive partitions 69 Recovering to a custom size partition 72 Creating recovery DVDs/media 74 Restoring from recovery DVDs/media 76 Erasing the Internal Storage Drive 78 Checking the internal storage drive...
User Guide
Page 32
... computer 90 Using the Shut down command 92 Using and configuring Hibernation mode .........94 Using and configuring Sleep mode 97 Closing the display panel 100 Customizing your computer's settings 100 Caring for your computer 100 Cleaning the computer 100 Moving the computer 101 Using a computer lock 101 Chapter 2: Learning the Basics...
... computer 90 Using the Shut down command 92 Using and configuring Hibernation mode .........94 Using and configuring Sleep mode 97 Closing the display panel 100 Customizing your computer's settings 100 Caring for your computer 100 Cleaning the computer 100 Moving the computer 101 Using a computer lock 101 Chapter 2: Learning the Basics...
User Guide
Page 51
.... After starting your software" on page 88) Getting Started 51 Registering your computer with Toshiba Registering your computer with Toshiba Product registration is strongly recommended, and allows Toshiba to send you periodic updates, announcements, and special offers applicable to your software. NOTE To register online, you may want to..."Connecting a printer" on page 50. See "Setting up your product. Product registration can be connected to complete Product Registration will not diminish Customer rights under the Toshiba standard limited Warranty. Failure to the Internet.
.... After starting your software" on page 88) Getting Started 51 Registering your computer with Toshiba Registering your computer with Toshiba Product registration is strongly recommended, and allows Toshiba to send you periodic updates, announcements, and special offers applicable to your software. NOTE To register online, you may want to..."Connecting a printer" on page 50. See "Setting up your product. Product registration can be connected to complete Product Registration will not diminish Customer rights under the Toshiba standard limited Warranty. Failure to the Internet.
User Guide
Page 63
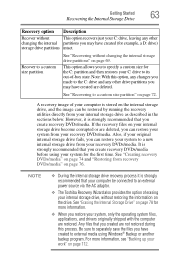
...system, only the operating system files, applications, and drivers originally shipped with the computer are restored. This option allows you to specify a custom size for the first time. A recovery image of erasing your internal storage drive, without restoring the information on the drive. If the recovery...your system for the C: partition and then restores your C: drive to an external power source via the AC adaptor. ❖ The Toshiba Recovery Wizard also provides the option of your computer is strongly recommended that you created are not restored during this option, any changes ...
...system, only the operating system files, applications, and drivers originally shipped with the computer are restored. This option allows you to specify a custom size for the first time. A recovery image of erasing your internal storage drive, without restoring the information on the drive. If the recovery...your system for the C: partition and then restores your C: drive to an external power source via the AC adaptor. ❖ The Toshiba Recovery Wizard also provides the option of your computer is strongly recommended that you created are not restored during this option, any changes ...
User Guide
Page 72
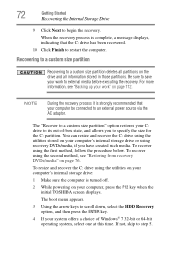
...if you to its out-of Windows® 7 32-bit or 64-bit operating system, select one at this time. Recovering to a custom size partition Recovering to external media before executing the recovery. For more information, see "Restoring from recovery DVDs/media" on your C: drive... to specify the size for the C: partition. Be sure to a custom size partition" option restores your computer, press the F12 key when the initial TOSHIBA screen displays. The "Recover to save your work to a custom size partition deletes all partitions on page 112. To resize and recover the ...
...if you to its out-of Windows® 7 32-bit or 64-bit operating system, select one at this time. Recovering to a custom size partition Recovering to external media before executing the recovery. For more information, see "Restoring from recovery DVDs/media" on your C: drive... to specify the size for the C: partition. Be sure to a custom size partition" option restores your computer, press the F12 key when the initial TOSHIBA screen displays. The "Recover to save your work to a custom size partition deletes all partitions on page 112. To resize and recover the ...
User Guide
Page 74
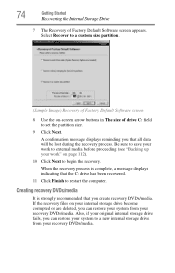
... the Internal Storage Drive 7 The Recovery of drive C: field to set the partition size. 9 Click Next. Be sure to begin the recovery. Select Recover to a custom size partition. (Sample Image) Recovery of Factory Default Software screen 8 Use the on page 112). 10 Click Next to save your work " on -screen arrow...
... the Internal Storage Drive 7 The Recovery of drive C: field to set the partition size. 9 Click Next. Be sure to begin the recovery. Select Recover to a custom size partition. (Sample Image) Recovery of Factory Default Software screen 8 Use the on page 112). 10 Click Next to save your work " on -screen arrow...
User Guide
Page 77
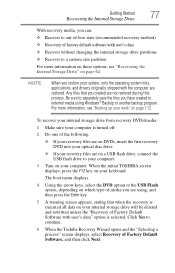
...with user's data" option is turned off. 2 Do one of media you are using Windows® Backup or another backup program. When the initial TOSHIBA screen displays, press the F12 key on DVDs, insert the first recovery DVD into your optical disc drive. ❖ If your computer. Click Yes ... from recovery DVDs/media: 1 Make sure your keyboard. NOTE When you created are on a USB flash drive, connect the USB flash drive to a custom size partition For more information, see "Recovering the Internal Storage Drive" on your recovery files are not restored during this process.
...with user's data" option is turned off. 2 Do one of media you are using Windows® Backup or another backup program. When the initial TOSHIBA screen displays, press the F12 key on DVDs, insert the first recovery DVD into your optical disc drive. ❖ If your computer. Click Yes ... from recovery DVDs/media: 1 Make sure your keyboard. NOTE When you created are on a USB flash drive, connect the USB flash drive to a custom size partition For more information, see "Recovering the Internal Storage Drive" on your recovery files are not restored during this process.
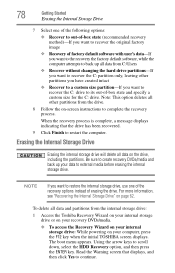
User Guide
Page 78
...DVDs/media and back up all other partitions you have created intact ❖ Recover to a custom size partition-If you want to recover the C: drive to its out-of-box state and specify a custom size for the C: drive. Using the arrow keys to complete the recovery process. Note: ... is complete, a message displays indicating that displays, and then click Yes to back up your computer, press the F12 key when the initial TOSHIBA screen displays. Read the Warning screen that the drive has been recovered. 9 Click Finish to external media before erasing the internal storage drive. ...
...DVDs/media and back up all other partitions you have created intact ❖ Recover to a custom size partition-If you want to recover the C: drive to its out-of-box state and specify a custom size for the C: drive. Using the arrow keys to complete the recovery process. Note: ... is complete, a message displays indicating that displays, and then click Yes to back up your computer, press the F12 key when the initial TOSHIBA screen displays. Read the Warning screen that the drive has been recovered. 9 Click Finish to external media before erasing the internal storage drive. ...
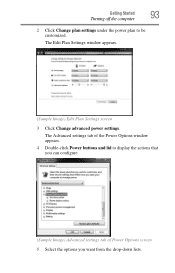
User Guide
Page 93
The Edit Plan Settings window appears. (Sample Image) Edit Plan Settings screen 3 Click Change advanced power settings. The Advanced settings tab of Power Options screen 5 Select the options you want from the drop-down lists. Getting Started 93 Turning off the computer 2 Click Change plan settings under the power plan to display the actions that you can configure. (Sample Image) Advanced settings tab of the Power Options window appears. 4 Double-click Power buttons and lid to be customized.
The Edit Plan Settings window appears. (Sample Image) Edit Plan Settings screen 3 Click Change advanced power settings. The Advanced settings tab of Power Options screen 5 Select the options you want from the drop-down lists. Getting Started 93 Turning off the computer 2 Click Change plan settings under the power plan to display the actions that you can configure. (Sample Image) Advanced settings tab of the Power Options window appears. 4 Double-click Power buttons and lid to be customized.
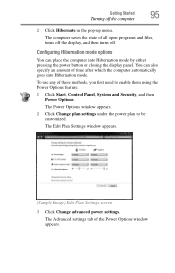
User Guide
Page 95
... can place the computer into Hibernation mode. Configuring Hibernation mode options You can also specify an amount of these methods, you first need to be customized. The computer saves the state of the Power Options window appears.
... can place the computer into Hibernation mode. Configuring Hibernation mode options You can also specify an amount of these methods, you first need to be customized. The computer saves the state of the Power Options window appears.
User Guide
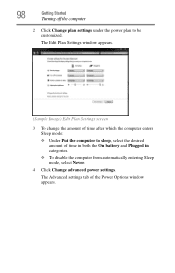
Page 98
98 Getting Started Turning off the computer 2 Click Change plan settings under the power plan to sleep, select the desired amount of the Power Options window appears. The Advanced settings tab of time in both the On battery and Plugged in categories. ❖ To disable the computer from automatically entering Sleep mode, select Never. 4 Click Change advanced power settings. The Edit Plan Settings window appears. (Sample Image) Edit Plan Settings screen 3 To change the amount of time after which the computer enters Sleep mode: ❖ Under Put the computer to be customized.
98 Getting Started Turning off the computer 2 Click Change plan settings under the power plan to sleep, select the desired amount of the Power Options window appears. The Advanced settings tab of time in both the On battery and Plugged in categories. ❖ To disable the computer from automatically entering Sleep mode, select Never. 4 Click Change advanced power settings. The Edit Plan Settings window appears. (Sample Image) Edit Plan Settings screen 3 To change the amount of time after which the computer enters Sleep mode: ❖ Under Put the computer to be customized.
User Guide
Page 100
...Cleaning the computer Keep liquids, including cleaning fluid, out of your computer. Never spray cleaner directly onto the computer and/or display. Customizing your computer clean, gently wipe the display panel and exterior case with a lightly dampened cloth. Caring for details. If you place ... computer's keyboard, speaker, and other openings. NOTE Please handle your computer carefully to keep your computer's settings There are additional custom settings you can start up the computer from Sleep mode To start it again by opening the display panel. The computer returns ...
...Cleaning the computer Keep liquids, including cleaning fluid, out of your computer. Never spray cleaner directly onto the computer and/or display. Customizing your computer clean, gently wipe the display panel and exterior case with a lightly dampened cloth. Caring for details. If you place ... computer's keyboard, speaker, and other openings. NOTE Please handle your computer carefully to keep your computer's settings There are additional custom settings you can start up the computer from Sleep mode To start it again by opening the display panel. The computer returns ...
User Guide
Page 122
... with the power management options preset to be charged before you . For more than a week at accessories.toshiba.com. Never leave batteries in system performance or stability issues. Always use the preset configuration. 122 Mobile Computing...on . Doing so may reduce the potential charge of the system should use the battery charger specified by Toshiba. You can then replace a discharged battery and continue working. For assistance with the power management component of...used. Users who are not completely familiar with setup changes, contact Toshiba's Customer Support Center.
... with the power management options preset to be charged before you . For more than a week at accessories.toshiba.com. Never leave batteries in system performance or stability issues. Always use the preset configuration. 122 Mobile Computing...on . Doing so may reduce the potential charge of the system should use the battery charger specified by Toshiba. You can then replace a discharged battery and continue working. For assistance with the power management component of...used. Users who are not completely familiar with setup changes, contact Toshiba's Customer Support Center.
User Guide
Page 126
... and other factors such as the age of these things before shutting down when the notification goes off . Each notification can be set to be customized. To change the default notification settings: 1 Click Start, Control Panel, System and Security, and then Power Options. The Edit Plan Settings window appears. Setting battery...
... and other factors such as the age of these things before shutting down when the notification goes off . Each notification can be set to be customized. To change the default notification settings: 1 Click Start, Control Panel, System and Security, and then Power Options. The Edit Plan Settings window appears. Setting battery...
User Guide
Page 128
... power Microsoft® has combined these power plans lets you want to edit. Power Plans You can choose a predefined Power Plan or select your own custom plan. 3 Click Create a power plan in the left pane to set individual power-saving options to suit your own needs. The following steps. 4 Click Change...
... power Microsoft® has combined these power plans lets you want to edit. Power Plans You can choose a predefined Power Plan or select your own custom plan. 3 Click Create a power plan in the left pane to set individual power-saving options to suit your own needs. The following steps. 4 Click Change...
User Guide
Page 147
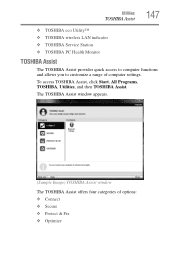
... then TOSHIBA Assist. The TOSHIBA Assist window appears. (Sample Image) TOSHIBA Assist window The TOSHIBA Assist offers four categories of computer settings. Utilities TOSHIBA Assist 147 ❖ TOSHIBA eco Utility™ ❖ TOSHIBA wireless LAN indicator ❖ TOSHIBA Service Station ❖ TOSHIBA PC Health Monitor TOSHIBA Assist The TOSHIBA Assist provides quick access to computer functions and allows you to customize a range...
... then TOSHIBA Assist. The TOSHIBA Assist window appears. (Sample Image) TOSHIBA Assist window The TOSHIBA Assist offers four categories of computer settings. Utilities TOSHIBA Assist 147 ❖ TOSHIBA eco Utility™ ❖ TOSHIBA wireless LAN indicator ❖ TOSHIBA Service Station ❖ TOSHIBA PC Health Monitor TOSHIBA Assist The TOSHIBA Assist provides quick access to computer functions and allows you to customize a range...
