
User Guide
Page 39
...NOTE The cooling fan location will vary depending on some disks is especially important for viruses. In this condition, observe the following: ❖ Never cover your computer or AC adaptor with any object. ❖ Never place your computer or AC adaptor near a heat source, such as large stereo ... your computer and AC adaptor have a CPU cooling fan that generate strong magnetic fields, such as an electric blanket or heater. ❖ Never cover or block the air vents including those located at the underside of the computer. Placing a magnet too close to a power outlet (even if...
...NOTE The cooling fan location will vary depending on some disks is especially important for viruses. In this condition, observe the following: ❖ Never cover your computer or AC adaptor with any object. ❖ Never place your computer or AC adaptor near a heat source, such as large stereo ... your computer and AC adaptor have a CPU cooling fan that generate strong magnetic fields, such as an electric blanket or heater. ❖ Never cover or block the air vents including those located at the underside of the computer. Placing a magnet too close to a power outlet (even if...
User Guide
Page 45
...module Memory modules can install one or two memory modules. The surrounding area may want to run most of data. Avoid touching the cover, the module(s), and the surrounding area before replacing it. The computer has two memory slots-Slot A and Slot B. You will ... mode, data will need a small Phillips screwdriver for this procedure. NOTE Before adding external devices or memory, Toshiba recommends setting up your system or visit accessories.toshiba.com. Getting Started 45 Adding memory (optional) Adding memory (optional) HINT: To purchase additional memory modules, ...
...module Memory modules can install one or two memory modules. The surrounding area may want to run most of data. Avoid touching the cover, the module(s), and the surrounding area before replacing it. The computer has two memory slots-Slot A and Slot B. You will ... mode, data will need a small Phillips screwdriver for this procedure. NOTE Before adding external devices or memory, Toshiba recommends setting up your system or visit accessories.toshiba.com. Getting Started 45 Adding memory (optional) Adding memory (optional) HINT: To purchase additional memory modules, ...
User Guide
Page 46
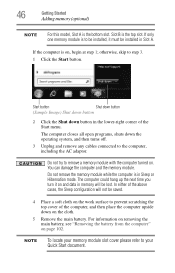
... computer is to remove a memory module with the computer turned on , begin at step 1; NOTE To locate your memory module slot cover please refer to prevent scratching the top cover of the Start menu. Do not try to be installed, it on and data in the lower-right corner of the computer...
... computer is to remove a memory module with the computer turned on , begin at step 1; NOTE To locate your memory module slot cover please refer to prevent scratching the top cover of the Start menu. Do not try to be installed, it on and data in the lower-right corner of the computer...
User Guide
Page 47
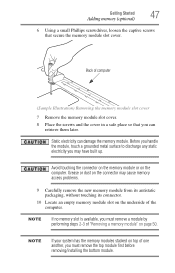
Back of computer (Sample Illustration) Removing the memory module slot cover 7 Remove the memory module slot cover. 8 Place the screws and the cover in a safe place so that secure the memory module slot cover. Avoid touching the connector on the memory module or on the underside of one another, you may cause memory access problems...
Back of computer (Sample Illustration) Removing the memory module slot cover 7 Remove the memory module slot cover. 8 Place the screws and the cover in a safe place so that secure the memory module slot cover. Avoid touching the connector on the memory module or on the underside of one another, you may cause memory access problems...
User Guide
Page 49
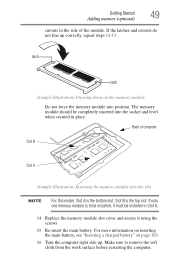
... slot NOTE For this model, Slot A is the top slot. Getting Started 49 Adding memory (optional) cutouts in Slot A. 14 Replace the memory module slot cover and secure it using the screws. 15 Re-insert the main battery.
... slot NOTE For this model, Slot A is the top slot. Getting Started 49 Adding memory (optional) cutouts in Slot A. 14 Replace the memory module slot cover and secure it using the screws. 15 Re-insert the main battery.
User Guide
Page 50
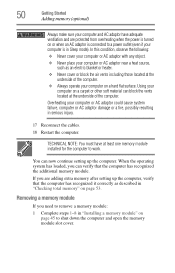
... for the computer to work. You can verify that the computer has recognized it correctly as an electric blanket or heater. ❖ Never cover or block the air vents including those located at the underside of the computer. ❖ Always operate your computer or AC adaptor could cause... carpet or other soft material can block the vents located at the underside of the computer. In this condition, observe the following: ❖ Never cover your computer or AC adaptor with any object. ❖ Never place your computer is connected to a power outlet (even if your computer or AC...
... for the computer to work. You can verify that the computer has recognized it correctly as an electric blanket or heater. ❖ Never cover or block the air vents including those located at the underside of the computer. ❖ Always operate your computer or AC adaptor could cause... carpet or other soft material can block the vents located at the underside of the computer. In this condition, observe the following: ❖ Never cover your computer or AC adaptor with any object. ❖ Never place your computer is connected to a power outlet (even if your computer or AC...
User Guide
Page 52
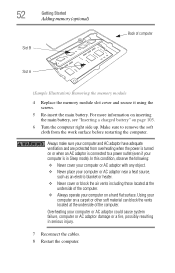
... AC adaptor with any object. ❖ Never place your computer or AC adaptor near a heat source, such as an electric blanket or heater. ❖ Never cover or block the air vents including those located at the underside of the computer. 52 Getting Started Adding memory (optional) Slot B Back of the computer... other soft material can block the vents located at the underside of computer Slot A (Sample Illustration) Removing the memory module 4 Replace the memory module slot cover and secure it using the screws. 5 Re-insert the main battery.
... AC adaptor with any object. ❖ Never place your computer or AC adaptor near a heat source, such as an electric blanket or heater. ❖ Never cover or block the air vents including those located at the underside of the computer. 52 Getting Started Adding memory (optional) Slot B Back of the computer... other soft material can block the vents located at the underside of computer Slot A (Sample Illustration) Removing the memory module 4 Replace the memory module slot cover and secure it using the screws. 5 Re-insert the main battery.
User Guide
Page 53
... allow you were trying to work. If the computer does not recognize the memory configuration, turn off the computer and remove the memory module slot cover (complete steps 1-8 in "Installing a memory module" on page 55. Installed memory (RAM) is displayed below the System heading. Recovering the Internal Storage Drive Your computer...
... allow you were trying to work. If the computer does not recognize the memory configuration, turn off the computer and remove the memory module slot cover (complete steps 1-8 in "Installing a memory module" on page 55. Installed memory (RAM) is displayed below the System heading. Recovering the Internal Storage Drive Your computer...
User Guide
Page 89
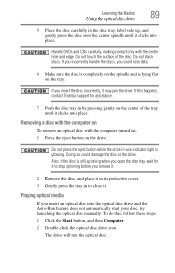
... media If you remove it. 2 Remove the disc, and place it in its protective cover. 3 Gently press the tray in to stop spinning before you insert an optical disc into place. To do this happens, contact Toshiba support for it to close it may jam the drive. Removing a disc with the computer...
... media If you remove it. 2 Remove the disc, and place it in its protective cover. 3 Gently press the tray in to stop spinning before you insert an optical disc into place. To do this happens, contact Toshiba support for it to close it may jam the drive. Removing a disc with the computer...
User Guide
Page 91
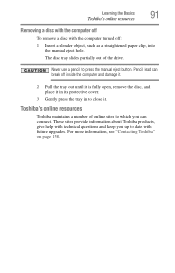
... Insert a slender object, such as a straightened paper clip, into the manual eject hole. Pencil lead can connect. Learning the Basics 91 Toshiba's online resources Removing a disc with the computer off To remove a disc with the computer turned off inside the computer and damage it....disc, and place it in its protective cover. 3 Gently press the tray in to close it. Toshiba's online resources Toshiba maintains a number of the drive. For more information, see "Contacting Toshiba" on page 158. These sites provide information about Toshiba products, give help with future upgrades. ...
... Insert a slender object, such as a straightened paper clip, into the manual eject hole. Pencil lead can connect. Learning the Basics 91 Toshiba's online resources Removing a disc with the computer off To remove a disc with the computer turned off inside the computer and damage it....disc, and place it in its protective cover. 3 Gently press the tray in to close it. Toshiba's online resources Toshiba maintains a number of the drive. For more information, see "Contacting Toshiba" on page 158. These sites provide information about Toshiba products, give help with future upgrades. ...
User Guide
Page 92
... that enhance its energy efficiency. It has a number of other features that you can recharge it many times. 92 Chapter 3 Mobile Computing This chapter covers all aspects of these features active, allowing your computer while traveling. We recommend you are away from an AC outlet. You can use it is... The computer contains a removable Lithium-Ion (Li-Ion) battery that provides power when you leave these energy-saving features have been preset by Toshiba. Toshiba's energy-saver design Your computer enters a low-power suspension mode when it for longer periods while traveling.
... that enhance its energy efficiency. It has a number of other features that you can recharge it many times. 92 Chapter 3 Mobile Computing This chapter covers all aspects of these features active, allowing your computer while traveling. We recommend you are away from an AC outlet. You can use it is... The computer contains a removable Lithium-Ion (Li-Ion) battery that provides power when you leave these energy-saving features have been preset by Toshiba. Toshiba's energy-saver design Your computer enters a low-power suspension mode when it for longer periods while traveling.
User Guide
Page 107
...on a sunny ledge or in a place where it could get wet or covered in dust. ❖ Always travel with the computer in "Selecting a place to pass your authorized Toshiba representative for more information see "Hot Keys/TOSHIBA Cards" on page 32, also apply while traveling. ❖ Never leave your.... TECHNICAL NOTE: When traveling by air, you may be required to work" on page 160. For more information or visit Toshiba's Web site at accessories.toshiba.com. NOTE To enable or disable wireless communication, use the Hot Key F12. The X-ray equipment will not harm your computer...
...on a sunny ledge or in a place where it could get wet or covered in dust. ❖ Always travel with the computer in "Selecting a place to pass your authorized Toshiba representative for more information see "Hot Keys/TOSHIBA Cards" on page 32, also apply while traveling. ❖ Never leave your.... TECHNICAL NOTE: When traveling by air, you may be required to work" on page 160. For more information or visit Toshiba's Web site at accessories.toshiba.com. NOTE To enable or disable wireless communication, use the Hot Key F12. The X-ray equipment will not harm your computer...
User Guide
Page 135
... a program that are the program has stopped responding. If you are working with a program that suddenly freezes all else fails, contact Toshiba. This chapter aims to help from your computer are most likely to identify and solve. Problems that has stopped responding: 1 Press Ctrl..., Alt, and Del simultaneously (once), then click Start Task Manager. The Windows® Task Manager window appears. 135 It covers the problems you are relatively easy to encounter. Others may encounter when using your network administrator or the manufacturer of this chapter. Chapter ...
... a program that are the program has stopped responding. If you are working with a program that suddenly freezes all else fails, contact Toshiba. This chapter aims to help from your computer are most likely to identify and solve. Problems that has stopped responding: 1 Press Ctrl..., Alt, and Del simultaneously (once), then click Start Task Manager. The Windows® Task Manager window appears. 135 It covers the problems you are relatively easy to encounter. Others may encounter when using your network administrator or the manufacturer of this chapter. Chapter ...
User Guide
Page 187
...track button 88 using 88 volume increase/decrease buttons 88 memory adding (optional) 45 check total memory 53 removing memory module slot cover 47 Memory card reader inserting memory media 114 removing memory media 115 using 114 memory module installation 45 inserting into socket 48 removing ... 79 N network accessing 112 connecting your computer 112 networking wireless 111 notification area 111 O ON/OFF indicator light 97 online resources Toshiba 91 optical disc Auto-Run feature 89 handling 89 inserting 88 playing optical media 89 positioning 89 recording optical media 90 removing with ...
...track button 88 using 88 volume increase/decrease buttons 88 memory adding (optional) 45 check total memory 53 removing memory module slot cover 47 Memory card reader inserting memory media 114 removing memory media 115 using 114 memory module installation 45 inserting into socket 48 removing ... 79 N network accessing 112 connecting your computer 112 networking wireless 111 notification area 111 O ON/OFF indicator light 97 online resources Toshiba 91 optical disc Auto-Run feature 89 handling 89 inserting 88 playing optical media 89 positioning 89 recording optical media 90 removing with ...
User Guide
Page 188
... 94 optimum performance 94 power plans selecting power plan options 100 power saving options 99 precautions safety 37 printer troubleshooting 148 problem solving contacting Toshiba 158 Startup options 139 program, starting 84 program, starting from Start menu 85 projector connecting 77 R real-time clock (RTC) battery... disc with computer on 89 and optical disc with computer off 91 battery from the computer 102 memory module 50 memory module slot cover 47 restore points troubleshooting 153 restoring your work 86 running computer on battery power 92 S safety computer 107 disposing of batteries 105...
... 94 optimum performance 94 power plans selecting power plan options 100 power saving options 99 precautions safety 37 printer troubleshooting 148 problem solving contacting Toshiba 158 Startup options 139 program, starting 84 program, starting from Start menu 85 projector connecting 77 R real-time clock (RTC) battery... disc with computer on 89 and optical disc with computer off 91 battery from the computer 102 memory module 50 memory module slot cover 47 restore points troubleshooting 153 restoring your work 86 running computer on battery power 92 S safety computer 107 disposing of batteries 105...

