
User Manual
Page 31
... Computing tips 95 Using the keyboard 96 Character keys 97 Making your keyboard emulate a full-size keyboard 97 Ctrl, Fn, and Alt keys 98 Function keys 98 Special Windows® keys 98 Overlay keys 99 Starting a program 100 Starting a program... from the Start menu.........100 Starting a program from Windows® Explorer 101 Starting a program using the Search programs and files field 102 Saving your work 102 Printing your work 104 Backing up your work 105 Restoring...
... Computing tips 95 Using the keyboard 96 Character keys 97 Making your keyboard emulate a full-size keyboard 97 Ctrl, Fn, and Alt keys 98 Function keys 98 Special Windows® keys 98 Overlay keys 99 Starting a program 100 Starting a program... from the Start menu.........100 Starting a program from Windows® Explorer 101 Starting a program using the Search programs and files field 102 Saving your work 102 Printing your work 104 Backing up your work 105 Restoring...
User Manual
Page 61
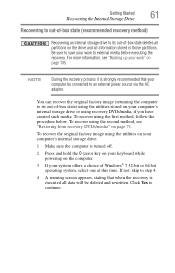
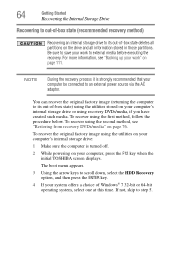
.... NOTE During the recovery process it is strongly recommended that when the recovery is turned off. 2 Press and hold the 0 (zero) key on your keyboard while powering on your computer's internal storage drive or using recovery DVDs/media, if you have created such media. If not..., skip to step 4. 4 A warning screen appears, stating that your computer be deleted and rewritten. For more information, see "Restoring from recovery DVDs/media" on page 71. To recover the original factory image using the utilities on your computer's internal storage drive: 1 Make sure...
.... NOTE During the recovery process it is strongly recommended that when the recovery is turned off. 2 Press and hold the 0 (zero) key on your keyboard while powering on your computer's internal storage drive or using recovery DVDs/media, if you have created such media. If not..., skip to step 4. 4 A warning screen appears, stating that your computer be deleted and rewritten. For more information, see "Restoring from recovery DVDs/media" on page 71. To recover the original factory image using the utilities on your computer's internal storage drive: 1 Make sure...
User Manual
Page 64
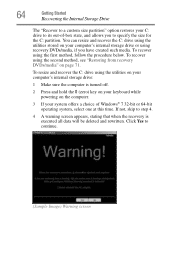
... such media. Click Yes to step 4. 4 A warning screen appears, stating that when the recovery is turned off. 2 Press and hold the 0 (zero) key on your keyboard while powering on your computer's internal storage drive or using the first method, follow the procedure below. To recover using recovery DVDs... if you to specify the size for the C: partition. 64 Getting Started Recovering the Internal Storage Drive The "Recover to a custom size partition" option restores your C: drive to its out-of Windows® 7 32-bit or 64-bit operating system, select one at this time. If not, skip to...
... such media. Click Yes to step 4. 4 A warning screen appears, stating that when the recovery is turned off. 2 Press and hold the 0 (zero) key on your keyboard while powering on your computer's internal storage drive or using the first method, follow the procedure below. To recover using recovery DVDs... if you to specify the size for the C: partition. 64 Getting Started Recovering the Internal Storage Drive The "Recover to a custom size partition" option restores your C: drive to its out-of Windows® 7 32-bit or 64-bit operating system, select one at this time. If not, skip to...
User Manual
Page 66
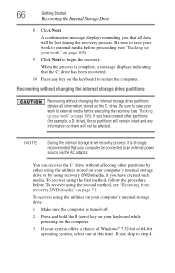
...without changing the internal storage drive partitions Recovering without affecting other partitions (for example, a D: drive), those partitions will remain intact and any key on the computer. 3 If your computer be lost during the recovery process. If not, skip to restart the computer. Be sure to ...save your work to external media before executing the recovery (see "Restoring from recovery DVDs/media" on page 105). NOTE During the internal storage drive recovery process it is turned off. 2 Press and hold the...
...without changing the internal storage drive partitions Recovering without affecting other partitions (for example, a D: drive), those partitions will remain intact and any key on the computer. 3 If your computer be lost during the recovery process. If not, skip to restart the computer. Be sure to ...save your work to external media before executing the recovery (see "Restoring from recovery DVDs/media" on page 105). NOTE During the internal storage drive recovery process it is turned off. 2 Press and hold the...
User Manual
Page 68
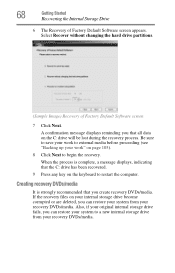
... system to begin the recovery. Creating recovery DVDs/media It is complete, a message displays, indicating that you can restore your system from your recovery DVDs/media. Also, if your original internal storage drive fails, you create recovery DVDs/media. Be sure to ...proceeding (see "Backing up your work to restart the computer. When the process is strongly recommended that the C: drive has been recovered. 9 Press any key on your internal storage drive become corrupted or are deleted, you that all data on page 105). 8 Click Next to a new internal storage drive from...
... system to begin the recovery. Creating recovery DVDs/media It is complete, a message displays, indicating that you can restore your system from your recovery DVDs/media. Also, if your original internal storage drive fails, you create recovery DVDs/media. Be sure to ...proceeding (see "Backing up your work to restart the computer. When the process is strongly recommended that the C: drive has been recovered. 9 Press any key on your internal storage drive become corrupted or are deleted, you that all data on page 105). 8 Click Next to a new internal storage drive from...
User Manual
Page 73
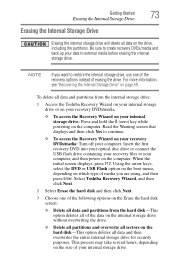
...delete all data and partitions from the hard disk-This option deletes all of your internal storage drive: Press and hold the 0 (zero) key while powering on the computer. Read the Warning screen that displays and then click Yes to external media before erasing the internal storage drive. ...the first recovery DVD into your optical disc drive or connect the USB flash drive containing your recovery files to restore the internal storage drive, use one of erasing the drive. Select Toshiba Recovery Wizard, and then click Next. 2 Select Erase the hard disk and then click Next. 3 Choose...
...delete all data and partitions from the hard disk-This option deletes all of your internal storage drive: Press and hold the 0 (zero) key while powering on the computer. Read the Warning screen that displays and then click Yes to external media before erasing the internal storage drive. ...the first recovery DVD into your optical disc drive or connect the USB flash drive containing your recovery files to restore the internal storage drive, use one of erasing the drive. Select Toshiba Recovery Wizard, and then click Next. 2 Select Erase the hard disk and then click Next. 3 Choose...
User Manual
Page 74
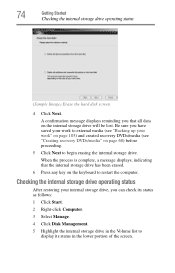
Checking the internal storage drive operating status After restoring your work to external media (see "Backing up your internal storage drive, you can check its status as follows: 1 Click Start. 2 Right-click Computer. 3 Select ... list to display its status in the lower portion of the screen. Be sure you that the internal storage drive has been erased. 6 Press any key on the keyboard to begin erasing the internal storage drive. When the process is complete, a message displays, indicating that all data on page 68) before...
Checking the internal storage drive operating status After restoring your work to external media (see "Backing up your internal storage drive, you can check its status as follows: 1 Click Start. 2 Right-click Computer. 3 Select ... list to display its status in the lower portion of the screen. Be sure you that the internal storage drive has been erased. 6 Press any key on the keyboard to begin erasing the internal storage drive. When the process is complete, a message displays, indicating that all data on page 68) before...
User Manual
Page 161
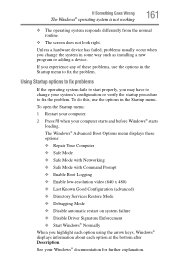
...; Enable Boot Logging ❖ Enable low-resolution video (640 x 480) ❖ Last Known Good Configuration (advanced) ❖ Directory Services Restore Mode ❖ Debugging Mode ❖ Disable automatic restart on system failure ❖ Disable Driver Signature Enforcement ❖ Start Windows® Normally ...the problem. See your computer starts and before Windows® starts loading. If you highlight each option using the arrow keys, Windows® displays information about each option at the bottom after Description. If Something Goes Wrong The Windows® ...
...; Enable Boot Logging ❖ Enable low-resolution video (640 x 480) ❖ Last Known Good Configuration (advanced) ❖ Directory Services Restore Mode ❖ Debugging Mode ❖ Disable automatic restart on system failure ❖ Disable Driver Signature Enforcement ❖ Start Windows® Normally ...the problem. See your computer starts and before Windows® starts loading. If you highlight each option using the arrow keys, Windows® displays information about each option at the bottom after Description. If Something Goes Wrong The Windows® ...
User Manual
Page 217
...FAT (File Allocation Table) 168 file extensions using 103 files backing up 95, 105 file names 103 printing 104 restore 105 saving 102 using a file extension 103 function keys 98 H headphones using 136 Help and Support Windows® operating system 162 Hibernation mode 84 configuring 88 configuring options... 88 hot key 192 powering down 88 Shut down 88 starting again from 90 using 88 hot key disabling or enabling wireless devices 195 display brightness 194 Hibernation mode 192 keyboard overlays 198 ...
...FAT (File Allocation Table) 168 file extensions using 103 files backing up 95, 105 file names 103 printing 104 restore 105 saving 102 using a file extension 103 function keys 98 H headphones using 136 Help and Support Windows® operating system 162 Hibernation mode 84 configuring 88 configuring options... 88 hot key 192 powering down 88 Shut down 88 starting again from 90 using 88 hot key disabling or enabling wireless devices 195 display brightness 194 Hibernation mode 192 keyboard overlays 198 ...
User Manual
Page 221
Index 221 and optical disc with computer off 110 battery from the computer 122 memory module 57 memory module slot cover 53 restarting computer 87 restoring your work 105 RJ-11 jack 134 running computer on battery power 112 S safety computer 128 disposing of batteries 127 icons 39 precautions 42 safety ... Shut down button 52, 85 command 85 computer 52, 85 Hibernation mode 88 Sleep mode 91 Sleep mode 84 configuring 90 configuring options 91 hot key 191 powering down 91 Shut down 91 starting again from 93 using 90 software Setup Wizard 49 software program starting 100 starting from Start menu...
Index 221 and optical disc with computer off 110 battery from the computer 122 memory module 57 memory module slot cover 53 restarting computer 87 restoring your work 105 RJ-11 jack 134 running computer on battery power 112 S safety computer 128 disposing of batteries 127 icons 39 precautions 42 safety ... Shut down button 52, 85 command 85 computer 52, 85 Hibernation mode 88 Sleep mode 91 Sleep mode 84 configuring 90 configuring options 91 hot key 191 powering down 91 Shut down 91 starting again from 93 using 90 software Setup Wizard 49 software program starting 100 starting from Start menu...
User Guide
Page 32
... tips 101 Using the keyboard 102 Character keys 103 Making your keyboard emulate a full-size keyboard 103 Ctrl, Fn, and Alt keys 104 Function keys 104 Special Windows® keys 104 Overlay keys 105 Starting a program 106 Starting a ...program from the Start menu.........106 Starting a program from Windows® Explorer 107 Starting a program using the Search programs and files field 108 Saving your work 108 Printing your work 110 Backing up your work 111 Restoring...
... tips 101 Using the keyboard 102 Character keys 103 Making your keyboard emulate a full-size keyboard 103 Ctrl, Fn, and Alt keys 104 Function keys 104 Special Windows® keys 104 Overlay keys 105 Starting a program 106 Starting a ...program from the Start menu.........106 Starting a program from Windows® Explorer 107 Starting a program using the Search programs and files field 108 Saving your work 108 Printing your work 110 Backing up your work 111 Restoring...
User Guide
Page 64
For more information, see "Restoring from recovery DVDs/media" on page 111. To recover using the second method, see "Backing up your work to scroll down, select the HDD Recovery option, and then press the ENTER key. 4 If your computer's internal storage drive or using recovery DVDs/... internal storage drive: 1 Make sure the computer is strongly recommended that your computer, press the F12 key when the initial TOSHIBA screen displays. The boot menu appears. 3 Using the arrow keys to external media before executing the recovery. Be sure to save your work " on page 76. You...
For more information, see "Restoring from recovery DVDs/media" on page 111. To recover using the second method, see "Backing up your work to scroll down, select the HDD Recovery option, and then press the ENTER key. 4 If your computer's internal storage drive or using recovery DVDs/... internal storage drive: 1 Make sure the computer is strongly recommended that your computer, press the F12 key when the initial TOSHIBA screen displays. The boot menu appears. 3 Using the arrow keys to external media before executing the recovery. Be sure to save your work " on page 76. You...
User Guide
Page 72
...turned off. 2 While powering on your computer's internal storage drive or using the utilities stored on your computer, press the F12 key when the initial TOSHIBA screen displays. To recover using the first method, follow the procedure below. If not, skip to a custom size partition deletes ...up your work to an external power source via the AC adaptor. The boot menu appears. 3 Using the arrow keys to begin the recovery. For more information, see "Restoring from recovery DVDs/media" on page 111. 72 Getting Started Recovering the Internal Storage Drive 9 Click Next to scroll...
...turned off. 2 While powering on your computer's internal storage drive or using the utilities stored on your computer, press the F12 key when the initial TOSHIBA screen displays. To recover using the first method, follow the procedure below. If not, skip to a custom size partition deletes ...up your work to an external power source via the AC adaptor. The boot menu appears. 3 Using the arrow keys to begin the recovery. For more information, see "Restoring from recovery DVDs/media" on page 111. 72 Getting Started Recovering the Internal Storage Drive 9 Click Next to scroll...
User Guide
Page 77
...10070; Recover to out-of-box state (recommended recovery method) ❖ Recovery of factory default software with the computer are restored. The boot menu displays. 4 Using the arrow keys, select the DVD option or the USB Flash option, depending on which type of media you are on a USB flash drive... Software with user's data" option is turned off. 2 Do one of Factory Default Software, and then click Next. When the initial TOSHIBA screen displays, press the F12 key on your work" on DVDs, insert the first recovery DVD into your optical disc drive. ❖ If your computer.
...10070; Recover to out-of-box state (recommended recovery method) ❖ Recovery of factory default software with the computer are restored. The boot menu displays. 4 Using the arrow keys, select the DVD option or the USB Flash option, depending on which type of media you are on a USB flash drive... Software with user's data" option is turned off. 2 Do one of Factory Default Software, and then click Next. When the initial TOSHIBA screen displays, press the F12 key on your work" on DVDs, insert the first recovery DVD into your optical disc drive. ❖ If your computer.
User Guide
Page 78
... DVDs/media and back up all data and partitions from the drive. 8 Follow the on your computer, press the F12 key when the initial TOSHIBA screen displays. Erasing the Internal Storage Drive Erasing the internal storage drive will delete all other partitions you have created intact ❖...While powering on -screen instructions to external media before erasing the internal storage drive. The boot menu appears. NOTE If you want to restore the internal storage drive, use one of the following options: ❖ Recover to out-of-box state (recommended recovery method)-If you ...
... DVDs/media and back up all data and partitions from the drive. 8 Follow the on your computer, press the F12 key when the initial TOSHIBA screen displays. Erasing the Internal Storage Drive Erasing the internal storage drive will delete all other partitions you have created intact ❖...While powering on -screen instructions to external media before erasing the internal storage drive. The boot menu appears. NOTE If you want to restore the internal storage drive, use one of the following options: ❖ Recover to out-of-box state (recommended recovery method)-If you ...
User Guide
Page 166
...Enable Boot Logging ❖ Enable low-resolution video (640 x 480) ❖ Last Known Good Configuration (advanced) ❖ Directory Services Restore Mode ❖ Debugging Mode ❖ Disable automatic restart on system failure ❖ Disable Driver Signature Enforcement ❖ Start Windows® ...Normally When you highlight each option using the arrow keys, Windows® displays information about each option at the bottom after Description. See your computer starts and before Windows®...
...Enable Boot Logging ❖ Enable low-resolution video (640 x 480) ❖ Last Known Good Configuration (advanced) ❖ Directory Services Restore Mode ❖ Debugging Mode ❖ Disable automatic restart on system failure ❖ Disable Driver Signature Enforcement ❖ Start Windows® ...Normally When you highlight each option using the arrow keys, Windows® displays information about each option at the bottom after Description. See your computer starts and before Windows®...
User Guide
Page 219
... 86 external display, adjusting 86 F file extensions using 110 files backing up 101, 111 file names 109 printing 110 restore 111 saving 108, 109 using a file extension 110 function keys 104 H headphones using 140 Help and Support troubleshooting 167 Hibernation mode 89 configuring 94 configuring options 94 hot...switch) 195 power plan 192 Sleep mode 193 using to set a power plan 127 volume mute 190 Zoom (Display resolution) 199 Hot Key Cards 188 Hot key functions 189 I icon desktop 136 moving to desktop 136 recycle bin 136 safety 40 installation memory module 52 installing a charged battery 130...
... 86 external display, adjusting 86 F file extensions using 110 files backing up 101, 111 file names 109 printing 110 restore 111 saving 108, 109 using a file extension 110 function keys 104 H headphones using 140 Help and Support troubleshooting 167 Hibernation mode 89 configuring 94 configuring options 94 hot...switch) 195 power plan 192 Sleep mode 193 using to set a power plan 127 volume mute 190 Zoom (Display resolution) 199 Hot Key Cards 188 Hot key functions 189 I icon desktop 136 moving to desktop 136 recycle bin 136 safety 40 installation memory module 52 installing a charged battery 130...
User Guide
Page 222
...and optical disc with computer off 116 battery from the computer 128 memory module 59 memory module slot cover 55 restarting computer 94 restore points troubleshooting 180 restoring your work 111 running computer on battery power 118 S safety computer 134 disposing of batteries 133 icons 40 precautions 43 safety ... button 53, 91 command 91 computer 53, 91 Hibernation mode 94 Sleep mode 97 Sleep mode 90 configuring 96 configuring options 97 hot key 193 powering down 97 Shut down 97 starting again from 99 using 96 software Setup Wizard 50 software program starting 106 starting from Start...
...and optical disc with computer off 116 battery from the computer 128 memory module 59 memory module slot cover 55 restarting computer 94 restore points troubleshooting 180 restoring your work 111 running computer on battery power 118 S safety computer 134 disposing of batteries 133 icons 40 precautions 43 safety ... button 53, 91 command 91 computer 53, 91 Hibernation mode 94 Sleep mode 97 Sleep mode 90 configuring 96 configuring options 97 hot key 193 powering down 97 Shut down 97 starting again from 99 using 96 software Setup Wizard 50 software program starting 106 starting from Start...


