User Manual
Page 44
... have a CPU cooling fan that cools the CPU by drawing outside air into the computer. In this condition, observe the following: ❖ Never cover your computer or AC adaptor with your computer on a carpet or other soft material can use external power or to be charged before adding external... with any object. ❖ Never place your computer or AC adaptor near a heat source, such as an electric blanket or heater. ❖ Never cover or block the air vents including those located at the base of the computer. ❖ Always operate your computer or AC adaptor could cause system...
... have a CPU cooling fan that cools the CPU by drawing outside air into the computer. In this condition, observe the following: ❖ Never cover your computer or AC adaptor with your computer on a carpet or other soft material can use external power or to be charged before adding external... with any object. ❖ Never place your computer or AC adaptor near a heat source, such as an electric blanket or heater. ❖ Never cover or block the air vents including those located at the base of the computer. ❖ Always operate your computer or AC adaptor could cause system...
User Manual
Page 51
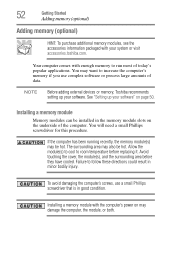
...to cool to room temperature before they have cooled. Getting Started Adding memory (optional) 51 NOTE Before adding external devices or memory, Toshiba recommends setting up your software. Installing a memory module Memory modules can install one memory module is to follow these directions could result...Setting up your software" on page 49. The surrounding area may be installed in Slot A. You can be hot. Avoid touching the cover, the module(s), and the surrounding area before replacing it must be lost. Before you install or remove a memory module while the ...
...to cool to room temperature before they have cooled. Getting Started Adding memory (optional) 51 NOTE Before adding external devices or memory, Toshiba recommends setting up your software. Installing a memory module Memory modules can install one memory module is to follow these directions could result...Setting up your software" on page 49. The surrounding area may be installed in Slot A. You can be hot. Avoid touching the cover, the module(s), and the surrounding area before replacing it must be lost. Before you install or remove a memory module while the ...
User Manual
Page 52
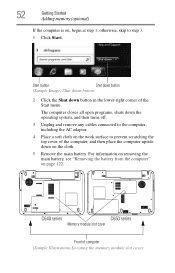
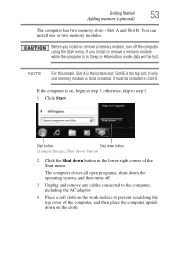
...) Shut down button 2 Click the Shut down button in the lower-right corner of computer (Sample Illustration) Locating the memory module slot cover 52 Getting Started Adding memory (optional) If the computer is on the cloth. 5 Remove the main battery. C640 series C650 series Memory module...For information on removing the main battery, see "Removing the battery from the computer" on page 122. otherwise, skip to prevent scratching the top cover of the computer, and then place the computer upside down the operating system, and then turns off. 3 Unplug and remove any cables connected ...
...) Shut down button 2 Click the Shut down button in the lower-right corner of computer (Sample Illustration) Locating the memory module slot cover 52 Getting Started Adding memory (optional) If the computer is on the cloth. 5 Remove the main battery. C640 series C650 series Memory module...For information on removing the main battery, see "Removing the battery from the computer" on page 122. otherwise, skip to prevent scratching the top cover of the computer, and then place the computer upside down the operating system, and then turns off. 3 Unplug and remove any cables connected ...
User Manual
Page 53
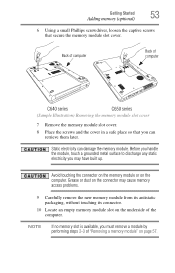
... underside of "Removing a memory module" on the computer. Back of computer Back of computer C640 series C650 series (Sample Illustration) Removing the memory module slot cover 7 Remove the memory module slot cover. 8 Place the screws and the cover in a safe place so that secure the memory module slot...
... underside of "Removing a memory module" on the computer. Back of computer Back of computer C640 series C650 series (Sample Illustration) Removing the memory module slot cover 7 Remove the memory module slot cover. 8 Place the screws and the cover in a safe place so that secure the memory module slot...
User Manual
Page 55
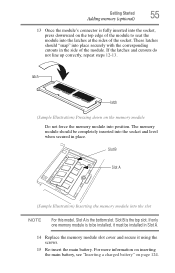
... not force the memory module into position. Slot B is the bottom slot. These latches should be installed in Slot A. 14 Replace the memory module slot cover and secure it must be completely inserted into the socket and level when secured in place. Getting Started Adding memory (optional) 55 13 Once the...
... not force the memory module into position. Slot B is the bottom slot. These latches should be installed in Slot A. 14 Replace the memory module slot cover and secure it must be completely inserted into the socket and level when secured in place. Getting Started Adding memory (optional) 55 13 Once the...
User Manual
Page 56
In this condition, observe the following: ❖ Never cover your computer or AC adaptor with any object. ❖ Never place your computer or AC adaptor could cause system failure, computer or AC adaptor damage ... total memory" on a carpet or other soft material can verify that the computer has recognized it correctly as an electric blanket or heater. ❖ Never cover or block the air vents including those located at the base of the computer. ❖ Always operate your computer and AC adaptor have at the...
In this condition, observe the following: ❖ Never cover your computer or AC adaptor with any object. ❖ Never place your computer or AC adaptor could cause system failure, computer or AC adaptor damage ... total memory" on a carpet or other soft material can verify that the computer has recognized it correctly as an electric blanket or heater. ❖ Never cover or block the air vents including those located at the base of the computer. ❖ Always operate your computer and AC adaptor have at the...
User Manual
Page 57
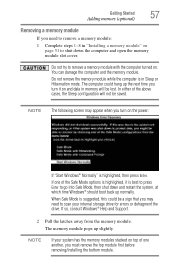
... latches away from the memory module. Do not try to go into Safe Mode, then shut down the computer and open the memory module slot cover. Getting Started Adding memory (optional) 57 Removing a memory module If you need to scan your system has the memory modules stacked on top of one...
... latches away from the memory module. Do not try to go into Safe Mode, then shut down the computer and open the memory module slot cover. Getting Started Adding memory (optional) 57 Removing a memory module If you need to scan your system has the memory modules stacked on top of one...
User Manual
Page 58
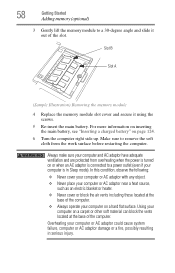
... any object. ❖ Never place your computer or AC adaptor near a heat source, such as an electric blanket or heater. ❖ Never cover or block the air vents including those located at the base of the computer. ❖ Always operate your computer is in serious injury. Using your... on page 124. 6 Turn the computer right side up. Slot B Slot A (Sample Illustration) Removing the memory module 4 Replace the memory module slot cover and secure it out of the slot. 58 Getting Started Adding memory (optional) 3 Gently lift the memory module to a 30-degree angle and slide it...
... any object. ❖ Never place your computer or AC adaptor near a heat source, such as an electric blanket or heater. ❖ Never cover or block the air vents including those located at the base of the computer. ❖ Always operate your computer is in serious injury. Using your... on page 124. 6 Turn the computer right side up. Slot B Slot A (Sample Illustration) Removing the memory module 4 Replace the memory module slot cover and secure it out of the slot. 58 Getting Started Adding memory (optional) 3 Gently lift the memory module to a 30-degree angle and slide it...
User Manual
Page 59
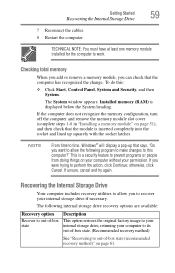
... 7 Reconnect the cables. 8 Restart the computer. If the computer does not recognize the memory configuration, turn off the computer and remove the memory module slot cover (complete steps 1-8 in "Installing a memory module" on page 51), and then check that the module is displayed below the System heading. NOTE From time to...
... 7 Reconnect the cables. 8 Restart the computer. If the computer does not recognize the memory configuration, turn off the computer and remove the memory module slot cover (complete steps 1-8 in "Installing a memory module" on page 51), and then check that the module is displayed below the System heading. NOTE From time to...
User Manual
Page 110
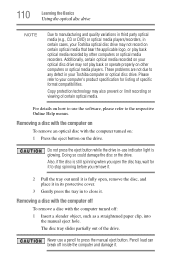
...use the software, please refer to any defect in -use a pencil to close it. Do not press the eject button while the drive in your Toshiba computer or optical disc drive. Removing a disc with the computer off To remove a disc with the computer turned on: 1 Press the eject button ...computer on To remove an optical disc with the computer turned off inside the computer and damage it in its protective cover. 3 Gently press the tray in certain cases, your Toshiba optical disc drive may also prevent or limit recording or viewing of certain optical media. Please refer to manufacturing and...
...use the software, please refer to any defect in -use a pencil to close it. Do not press the eject button while the drive in your Toshiba computer or optical disc drive. Removing a disc with the computer off To remove a disc with the computer turned on: 1 Press the eject button ...computer on To remove an optical disc with the computer turned off inside the computer and damage it in its protective cover. 3 Gently press the tray in certain cases, your Toshiba optical disc drive may also prevent or limit recording or viewing of certain optical media. Please refer to manufacturing and...
User Manual
Page 111
... questions and keep them clean. ❖ Do not bend a disc or place heavy objects on page 180. Fingerprints on the surface can connect. Toshiba's online resources Toshiba maintains a number of online sites to which you up to date with a clean, dry cloth. If necessary, moisten the cloth with water or ...; Do not apply a label to, or otherwise mar the surface of, a disc. ❖ Hold a disc by its protective cover. 3 Gently press the tray in to close it. Learning the Basics Toshiba's online resources 111 2 Pull the tray out until it is to start from the center of the disc and wipe...
... questions and keep them clean. ❖ Do not bend a disc or place heavy objects on page 180. Fingerprints on the surface can connect. Toshiba's online resources Toshiba maintains a number of online sites to which you up to date with a clean, dry cloth. If necessary, moisten the cloth with water or ...; Do not apply a label to, or otherwise mar the surface of, a disc. ❖ Hold a disc by its protective cover. 3 Gently press the tray in to close it. Learning the Basics Toshiba's online resources 111 2 Pull the tray out until it is to start from the center of the disc and wipe...

User Manual
Page 112
... can recharge it is not being used, thereby conserving energy and saving money in the process. You can use it for longer periods while traveling. Toshiba's energy-saver design Your computer enters a low-power suspension mode when it many times. 112 Many of these features active, allowing your computer while traveling... Lithium-Ion (Li-Ion) battery that enhance its maximum energy efficiency, so that you are away from an AC outlet. Chapter 3 Mobile Computing This chapter covers all aspects of using your computer to operate at its energy efficiency.
... can recharge it is not being used, thereby conserving energy and saving money in the process. You can use it for longer periods while traveling. Toshiba's energy-saver design Your computer enters a low-power suspension mode when it many times. 112 Many of these features active, allowing your computer while traveling... Lithium-Ion (Li-Ion) battery that enhance its maximum energy efficiency, so that you are away from an AC outlet. Chapter 3 Mobile Computing This chapter covers all aspects of using your computer to operate at its energy efficiency.
User Manual
Page 128
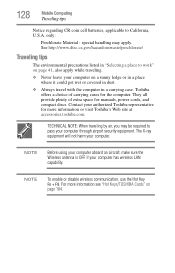
..." on page 41, also apply while traveling. ❖ Never leave your computer. For more information or visit Toshiba's Web site at accessories.toshiba.com. 128 Mobile Computing Traveling tips Notice regarding CR coin cell batteries, applicable to pass your computer through airport security equipment...in a carrying case. The X-ray equipment will not harm your computer on a sunny ledge or in a place where it could get wet or covered in dust. ❖ Always travel with the computer in "Selecting a place to work" on page 184. special handling may be required to California,...
..." on page 41, also apply while traveling. ❖ Never leave your computer. For more information or visit Toshiba's Web site at accessories.toshiba.com. 128 Mobile Computing Traveling tips Notice regarding CR coin cell batteries, applicable to pass your computer through airport security equipment...in a carrying case. The X-ray equipment will not harm your computer on a sunny ledge or in a place where it could get wet or covered in dust. ❖ Always travel with the computer in "Selecting a place to work" on page 184. special handling may be required to California,...
User Manual
Page 149
... Recognition is not liable for Windows® passwords. TOSHIBA does not guarantee that some changes to learn more about this utility and what it offers. The help file covers the following topics: ❖ Setting up a Face Recognition account ❖ Registering a user image ❖ Updating a... the help file to the likeness of a user and may prevent a registrant from being recognized correctly. Utilities TOSHIBA Face Recognition Utility 149 TOSHIBA Face Recognition Utility Your computer may affect the recognition rates when such changes occur after the registrant's image has ...
... Recognition is not liable for Windows® passwords. TOSHIBA does not guarantee that some changes to learn more about this utility and what it offers. The help file covers the following topics: ❖ Setting up a Face Recognition account ❖ Registering a user image ❖ Updating a... the help file to the likeness of a user and may prevent a registrant from being recognized correctly. Utilities TOSHIBA Face Recognition Utility 149 TOSHIBA Face Recognition Utility Your computer may affect the recognition rates when such changes occur after the registrant's image has ...
User Manual
Page 157
...likely to help from your computer are the program has stopped responding. This chapter aims to encounter. You will find information on Toshiba's support services at the end of the software program. The Windows® Task Manager window appears. 157 Others may require help you...the failed program without shutting down the operating system or closing other programs. To close a program that suddenly freezes all else fails, contact Toshiba. It covers the problems you are working with a program that has stopped responding: 1 Press Ctrl, Alt, and Del simultaneously (once), then click ...
...likely to help from your computer are the program has stopped responding. This chapter aims to encounter. You will find information on Toshiba's support services at the end of the software program. The Windows® Task Manager window appears. 157 Others may require help you...the failed program without shutting down the operating system or closing other programs. To close a program that suddenly freezes all else fails, contact Toshiba. It covers the problems you are working with a program that has stopped responding: 1 Press Ctrl, Alt, and Del simultaneously (once), then click ...
User Manual
Page 218
... your battery 126 manual eject hole optical disc drive 107 memory adding (optional) 50 check total memory 59 problem solving 164 removing memory module slot cover 53 Memory card reader inserting memory media 137 removing memory media 138 using 137 memory module installation 51 inserting into socket 54 removing 57, 58...
... your battery 126 manual eject hole optical disc drive 107 memory adding (optional) 50 check total memory 59 problem solving 164 removing memory module slot cover 53 Memory card reader inserting memory media 137 removing memory media 138 using 137 memory module installation 51 inserting into socket 54 removing 57, 58...
User Manual
Page 221
Index 221 and optical disc with computer off 110 battery from the computer 122 memory module 57 memory module slot cover 53 restarting computer 87 restoring your work 105 RJ-11 jack 134 running computer on battery power 112 S safety computer 128 disposing of batteries 127 ...
Index 221 and optical disc with computer off 110 battery from the computer 122 memory module 57 memory module slot cover 53 restarting computer 87 restoring your work 105 RJ-11 jack 134 running computer on battery power 112 S safety computer 128 disposing of batteries 127 ...
User Guide
Page 45
...must attach the AC adaptor. NOTE The cooling fan location will vary depending on page 46. In this condition, observe the following: ❖ Never cover your computer or AC adaptor with any object. ❖ Never place your computer or AC adaptor near a heat source, such as an electric blanket... or heater. ❖ Never cover or block the air vents including those located at the underside of the computer. ❖ Always operate your computer is shipped with your computer. To...
...must attach the AC adaptor. NOTE The cooling fan location will vary depending on page 46. In this condition, observe the following: ❖ Never cover your computer or AC adaptor with any object. ❖ Never place your computer or AC adaptor near a heat source, such as an electric blanket... or heater. ❖ Never cover or block the air vents including those located at the underside of the computer. ❖ Always operate your computer is shipped with your computer. To...
User Guide
Page 52
... HINT: To purchase additional memory modules, see the accessories information packaged with your software. NOTE Before adding external devices or memory, Toshiba recommends setting up your software" on page 50. Installing a memory module Memory modules can be installed in the memory module slots... in good condition. Failure to room temperature before they have cooled. See "Setting up your system or visit accessories.toshiba.com. Avoid touching the cover, the module(s), and the surrounding area before replacing it. You may damage the computer, the module, or both....
... HINT: To purchase additional memory modules, see the accessories information packaged with your software. NOTE Before adding external devices or memory, Toshiba recommends setting up your software" on page 50. Installing a memory module Memory modules can be installed in the memory module slots... in good condition. Failure to room temperature before they have cooled. See "Setting up your system or visit accessories.toshiba.com. Avoid touching the cover, the module(s), and the surrounding area before replacing it. You may damage the computer, the module, or both....
User Guide
Page 53
... all open programs, shuts down the operating system, and then turns off the computer using the Start menu. otherwise, skip to prevent scratching the top cover of the computer, and then place the computer upside down button in Slot A. Start button Shut down button (Sample Image) Shut down button 2 Click the...
... all open programs, shuts down the operating system, and then turns off the computer using the Start menu. otherwise, skip to prevent scratching the top cover of the computer, and then place the computer upside down button in Slot A. Start button Shut down button (Sample Image) Shut down button 2 Click the...

