
User Manual
Page 45
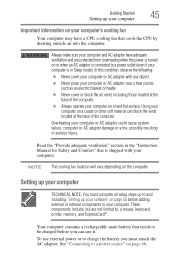
.... ❖ Never place your computer or AC adaptor near a heat source, such as an electric blanket or heater. ❖ Never cover or block the air vents including those located at the base of the computer. ❖ Always operate your computer on or when an ..., memory, and ExpressCard®. Read the "Provide adequate ventilation" section in serious injury. In this condition, observe the following: ❖ Never cover your computer or AC adaptor with your computer. Your computer contains a rechargeable main battery that cools the CPU by drawing outside air into the computer...
.... ❖ Never place your computer or AC adaptor near a heat source, such as an electric blanket or heater. ❖ Never cover or block the air vents including those located at the base of the computer. ❖ Always operate your computer on or when an ..., memory, and ExpressCard®. Read the "Provide adequate ventilation" section in serious injury. In this condition, observe the following: ❖ Never cover your computer or AC adaptor with your computer. Your computer contains a rechargeable main battery that cools the CPU by drawing outside air into the computer...

User Manual
Page 52
... on the base of data. If the computer has been running recently, the memory module(s) may also be hot. Avoid touching the cover, the module(s), and the surrounding area before replacing it. The surrounding area may be hot. 52 Getting Started Adding memory (optional) ...Adding memory (optional) HINT: To purchase additional memory modules, see the accessories information packaged with your system or visit accessories.toshiba.com. You may damage the computer, the module, or both. To avoid damaging the computer's screws, use complex software or process ...
... on the base of data. If the computer has been running recently, the memory module(s) may also be hot. Avoid touching the cover, the module(s), and the surrounding area before replacing it. The surrounding area may be hot. 52 Getting Started Adding memory (optional) ...Adding memory (optional) HINT: To purchase additional memory modules, see the accessories information packaged with your system or visit accessories.toshiba.com. You may damage the computer, the module, or both. To avoid damaging the computer's screws, use complex software or process ...
User Manual
Page 53
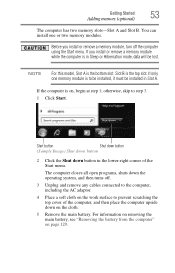
... corner of the Start menu. Slot B is on, begin at step 1; If only one or two memory modules. otherwise, skip to prevent scratching the top cover of the computer, and then place the computer upside down button in Slot A. For information on removing the main battery, see "Removing the battery from...
... corner of the Start menu. Slot B is on, begin at step 1; If only one or two memory modules. otherwise, skip to prevent scratching the top cover of the computer, and then place the computer upside down button in Slot A. For information on removing the main battery, see "Removing the battery from...
User Manual
Page 54
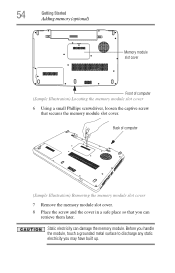
Back of computer (Sample Illustration) Locating the memory module slot cover 6 Using a small Phillips screwdriver, loosen the captive screw that you may have built up. Static electricity can retrieve them later. Before you handle the module,...to discharge any static electricity you can damage the memory module. 54 Getting Started Adding memory (optional) Memory module slot cover Front of computer (Sample Illustration) Removing the memory module slot cover 7 Remove the memory module slot cover. 8 Place the screw and the cover in a safe place so that secures the memory module slot...
Back of computer (Sample Illustration) Locating the memory module slot cover 6 Using a small Phillips screwdriver, loosen the captive screw that you may have built up. Static electricity can retrieve them later. Before you handle the module,...to discharge any static electricity you can damage the memory module. 54 Getting Started Adding memory (optional) Memory module slot cover Front of computer (Sample Illustration) Removing the memory module slot cover 7 Remove the memory module slot cover. 8 Place the screw and the cover in a safe place so that secures the memory module slot...
User Manual
Page 57
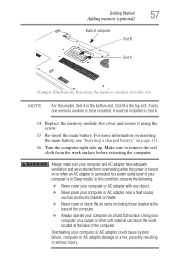
...Back of computer Slot B Slot A (Sample Illustration) Inserting the memory module into the slot NOTE For this condition, observe the following: ❖ Never cover your computer or AC adaptor with any object. ❖ Never place your computer or AC adaptor near a heat source, such as an electric blanket ...or heater. ❖ Never cover or block the air vents including those located at the base of the computer. ❖ Always operate your computer is connected to remove the ...
...Back of computer Slot B Slot A (Sample Illustration) Inserting the memory module into the slot NOTE For this condition, observe the following: ❖ Never cover your computer or AC adaptor with any object. ❖ Never place your computer or AC adaptor near a heat source, such as an electric blanket ...or heater. ❖ Never cover or block the air vents including those located at the base of the computer. ❖ Always operate your computer is connected to remove the ...

User Manual
Page 58
.... TECHNICAL NOTE: You must have at least one memory module installed for the computer to shut down the computer and open the memory module slot cover. Do not try to remove a memory module with the computer turned on and data in Sleep or Hibernation mode.
.... TECHNICAL NOTE: You must have at least one memory module installed for the computer to shut down the computer and open the memory module slot cover. Do not try to remove a memory module with the computer turned on and data in Sleep or Hibernation mode.
User Manual
Page 60
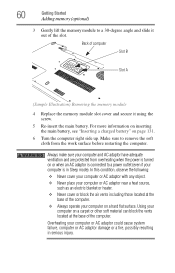
... at the base of the computer. Back of computer Slot B Slot A (Sample Illustration) Removing the memory module 4 Replace the memory module slot cover and secure it out of the slot. 60 Getting Started Adding memory (optional) 3 Gently lift the memory module to a power outlet (even if...the main battery. Overheating your computer on page 131. 6 Turn the computer right side up. In this condition, observe the following: ❖ Never cover your computer or AC adaptor with any object. ❖ Never place your computer or AC adaptor near a heat source, such as an electric blanket...
... at the base of the computer. Back of computer Slot B Slot A (Sample Illustration) Removing the memory module 4 Replace the memory module slot cover and secure it out of the slot. 60 Getting Started Adding memory (optional) 3 Gently lift the memory module to a power outlet (even if...the main battery. Overheating your computer on page 131. 6 Turn the computer right side up. In this condition, observe the following: ❖ Never cover your computer or AC adaptor with any object. ❖ Never place your computer or AC adaptor near a heat source, such as an electric blanket...

User Manual
Page 61
... socket latches. The System window appears. If the computer does not recognize the memory configuration, turn off the computer and remove the memory module slot cover (complete steps 1-8 in "Installing a memory module" on your computer without your internal storage drive if necessary. NOTE From time to this : ❖ Click Start, Control...
... socket latches. The System window appears. If the computer does not recognize the memory configuration, turn off the computer and remove the memory module slot cover (complete steps 1-8 in "Installing a memory module" on your computer without your internal storage drive if necessary. NOTE From time to this : ❖ Click Start, Control...
User Manual
Page 113
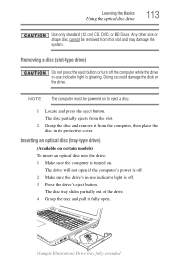
... open if the computer's power is off. 2 Make sure the drive's in-use indicator light is off the computer while the drive in its protective cover. Inserting an optical disc (tray-type drive) (Available on certain models) To insert an optical disc into the drive: 1 Make sure the computer is turned...
... open if the computer's power is off. 2 Make sure the drive's in-use indicator light is off the computer while the drive in its protective cover. Inserting an optical disc (tray-type drive) (Available on certain models) To insert an optical disc into the drive: 1 Make sure the computer is turned...

User Manual
Page 116
... 116 Learning the Basics Using the optical disc drive NOTE Due to press the manual eject button. These problems are not due to your Toshiba optical disc drive may not record on other computers or optical media recorders. Copy protection technology may not play back or operate properly on ...partially out of certain optical media. Also, if the disc is still spinning when you open , remove the disc, and place it in its protective cover. 3 Gently press the tray in certain cases, your computer's product specification for it to stop spinning before you remove it. 2 Pull the tray ...
... 116 Learning the Basics Using the optical disc drive NOTE Due to press the manual eject button. These problems are not due to your Toshiba optical disc drive may not record on other computers or optical media recorders. Copy protection technology may not play back or operate properly on ...partially out of certain optical media. Also, if the disc is still spinning when you open , remove the disc, and place it in its protective cover. 3 Gently press the tray in certain cases, your computer's product specification for it to stop spinning before you remove it. 2 Pull the tray ...
User Manual
Page 117
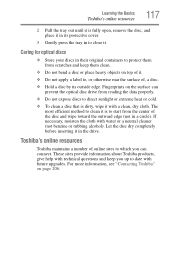
...dry completely before inserting it in the drive. For more information, see "Contacting Toshiba" on top of it. ❖ Do not apply a label to, or otherwise mar the surface of, a disc. ❖ Hold a disc by its protective cover. 3 Gently press the tray in to close it. The most efficient method ... heavy objects on page 206. If necessary, moisten the cloth with a clean, dry cloth. Fingerprints on the surface can connect. Learning the Basics Toshiba's online resources 117 2 Pull the tray out until it is dirty, wipe it with water or a neutral cleaner (not benzine or rubbing alcohol).
...dry completely before inserting it in the drive. For more information, see "Contacting Toshiba" on top of it. ❖ Do not apply a label to, or otherwise mar the surface of, a disc. ❖ Hold a disc by its protective cover. 3 Gently press the tray in to close it. The most efficient method ... heavy objects on page 206. If necessary, moisten the cloth with a clean, dry cloth. Fingerprints on the surface can connect. Learning the Basics Toshiba's online resources 117 2 Pull the tray out until it is dirty, wipe it with water or a neutral cleaner (not benzine or rubbing alcohol).

User Manual
Page 118
We recommend you leave these energy-saving features have been preset by Toshiba. Toshiba's energy-saver design Your computer enters a low-power suspension mode when it many times. 118 You can use it for longer periods while traveling. It ... on battery power The computer contains a removable Lithium-Ion (Li-Ion) battery that you are away from an AC outlet. Chapter 3 Mobile Computing This chapter covers all aspects of using your computer to operate at its energy efficiency. Many of these features active, allowing your computer while traveling.
We recommend you leave these energy-saving features have been preset by Toshiba. Toshiba's energy-saver design Your computer enters a low-power suspension mode when it many times. 118 You can use it for longer periods while traveling. It ... on battery power The computer contains a removable Lithium-Ion (Li-Ion) battery that you are away from an AC outlet. Chapter 3 Mobile Computing This chapter covers all aspects of using your computer to operate at its energy efficiency. Many of these features active, allowing your computer while traveling.
User Manual
Page 135
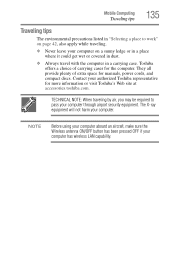
... on a sunny ledge or in a place where it could get wet or covered in dust. ❖ Always travel with the computer in "Selecting a place to pass your authorized Toshiba representative for more information or visit Toshiba's Web site at accessories.toshiba.com. TECHNICAL NOTE: When traveling by air, you may be required to work... traveling. ❖ Never leave your computer has wireless LAN capability. Contact your computer through airport security equipment. The X-ray equipment will not harm your computer. Toshiba offers a choice of extra space for the computer.
... on a sunny ledge or in a place where it could get wet or covered in dust. ❖ Always travel with the computer in "Selecting a place to pass your authorized Toshiba representative for more information or visit Toshiba's Web site at accessories.toshiba.com. TECHNICAL NOTE: When traveling by air, you may be required to work... traveling. ❖ Never leave your computer has wireless LAN capability. Contact your computer through airport security equipment. The X-ray equipment will not harm your computer. Toshiba offers a choice of extra space for the computer.

User Manual
Page 148
... Light Sensor (ALS) The Ambient Light Sensor (ALS) can sense light levels in the area of your computer's built-in-display's brightness. NOTE Do not cover the ALS as the sensor will automatically adjust the computer's built-in-display's brightness to improve screen visibility in low-light and high-light conditions...
... Light Sensor (ALS) The Ambient Light Sensor (ALS) can sense light levels in the area of your computer's built-in-display's brightness. NOTE Do not cover the ALS as the sensor will automatically adjust the computer's built-in-display's brightness to improve screen visibility in low-light and high-light conditions...
User Manual
Page 160
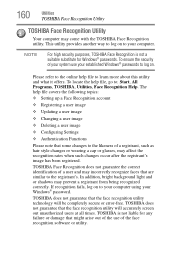
... recognition utility technology will accurately screen out unauthorized users at all times. TOSHIBA is not a suitable substitute for any failure or damage that some changes to your computer using your computer. The help file covers the following topics: ❖ Setting up a Face Recognition account ❖...such as hair style changes or wearing a cap or glasses, may incorrectly recognize faces that are similar to : Start, All Programs, TOSHIBA, Utilities, Face Recognition Help. Please refer to the online help file, go to the registrant's. In addition, bright background light and or...
... recognition utility technology will accurately screen out unauthorized users at all times. TOSHIBA is not a suitable substitute for any failure or damage that some changes to your computer using your computer. The help file covers the following topics: ❖ Setting up a Face Recognition account ❖...such as hair style changes or wearing a cap or glasses, may incorrectly recognize faces that are similar to : Start, All Programs, TOSHIBA, Utilities, Face Recognition Help. Please refer to the online help file, go to the registrant's. In addition, bright background light and or...
User Manual
Page 179
It covers the problems you are working with a program that suddenly freezes all else fails, contact Toshiba. You will find information on Toshiba's support services at the end of the software program. The Windows® Task Manager window appears. 179 You can exit the failed program without shutting ...
It covers the problems you are working with a program that suddenly freezes all else fails, contact Toshiba. You will find information on Toshiba's support services at the end of the software program. The Windows® Task Manager window appears. 179 You can exit the failed program without shutting ...
User Manual
Page 245
...112 Wireless antenna ON/OFF button 112 memory adding (optional) 52 check total memory 61 problem solving 186 removing memory module slot cover 54 Memory card reader inserting memory media 146 removing memory media 146 using 145 memory module installation 52 inserting into socket 55 removing ... 140 Connect to the Internet 140 connecting your computer 140 networking wireless 139 notification area 139 O ON/OFF indicator light 123 online resources Toshiba 117 optical disc Auto-Run feature 115 caring for 117 handling 112, 114 inserting 113 inserting (slot-type drive) 112 inserting (tray-type...
...112 Wireless antenna ON/OFF button 112 memory adding (optional) 52 check total memory 61 problem solving 186 removing memory module slot cover 54 Memory card reader inserting memory media 146 removing memory media 146 using 145 memory module installation 52 inserting into socket 55 removing ... 140 Connect to the Internet 140 connecting your computer 140 networking wireless 139 notification area 139 O ON/OFF indicator light 123 online resources Toshiba 117 optical disc Auto-Run feature 115 caring for 117 handling 112, 114 inserting 113 inserting (slot-type drive) 112 inserting (tray-type...
User Manual
Page 247
... optical disc with computer on 116 battery from the computer 129 CDs, DVDs, and BDs 113 ExpressCard® 145 memory module 58 memory module slot cover 54 optical disc, with computer off 116 restarting computer 91 restoring your work 108 RJ-11 jack 141 running computer on battery power 118 S safety
... optical disc with computer on 116 battery from the computer 129 CDs, DVDs, and BDs 113 ExpressCard® 145 memory module 58 memory module slot cover 54 optical disc, with computer off 116 restarting computer 91 restoring your work 108 RJ-11 jack 141 running computer on battery power 118 S safety
User Guide 1
Page 45
...any object. ❖ Never place your computer or AC adaptor near a heat source, such as an electric blanket or heater. ❖ Never cover or block the air vents including those located at the base of the computer. ❖ Always operate your computer on a hard flat surface. Getting... the AC adaptor. Your computer contains a rechargeable main battery that is in serious injury. In this condition, observe the following: ❖ Never cover your computer or AC adaptor with your computer. Using your computer or AC adaptor could cause system failure, computer or AC adaptor damage or a ...
...any object. ❖ Never place your computer or AC adaptor near a heat source, such as an electric blanket or heater. ❖ Never cover or block the air vents including those located at the base of the computer. ❖ Always operate your computer on a hard flat surface. Getting... the AC adaptor. Your computer contains a rechargeable main battery that is in serious injury. In this condition, observe the following: ❖ Never cover your computer or AC adaptor with your computer. Using your computer or AC adaptor could cause system failure, computer or AC adaptor damage or a ...

User Guide 1
Page 52
...be hot. To avoid damaging the computer's screws, use complex software or process large amounts of today's popular applications. Avoid touching the cover, the module(s), and the surrounding area before replacing it. 52 Getting Started Adding memory (optional) Adding memory (optional) HINT: To .... Allow the module(s) to cool to run most of data. NOTE Before adding external devices or memory, Toshiba recommends setting up your system or visit accessories.toshiba.com. Installing a memory module with enough memory to room temperature before they have cooled.
...be hot. To avoid damaging the computer's screws, use complex software or process large amounts of today's popular applications. Avoid touching the cover, the module(s), and the surrounding area before replacing it. 52 Getting Started Adding memory (optional) Adding memory (optional) HINT: To .... Allow the module(s) to cool to run most of data. NOTE Before adding external devices or memory, Toshiba recommends setting up your system or visit accessories.toshiba.com. Installing a memory module with enough memory to room temperature before they have cooled.

