
User Guide
Page 2
... you fail to persons or loss of the data. YOU AGREE THAT TOSHIBA, ITS AFFILIATES AND SUPPLIERS SHALL HAVE NO RESPONSIBILITY FOR DAMAGE TO OR LOSS OF ANY BUSINESS, PROFITS, PROGRAMS, DATA OR REMOVABLE STORAGE MEDIA ARISING OUT OF OR RESULTING FROM THE USE OF THE PRODUCT...ARISING OUT OF THE USE OF THE COMPUTER PRODUCTS IN 2 Model: Satellite® 2410/2415 Series Compact Disk-ReWritable The computer system you have purchased is not designed for any "critical applications." TOSHIBA AMERICA INFORMATION SYSTEMS ("TOSHIBA"), ITS AFFILIATES AND SUPPLIERS DO NOT WARRANT THAT OPERATION OF THE ...
... you fail to persons or loss of the data. YOU AGREE THAT TOSHIBA, ITS AFFILIATES AND SUPPLIERS SHALL HAVE NO RESPONSIBILITY FOR DAMAGE TO OR LOSS OF ANY BUSINESS, PROFITS, PROGRAMS, DATA OR REMOVABLE STORAGE MEDIA ARISING OUT OF OR RESULTING FROM THE USE OF THE PRODUCT...ARISING OUT OF THE USE OF THE COMPUTER PRODUCTS IN 2 Model: Satellite® 2410/2415 Series Compact Disk-ReWritable The computer system you have purchased is not designed for any "critical applications." TOSHIBA AMERICA INFORMATION SYSTEMS ("TOSHIBA"), ITS AFFILIATES AND SUPPLIERS DO NOT WARRANT THAT OPERATION OF THE ...
User Guide
Page 5
... identification of the business, other entity or individual. or an authorized representative of connection. The customer should be performed by Toshiba Corporation, Toshiba America Information Systems, Inc. Disconnection If you will be given the opportunity to correct the problem and informed of this information... Instructions for your fax software before sending a message. 5 company will give you notice, in writing, to allow you should immediately remove it from its present line, please call the telephone company and let them know of your right to file a complaint with the ...
... identification of the business, other entity or individual. or an authorized representative of connection. The customer should be performed by Toshiba Corporation, Toshiba America Information Systems, Inc. Disconnection If you will be given the opportunity to correct the problem and informed of this information... Instructions for your fax software before sending a message. 5 company will give you notice, in writing, to allow you should immediately remove it from its present line, please call the telephone company and let them know of your right to file a complaint with the ...

User Guide
Page 15
...keys 77 Windows® special keys 78 Overlay keys 78 Emulating a full-size keyboard 80 TOSHIBA Console button 80 Starting a program 81 Saving your work 81 Printing your work 82 Using diskettes 83 Inserting and removing diskettes 84 Caring for diskettes 84 Backing up your files 85 Copying to a diskette 85... and Digital audio modes 89 Inserting a disc 90 Playing an audio CD 92 Viewing the contents of a CD or DVD 94 Removing a disc with the computer on 95 Removing a disc with the computer off 95 Caring for CDs and DVDs 96 Using the DVD-ROM or multi-function drive.......... 96
...keys 77 Windows® special keys 78 Overlay keys 78 Emulating a full-size keyboard 80 TOSHIBA Console button 80 Starting a program 81 Saving your work 81 Printing your work 82 Using diskettes 83 Inserting and removing diskettes 84 Caring for diskettes 84 Backing up your files 85 Copying to a diskette 85... and Digital audio modes 89 Inserting a disc 90 Playing an audio CD 92 Viewing the contents of a CD or DVD 94 Removing a disc with the computer on 95 Removing a disc with the computer off 95 Caring for CDs and DVDs 96 Using the DVD-ROM or multi-function drive.......... 96

User Guide
Page 17
17 Contents Setting battery alarms 125 Changing the main battery 126 Removing the battery from the computer ...... 126 Removing the battery from the battery cover. 127 Inserting a charged battery 128 Disposing of used batteries safely 129 Traveling tips 130 Chapter 5: Getting to Know the ... 149 Creating a shortcut to the Character Map ...... 150 Lesson 10: Changing the screen saver 152 Lesson 11: Setting the date and time 154 Lesson 12: Removing objects from the desktop .. 155 Lesson 13: Using System Restore 157 Lesson 14: If I am lost, what do I do 158 Windows® XP Help and...
17 Contents Setting battery alarms 125 Changing the main battery 126 Removing the battery from the computer ...... 126 Removing the battery from the battery cover. 127 Inserting a charged battery 128 Disposing of used batteries safely 129 Traveling tips 130 Chapter 5: Getting to Know the ... 149 Creating a shortcut to the Character Map ...... 150 Lesson 10: Changing the screen saver 152 Lesson 11: Setting the date and time 154 Lesson 12: Removing objects from the desktop .. 155 Lesson 13: Using System Restore 157 Lesson 14: If I am lost, what do I do 158 Windows® XP Help and...
User Guide
Page 19
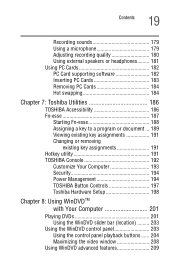
...or headphones......... 181 Using PC Cards 182 PC Card supporting software 182 Inserting PC Cards 183 Removing PC Cards 184 Hot swapping 184 Chapter 7: Toshiba Utilities 186 TOSHIBA Accessibility 186 Fn-esse 187 Starting Fn-esse 188 Assigning a key to a program or document... ... 189 Viewing existing key assignments 191 Changing or removing existing key assignments 191 Hotkey utility 191 TOSHIBA Console 192 Customize Your Computer 193 Security 194 Power Management 194 TOSHIBA Button Controls 197 Toshiba Hardware Setup 198 Chapter 8: Using WinDVDTM with Your Computer ...
...or headphones......... 181 Using PC Cards 182 PC Card supporting software 182 Inserting PC Cards 183 Removing PC Cards 184 Hot swapping 184 Chapter 7: Toshiba Utilities 186 TOSHIBA Accessibility 186 Fn-esse 187 Starting Fn-esse 188 Assigning a key to a program or document... ... 189 Viewing existing key assignments 191 Changing or removing existing key assignments 191 Hotkey utility 191 TOSHIBA Console 192 Customize Your Computer 193 Security 194 Power Management 194 TOSHIBA Button Controls 197 Toshiba Hardware Setup 198 Chapter 8: Using WinDVDTM with Your Computer ...
User Guide
Page 29
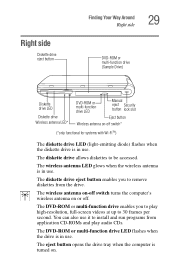
... drive tray when the computer is in use it to install and run programs from the drive. The diskette drive eject button enables you to remove diskettes from application CD-ROMs and play high-resolution, full-screen videos at up to be accessed. Right side Diskette drive eject button Finding Your...
... drive tray when the computer is in use it to install and run programs from the drive. The diskette drive eject button enables you to remove diskettes from application CD-ROMs and play high-resolution, full-screen videos at up to be accessed. Right side Diskette drive eject button Finding Your...

User Guide
Page 43
... stored magnetically. Placing a magnet too close to let it dry out before you can erase important files. ❖ Scan all new files for files you remove a PC Card that gets into the keyboard, turn off the computer while it is reading from or writing to check for a long period. ❖ Avoid...
... stored magnetically. Placing a magnet too close to let it dry out before you can erase important files. ❖ Scan all new files for files you remove a PC Card that gets into the keyboard, turn off the computer while it is reading from or writing to check for a long period. ❖ Avoid...
User Guide
Page 46
There are two memory slots. If you install or remove a memory module while the computer is in Standby or Hibernation mode, data will become hot. You may have both slots occupied. If this happens, let ... system may want to room temperature before you use the computer for a long time, the memory modules will be lost. CAUTION: If you install or remove a memory module, turn off the computer using the Start menu. 46 Getting Started Installing additional memory (optional) ❖ Connect a full-size keyboard (see "Using an...
There are two memory slots. If you install or remove a memory module while the computer is in Standby or Hibernation mode, data will become hot. You may have both slots occupied. If this happens, let ... system may want to room temperature before you use the computer for a long time, the memory modules will be lost. CAUTION: If you install or remove a memory module, turn off the computer using the Start menu. 46 Getting Started Installing additional memory (optional) ❖ Connect a full-size keyboard (see "Using an...
User Guide
Page 47
The computer is on page 99. 2 Unplug and remove any cables connected to install a memory module under the following conditions. The computer was shut down command" on , turn the computer upside down. You can ... Off or Shut down using Standby mode. 3. Power to the DVD-ROM or multi-function drive has been turned on . 2. CAUTION: Do not install or remove a memory module while the DVD-ROM or multi-function drive power is on. 1 If the computer is turned on .
The computer is on page 99. 2 Unplug and remove any cables connected to install a memory module under the following conditions. The computer was shut down command" on , turn the computer upside down. You can ... Off or Shut down using Standby mode. 3. Power to the DVD-ROM or multi-function drive has been turned on . 2. CAUTION: Do not install or remove a memory module while the DVD-ROM or multi-function drive power is on. 1 If the computer is turned on .
User Guide
Page 48
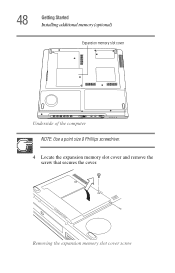
Removing the expansion memory slot cover screw 48 Getting Started Installing additional memory (optional) Expansion memory slot cover Underside of the computer NOTE: Use a point size 0 Phillips screwdriver. 4 Locate the expansion memory slot cover and remove the screw that secures the cover.
Removing the expansion memory slot cover screw 48 Getting Started Installing additional memory (optional) Expansion memory slot cover Underside of the computer NOTE: Use a point size 0 Phillips screwdriver. 4 Locate the expansion memory slot cover and remove the screw that secures the cover.

User Guide
Page 49
Before you handle the module, touch a grounded metal surface to touch its gold connector bar (on the side you insert into the computer). 7 Remove the new memory module from its antistatic packaging. 8 Holding the memory module by its edges so that you may have built up. To avoid damaging ...
Before you handle the module, touch a grounded metal surface to touch its gold connector bar (on the side you insert into the computer). 7 Remove the new memory module from its antistatic packaging. 8 Holding the memory module by its edges so that you may have built up. To avoid damaging ...
User Guide
Page 50
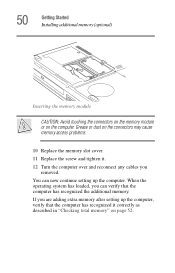
Grease or dust on the computer. You can verify that the computer has recognized it . 12 Turn the computer over and reconnect any cables you removed. If you can now continue setting up the computer, verify that the computer has recognized the additional memory. When the operating system has loaded, you ...
Grease or dust on the computer. You can verify that the computer has recognized it . 12 Turn the computer over and reconnect any cables you removed. If you can now continue setting up the computer, verify that the computer has recognized the additional memory. When the operating system has loaded, you ...
User Guide
Page 51
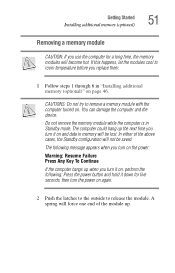
...button and hold it on, perform the following message appears when you turn the power on again. 2 Push the latches to the outside to remove a memory module with the computer turned on the power: Warning: Resume Failure Press Any Key To Continue If the computer hangs up when you... replace them. 1 Follow steps 1 through 6 in Standby mode. Getting Started Installing additional memory (optional) 51 Removing a memory module CAUTION: If you use the computer for five seconds, then turn on . In either of the module up. CAUTIONS: Do not try ...
...button and hold it on, perform the following message appears when you turn the power on again. 2 Push the latches to the outside to remove a memory module with the computer turned on the power: Warning: Resume Failure Press Any Key To Continue If the computer hangs up when you... replace them. 1 Follow steps 1 through 6 in Standby mode. Getting Started Installing additional memory (optional) 51 Removing a memory module CAUTION: If you use the computer for five seconds, then turn on . In either of the module up. CAUTIONS: Do not try ...
User Guide
Page 52
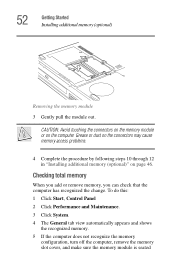
...4 Complete the procedure by following steps 10 through 12 in "Installing additional memory (optional)" on the computer. Checking total memory When you add or remove memory, you can check that the computer has recognized the change. To do this: 1 Click Start, Control Panel 2 Click Performance and Maintenance. 3...tab view automatically appears and shows the recognized memory. 5 If the computer does not recognize the memory configuration, turn off the computer, remove the memory slot cover, and make sure the memory module is seated CAUTION: Avoid touching the connectors on the memory module or on...
...4 Complete the procedure by following steps 10 through 12 in "Installing additional memory (optional)" on the computer. Checking total memory When you add or remove memory, you can check that the computer has recognized the change. To do this: 1 Click Start, Control Panel 2 Click Performance and Maintenance. 3...tab view automatically appears and shows the recognized memory. 5 If the computer does not recognize the memory configuration, turn off the computer, remove the memory slot cover, and make sure the memory module is seated CAUTION: Avoid touching the connectors on the memory module or on...

User Guide
Page 60
... and the battery light glows amber to show that it . The less power the computer is charging. For more than a few hours at a time. Never remove the power plug from the outlet with the computer turned off or on. Connect the computer to the power cable. Never modify, forcibly bend, place...
... and the battery light glows amber to show that it . The less power the computer is charging. For more than a few hours at a time. Never remove the power plug from the outlet with the computer turned off or on. Connect the computer to the power cable. Never modify, forcibly bend, place...

User Guide
Page 74
The computer is no way for your computer PORT-Noteworthy computer lock cable To secure the computer: 1 Loop the cable through the loop. 3 Insert the cable's locking end into the security lock slot located on the right side of a heavy object. Sample locking the computer 74 Getting Started Caring for a potential thief to deter computer theft. Make sure there is now securely locked to slip the cable off the object. 2 Pass the locking end through or around some part of the computer, then rotate the key a quarter turn and remove it.
The computer is no way for your computer PORT-Noteworthy computer lock cable To secure the computer: 1 Loop the cable through the loop. 3 Insert the cable's locking end into the security lock slot located on the right side of a heavy object. Sample locking the computer 74 Getting Started Caring for a potential thief to deter computer theft. Make sure there is now securely locked to slip the cable off the object. 2 Pass the locking end through or around some part of the computer, then rotate the key a quarter turn and remove it.

User Guide
Page 76
... in "Powering down command (unless you may be lost. 76 Learning the Basics Using the keyboard ❖ Back up your files to diskettes (or other removable storage media) on page 99).
... in "Powering down command (unless you may be lost. 76 Learning the Basics Using the keyboard ❖ Back up your files to diskettes (or other removable storage media) on page 99).

User Guide
Page 84
... data stored on your diskette contents: 1 Click Start, then click My Computer. 2 Double-click the 3 1/2 Floppy (A:) drive. 84 Learning the Basics Using diskettes Inserting and removing diskettes 1 Hold the diskette so that the arrow on its upper surface points toward the drive. 2 Push the diskette gently into the drive slot.
... data stored on your diskette contents: 1 Click Start, then click My Computer. 2 Double-click the 3 1/2 Floppy (A:) drive. 84 Learning the Basics Using diskettes Inserting and removing diskettes 1 Hold the diskette so that the arrow on its upper surface points toward the drive. 2 Push the diskette gently into the drive slot.

User Guide
Page 90
90 Learning the Basics Playing a CD or DVD CAUTION: Do not install or remove a memory module while the DVD-ROM or multi-function drive power is off before opening the disc tray. 2 Grasp the disc tray and pull it ...
90 Learning the Basics Playing a CD or DVD CAUTION: Do not install or remove a memory module while the DVD-ROM or multi-function drive power is off before opening the disc tray. 2 Grasp the disc tray and pull it ...
User Guide
Page 95
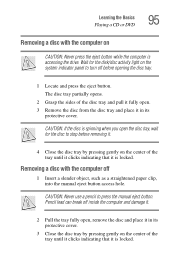
... disc from the disc tray and place it in its protective cover. Learning the Basics Playing a CD or DVD 95 Removing a disc with the computer off 1 Insert a slender object, such as a straightened paper clip, into the manual eject button access hole. CAUTION: Never use a pencil to ... disc tray by pressing gently on the system indicator panel to press the manual eject button. CAUTION: If the disc is spinning when you open , remove the disc and place it is locked. The disc tray partially opens. 2 Grasp the sides of the tray until it clicks indicating that it is...
... disc from the disc tray and place it in its protective cover. Learning the Basics Playing a CD or DVD 95 Removing a disc with the computer off 1 Insert a slender object, such as a straightened paper clip, into the manual eject button access hole. CAUTION: Never use a pencil to ... disc tray by pressing gently on the system indicator panel to press the manual eject button. CAUTION: If the disc is spinning when you open , remove the disc and place it is locked. The disc tray partially opens. 2 Grasp the sides of the tray until it clicks indicating that it is...


