User Manual
Page 30
Contents Introduction 37 This guide 39 Safety icons 40 Other icons used 40 Your computer's features and specifications ....41 Other documentation 41 Service options 41 Chapter 1: Getting Started 42 Selecting a place to work 42 Setting up a work environment 42 Keeping yourself comfortable 43 Precautions 43 Important information on your computer's cooling fan 45 Setting up your computer 45 Connecting to a power source 46 Charging the main battery 48 Using the computer for the first time 49 Opening the display panel 49 30
Contents Introduction 37 This guide 39 Safety icons 40 Other icons used 40 Your computer's features and specifications ....41 Other documentation 41 Service options 41 Chapter 1: Getting Started 42 Selecting a place to work 42 Setting up a work environment 42 Keeping yourself comfortable 43 Precautions 43 Important information on your computer's cooling fan 45 Setting up your computer 45 Connecting to a power source 46 Charging the main battery 48 Using the computer for the first time 49 Opening the display panel 49 30

User Manual
Page 32
32 Contents Using and configuring Hibernation mode .........85 Using and configuring Sleep mode 87 Closing the display panel 90 Customizing your computer's settings 90 Caring for your computer 90 Cleaning the computer 90 Moving the computer 91 Using a computer lock 91 ... a program from Windows® Explorer 97 Starting a program using the Search programs and files field 98 Saving your work 98 Printing your work 100 Backing up your work 101 Restoring your work 102 Using the optical drive 102 Optical drive components 103 Inserting an optical disc 104 Playing an audio CD 105...
32 Contents Using and configuring Hibernation mode .........85 Using and configuring Sleep mode 87 Closing the display panel 90 Customizing your computer's settings 90 Caring for your computer 90 Cleaning the computer 90 Moving the computer 91 Using a computer lock 91 ... a program from Windows® Explorer 97 Starting a program using the Search programs and files field 98 Saving your work 98 Printing your work 100 Backing up your work 101 Restoring your work 102 Using the optical drive 102 Optical drive components 103 Inserting an optical disc 104 Playing an audio CD 105...
User Manual
Page 35
... 160 Problems when you turn on the computer............161 The Windows® operating system is not working 164 Using Startup options to fix problems 165 Internet problems 166 The Windows® operating system ... 167 Checking device properties 167 Memory problems 168 Power and the batteries 168 Keyboard problems 170 Display problems 170 Disk or storage drive problems 172 Error-checking 172 Optical drive problems 174 Sound ... need further assistance 184 Before you contact Toshiba 184 Contacting Toshiba 184 Other Toshiba Internet Web sites 185 Toshiba's worldwide offices 185
... 160 Problems when you turn on the computer............161 The Windows® operating system is not working 164 Using Startup options to fix problems 165 Internet problems 166 The Windows® operating system ... 167 Checking device properties 167 Memory problems 168 Power and the batteries 168 Keyboard problems 170 Display problems 170 Disk or storage drive problems 172 Error-checking 172 Optical drive problems 174 Sound ... need further assistance 184 Before you contact Toshiba 184 Contacting Toshiba 184 Other Toshiba Internet Web sites 185 Toshiba's worldwide offices 185

User Manual
Page 37
With your Toshiba computer, your work and entertainment can wake the computer from Sleep mode by pressing the ...settings to meet the latest ENERGY STAR® guidelines for energy efficiency. You can accompany you wherever you go. Toshiba is a partner in AC power mode. To conserve energy, your computer is labeled with the power management options...qualified, it is set to enter the low-power Sleep mode which shuts down the system and display within 15 minutes of the Toshiba User's Guide for both AC power and battery modes. Introduction Welcome to a configuration that your...
With your Toshiba computer, your work and entertainment can wake the computer from Sleep mode by pressing the ...settings to meet the latest ENERGY STAR® guidelines for energy efficiency. You can accompany you wherever you go. Toshiba is a partner in AC power mode. To conserve energy, your computer is labeled with the power management options...qualified, it is set to enter the low-power Sleep mode which shuts down the system and display within 15 minutes of the Toshiba User's Guide for both AC power and battery modes. Introduction Welcome to a configuration that your...
User Manual
Page 59
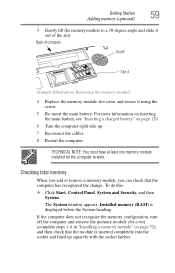
... with the socket latches. The System window appears. Checking total memory When you add or remove a memory module, you can check that the module is displayed below the System heading. Installed memory (RAM) is inserted completely into the socket and lined up . 7 Reconnect the cables. 8 Restart the computer. Getting Started 59...
... with the socket latches. The System window appears. Checking total memory When you add or remove a memory module, you can check that the module is displayed below the System heading. Installed memory (RAM) is inserted completely into the socket and lined up . 7 Reconnect the cables. 8 Restart the computer. Getting Started 59...

User Manual
Page 63
... computer be lost during the recovery process. Be sure to save your work to external media before proceeding. 8 Click Next to external media before executing the recovery. A confirmation message displays reminding you that the internal storage drive has been recovered. 9 Press ...Factory Default Software screen appears. NOTE During the recovery process it is complete, a message displays indicating that all information stored in those partitions. Be sure to save your work to begin the recovery. Getting Started 63 Recovering the Internal Storage Drive 6 The Recovery of...
... computer be lost during the recovery process. Be sure to save your work to external media before proceeding. 8 Click Next to external media before executing the recovery. A confirmation message displays reminding you that the internal storage drive has been recovered. 9 Press ...Factory Default Software screen appears. NOTE During the recovery process it is complete, a message displays indicating that all information stored in those partitions. Be sure to save your work to begin the recovery. Getting Started 63 Recovering the Internal Storage Drive 6 The Recovery of...

User Manual
Page 66
... be affected. Be sure to save your computer be lost during the recovery process. When the process is strongly recommended that your work to restart the computer. To recover using the first method, follow the procedure below. NOTE During the internal storage drive recovery process... on the keyboard to external media before proceeding. 9 Click Next to an external power source via the AC adaptor. A confirmation message displays reminding you have created such media. You can recover the C: drive without changing the internal storage drive partitions deletes all data will be...
... be affected. Be sure to save your computer be lost during the recovery process. When the process is strongly recommended that your work to restart the computer. To recover using the first method, follow the procedure below. NOTE During the internal storage drive recovery process... on the keyboard to external media before proceeding. 9 Click Next to an external power source via the AC adaptor. A confirmation message displays reminding you have created such media. You can recover the C: drive without changing the internal storage drive partitions deletes all data will be...
User Manual
Page 68
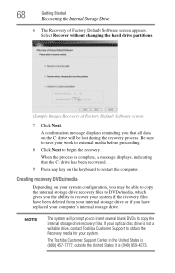
...your internal storage drive or if you may be lost during the recovery process. A confirmation message displays reminding you to insert several blank DVDs to obtain the Recovery media for your work to external media before proceeding. 8 Click Next to restart the computer. When the process is ...not a writable drive, contact Toshiba Customer Support to copy the internal storage drive recovery files. 68 Getting...
...your internal storage drive or if you may be lost during the recovery process. A confirmation message displays reminding you to insert several blank DVDs to obtain the Recovery media for your work to external media before proceeding. 8 Click Next to restart the computer. When the process is ...not a writable drive, contact Toshiba Customer Support to copy the internal storage drive recovery files. 68 Getting...

User Manual
Page 72
...internal storage drive has been erased. 6 Press any key on the keyboard to restart the computer. When the process is complete, a message displays, indicating that all data and then overwrites the entire internal storage drive for security purposes. This process may take several hours, depending on the... size of your internal storage drive, you have saved your work to external media before proceeding. 5 Click Next to display its status in the lower portion of the screen. Be sure you can check its status as follows: 1 Click ...
...internal storage drive has been erased. 6 Press any key on the keyboard to restart the computer. When the process is complete, a message displays, indicating that all data and then overwrites the entire internal storage drive for security purposes. This process may take several hours, depending on the... size of your internal storage drive, you have saved your work to external media before proceeding. 5 Click Next to display its status in the lower portion of the screen. Be sure you can check its status as follows: 1 Click ...

User Manual
Page 96
... on . To turn the cursor control overlay on . To start a program is listed, go to start a program that contains the information you want to work on their left front are the numeric overlay keys. To find the file, use the Windows® WordPad program as an example: 1 Click Start, and... then All Programs. The Windows® operating system displays the All Programs menu, which use the Start menu or Windows® Explorer. To disable the numeric overlay, hold down the Fn key and press...
... on . To turn the cursor control overlay on . To start a program is listed, go to start a program that contains the information you want to work on their left front are the numeric overlay keys. To find the file, use the Windows® WordPad program as an example: 1 Click Start, and... then All Programs. The Windows® operating system displays the All Programs menu, which use the Start menu or Windows® Explorer. To disable the numeric overlay, hold down the Fn key and press...
User Manual
Page 98
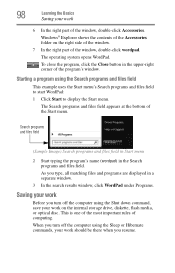
... corner of computing. The operating system opens WordPad. As you type, all matching files and programs are displayed in a separate window. 3 In the search results window, click WordPad under Programs. Saving your work on the right side of the window. 7 In the right part of the window, double-click Accessories... files field appears at the bottom of the Start menu. When you turn off the computer using the Shut down command, save your work should be there when you turn off the computer using the Search programs and files field This example uses the Start menu's Search programs...
... corner of computing. The operating system opens WordPad. As you type, all matching files and programs are displayed in a separate window. 3 In the search results window, click WordPad under Programs. Saving your work on the right side of the window. 7 In the right part of the window, double-click Accessories... files field appears at the bottom of the Start menu. When you turn off the computer using the Shut down command, save your work should be there when you turn off the computer using the Search programs and files field This example uses the Start menu's Search programs...

User Manual
Page 99
If you created a new document, your file to give it has an automatic save feature. Use this is all you want your program displays a Save As dialog box. Check your Windows®-based application to do. Saving files 1 Click on the arrow in the upper-left corner of your ... it a file name. (Sample Image) Save As dialog box 2 Choose the drive and folder where you need to display the drop-down menu, and then click Save. Learning the Basics 99 Saving your work Many programs offer a feature that already has a file name, this dialog box to specify where to store the...
If you created a new document, your file to give it has an automatic save feature. Use this is all you want your program displays a Save As dialog box. Check your Windows®-based application to do. Saving files 1 Click on the arrow in the upper-left corner of your ... it a file name. (Sample Image) Save As dialog box 2 Choose the drive and folder where you need to display the drop-down menu, and then click Save. Learning the Basics 99 Saving your work Many programs offer a feature that already has a file name, this dialog box to specify where to store the...

User Manual
Page 101
... drive. Small files can back up your files to a network, if available. Learning the Basics Backing up your work Back up all the files on the computer's internal storage drive. The program displays a Print dialog box. (Sample Image) Print dialog box 3 Specify the print parameters. To back up several files...if an optional external diskette drive is available. Also see "Backing up all the files you create in the upper-left corner of copies to display the drop-down menu, and then click Print. You can be backed up your entire computer with the Windows® operating system" on ...
... drive. Small files can back up your files to a network, if available. Learning the Basics Backing up your work Back up all the files on the computer's internal storage drive. The program displays a Print dialog box. (Sample Image) Print dialog box 3 Specify the print parameters. To back up several files...if an optional external diskette drive is available. Also see "Backing up all the files you create in the upper-left corner of copies to display the drop-down menu, and then click Print. You can be backed up your entire computer with the Windows® operating system" on ...

User Manual
Page 112
... page 118 for 24 hours. If the RTC battery is on replacing the main battery. NOTE Battery life and charge time may display the incorrect time and date or stop working. The computer can be monitored. Disconnect the AC power cord/cable and remove the battery pack. NOTE It is not plugged...
... page 118 for 24 hours. If the RTC battery is on replacing the main battery. NOTE Battery life and charge time may display the incorrect time and date or stop working. The computer can be monitored. Disconnect the AC power cord/cable and remove the battery pack. NOTE It is not plugged...
User Manual
Page 114
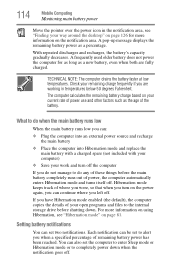
... Place the computer into Hibernation mode and replace the main battery with a charged spare (not included with your computer) ❖ Save your work and turn on the power again, you can continue where you are fully charged. You can set the computer to enter Sleep mode or ...battery completely runs out of these things before shutting down when the notification goes off. A pop-up message displays the remaining battery power as a new battery, even when both are working in the notification area, see "Hibernation mode" on the notification area. Check your open programs and files...
... Place the computer into Hibernation mode and replace the main battery with a charged spare (not included with your computer) ❖ Save your work and turn on the power again, you can continue where you are fully charged. You can set the computer to enter Sleep mode or ...battery completely runs out of these things before shutting down when the notification goes off. A pop-up message displays the remaining battery power as a new battery, even when both are working in the notification area, see "Hibernation mode" on the notification area. Check your open programs and files...

User Manual
Page 115
...10070; How much you use the internal storage drive, optical drive, diskette drives, or other optional devices ❖ Where you are working, since operating time decreases at low temperatures Conserving battery power How long a fully charged battery pack lasts when you are using the... computer depends on a number of Power Options screen 4 Double-click Battery to display the battery options. 5 Configure the alarm settings to be customized. Mobile Computing Monitoring main battery power 115 To change the default notification settings...
...10070; How much you use the internal storage drive, optical drive, diskette drives, or other optional devices ❖ Where you are working, since operating time decreases at low temperatures Conserving battery power How long a fully charged battery pack lasts when you are using the... computer depends on a number of Power Options screen 4 Double-click Battery to display the battery options. 5 Configure the alarm settings to be customized. Mobile Computing Monitoring main battery power 115 To change the default notification settings...

User Manual
Page 118
... device could also damage the battery pack and computer. ❖ Never expose a battery pack to the computer, including the AC adaptor. 4 Close the display panel and turn the computer upside down your main battery has run out of power, you have two options: plug in death or serious injury.... 118 Mobile Computing Changing the main battery 3 Release the Fn key. Removing the battery from the computer To remove the battery: 1 Save your work. 2 Turn off the computer or place it into Hibernation mode before changing the main battery. The hot key card disappears. You are now in ...
... device could also damage the battery pack and computer. ❖ Never expose a battery pack to the computer, including the AC adaptor. 4 Close the display panel and turn the computer upside down your main battery has run out of power, you have two options: plug in death or serious injury.... 118 Mobile Computing Changing the main battery 3 Release the Fn key. Removing the battery from the computer To remove the battery: 1 Save your work. 2 Turn off the computer or place it into Hibernation mode before changing the main battery. The hot key card disappears. You are now in ...

User Manual
Page 154
... select which applications will now work with the applications you to zoom out, hold down the Fn key and press 1. To zoom in /out hot keys (see "Zoom (Display resolution)" on the desktop To access the TOSHIBA Zooming Utility: 1 Click Start, All Programs, TOSHIBA, Utilities, and then TOSHIBA Zooming Utility. The TOSHIBA Zooming Utility Properties screen...
... select which applications will now work with the applications you to zoom out, hold down the Fn key and press 1. To zoom in /out hot keys (see "Zoom (Display resolution)" on the desktop To access the TOSHIBA Zooming Utility: 1 Click Start, All Programs, TOSHIBA, Utilities, and then TOSHIBA Zooming Utility. The TOSHIBA Zooming Utility Properties screen...
User Manual
Page 157
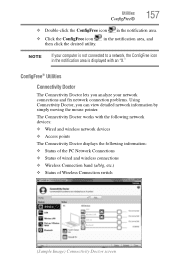
... If your network connections and fix network connection problems. Using Connectivity Doctor, you analyze your computer is displayed with the following network devices: ❖ Wired and wireless network devices ❖ Access points The Connectivity Doctor displays the following information: ❖ Status of the PC Network Connections ❖ Status of wired and wireless... screen ConfigFree® Utilities Connectivity Doctor The Connectivity Doctor lets you can view detailed network information by simply moving the mouse pointer. The Connectivity Doctor works with an "X."
... If your network connections and fix network connection problems. Using Connectivity Doctor, you analyze your computer is displayed with the following network devices: ❖ Wired and wireless network devices ❖ Access points The Connectivity Doctor displays the following information: ❖ Status of the PC Network Connections ❖ Status of wired and wireless... screen ConfigFree® Utilities Connectivity Doctor The Connectivity Doctor lets you can view detailed network information by simply moving the mouse pointer. The Connectivity Doctor works with an "X."
User Manual
Page 163
... drive, remove it and press any key does not work, press Ctrl, Alt, and Del. The error condition will deliver a slow, steady "trickle-charge" to restart the computer. If the trickle-charging does not prove effective, visit the Toshiba Web site at pcsupport.toshiba.com and see "The computer is blinking, try the...-right corner of the computer. Do not connect the AC adaptor. If Something Goes Wrong Problems when you turn on the computer 163 The computer displays the Non-System disk or disk error message. Click the red arrow button ( ) in the optional external diskette drive.
... drive, remove it and press any key does not work, press Ctrl, Alt, and Del. The error condition will deliver a slow, steady "trickle-charge" to restart the computer. If the trickle-charging does not prove effective, visit the Toshiba Web site at pcsupport.toshiba.com and see "The computer is blinking, try the...-right corner of the computer. Do not connect the AC adaptor. If Something Goes Wrong Problems when you turn on the computer 163 The computer displays the Non-System disk or disk error message. Click the red arrow button ( ) in the optional external diskette drive.

