

Operation Manual
Page 1
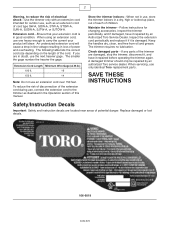
...still does not fit, contact a qualified electrician to do the job better and with less likelihood of a risk of injury at www.Toro.com Read and understand the instruction because it was intended. Use a polarized Ground Fault Circuit Interrupter (GFCI) outlet-GFCI protection should always ...-personal safety instruction. Do not overreach-Keep proper footing and balance at most retail stores. Form No. 3352-878 15in Trim and Edge Electric Trimmer Model No. 51346-Serial No. 250000001 and Up Operator's Manual If you or any other operator of the appliance read and understand the contents...
...still does not fit, contact a qualified electrician to do the job better and with less likelihood of a risk of injury at www.Toro.com Read and understand the instruction because it was intended. Use a polarized Ground Fault Circuit Interrupter (GFCI) outlet-GFCI protection should always ...-personal safety instruction. Do not overreach-Keep proper footing and balance at most retail stores. Form No. 3352-878 15in Trim and Edge Electric Trimmer Model No. 51346-Serial No. 250000001 and Up Operator's Manual If you or any other operator of the appliance read and understand the contents...
Operation Manual
Page 2
... Cord Length Minimum Wire Gage (A.W.G.) 100 ft. 16 150 ft. 14 Note: Do not use only identical Toro replacement parts. Check damaged parts-If any parts of the trimmer are located near areas of this manual. To reduce the risk of disconnection of the extension cord during use ...the next heavier gage. 2 Warning, to reduce the risk of electrical shock-Use the trimmer only with an extension cord intended for changing accessories. If you are in loss of children. An undersized extension cord will draw. The...
... Cord Length Minimum Wire Gage (A.W.G.) 100 ft. 16 150 ft. 14 Note: Do not use only identical Toro replacement parts. Check damaged parts-If any parts of the trimmer are located near areas of this manual. To reduce the risk of disconnection of the extension cord during use ...the next heavier gage. 2 Warning, to reduce the risk of electrical shock-Use the trimmer only with an extension cord intended for changing accessories. If you are in loss of children. An undersized extension cord will draw. The...
Operation Manual
Page 3
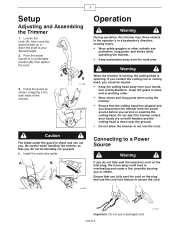
...desired height. 2. A 3. Keep the guard in place and in the operator's or a bystander's direction, causing injury. S Do not allow the trimmer to a comfortable position (B), then tighten the knob. Connecting to a Power Source Warning If you do not accidentally cut you could lead to secure ... guard as shown, snapping it into the cord. S Wear safety goggles or other suitable eye protection, long pants, and shoes while operating the trimmer. Loosen the knob (A), then move the assist handle up or down near the ground. S Ensure that you service or examine the cutting head...
...desired height. 2. A 3. Keep the guard in place and in the operator's or a bystander's direction, causing injury. S Do not allow the trimmer to a comfortable position (B), then tighten the knob. Connecting to a Power Source Warning If you do not accidentally cut you could lead to secure ... guard as shown, snapping it into the cord. S Wear safety goggles or other suitable eye protection, long pants, and shoes while operating the trimmer. Loosen the knob (A), then move the assist handle up or down near the ground. S Ensure that you service or examine the cutting head...
Operation Manual
Page 4
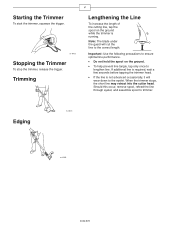
... not hold the spool on the ground while the trimmer is not advanced occasionally, it will cut the line to the eyelet. m-6412 Stopping the Trimmer To stop the trimmer, release the trigger. m-6316 Edging m-6325 3352-878 Note: The blade under the guard... will wear down to the correct length. If additional line is required, wait a few seconds before tapping the trimmer head. • If the line is running. When the trimmer stops, the short line may retract into the cutter head. Trimming...
... not hold the spool on the ground while the trimmer is not advanced occasionally, it will cut the line to the eyelet. m-6412 Stopping the Trimmer To stop the trimmer, release the trigger. m-6316 Edging m-6325 3352-878 Note: The blade under the guard... will wear down to the correct length. If additional line is required, wait a few seconds before tapping the trimmer head. • If the line is running. When the trimmer stops, the short line may retract into the cutter head. Trimming...

Operation Manual
Page 5
...knives, or any wire, rope or string-like matter which could become entangled in excess of the line to the left. Both are available from the trimming area. • Trim only when the grass and weeds are dry. • Slowly move the trimmer in small increments. • Do... trimmer. m-6318 To lengthen the line to cut inside the metal wire guide (for general trimming and edging). Do not use the following techniques when trimming: • Remove any material other than Toro .065 inch dia. (1.6 mm) nylon monofilament may overload the motor, possibly causing a fire or electrical ...
...knives, or any wire, rope or string-like matter which could become entangled in excess of the line to the left. Both are available from the trimming area. • Trim only when the grass and weeds are dry. • Slowly move the trimmer in small increments. • Do... trimmer. m-6318 To lengthen the line to cut inside the metal wire guide (for general trimming and edging). Do not use the following techniques when trimming: • Remove any material other than Toro .065 inch dia. (1.6 mm) nylon monofilament may overload the motor, possibly causing a fire or electrical ...
Operation Manual
Page 6
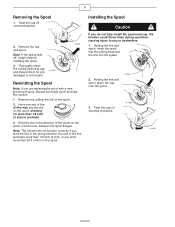
Remove the cap and spool. Installing the Spool Caution If you do not fully install the spool and cap, the trimmer could throw them for any cutting line left on securely clockwise. Holding the line and spool, insert the spool into the cutting head and the ... or bystanders. 1. Holding the line and spool, place the cap over the spool. Twist the cap off , install it before installing the spool. 3. Note: The trimmer will not function correctly if you wind the line in the direction of line on the spool. m-7853 3. 6 Removing the Spool 1.
Remove the cap and spool. Installing the Spool Caution If you do not fully install the spool and cap, the trimmer could throw them for any cutting line left on securely clockwise. Holding the line and spool, insert the spool into the cutting head and the ... or bystanders. 1. Holding the line and spool, place the cap over the spool. Twist the cap off , install it before installing the spool. 3. Note: The trimmer will not function correctly if you wind the line in the direction of line on the spool. m-7853 3. 6 Removing the Spool 1.
Operation Manual
Page 7
...motor from overheating. Important: Do not rest the trimmer on the guard or it . • Brush debris away from air intake vents on the back of the shaft to fix Toro products and will ensure that your Toro stays "All" Toro. Your Toro Dealer is provided on the appliance. 3352-878 ... should a means for grounding be identical to your Authorized Toro Service Dealer. Service Toro has designed this product to the appliance. The symbol (square within a square) may warp and interfere with the cutting line. Do not hose the trimmer down or submerge it need service, take the product to...
...motor from overheating. Important: Do not rest the trimmer on the guard or it . • Brush debris away from air intake vents on the back of the shaft to fix Toro products and will ensure that your Toro stays "All" Toro. Your Toro Dealer is provided on the appliance. 3352-878 ... should a means for grounding be identical to your Authorized Toro Service Dealer. Service Toro has designed this product to the appliance. The symbol (square within a square) may warp and interfere with the cutting line. Do not hose the trimmer down or submerge it need service, take the product to...

Operation Manual
Page 8
... or Mexico Customers who have purchased Toro products exported from state to you. If all other rights which vary from the United States, Canada, or Mexico should contact their product, with your country, province, or state. Electric Trimmers A Two-Year Full Warranty for Residential... Use for the United States, Canada, and Mexico The Toro Company and its affiliate, Toro Warranty Company, pursuant to an agreement between them, jointly warrant this ...
... or Mexico Customers who have purchased Toro products exported from state to you. If all other rights which vary from the United States, Canada, or Mexico should contact their product, with your country, province, or state. Electric Trimmers A Two-Year Full Warranty for Residential... Use for the United States, Canada, and Mexico The Toro Company and its affiliate, Toro Warranty Company, pursuant to an agreement between them, jointly warrant this ...
Parts Catalog
Page 1
... part in the parts list, along with other information about the part. Register your product at www.Toro.com © The Toro Company - 2005 All Rights Reserved Form Number 3352-880 15in Trim and Edge Electric Trimmer Model No. 51346 - 250000001 and up. This catalog uses two special reference number formats, one part, the reference number has...
... part in the parts list, along with other information about the part. Register your product at www.Toro.com © The Toro Company - 2005 All Rights Reserved Form Number 3352-880 15in Trim and Edge Electric Trimmer Model No. 51346 - 250000001 and up. This catalog uses two special reference number formats, one part, the reference number has...


