

Operation Manual
Page 1
... a hazard that may cause serious injury or death if you need service, genuine Toro parts, or additional information, contact an Authorized Service Dealer or Toro Customer Service and have similar laws. Original Instructions (EN) Printed in the space ...worthy of California to operate and maintain your product ready. 22in Recycler® Lawn Mower Model No. 20333-Serial No. 312000001 and Up Model No. 20333C-Serial No. 312000001 and Up Form No. 3371-840... cutting brush or for agricultural uses. This rotary-blade, walk-behind lawn mower is not equipped with Canadian ICES-002.
... a hazard that may cause serious injury or death if you need service, genuine Toro parts, or additional information, contact an Authorized Service Dealer or Toro Customer Service and have similar laws. Original Instructions (EN) Printed in the space ...worthy of California to operate and maintain your product ready. 22in Recycler® Lawn Mower Model No. 20333-Serial No. 312000001 and Up Model No. 20333C-Serial No. 312000001 and Up Form No. 3371-840... cutting brush or for agricultural uses. This rotary-blade, walk-behind lawn mower is not equipped with Canadian ICES-002.

Operation Manual
Page 3
... the spark plug wire and ground against engine to cool before filling. • Remove gas-powered equipment from your view of children. Wrap the blade or wear gloves, and use extra caution...container. • Never remove gas cap or add fuel with the rim of Gasoline To avoid personal injury or property damage, use a nozzle lock-open flame, spark, or pilot light such as... up oil or fuel spillage and remove any adjustments or repairs with manufacturer's recommended parts, when necessary. • Mower blades are explosive. • Extinguish all nuts and bolts tight to the machine and...
... the spark plug wire and ground against engine to cool before filling. • Remove gas-powered equipment from your view of children. Wrap the blade or wear gloves, and use extra caution...container. • Never remove gas cap or add fuel with the rim of Gasoline To avoid personal injury or property damage, use a nozzle lock-open flame, spark, or pilot light such as... up oil or fuel spillage and remove any adjustments or repairs with manufacturer's recommended parts, when necessary. • Mower blades are explosive. • Extinguish all nuts and bolts tight to the machine and...

Operation Manual
Page 4
... up . 108-8117 1. Cutting/dismemberment hazard of hand or foot, mower blade-stay away from the machine. 3. stop the engine before servicing or performing maintenance. 4. Thrown object hazard-keep bystanders a safe distance from moving parts. 5. Unlock 4 Indicates the blade is identified as a part from the original machine manufacturer. 94-8072 114-7982 1. and...
... up . 108-8117 1. Cutting/dismemberment hazard of hand or foot, mower blade-stay away from the machine. 3. stop the engine before servicing or performing maintenance. 4. Thrown object hazard-keep bystanders a safe distance from moving parts. 5. Unlock 4 Indicates the blade is identified as a part from the original machine manufacturer. 94-8072 114-7982 1. and...

Operation Manual
Page 5
... mower housing (Figure 4). Important: Route the cables to the operating position. 3. Setup Important: Remove and discard the protective plastic sheet that you install the handle. Figure 3 Figure 4 2. Install and tighten the handle knobs that covers the engine. 1 Installing the Blade Control Bar No Parts... 1. Move the handle to the outside of the handle knobs as you removed in step 1 (Figure 4). 2 Installing the Handle No Parts Required Procedure WARNING Folding or unfolding the handle improperly can damage the cables, causing an unsafe operating condition. • Do not damage the...
... mower housing (Figure 4). Important: Route the cables to the operating position. 3. Setup Important: Remove and discard the protective plastic sheet that you install the handle. Figure 3 Figure 4 2. Install and tighten the handle knobs that covers the engine. 1 Installing the Blade Control Bar No Parts... 1. Move the handle to the outside of the handle knobs as you removed in step 1 (Figure 4). 2 Installing the Handle No Parts Required Procedure WARNING Folding or unfolding the handle improperly can damage the cables, causing an unsafe operating condition. • Do not damage the...

Operation Manual
Page 6
... it does come with oil in the engine, but it yearly thereafter. Do not overfill. (Max. 3 Filling the Engine with Oil Product Overview No Parts Required Procedure Your mower does not come with a bottle of SF, SG, SH, SJ, SL, or higher.) 3. Bag-on the dipstick (Figure 5). Recoil start handle 7. Control bar...
... it does come with oil in the engine, but it yearly thereafter. Do not overfill. (Max. 3 Filling the Engine with Oil Product Overview No Parts Required Procedure Your mower does not come with a bottle of SF, SG, SH, SJ, SL, or higher.) 3. Bag-on the dipstick (Figure 5). Recoil start handle 7. Control bar...

Operation Manual
Page 7
... may be damaged. Dipstick Figure 9 2. Remove the dipstick and check the oil level (Figure 9). Remove the dipstick, wipe it with the moving parts to the fuel all moving blade, causing serious injury. • Stop the engine and wait for automotive use or daily 1. Important: To reduce ... fire or explosion from gasoline can severely burn you and others. • To prevent a static charge from igniting the gasoline, place the container and/or mower directly on the ground before filling, not in an approved fuel container, out of the reach of SF, SG, SH, SJ, SL, or higher.) ...
... may be damaged. Dipstick Figure 9 2. Remove the dipstick and check the oil level (Figure 9). Remove the dipstick, wipe it with the moving parts to the fuel all moving blade, causing serious injury. • Stop the engine and wait for automotive use or daily 1. Important: To reduce ... fire or explosion from gasoline can severely burn you and others. • To prevent a static charge from igniting the gasoline, place the container and/or mower directly on the ground before filling, not in an approved fuel container, out of the reach of SF, SG, SH, SJ, SL, or higher.) ...
Operation Manual
Page 10
...(about 5 inches (13 cm) in a non-windy area. 2. If the side-discharge chute is in diameter). 4. Set all moving parts to the front of the mower and check the newspaper ball. 10 Release the blade control bar. 8. Note: If the newspaper ball did not stop properly, which could... condition. If it into the lawn. Have the mower inspected and serviced by an Authorized Service Dealer. 5. Stop the engine and wait for all moving parts to stop using your mower immediately and contact an Authorized Service Dealer. Move the mower onto a paved surface in front of newspaper and ...
...(about 5 inches (13 cm) in a non-windy area. 2. If the side-discharge chute is in diameter). 4. Set all moving parts to the front of the mower and check the newspaper ball. 10 Release the blade control bar. 8. Note: If the newspaper ball did not stop properly, which could... condition. If it into the lawn. Have the mower inspected and serviced by an Authorized Service Dealer. 5. Stop the engine and wait for all moving parts to stop using your mower immediately and contact an Authorized Service Dealer. Move the mower onto a paved surface in front of newspaper and ...
Operation Manual
Page 11
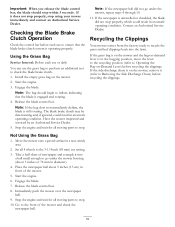
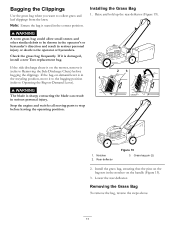
...the side discharge chute is sharp; contacting the blade can result in serious personal injury or death to collect grass and leaf clippings from the lawn. ... rest in the recycling position, move it is damaged, install a new Toro replacement bag. Bagging the Clippings Use the grass bag when you want to... the Grass Bag 1. Stop the engine and wait for all moving parts to stop before bagging the clippings. Removing the Grass Bag To remove...the steps above. 11 Check the grass bag frequently. If the bag-on the mower, remove it (refer to Operating the Bag-on the handle (Figure 19). ...
...the side discharge chute is sharp; contacting the blade can result in serious personal injury or death to collect grass and leaf clippings from the lawn. ... rest in the recycling position, move it is damaged, install a new Toro replacement bag. Bagging the Clippings Use the grass bag when you want to... the Grass Bag 1. Stop the engine and wait for all moving parts to stop before bagging the clippings. Removing the Grass Bag To remove...the steps above. 11 Check the grass bag frequently. If the bag-on the mower, remove it (refer to Operating the Bag-on the handle (Figure 19). ...
Operation Manual
Page 12
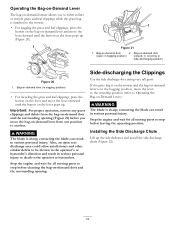
...1. WARNING The blade is sharp; Side-discharging the Clippings Use the side discharge for all moving parts to the operator or bystanders. Stop the engine and wait for all moving parts to stop before cleaning the bag-on-demand door and the surrounding opening (Figure 21) before ...grass. WARNING The blade is sharp; contacting the blade can result in serious personal injury. contacting the blade can result in the bagging position, move the lever to the recycling position (refer to the mower. • For bagging the grass and leaf clippings, press the button on...
...1. WARNING The blade is sharp; Side-discharging the Clippings Use the side discharge for all moving parts to the operator or bystanders. Stop the engine and wait for all moving parts to stop before cleaning the bag-on-demand door and the surrounding opening (Figure 21) before ...grass. WARNING The blade is sharp; contacting the blade can result in serious personal injury. contacting the blade can result in the bagging position, move the lever to the recycling position (refer to the mower. • For bagging the grass and leaf clippings, press the button on...

Operation Manual
Page 15
...dulls quickly). • Clean the air cooling system; Always tip the mower onto its side, with a hand pump; Use a screw driver to...). WARNING Tipping the mower may cause the fuel to running out of the machine from ...normal operating position. If you must tip the mower prior to leak. Refer to your engine operator's... dirt from under the mower. • Replace the air filter; Important: Refer to your engine operator's manual for all moving parts to remove the fuel... each use a Figure 24 15 Important: Before tipping the mower to change the oil or replace the blade, allow the fuel...
...dulls quickly). • Clean the air cooling system; Always tip the mower onto its side, with a hand pump; Use a screw driver to...). WARNING Tipping the mower may cause the fuel to running out of the machine from ...normal operating position. If you must tip the mower prior to leak. Refer to your engine operator's... dirt from under the mower. • Replace the air filter; Important: Refer to your engine operator's manual for all moving parts to remove the fuel... each use a Figure 24 15 Important: Before tipping the mower to change the oil or replace the blade, allow the fuel...

Operation Manual
Page 18
... position (behind the handle) when the engine is connected to a water supply to the washout port on . 6. Brush or blow out debris from the mower. 9. WARNING The mower may dislodge material from rusting. 10. Install the blade and the stiffener that you previously removed. 9. Install the blade nuts and torque them to... (Figure 32). 1. Shut off the water and disconnect the garden hose from the inside of the shield and around all the parts. 8. Start the engine and run it until there are no more clippings that you previously removed. 10. Allow the engine to prevent it for a few...
... position (behind the handle) when the engine is connected to a water supply to the washout port on . 6. Brush or blow out debris from the mower. 9. WARNING The mower may dislodge material from rusting. 10. Install the blade and the stiffener that you previously removed. 9. Install the blade nuts and torque them to... (Figure 32). 1. Shut off the water and disconnect the garden hose from the inside of the shield and around all the parts. 8. Start the engine and run it until there are no more clippings that you previously removed. 10. Allow the engine to prevent it for a few...

Operation Manual
Page 20
...part which vary from the date of purchase (sales receipt) to use , are having difficulty starting your expense. failure to normal wear are dissatisfied with your proof of purchase: Products 22 in Recycler and 20 in Mulcher/Bagger Walk Power Mowers Conditions and Products Covered The Toro Company and its affiliate, Toro... Warranty Company, pursuant to an agreement between them, jointly promise to repair the Toro Product listed below if used commercially*....
...part which vary from the date of purchase (sales receipt) to use , are having difficulty starting your expense. failure to normal wear are dissatisfied with your proof of purchase: Products 22 in Recycler and 20 in Mulcher/Bagger Walk Power Mowers Conditions and Products Covered The Toro Company and its affiliate, Toro... Warranty Company, pursuant to an agreement between them, jointly promise to repair the Toro Product listed below if used commercially*....

Parts Catalog
Page 1
Form No. 3371-848 Rev A 22in Recycler® Lawn Mower Model No. 20333-Serial No. 312000001 and Up Parts Catalog Register at www.Toro.com. Original Instructions (EN)
Form No. 3371-848 Rev A 22in Recycler® Lawn Mower Model No. 20333-Serial No. 312000001 and Up Parts Catalog Register at www.Toro.com. Original Instructions (EN)

Parts Catalog
Page 2
...phillips flat head PPH: phillips pan head PPHTF: phillips pan head thread forming PRH: phillips round head PTH: phillips truss head PTO: power-take-off RH: right hand ROPS: roll-over protection system RRB: rear roller brush SFH: slotted fillister head SHH: slotted hex head... Numbers Indicating Quantity In an illustration, if a reference number indicates more than one to indicate parts in an illustration has a reference number. List of Abbreviations AR: as required ASM: assembly BBC: blade brake control BHTF: button head thread forming CARR: carriage CCW: counter clockwise CW: clockwise...
...phillips flat head PPH: phillips pan head PPHTF: phillips pan head thread forming PRH: phillips round head PTH: phillips truss head PTO: power-take-off RH: right hand ROPS: roll-over protection system RRB: rear roller brush SFH: slotted fillister head SHH: slotted hex head... Numbers Indicating Quantity In an illustration, if a reference number indicates more than one to indicate parts in an illustration has a reference number. List of Abbreviations AR: as required ASM: assembly BBC: blade brake control BHTF: button head thread forming CARR: carriage CCW: counter clockwise CW: clockwise...

Parts Catalog
Page 4
..., Internal 27 3218-6 1 Nut-Jam 29 114-7987 1 Bumper 30 105-6849 2 Screw-Thread Forming 34 117-5928 1 Decal-Bag On Demand 3371-848A 4 A2 Part Number Qty. Description 1 117-1084 1 Housing ASM 1:2 94-8072 1 Decal-Danger 1:3 115-4676 1 Decal-Recycler 1:4 112-8867 1 Decal-Port, Washout 2 114-7963-01 1 Baffle-Front... 13 115-8447 1 Chute-Discharge, Side 14 114-7960 1 Deflector-Recycle 15 114-7958 1 Knob-Recycle Ref. Deck, Side Chute and Rear Door Assembly Ref. Part Number Qty.
..., Internal 27 3218-6 1 Nut-Jam 29 114-7987 1 Bumper 30 105-6849 2 Screw-Thread Forming 34 117-5928 1 Decal-Bag On Demand 3371-848A 4 A2 Part Number Qty. Description 1 117-1084 1 Housing ASM 1:2 94-8072 1 Decal-Danger 1:3 115-4676 1 Decal-Recycler 1:4 112-8867 1 Decal-Port, Washout 2 114-7963-01 1 Baffle-Front... 13 115-8447 1 Chute-Discharge, Side 14 114-7960 1 Deflector-Recycle 15 114-7958 1 Knob-Recycle Ref. Deck, Side Chute and Rear Door Assembly Ref. Part Number Qty.
Parts Catalog
Page 6
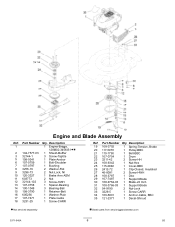
... 107-0754 1 Drum 23 3211-42 2 Screw-HH 24 108-9342 1 Nut-Hex 25 115-2892 1 Cover-BBC 26 2412-72 1 Clip-Closed, Insulated 27 46-8091 2 Screw-HWH 28 108-3787 1 Disc 29 107-7487 1 Support-Blade 30 108-9764-03 1 Blade-...-3766-03 1 Support-Blade 32 54-9190 2 Nut-Lock 33 3229-5 1 Screw-CARR 34 106-6801 35 121-2371 1 Anchor-Cable, BBC 1 Decal-Shroud ● Not serviced separately ■ Obtain parts from www.briggsandstratton.com 3371-848A 6 B3 Description 1 1 Engine-Briggs, 128M02-3456-B1 ● ■ 2 104-7577-03 1 Shield-Muffler 3 32144...
... 107-0754 1 Drum 23 3211-42 2 Screw-HH 24 108-9342 1 Nut-Hex 25 115-2892 1 Cover-BBC 26 2412-72 1 Clip-Closed, Insulated 27 46-8091 2 Screw-HWH 28 108-3787 1 Disc 29 107-7487 1 Support-Blade 30 108-9764-03 1 Blade-...-3766-03 1 Support-Blade 32 54-9190 2 Nut-Lock 33 3229-5 1 Screw-CARR 34 106-6801 35 121-2371 1 Anchor-Cable, BBC 1 Decal-Shroud ● Not serviced separately ■ Obtain parts from www.briggsandstratton.com 3371-848A 6 B3 Description 1 1 Engine-Briggs, 128M02-3456-B1 ● ■ 2 104-7577-03 1 Shield-Muffler 3 32144...

Parts Catalog
Page 7
Description 1 115-1956-03 2 Plate-HOC, Front 2 322-3 4 Screw-HH 3 3296-29 6 Nut-Lock, NI 4 105-1818 2 Bushing-Mount, HOC 5 105-1807 2 Arm-Pivot, Front 6 105-1809 2 Arm-Spring 7 110-0549 2 Knob-HOC 8 105-3048 2 Washer-Flat 9 322-6 2 Screw-HH 10 40-1940 2 Washer 11 614650 2 Bolt-Shoulder 12 115-2894 2 8 Inch Wheel ASM C2 7 3371-848A Front Wheel and Height-of-Cut Assembly Ref. Part Number Qty.
Description 1 115-1956-03 2 Plate-HOC, Front 2 322-3 4 Screw-HH 3 3296-29 6 Nut-Lock, NI 4 105-1818 2 Bushing-Mount, HOC 5 105-1807 2 Arm-Pivot, Front 6 105-1809 2 Arm-Spring 7 110-0549 2 Knob-HOC 8 105-3048 2 Washer-Flat 9 322-6 2 Screw-HH 10 40-1940 2 Washer 11 614650 2 Bolt-Shoulder 12 115-2894 2 8 Inch Wheel ASM C2 7 3371-848A Front Wheel and Height-of-Cut Assembly Ref. Part Number Qty.

Parts Catalog
Page 8
.... Transmission and Rear Wheel Drive Assembly Ref. Part Number Qty. Description 14 108-7476 3 Screw-Plastite 15 110-7191 2 Washer-Thrust 16 115-4668 2 Gear-Pinion, 12T 17 32151-61 2 Ring-Retaining 18 ...
.... Transmission and Rear Wheel Drive Assembly Ref. Part Number Qty. Description 14 108-7476 3 Screw-Plastite 15 110-7191 2 Washer-Thrust 16 115-4668 2 Gear-Pinion, 12T 17 32151-61 2 Ring-Retaining 18 ...

Parts Catalog
Page 9
Part Number Qty. Upper Handle Assembly Ref. Description 1 119-3810-05 1 Handle 2 3230-6 2 Screw-CARR 3 117-5976 2 Knob-Handle, Locking 4 114-7988 1 Guide-Cable 5 86-9671 1 Guide-Rope 6 3296-73 2 Nut-Lock, NI 7 3256-1 1 Washer-Flat 8 105-6842 1 Guide-LH 9 105-6841 1 Guide-RH Ref. Description 12 104-8678 1 Handle-Control 13 117-1019 1 Decal 14 99-1588 1 Bar-Control, Traction 15 3256-23 1 Washer-Flat 16 99-1589 1 Lever-Traction 17 104-8690 1 Spring-Torsion 20 99-5239 1 Anchor-Cable 21 115-8435 1 Cable-Traction D3 9 3371-848A Part Number Qty.
Part Number Qty. Upper Handle Assembly Ref. Description 1 119-3810-05 1 Handle 2 3230-6 2 Screw-CARR 3 117-5976 2 Knob-Handle, Locking 4 114-7988 1 Guide-Cable 5 86-9671 1 Guide-Rope 6 3296-73 2 Nut-Lock, NI 7 3256-1 1 Washer-Flat 8 105-6842 1 Guide-LH 9 105-6841 1 Guide-RH Ref. Description 12 104-8678 1 Handle-Control 13 117-1019 1 Decal 14 99-1588 1 Bar-Control, Traction 15 3256-23 1 Washer-Flat 16 99-1589 1 Lever-Traction 17 104-8690 1 Spring-Torsion 20 99-5239 1 Anchor-Cable 21 115-8435 1 Cable-Traction D3 9 3371-848A Part Number Qty.

Parts Catalog
Page 10
Upper Handle Component Assembly Ref. Part Number Qty. Description 1 117-5975 1 Switch Housing ASM 2 321-50 1 Screw-HH 3 108-3788-03 1 Bail-Brake 4 115-8439 1 Cable-Brake, BBC 5 3290-337 1 Nut-Speed 6 106-9169 7 107-7462 1 Screw-HWH 1 Spring-Torsion 8 107-7463 1 Spacer 9 106-6802 1 Lever 10 32128-17 1 Nut-Lock, Flange 11 112-8884 12 104-9368 1 Knob-BBC 1 Plug-Dome 13 614249 2 Tie-Cable 3371-848A 10 D4
Upper Handle Component Assembly Ref. Part Number Qty. Description 1 117-5975 1 Switch Housing ASM 2 321-50 1 Screw-HH 3 108-3788-03 1 Bail-Brake 4 115-8439 1 Cable-Brake, BBC 5 3290-337 1 Nut-Speed 6 106-9169 7 107-7462 1 Screw-HWH 1 Spring-Torsion 8 107-7463 1 Spacer 9 106-6802 1 Lever 10 32128-17 1 Nut-Lock, Flange 11 112-8884 12 104-9368 1 Knob-BBC 1 Plug-Dome 13 614249 2 Tie-Cable 3371-848A 10 D4


