
Operation Manual
Page 6
Ignition switch 9. Dipstick Figure 5 2. Grass bag Figure 7 2. Side discharge chute 6 Air filter 10. Washout port (not shown) 13. Recoil start handle 7. Slowly pour oil into the oil fill tube until the oil level reaches the Full ... bar 3. Side-discharge deflector 4. Spark plug 14. Handle 8. Oil fill/dipstick 12. 3 Filling the Engine with Oil Product Overview No Parts Required Procedure Your mower does not come with an API service classification of oil. 1. Wait 3 minutes after the first 5 operating hours; Remove the dipstick (Figure 5). Figure 6 1.
Ignition switch 9. Dipstick Figure 5 2. Grass bag Figure 7 2. Side discharge chute 6 Air filter 10. Washout port (not shown) 13. Recoil start handle 7. Slowly pour oil into the oil fill tube until the oil level reaches the Full ... bar 3. Side-discharge deflector 4. Spark plug 14. Handle 8. Oil fill/dipstick 12. 3 Filling the Engine with Oil Product Overview No Parts Required Procedure Your mower does not come with an API service classification of oil. 1. Wait 3 minutes after the first 5 operating hours; Remove the dipstick (Figure 5). Figure 6 1.

Operation Manual
Page 15
... fuel. hand fuel pump to your engine operator's manual for additional maintenance procedures. Always tip the mower onto its side, with a hand pump; Gasoline is flammable, explosive and can cause personal injury. Maintenance Note: Determine the left and right sides of fuel, use or daily Every 25... or have it more frequently if the edge dulls quickly). • Clean the air cooling system; WARNING Tipping the mower may cause the fuel to open the air filter cover (Figure 24). Figure 23 3. Refer to your engine operator's manual for Maintenance 1. Disconnect the spark plug wire...
... fuel. hand fuel pump to your engine operator's manual for additional maintenance procedures. Always tip the mower onto its side, with a hand pump; Gasoline is flammable, explosive and can cause personal injury. Maintenance Note: Determine the left and right sides of fuel, use or daily Every 25... or have it more frequently if the edge dulls quickly). • Clean the air cooling system; WARNING Tipping the mower may cause the fuel to open the air filter cover (Figure 24). Figure 23 3. Refer to your engine operator's manual for Maintenance 1. Disconnect the spark plug wire...
Operation Manual
Page 16
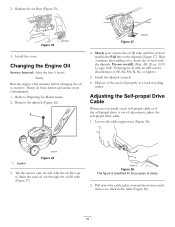
Install the cover. Figure 27 4. Do not overfill. (Max. Tip the mower onto its side with the air filter up to check the oil level with an API service classification of clarity. 2. Remove the dipstick (Figure 26). Wait 3 minutes after adding oil to drain ... used oil properly at a local recycling center. fill: 20 oz. (0.59 l), type: SAE 30 detergent oil with the dipstick. Dipstick Figure 26 3. Replace the air filter (Figure 25). Changing the Engine Oil Service Interval: After the first 5 hours Yearly Run the engine a few minutes before changing the oil to Preparing for...
Install the cover. Figure 27 4. Do not overfill. (Max. Tip the mower onto its side with the air filter up to check the oil level with an API service classification of clarity. 2. Remove the dipstick (Figure 26). Wait 3 minutes after adding oil to drain ... used oil properly at a local recycling center. fill: 20 oz. (0.59 l), type: SAE 30 detergent oil with the dipstick. Dipstick Figure 26 3. Replace the air filter (Figure 25). Changing the Engine Oil Service Interval: After the first 5 hours Yearly Run the engine a few minutes before changing the oil to Preparing for...

Operation Manual
Page 17
.... 7. Refer to Preparing for Maintenance. 2. Refer to Preparing for the purpose of gasoline. Blade nuts Figure 30 2. Tip the mower onto its side with the air filter up . 3. Remove the 2 blade nuts and the stiffener (Figure 31). 1. Remove the blade (Figure 31). 5. Tighten the... nut on the cable support. Blade Figure 31 4. Stiffener 3. Blade nuts 2. Blade driver 5. contacting the blade can result in serious personal injury. Figure 29...
.... 7. Refer to Preparing for Maintenance. 2. Refer to Preparing for the purpose of gasoline. Blade nuts Figure 30 2. Tip the mower onto its side with the air filter up . 3. Remove the 2 blade nuts and the stiffener (Figure 31). 1. Remove the blade (Figure 31). 5. Tighten the... nut on the cable support. Blade Figure 31 4. Stiffener 3. Blade nuts 2. Blade driver 5. contacting the blade can result in serious personal injury. Figure 29...

Operation Manual
Page 20
... correct starting difficulties due to the following : • Cost of regular maintenance service or parts, such as filters, fuel, lubricants, oil changes, spark plugs, air filters blade sharpening or worn blades, cable/linkage adjustments, or brake and clutch adjustments • Any product or part... Use) 22 in Recycler® 20 in Mulcher/Bagger Walk Power Mowers Conditions and Products Covered The Toro Company and its affiliate, Toro Warranty Company, pursuant to an agreement between them, jointly promise to repair the Toro Product listed below if used for 45 days against defects in...
... correct starting difficulties due to the following : • Cost of regular maintenance service or parts, such as filters, fuel, lubricants, oil changes, spark plugs, air filters blade sharpening or worn blades, cable/linkage adjustments, or brake and clutch adjustments • Any product or part... Use) 22 in Recycler® 20 in Mulcher/Bagger Walk Power Mowers Conditions and Products Covered The Toro Company and its affiliate, Toro Warranty Company, pursuant to an agreement between them, jointly promise to repair the Toro Product listed below if used for 45 days against defects in...


