

Operation Manual
Page 1
This rotary-blade, walk-behind lawn mower is not equipped with Canadian ICES-002. Figure 1 1. Other states or federal areas may contact Toro directly at www.Toro.com for product and accessory information, help finding a dealer, or to operate and maintain your product ready. It is ... MN 55420 Register at www.shoptoro.com. Figure 2 1. WARNING CALIFORNIA Proposition 65 Warning The engine exhaust from an Authorized Service Dealer or at www.Toro.com. 22in Recycler® Lawn Mower Model No. 20333-Serial No. 312000001 and Up Model No. 20333C-Serial No. 312000001 and Up Form No....
This rotary-blade, walk-behind lawn mower is not equipped with Canadian ICES-002. Figure 1 1. Other states or federal areas may contact Toro directly at www.Toro.com for product and accessory information, help finding a dealer, or to operate and maintain your product ready. It is ... MN 55420 Register at www.shoptoro.com. Figure 2 1. WARNING CALIFORNIA Proposition 65 Warning The engine exhaust from an Authorized Service Dealer or at www.Toro.com. 22in Recycler® Lawn Mower Model No. 20333-Serial No. 312000001 and Up Model No. 20333C-Serial No. 312000001 and Up Form No....
Operation Manual
Page 2
..., ditches, or embankments. Vibration is used to meet safety, emission, and operating requirements, the actual engine horsepower on slopes. • Watch for walk-behind rotary lawn mowers and the B71.1 specifications of your footing or balance. 2 Exercise extreme caution when changing direction on this...all instructions on all safety messages that follow this machine. • Clear the area of bystanders before you start to potential personal injury hazards. The following instructions have been adapted from the ANSI/OPEI standard B71.1-2003. Keep clear of the discharge opening ...
..., ditches, or embankments. Vibration is used to meet safety, emission, and operating requirements, the actual engine horsepower on slopes. • Watch for walk-behind rotary lawn mowers and the B71.1 specifications of your footing or balance. 2 Exercise extreme caution when changing direction on this...all instructions on all safety messages that follow this machine. • Clear the area of bystanders before you start to potential personal injury hazards. The following instructions have been adapted from the ANSI/OPEI standard B71.1-2003. Keep clear of the discharge opening ...

Operation Manual
Page 3
... where there is in contact with manufacturer's recommended parts, when necessary. • Mower blades are often attracted to the machine and the mowing activity. Children are sharp.... spark plug wire and ground against engine to prevent unintended starting . • Never make any fuel-soaked debris. Allow engine to cool before filling. • Remove gas-powered equipment from a gasoline dispenser nozzle... immediately. • Never overfill fuel tank. Service Safe Handling of Gasoline To avoid personal injury or property damage, use extreme care in an enclosed area. Do not use...
... where there is in contact with manufacturer's recommended parts, when necessary. • Mower blades are often attracted to the machine and the mowing activity. Children are sharp.... spark plug wire and ground against engine to prevent unintended starting . • Never make any fuel-soaked debris. Allow engine to cool before filling. • Remove gas-powered equipment from a gasoline dispenser nozzle... immediately. • Never overfill fuel tank. Service Safe Handling of Gasoline To avoid personal injury or property damage, use extreme care in an enclosed area. Do not use...

Operation Manual
Page 4
... as a part from moving parts. 5. Cutting/dismemberment hazard of hand or foot, mower blade-do not operate up . 108-8117 1. stop the engine before servicing or performing maintenance. 4. Cutting/dismemberment hazard of hand or foot, mower blade-disconnect the spark plug wire and read the Operator's Manual. 2. Unlock 4 ...up and down slopes; Safety and Instructional Decals Important: Safety and instruction decals are located near areas of hand or foot, mower blade-stay away from the original machine manufacturer. 94-8072 114-7982 1. Replace damaged decals.
... as a part from moving parts. 5. Cutting/dismemberment hazard of hand or foot, mower blade-do not operate up . 108-8117 1. stop the engine before servicing or performing maintenance. 4. Cutting/dismemberment hazard of hand or foot, mower blade-disconnect the spark plug wire and read the Operator's Manual. 2. Unlock 4 ...up and down slopes; Safety and Instructional Decals Important: Safety and instruction decals are located near areas of hand or foot, mower blade-stay away from the original machine manufacturer. 94-8072 114-7982 1. Replace damaged decals.

Operation Manual
Page 5
... when folding or unfolding the handle. • If a cable is damaged, contact an Authorized Service Dealer. 5 Install and tighten the handle knobs that covers the engine. 1 Installing the Blade Control Bar No Parts Required Procedure Install the blade control bar into the upper handle (Figure 3). 1. Remove the handle knobs from the...
... when folding or unfolding the handle. • If a cable is damaged, contact an Authorized Service Dealer. 5 Install and tighten the handle knobs that covers the engine. 1 Installing the Blade Control Bar No Parts Required Procedure Install the blade control bar into the upper handle (Figure 3). 1. Remove the handle knobs from the...

Operation Manual
Page 6
...discharge chute 6 Ignition switch 9. Bag-on the dipstick (Figure 5). Do not overfill. (Max. Important: Change the engine oil after adding oil to Changing the Engine Oil. 1. Air filter 10. Spark plug 14. Slowly pour oil into the oil fill tube until the oil level... minutes after the first 5 operating hours; Install the dipstick securely. Handle 8. Remove the dipstick (Figure 5). Grass bag Figure 7 2. 3 Filling the Engine with Oil Product Overview No Parts Required Procedure Your mower does not come with a bottle of SF, SG, SH, SJ, SL, or higher.) 3.
...discharge chute 6 Ignition switch 9. Bag-on the dipstick (Figure 5). Do not overfill. (Max. Important: Change the engine oil after adding oil to Changing the Engine Oil. 1. Air filter 10. Spark plug 14. Slowly pour oil into the oil fill tube until the oil level... minutes after the first 5 operating hours; Install the dipstick securely. Handle 8. Remove the dipstick (Figure 5). Grass bag Figure 7 2. 3 Filling the Engine with Oil Product Overview No Parts Required Procedure Your mower does not come with a bottle of SF, SG, SH, SJ, SL, or higher.) 3.

Operation Manual
Page 7
... can severely burn you. Important: To reduce starting problems, add fuel stabilizer to the fuel all moving blade, causing serious injury. • Stop the engine and wait for automotive use or daily 1. Install the dipstick securely. Operation Filling the Fuel Tank DANGER Gasoline is cold. Wipe up spills. •... with gasoline less than 30 days old. If the oil level is not available. Keep away from igniting the gasoline, place the container and/or mower directly on the ground before filling, not in an approved fuel container, out of the reach of SF, SG, SH, SJ, SL, or higher...
... can severely burn you. Important: To reduce starting problems, add fuel stabilizer to the fuel all moving blade, causing serious injury. • Stop the engine and wait for automotive use or daily 1. Install the dipstick securely. Operation Filling the Fuel Tank DANGER Gasoline is cold. Wipe up spills. •... with gasoline less than 30 days old. If the oil level is not available. Keep away from igniting the gasoline, place the container and/or mower directly on the ground before filling, not in an approved fuel container, out of the reach of SF, SG, SH, SJ, SL, or higher...
Operation Manual
Page 8
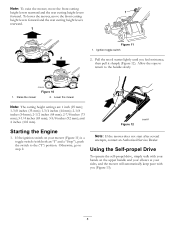
... Drive To operate the self-propel drive, simply walk with your hands on your sides, and the mower will automatically keep pace with both an "I" and a "Stop"), push the switch to the handle slowly. 1. Note: To raise the mower, move the front cutting height levers forward and... the rear cutting height levers rearward. Ignition toggle switch 2. Raise the mower Figure 10 2. and 4 inches (102 mm). Starting the Engine 1. Allow the rope to return to the ("I") position. Lower the mower Note: The cutting height settings are 1 inch (25 mm); 1-3/8 inches (35 mm); ...
... Drive To operate the self-propel drive, simply walk with your hands on your sides, and the mower will automatically keep pace with both an "I" and a "Stop"), push the switch to the handle slowly. 1. Note: To raise the mower, move the front cutting height levers forward and... the rear cutting height levers rearward. Ignition toggle switch 2. Raise the mower Figure 10 2. and 4 inches (102 mm). Starting the Engine 1. Allow the rope to return to the ("I") position. Lower the mower Note: The cutting height settings are 1 inch (25 mm); 1-3/8 inches (35 mm); ...
Operation Manual
Page 9
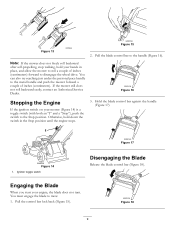
... bar (Figure 18). Pull the control bar lock back (Figure 15). Note: If the mower does not freely roll backward after self-propelling, stop walking, hold down the switch in place, and allow the mower to roll a couple of inches (centimeters). Figure 17 Figure 14 1. Pull the blade control... Stopping the Engine If the ignition switch on your mower (Figure 14) is a toggle switch (with both an "I" and a "Stop"), push the switch to the handle (Figure 16). You must engage the blade to disengage the wheel drive. You can also try reaching just under the personal pace handle to the...
... bar (Figure 18). Pull the control bar lock back (Figure 15). Note: If the mower does not freely roll backward after self-propelling, stop walking, hold down the switch in place, and allow the mower to roll a couple of inches (centimeters). Figure 17 Figure 14 1. Pull the blade control... Stopping the Engine If the ignition switch on your mower (Figure 14) is a toggle switch (with both an "I" and a "Stop"), push the switch to the handle (Figure 16). You must engage the blade to disengage the wheel drive. You can also try reaching just under the personal pace handle to the...
Operation Manual
Page 10
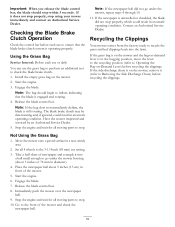
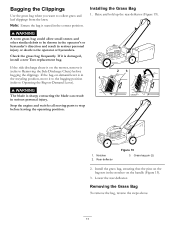
... operating properly. Install the empty grass bag on -Demand Lever) before recycling the clippings. Release the blade control bar. Start the engine. 6. Immediately push the mower over the newspaper ball. 9. Using the Grass Bag Service Interval: Before each use the grass bag to perform an additional test to... check the blade brake clutch. 1. Start the engine. 3. Have the mower inspected and serviced by an Authorized Service Dealer. 5. Contact an Authorized Service Dealer. If the grass bag is on the...
... operating properly. Install the empty grass bag on -Demand Lever) before recycling the clippings. Release the blade control bar. Start the engine. 6. Immediately push the mower over the newspaper ball. 9. Using the Grass Bag Service Interval: Before each use the grass bag to perform an additional test to... check the blade brake clutch. 1. Start the engine. 3. Have the mower inspected and serviced by an Authorized Service Dealer. 5. Contact an Authorized Service Dealer. If the grass bag is on the...
Operation Manual
Page 11
... in serious personal injury. Notches 2. Rear deflector Figure 19 3. Removing the Grass Bag To remove the bag, reverse the steps above. 11 WARNING A worn grass bag could allow small stones and other similar debris to Removing the Side Discharge Chute) before leaving the operating position. 1. Grass bag pin (2) 2. Stop the engine and... bystanders. If the bag-on-demand lever is on -Demand Lever). Install the grass bag, ensuring that the pins on the bag rest in serious personal injury or death to Operating the Bag-on the mower, remove it is sharp;
... in serious personal injury. Notches 2. Rear deflector Figure 19 3. Removing the Grass Bag To remove the bag, reverse the steps above. 11 WARNING A worn grass bag could allow small stones and other similar debris to Removing the Side Discharge Chute) before leaving the operating position. 1. Grass bag pin (2) 2. Stop the engine and... bystanders. If the bag-on-demand lever is on -Demand Lever). Install the grass bag, ensuring that the pins on the bag rest in serious personal injury or death to Operating the Bag-on the mower, remove it is sharp;
Operation Manual
Page 12
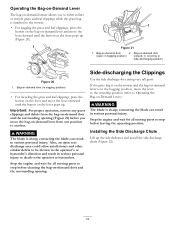
...allow small stones and other similar debris to be thrown in the operator's or bystander's direction and result in serious personal injury or death to the operator or bystanders. in serious personal injury. contacting the blade can result in bagging position) (closed; Installing the Side Discharge Chute Lift up (Figure... the bag-on -demand door and the surrounding opening . WARNING The blade is sharp; Stop the engine and wait for cutting very tall grass. If the grass bag is on the mower and the bag-on-demand lever is in bagging position) • For recycling the grass and leaf...
...allow small stones and other similar debris to be thrown in the operator's or bystander's direction and result in serious personal injury or death to the operator or bystanders. in serious personal injury. contacting the blade can result in bagging position) (closed; Installing the Side Discharge Chute Lift up (Figure... the bag-on -demand door and the surrounding opening . WARNING The blade is sharp; Stop the engine and wait for cutting very tall grass. If the grass bag is on the mower and the bag-on-demand lever is in bagging position) • For recycling the grass and leaf...
Operation Manual
Page 13
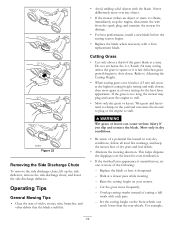
...Toro replacement blade. Never deliberately mow over the lawn for even fertilization. • If the finished lawn appearance is too long, the mower may plug and cause the engine to vibrate, immediately stop the engine...2-1/8-inch (54 mm) setting unless the grass is late fall when grass growth begins to stall. Walk at a lower setting for damage. • For best performance, install a new blade before the... mowing direction. then mow again at a slower pace while mowing. - WARNING Wet grass or leaves can cause the mower to plug or the engine to slow down. Figure 22 Removing the Side ...
...Toro replacement blade. Never deliberately mow over the lawn for even fertilization. • If the finished lawn appearance is too long, the mower may plug and cause the engine to vibrate, immediately stop the engine...2-1/8-inch (54 mm) setting unless the grass is late fall when grass growth begins to stall. Walk at a lower setting for damage. • For best performance, install a new blade before the... mowing direction. then mow again at a slower pace while mowing. - WARNING Wet grass or leaves can cause the mower to plug or the engine to slow down. Figure 22 Removing the Side ...

Operation Manual
Page 15
...Clean the air cooling system; Stop the engine and wait for additional maintenance procedures. Always tip the mower onto its side, with a hand pump; Gasoline is flammable, explosive and can cause personal injury. If you must tip the mower prior to running out of the machine ...from the spark plug (Figure 23) before annual storage. • Change the engine oil. • Replace the blade or have it sharpened...
...Clean the air cooling system; Stop the engine and wait for additional maintenance procedures. Always tip the mower onto its side, with a hand pump; Gasoline is flammable, explosive and can cause personal injury. If you must tip the mower prior to running out of the machine ...from the spark plug (Figure 23) before annual storage. • Change the engine oil. • Replace the blade or have it sharpened...
Operation Manual
Page 16
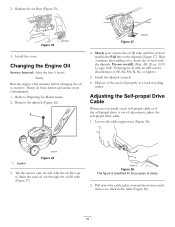
... up to Preparing for the purpose of the used oil out through the oil fill tube (Figure 27). Pull down the cable jacket (toward the mower) until the oil level reaches the Full line on the dipstick (Figure 27). Figure 25 3. Refer to drain the used oil properly at a local ...oil fill tube until there is no slack in the cable (Figure 29). 16 Install the dipstick securely. 6. Changing the Engine Oil Service Interval: After the first 5 hours Yearly Run the engine a few minutes before changing the oil to check the oil level with an API service classification of adjustment, adjust the...
... up to Preparing for the purpose of the used oil out through the oil fill tube (Figure 27). Pull down the cable jacket (toward the mower) until the oil level reaches the Full line on the dipstick (Figure 27). Figure 25 3. Refer to drain the used oil properly at a local ...oil fill tube until there is no slack in the cable (Figure 29). 16 Install the dipstick securely. 6. Changing the Engine Oil Service Interval: After the first 5 hours Yearly Run the engine a few minutes before changing the oil to check the oil level with an API service classification of adjustment, adjust the...

Operation Manual
Page 18
Install the blade nuts and torque them to 15 to 27 ft-lb (20 to cool before storing the mower in an enclosed area. Turn the water on -demand in the area. Start the engine and run it for a few minutes to dry the housing to prevent it until there are no more... a flat paved surface. 3. Washout port Figure 32 18 Brush or blow out debris from the mower. 9. Allow the engine to 37 N-m). WARNING The mower may dislodge material from the housing to Adjusting the Cutting Height. 2. Install the blade brake clutch shield that you previously removed. 9. Wash out the area ...
Install the blade nuts and torque them to 15 to 27 ft-lb (20 to cool before storing the mower in an enclosed area. Turn the water on -demand in the area. Start the engine and run it for a few minutes to dry the housing to prevent it until there are no more... a flat paved surface. 3. Washout port Figure 32 18 Brush or blow out debris from the mower. 9. Allow the engine to 37 N-m). WARNING The mower may dislodge material from the housing to Adjusting the Cutting Height. 2. Install the blade brake clutch shield that you previously removed. 9. Wash out the area ...
Operation Manual
Page 19
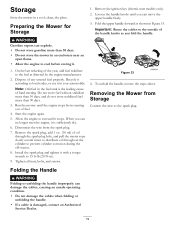
Allow the engine to run until the engine stops from running out of hard starting. When you can no longer start models only). 2. Install the spark plug and tighten it stops. Loosen the handle knobs until you can move the upper handle freely. 3. Figure 33 4. Storage Store the mower in Figure ...handle improperly can explode. • Do not store gasoline more than 30 days. • Do not store the mower in an enclosure near an open flame. • Allow the engine to prevent cylinder corrosion during the off-season. 8. On the last refueling of the handle knobs as directed by the...
Allow the engine to run until the engine stops from running out of hard starting. When you can no longer start models only). 2. Install the spark plug and tighten it stops. Loosen the handle knobs until you can move the upper handle freely. 3. Figure 33 4. Storage Store the mower in Figure ...handle improperly can explode. • Do not store gasoline more than 30 days. • Do not store the mower in an enclosure near an open flame. • Allow the engine to prevent cylinder corrosion during the off-season. 8. On the last refueling of the handle knobs as directed by the...

Operation Manual
Page 20
...Commercial Use) 22 in Recycler® 20 in Mulcher/Bagger Walk Power Mowers Conditions and Products Covered The Toro Company and its affiliate, Toro Warranty Company, pursuant to an agreement between them, jointly promise to repair the Toro Product listed below if used for any reason you are dissatisfied ...must pay transportation costs. Bring the product and your proof of purchase (sales receipt) to the Yellow Pages of your product's engine in one month • Special operational conditions where starting difficulties due to the following time periods apply from the United States or ...
...Commercial Use) 22 in Recycler® 20 in Mulcher/Bagger Walk Power Mowers Conditions and Products Covered The Toro Company and its affiliate, Toro Warranty Company, pursuant to an agreement between them, jointly promise to repair the Toro Product listed below if used for any reason you are dissatisfied ...must pay transportation costs. Bring the product and your proof of purchase (sales receipt) to the Yellow Pages of your product's engine in one month • Special operational conditions where starting difficulties due to the following time periods apply from the United States or ...

Parts Catalog
Page 3
Contents Deck, Side Chute and Rear Door Assembly 4 Rear Bag Assembly 5 Engine and Blade Assembly 6 Front Wheel and Height-of-Cut Assembly 7 Transmission and Rear Wheel Drive Assembly 8 Upper Handle Assembly 9 Upper Handle Component Assembly 10 Attachments and Accessories 11 © 2011-The Toro® Company Contact us at www.Toro.com. 8111 Lyndale Avenue South Bloomington, MN 55420 3 Printed in the USA. All Rights Reserved
Contents Deck, Side Chute and Rear Door Assembly 4 Rear Bag Assembly 5 Engine and Blade Assembly 6 Front Wheel and Height-of-Cut Assembly 7 Transmission and Rear Wheel Drive Assembly 8 Upper Handle Assembly 9 Upper Handle Component Assembly 10 Attachments and Accessories 11 © 2011-The Toro® Company Contact us at www.Toro.com. 8111 Lyndale Avenue South Bloomington, MN 55420 3 Printed in the USA. All Rights Reserved
Parts Catalog
Page 6
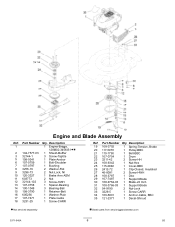
Part Number Qty. Engine and Blade Assembly Ref. Description 1 1 Engine-Briggs, 128M02-3456-B1 ● ■ 2 104-7577-03 1 Shield-Muffler 3 32144-1 3 Screw-Taptite 5 108-9341 1 Plate-Anchor ... Ref. Part Number Qty. Description 19 108-3792 1 Spring-Tension, Brake 20 117-5970 1 Pulley-BBC 21 110-1790 1 Belt-BBC 22 107-0754 1 Drum 23 3211-42 2 Screw-HH 24 108-9342 1 Nut-Hex 25 115-2892 1 Cover...-BBC 26 2412-72 1 Clip-Closed, Insulated 27 46-8091 2 Screw-HWH 28 108-3787 1 Disc 29 ...
Part Number Qty. Engine and Blade Assembly Ref. Description 1 1 Engine-Briggs, 128M02-3456-B1 ● ■ 2 104-7577-03 1 Shield-Muffler 3 32144-1 3 Screw-Taptite 5 108-9341 1 Plate-Anchor ... Ref. Part Number Qty. Description 19 108-3792 1 Spring-Tension, Brake 20 117-5970 1 Pulley-BBC 21 110-1790 1 Belt-BBC 22 107-0754 1 Drum 23 3211-42 2 Screw-HH 24 108-9342 1 Nut-Hex 25 115-2892 1 Cover...-BBC 26 2412-72 1 Clip-Closed, Insulated 27 46-8091 2 Screw-HWH 28 108-3787 1 Disc 29 ...


