

Operation Manual
Page 1
...potential hazards and has safety messages identified by residential homeowners. Other states or federal areas may contact Toro directly at www.shoptoro.com. 22in Recycler® Lawn Mower Model No. 20332-Serial No. 312000001 and Up Model No. 20334-Serial No. 312000001 and Up Model No. 20352...This engine is not equipped with Canadian ICES-002. © 2011-The Toro® Company 8111 Lyndale Avenue South Bloomington, MN 55420 Register at www.Toro.com. This rotary-blade, walk-behind lawn mower is a violation of special attention. Important calls attention to special mechanical information...
...potential hazards and has safety messages identified by residential homeowners. Other states or federal areas may contact Toro directly at www.shoptoro.com. 22in Recycler® Lawn Mower Model No. 20332-Serial No. 312000001 and Up Model No. 20334-Serial No. 312000001 and Up Model No. 20352...This engine is not equipped with Canadian ICES-002. © 2011-The Toro® Company 8111 Lyndale Avenue South Bloomington, MN 55420 Register at www.Toro.com. This rotary-blade, walk-behind lawn mower is a violation of special attention. Important calls attention to special mechanical information...

Operation Manual
Page 9
...your hands on the mower, remove it is sharp; contacting the blade can also try reaching just under the personal pace handle to Operating the Bag-on -Demand Lever). Recycling the Clippings Your mower comes from the lawn. If it (refer... to the operator or bystanders. Bagging the Clippings Use the grass bag when you leave the mower (electric-start after self-propelling, stop before bagging the clippings. WARNING The blade is damaged, install a new Toro...
...your hands on the mower, remove it is sharp; contacting the blade can also try reaching just under the personal pace handle to Operating the Bag-on -Demand Lever). Recycling the Clippings Your mower comes from the lawn. If it (refer... to the operator or bystanders. Bagging the Clippings Use the grass bag when you leave the mower (electric-start after self-propelling, stop before bagging the clippings. WARNING The blade is damaged, install a new Toro...

Operation Manual
Page 10
... 14). 3. contacting the blade can result in the notches on the bag rest in serious personal injury. Also, an open rear discharge area could allow small stones and other similar debris to either collect or recycle grass and leaf clippings while the grass bag is sharp; Bag-on -demand lever from one... position to the operator or bystanders. WARNING The blade is attached to the mower. • For bagging the grass and leaf clippings, press the button on the bag-on-demand lever and move the • For recycling the grass and leaf clippings, press the button on the lever and move the...
... 14). 3. contacting the blade can result in the notches on the bag rest in serious personal injury. Also, an open rear discharge area could allow small stones and other similar debris to either collect or recycle grass and leaf clippings while the grass bag is sharp; Bag-on -demand lever from one... position to the operator or bystanders. WARNING The blade is attached to the mower. • For bagging the grass and leaf clippings, press the button on the bag-on-demand lever and move the • For recycling the grass and leaf clippings, press the button on the lever and move the...

Operation Manual
Page 11
... install the side discharge chute (Figure 17). 1. If the grass bag is on the mower and the bag-on -Demand Lever). WARNING The blade is in serious personal injury. contacting the blade can result in the bagging position, move the lever to the recycling position (refer to stop before leaving the operating position.
... install the side discharge chute (Figure 17). 1. If the grass bag is on the mower and the bag-on -Demand Lever). WARNING The blade is in serious personal injury. contacting the blade can result in the bagging position, move the lever to the recycling position (refer to stop before leaving the operating position.

Operation Manual
Page 14
...crankcase. 7. Refer to Preparing for the oil to drain the used oil properly at the Full mark on the dipstick reads Full. 11. Return the mower to warm it. Wait 3 minutes for Maintenance. 3. Insert the dipstick fully into the oil fill tube securely. 12. Note: If the oil ...level is at a local recycling center. 14 Replace the air filter (Figure 19). 3. Figure 19 Changing the Engine Oil Service Interval: After the first 5 hours Yearly Run the engine a...
...crankcase. 7. Refer to Preparing for the oil to drain the used oil properly at the Full mark on the dipstick reads Full. 11. Return the mower to warm it. Wait 3 minutes for Maintenance. 3. Insert the dipstick fully into the oil fill tube securely. 12. Note: If the oil ...level is at a local recycling center. 14 Replace the air filter (Figure 19). 3. Figure 19 Changing the Engine Oil Service Interval: After the first 5 hours Yearly Run the engine a...

Operation Manual
Page 15
... indicates the following states of California to cause cancer and reproductive harm. Note: When the battery no longer holds a charge, recycle or dispose of the lead-acid battery according to the mower wire harness located below the ignition key (Figure 22). • A green light indicates that the charger is fully charged or...
... indicates the following states of California to cause cancer and reproductive harm. Note: When the battery no longer holds a charge, recycle or dispose of the lead-acid battery according to the mower wire harness located below the ignition key (Figure 22). • A green light indicates that the charger is fully charged or...

Operation Manual
Page 18
...2. Loosely install the spark plug. 9. If you can move the upper handle freely. 3. Removing the Mower from the spark plug. 7. Preparing the Mower for 24 hours (electric-start the engine, it stops. Recycle it according to run until it is damaged, contact an Authorized Service Dealer. 1. Allow the engine to... local codes, or use it . 1. Charge the battery for 24 hours, then unplug the battery charger an store the mower in a heated area, you can...
...2. Loosely install the spark plug. 9. If you can move the upper handle freely. 3. Removing the Mower from the spark plug. 7. Preparing the Mower for 24 hours (electric-start the engine, it stops. Recycle it according to run until it is damaged, contact an Authorized Service Dealer. 1. Allow the engine to... local codes, or use it . 1. Charge the battery for 24 hours, then unplug the battery charger an store the mower in a heated area, you can...

Operation Manual
Page 20
... dealer will not start your proof of parts and labor, but you . Items and Conditions Not Covered There is covered under "Lawn Mowers") or access our web site at 866-214-9808 (Canadian customers) Owner Responsibilities You must maintain your Operator's Manual if in doubt...(Not Applicable for Commercial Use) 22 in Recycler® 20 in Mulcher/Bagger Walk Power Mowers Conditions and Products Covered The Toro Company and its affiliate, Toro Warranty Company, pursuant to an agreement between them, jointly promise to repair the Toro Product listed below if used commercially*. Instructions...
... dealer will not start your proof of parts and labor, but you . Items and Conditions Not Covered There is covered under "Lawn Mowers") or access our web site at 866-214-9808 (Canadian customers) Owner Responsibilities You must maintain your Operator's Manual if in doubt...(Not Applicable for Commercial Use) 22 in Recycler® 20 in Mulcher/Bagger Walk Power Mowers Conditions and Products Covered The Toro Company and its affiliate, Toro Warranty Company, pursuant to an agreement between them, jointly promise to repair the Toro Product listed below if used commercially*. Instructions...

Parts Catalog
Page 1
Original Instructions (EN) Form No. 3371-846 Rev A 22in Recycler® Lawn Mower Model No. 20332-Serial No. 312000001 and Up Parts Catalog Register at www.Toro.com.
Original Instructions (EN) Form No. 3371-846 Rev A 22in Recycler® Lawn Mower Model No. 20332-Serial No. 312000001 and Up Parts Catalog Register at www.Toro.com.
Parts Catalog
Page 4
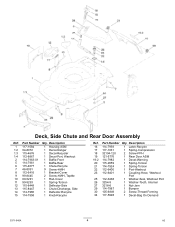
... and Rear Door Assembly Ref. Description 1 117-1084 1 Housing ASM 1:2 94-8072 1 Decal-Danger 1:3 115-4676 1 Decal-Recycler 1:4 112-8867 1 Decal-Port, Washout 2 114-7963-01 1 Baffle-Front 5 114-7961 1 Baffle-Rear 6 115-4677 1 Chute-Recycle 7 46-8091 9 Screw-HWH 8 112-6416 1 Bracket-Cover 9 99-8445 2 Screw-HWH, Taptite 10 99-5291...
... and Rear Door Assembly Ref. Description 1 117-1084 1 Housing ASM 1:2 94-8072 1 Decal-Danger 1:3 115-4676 1 Decal-Recycler 1:4 112-8867 1 Decal-Port, Washout 2 114-7963-01 1 Baffle-Front 5 114-7961 1 Baffle-Rear 6 115-4677 1 Chute-Recycle 7 46-8091 9 Screw-HWH 8 112-6416 1 Bracket-Cover 9 99-8445 2 Screw-HWH, Taptite 10 99-5291...


