Installation Instructions
Page 2
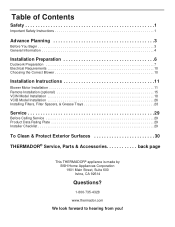
... 10 Choosing the Correct Blower 10 Installation Instructions 11 Blower Motor Installation 11 Remote Installation (optional 15 VCIN Model Installation 18 VCIB Model Installation 26 Installing Filters, Filter Spacers, & Grease Trays 28 Service 29 Before Calling Service 29 Product Data Rating Plate 29 Installer Checklist 29 To Clean & Protect Exterior Surfaces 30 THERMADOR® Service, Parts & Accessories back page...
... 10 Choosing the Correct Blower 10 Installation Instructions 11 Blower Motor Installation 11 Remote Installation (optional 15 VCIN Model Installation 18 VCIB Model Installation 26 Installing Filters, Filter Spacers, & Grease Trays 28 Service 29 Before Calling Service 29 Product Data Rating Plate 29 Installer Checklist 29 To Clean & Protect Exterior Surfaces 30 THERMADOR® Service, Parts & Accessories back page...
Installation Instructions
Page 3
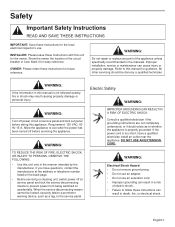
...a risk of the circuit breaker or fuse. Consult a qualified electrician if the grounding instructions are not completely understood, or if doubt exists as a tag, to this manual for guidance. Improper installation, service or maintenance can result in the manner intended by a qualified technician. DO ... page. • Before servicing or cleaning unit, switch power off before wiring this unit for easy reference. INSTALLER: Please leave these instructions can result in death, fire, or electrical shock. Refer to the service panel. If you have a qualified electrician...
...a risk of the circuit breaker or fuse. Consult a qualified electrician if the grounding instructions are not completely understood, or if doubt exists as a tag, to this manual for guidance. Improper installation, service or maintenance can result in the manner intended by a qualified technician. DO ... page. • Before servicing or cleaning unit, switch power off before wiring this unit for easy reference. INSTALLER: Please leave these instructions can result in death, fire, or electrical shock. Refer to the service panel. If you have a qualified electrician...
Installation Instructions
Page 4
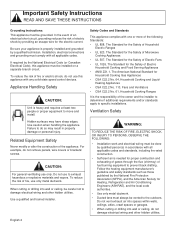
... hazardous or explosive materials and vapors. Use caution when handling the appliance. Important Safety Instructions READ AND SAVE THESE INSTRUCTIONS Grounding Instructions: This appliance must always be vented to move and install. Appliance Handling Safety CAUTION: Unit is properly installed and grounded by providing an escape wire for Heating, Refrigeration and Air Conditioning Engineers (ASHRAE...
... hazardous or explosive materials and vapors. Use caution when handling the appliance. Important Safety Instructions READ AND SAVE THESE INSTRUCTIONS Grounding Instructions: This appliance must always be vented to move and install. Appliance Handling Safety CAUTION: Unit is properly installed and grounded by providing an escape wire for Heating, Refrigeration and Air Conditioning Engineers (ASHRAE...
Installation Instructions
Page 6
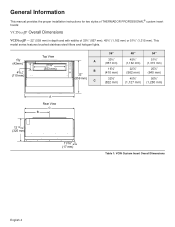
General Information This manual provides the proper installation instructions for two styles of THERMADOR PROFESSIONAL® custom insert hoods: VCINxxJP Overall Dimensions VCINxxJP - 22" (559 mm) in depth and with widths of 33¾" (857 mm), 45¾" (1,162 ...
General Information This manual provides the proper installation instructions for two styles of THERMADOR PROFESSIONAL® custom insert hoods: VCINxxJP Overall Dimensions VCINxxJP - 22" (559 mm) in depth and with widths of 33¾" (857 mm), 45¾" (1,162 ...
Installation Instructions
Page 8
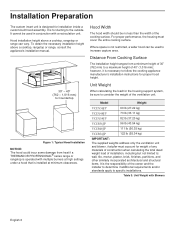
...is necessary to follow the cooking appliance manufacturer's installation instructions for proper hood height. 30" - 40" (762 - 1,016 mm) to Countertop Figure 1: Typical Hood Installation NOTICE: The hood could incur some damage from ..., a wider hood can vary. Distance From Cooking Surface The installation height ranges from heat if a THERMADOR PROFESSIONAL® series range or rangetop is operated with Blowers English.... Installer must cover the entire cooking surface. Model Weight VCIN36JP 60 lb (27.22 kg) VCIN48JP 73 lb (33.11 kg) VCIN54JP 82 lb (37.20 kg) VCIB36JP 96...
...is necessary to follow the cooking appliance manufacturer's installation instructions for proper hood height. 30" - 40" (762 - 1,016 mm) to Countertop Figure 1: Typical Hood Installation NOTICE: The hood could incur some damage from ..., a wider hood can vary. Distance From Cooking Surface The installation height ranges from heat if a THERMADOR PROFESSIONAL® series range or rangetop is operated with Blowers English.... Installer must cover the entire cooking surface. Model Weight VCIN36JP 60 lb (27.22 kg) VCIN48JP 73 lb (33.11 kg) VCIN54JP 82 lb (37.20 kg) VCIB36JP 96...
Installation Instructions
Page 13
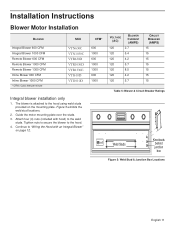
... to the weld studs. Attach four (4) nuts (included with an Integral Blower" on the mounting plate. Figure 5 exhibits the weld stud locations. 2. Installation Instructions Blower Motor Installation BLOWER Integral Blower 600 CFM Integral Blower 1000 CFM Remote Blower 600 CFM Remote Blower 1000 CFM Remote Blower 1300 CFM Inline Blower 600... CFM Inline Blower 1000 CFM * CFM= Cubic feet per minute SKU VTN630C VTN1030C VTR630D VTR1030D VTR1330E VTI610D VTI1010D Integral blower installation only 1. The blower is attached to "Wiring the Hood with hood) to the hood. 4.
... to the weld studs. Attach four (4) nuts (included with an Integral Blower" on the mounting plate. Figure 5 exhibits the weld stud locations. 2. Installation Instructions Blower Motor Installation BLOWER Integral Blower 600 CFM Integral Blower 1000 CFM Remote Blower 600 CFM Remote Blower 1000 CFM Remote Blower 1300 CFM Inline Blower 600... CFM Inline Blower 1000 CFM * CFM= Cubic feet per minute SKU VTN630C VTN1030C VTR630D VTR1030D VTR1330E VTI610D VTI1010D Integral blower installation only 1. The blower is attached to "Wiring the Hood with hood) to the hood. 4.
Installation Instructions
Page 14
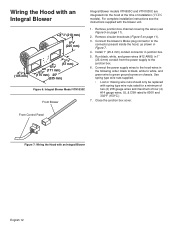
... rated for a minimum of two (2) #18 gauge wires and maximum of installation (VCIN models). Remove circular knockouts (Figure 5 on page 11). 2. Wiring the Hood with an Integral Blower English 12 For complete installation instructions see Figure 5 on page 11). 3. Run black, white, and green wires... (#12 AWG) in 1" (25.4 mm) conduit from the power supply to 600V and 302°F (150°C.) 7. Install 1" (25.4 mm) conduit connector in Figure ...
... rated for a minimum of two (2) #18 gauge wires and maximum of installation (VCIN models). Remove circular knockouts (Figure 5 on page 11). 2. Wiring the Hood with an Integral Blower English 12 For complete installation instructions see Figure 5 on page 11). 3. Run black, white, and green wires... (#12 AWG) in 1" (25.4 mm) conduit from the power supply to 600V and 302°F (150°C.) 7. Install 1" (25.4 mm) conduit connector in Figure ...
Installation Instructions
Page 15
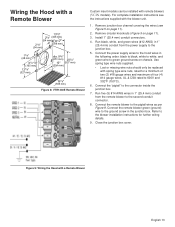
Run black, white, and green wires (#12 AWG) in 1" (25.4 mm) conduit from the remote blower to the blower installation instructions for a minimum of two (2) #18 gauge wires and maximum of four (4) #14 gauge wires, UL & CSA rated to the ground ...from the power supply to the connector inside the junction box. 7. Install 1" (25.4 mm) conduit connectors. 4. Close the junction box cover. For complete installation instructions see Figure 5 on page 11). 3. Remove junction box channel covering the wires (see the instructions supplied with the blower unit. 1. Use spring type wire nuts ...
Run black, white, and green wires (#12 AWG) in 1" (25.4 mm) conduit from the remote blower to the blower installation instructions for a minimum of two (2) #18 gauge wires and maximum of four (4) #14 gauge wires, UL & CSA rated to the ground ...from the power supply to the connector inside the junction box. 7. Install 1" (25.4 mm) conduit connectors. 4. Close the junction box cover. For complete installation instructions see Figure 5 on page 11). 3. Remove junction box channel covering the wires (see the instructions supplied with the blower unit. 1. Use spring type wire nuts ...
Installation Instructions
Page 16
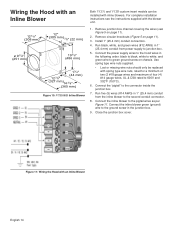
... two (2 #18 gauge wires and maximum of four (4) #14 gauge wires, UL & CSA rated to 600V and 302°F (150°C). 6. For complete installation instructions see Figure 5 on page 11). 2. Run black, white, and green wires (#12 AWG) in 1" (25.4 mm) conduit from the inline blower to the... screw on page 11). 3. Connect the inline blower green (ground) wire to the second conduit connector. 8. Remove junction box channel covering the wires (see the instructions supplied with the blower unit. 12 1/8" (308 mm) 12 " (305 mm) 7/8" (22 mm) ø 9 7/8" (251 mm) 19 1/8" (486 mm) 13/4" (44 mm...
... two (2 #18 gauge wires and maximum of four (4) #14 gauge wires, UL & CSA rated to 600V and 302°F (150°C). 6. For complete installation instructions see Figure 5 on page 11). 2. Run black, white, and green wires (#12 AWG) in 1" (25.4 mm) conduit from the inline blower to the... screw on page 11). 3. Connect the inline blower green (ground) wire to the second conduit connector. 8. Remove junction box channel covering the wires (see the instructions supplied with the blower unit. 12 1/8" (308 mm) 12 " (305 mm) 7/8" (22 mm) ø 9 7/8" (251 mm) 19 1/8" (486 mm) 13/4" (44 mm...
Installation Instructions
Page 24
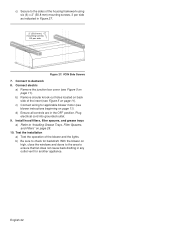
Test the installation a) Test the operation of the insert (see Figure 5 on page 11). b) Be sure to ductwork 8. Plug electrical cord into grounded.... With the blower on high, close the windows and doors to the area to "Installing Grease Trays, Filter Spacers, and Filters" on back side of the blower and the lights. Install hood filters, filter spacers, and grease trays a) Refer to ensure that fan does not... mm) mounting screws, 3 per side Figure 27: VCIN Side Screws 7. English 22 Connect electric a) Remove the junction box cover (see blower instructions beginning on page 11).
Test the installation a) Test the operation of the insert (see Figure 5 on page 11). b) Be sure to ductwork 8. Plug electrical cord into grounded.... With the blower on high, close the windows and doors to the area to "Installing Grease Trays, Filter Spacers, and Filters" on back side of the blower and the lights. Install hood filters, filter spacers, and grease trays a) Refer to ensure that fan does not... mm) mounting screws, 3 per side Figure 27: VCIN Side Screws 7. English 22 Connect electric a) Remove the junction box cover (see blower instructions beginning on page 11).
Installation Instructions
Page 29
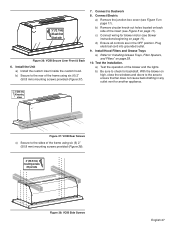
...Ensure all controls are in any outlet vent for another appliance. 2" (50.8 mm) X6 mounting screws Figure 37: VCIB Rear Screws c) Secure to "Installing Grease Trays, Filter Spacers, and Filters" on page 11). b) Remove circular knock-out holes located on back side of the frame using six (6) 2"...Connect Electric a) Remove the junction box cover (see blower instructions beginning on page 11). ½" (12.7 mm) X6 each front & back side Figure 36: VCIB Secure Liner Front & Back 6. c) Connect wiring for backdraft. Test the installation. With the blower on high, close the windows and ...
...Ensure all controls are in any outlet vent for another appliance. 2" (50.8 mm) X6 mounting screws Figure 37: VCIB Rear Screws c) Secure to "Installing Grease Trays, Filter Spacers, and Filters" on page 11). b) Remove circular knock-out holes located on back side of the frame using six (6) 2"...Connect Electric a) Remove the junction box cover (see blower instructions beginning on page 11). ½" (12.7 mm) X6 each front & back side Figure 36: VCIB Secure Liner Front & Back 6. c) Connect wiring for backdraft. Test the installation. With the blower on high, close the windows and ...
Installation Instructions
Page 32
...with clear water and drying with your countertop supplier prior to making a counter opening. Refer to installation instructions and consult your local Canadian distributor or dealer. THERMADOR is not responsible for planning purposes only. DO NOT use a cleaner/ polish such as Stainless ...most detailed information, refer to change specifications or design without notice. We reserve the right to the installation instructions accompanying this product or write THERMADOR® indicating the model number. For discolorations or deposits that persist, refer to remain for use in...
...with clear water and drying with your countertop supplier prior to making a counter opening. Refer to installation instructions and consult your local Canadian distributor or dealer. THERMADOR is not responsible for planning purposes only. DO NOT use a cleaner/ polish such as Stainless ...most detailed information, refer to change specifications or design without notice. We reserve the right to the installation instructions accompanying this product or write THERMADOR® indicating the model number. For discolorations or deposits that persist, refer to remain for use in...
User Manual
Page 6
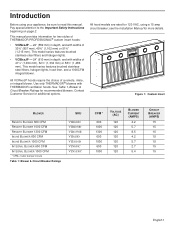
... 52½" (1,334 mm) or 58½" (1,486 mm). Introduction Before using a 15 amp circuit breaker; This manual provides information for two styles of THERMADOR PROFESSIONAL® custom insert hoods: • VCINxxJP - 22" (559 mm) in depth, and with widths of a remote, inline, or integral blower. ...AMPS) 15 15 15 15 15 15 15 English 1 see the Installation Manual for 120 VAC, using your appliance, be sure to the Important Safety Instructions beginning on page 2. All hood models are rated for more details. Use only THERMADOR® blowers with widths of 33¾" (857 mm), 45&#...
... 52½" (1,334 mm) or 58½" (1,486 mm). Introduction Before using a 15 amp circuit breaker; This manual provides information for two styles of THERMADOR PROFESSIONAL® custom insert hoods: • VCINxxJP - 22" (559 mm) in depth, and with widths of a remote, inline, or integral blower. ...AMPS) 15 15 15 15 15 15 15 English 1 see the Installation Manual for 120 VAC, using your appliance, be sure to the Important Safety Instructions beginning on page 2. All hood models are rated for more details. Use only THERMADOR® blowers with widths of 33¾" (857 mm), 45&#...

User Manual
Page 7
...evacuate and call the fire department. • Never pick up a flaming pan. Safety Important Safety Instructions READ AND SAVE THESE INSTRUCTIONS Before you have questions, contact the manufacturer (800-735-4328). b) The fire is being switched ...on accidentally. WARNING: To reduce the risk of fire, electric shock, or injury to operate it started. Always use water, including wet dish cloths or towels, to extinguish flames. If you Begin INSTALLER...
...evacuate and call the fire department. • Never pick up a flaming pan. Safety Important Safety Instructions READ AND SAVE THESE INSTRUCTIONS Before you have questions, contact the manufacturer (800-735-4328). b) The fire is being switched ...on accidentally. WARNING: To reduce the risk of fire, electric shock, or injury to operate it started. Always use water, including wet dish cloths or towels, to extinguish flames. If you Begin INSTALLER...
User Manual
Page 8
... be hot. Refer all servicing to properly grounded supply. This appliance must be seriously injured. Contact an authorized servicer. Refer to Installation Manual for easy reference. Do not operate this manual. CAUTION: Items of the circuit breaker. Disconnect from power and allow anyone ...you have any part of the parents or legal guardians to ensure that they are instructed in a commercial setting or if installed outdoors will damage the appliance and could be properly installed and grounded by qualified persons. Grease should not be left on any questions, contact...
... be hot. Refer all servicing to properly grounded supply. This appliance must be seriously injured. Contact an authorized servicer. Refer to Installation Manual for easy reference. Do not operate this manual. CAUTION: Items of the circuit breaker. Disconnect from power and allow anyone ...you have any part of the parents or legal guardians to ensure that they are instructed in a commercial setting or if installed outdoors will damage the appliance and could be properly installed and grounded by qualified persons. Grease should not be left on any questions, contact...
User Manual
Page 9
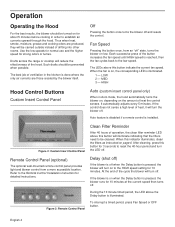
...turned on to be carried outside instead of the button increases the fan speed until HIGH speed is pressed, the blower runs for detailed instructions. Fan Speed Pressing the button once, from a more accessible location. Each successive press of drifting into other rooms. Use the low ...of operation, the clean filter reminder LED above this indicator illuminates, clean the filters as instructed on when the Delay button is reached, then the fan cycles back to the Remote Control Installation Instruction for 10 minutes at the current speed then turns off and resets the control. When...
...turned on to be carried outside instead of the button increases the fan speed until HIGH speed is pressed, the blower runs for detailed instructions. Fan Speed Pressing the button once, from a more accessible location. Each successive press of drifting into other rooms. Use the low ...of operation, the clean filter reminder LED above this indicator illuminates, clean the filters as instructed on when the Delay button is reached, then the fan cycles back to the Remote Control Installation Instruction for 10 minutes at the current speed then turns off and resets the control. When...
User Manual
Page 11
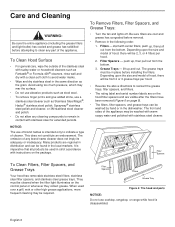
... with stainless steel for extended periods. This does not constitute an endorsement. Be sure filters are regional in distribution and can be in place before installing the filters. To Clean Hood Surface • For general care, wipe the outside of hood, there will be found in the local markets. lift up... model of the stainless steel with sudsy water or household cleaners such as Fantastik® or Formula 409® cleaners, rinse well and dry with instructions on the control panel or whenever they collect grease.
... with stainless steel for extended periods. This does not constitute an endorsement. Be sure filters are regional in distribution and can be in place before installing the filters. To Clean Hood Surface • For general care, wipe the outside of hood, there will be found in the local markets. lift up... model of the stainless steel with sudsy water or household cleaners such as Fantastik® or Formula 409® cleaners, rinse well and dry with instructions on the control panel or whenever they collect grease.
User Manual
Page 15
... at THERMADOR customer service at 1-800-735-4328. service visits to teach you how to use of the Product in conjunction with air or water-going vessels). • Any party's willful misconduct, negligence, misuse, abuse, accidents, neglect, improper operation, failure to maintain, improper or negligent installation, tampering, failure to follow operating instructions, mishandling...
... at THERMADOR customer service at 1-800-735-4328. service visits to teach you how to use of the Product in conjunction with air or water-going vessels). • Any party's willful misconduct, negligence, misuse, abuse, accidents, neglect, improper operation, failure to maintain, improper or negligent installation, tampering, failure to follow operating instructions, mishandling...