
Installation Instructions
Page 5
...3 - Lock service panel to play with backdraft damper 2, 3, or 4 - Remote Control Remove all THERMADOR® appliance packaging material is recyclable. Use & Care Guide, Installation Manual, and Registration Card English 3 Liner (VCIBxxJP models only) 4 - Tools and Parts Needed Blower motor (VCINxxJP models only, see Table ...saw or jigsaw Tape measure Phillips head screwdriver Protective work gloves Available Accessories LINER236 - 36" Custom Hood Liner (VCIN models only) LINER248 - 48" Custom Hood Liner (VCIN models only) LINER254 - 54" Custom Hood Liner (VCIN models only) VCI2REMKS -
...3 - Lock service panel to play with backdraft damper 2, 3, or 4 - Remote Control Remove all THERMADOR® appliance packaging material is recyclable. Use & Care Guide, Installation Manual, and Registration Card English 3 Liner (VCIBxxJP models only) 4 - Tools and Parts Needed Blower motor (VCINxxJP models only, see Table ...saw or jigsaw Tape measure Phillips head screwdriver Protective work gloves Available Accessories LINER236 - 36" Custom Hood Liner (VCIN models only) LINER248 - 48" Custom Hood Liner (VCIN models only) LINER254 - 54" Custom Hood Liner (VCIN models only) VCI2REMKS -
Installation Instructions
Page 7
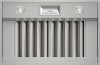
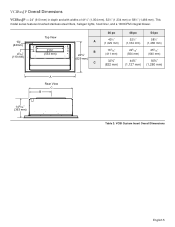
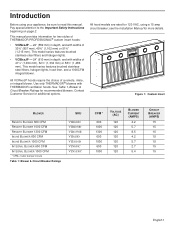
... widths of 41½" (1,054 mm), 52½" (1,334 mm) or 58½" (1,486 mm). This model series features brushed stainless-steel filters, halogen lights, hood liner, and a 1000CFM integral blower. 15/8" (42mm) 45/16" (110 mm) Top View 21¾" (553 mm) A B 24¾" (629 mm) C 36 po 40½" (1,029...
... widths of 41½" (1,054 mm), 52½" (1,334 mm) or 58½" (1,486 mm). This model series features brushed stainless-steel filters, halogen lights, hood liner, and a 1000CFM integral blower. 15/8" (42mm) 45/16" (110 mm) Top View 21¾" (553 mm) A B 24¾" (629 mm) C 36 po 40½" (1,029...
Installation Instructions
Page 25
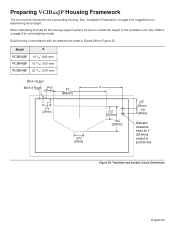
Preparing VCIBxxJP Housing Framework The unit must be sure to include the weight of Hood 3 3/16" (81mm) 23" (584mm) 11/8" (29mm) 33/16" (81mm) A 77/8" (200mm) 10¼" (260mm) 23/8" (86mm) 17/8" (48mm) Diameter clearance holes for 1" (25.4mm) conduit ... 23 Build housing in accordance with the dimensions noted in Figure 28 thru Figure 32. Model A VCIB36JP VCIB48JP VCIB54JP 14 3/16" (360 mm) 19 13/16" (503 mm) 22 13/16" (579 mm) Back of Liner Back of the ventilation unit. See Table 3 on page 6 for suggestions for unit weight by model...
Preparing VCIBxxJP Housing Framework The unit must be sure to include the weight of Hood 3 3/16" (81mm) 23" (584mm) 11/8" (29mm) 33/16" (81mm) A 77/8" (200mm) 10¼" (260mm) 23/8" (86mm) 17/8" (48mm) Diameter clearance holes for 1" (25.4mm) conduit ... 23 Build housing in accordance with the dimensions noted in Figure 28 thru Figure 32. Model A VCIB36JP VCIB48JP VCIB54JP 14 3/16" (360 mm) 19 13/16" (503 mm) 22 13/16" (579 mm) Back of Liner Back of the ventilation unit. See Table 3 on page 6 for suggestions for unit weight by model...
Installation Instructions
Page 28
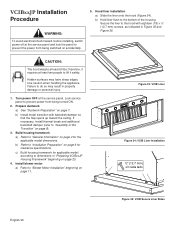
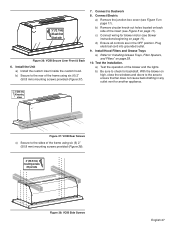
... so that the flap opens up toward the ceiling. b) Refer to the bottom of the Transition" on page 4 for the applicable model dimensions. Hood liner installation a) Slide the liner onto the hood (Figure 34). b) Hold liner flush to "Installation Preparation" on page 11. Failure to lift it requires at the service panel. Figure 33: VCIB...
... so that the flap opens up toward the ceiling. b) Refer to the bottom of the Transition" on page 4 for the applicable model dimensions. Hood liner installation a) Slide the liner onto the hood (Figure 34). b) Hold liner flush to "Installation Preparation" on page 11. Failure to lift it requires at the service panel. Figure 33: VCIB...
Installation Instructions
Page 29
... 37). 7. b) Remove circular knock-out holes located on page 11). With the blower on page 11). Test the installation. Install Hood Filters and Grease Trays a) Refer to the sides of the frame using six (6) 2" (50.8 mm) mounting screws provided (Figure ... 5 on back side of the blower and the lights. Install the Unit a) Install the custom insert inside the custom hood. b) Secure to ensure that fan does not cause back drafting in the OFF position. c) Connect wiring for another appliance... 11). ½" (12.7 mm) X6 each front & back side Figure 36: VCIB Secure Liner Front & Back 6.
... 37). 7. b) Remove circular knock-out holes located on page 11). With the blower on page 11). Test the installation. Install Hood Filters and Grease Trays a) Refer to the sides of the frame using six (6) 2" (50.8 mm) mounting screws provided (Figure ... 5 on back side of the blower and the lights. Install the Unit a) Install the custom insert inside the custom hood. b) Secure to ensure that fan does not cause back drafting in the OFF position. c) Connect wiring for another appliance... 11). ½" (12.7 mm) X6 each front & back side Figure 36: VCIB Secure Liner Front & Back 6.
User Manual
Page 6
This model series features brushed stainlesssteel filters, halogen lights, hood liner, and a 1000CFM integral blower. Introduction Before using a 15 amp circuit breaker; Figure 1: Custom Insert BLOWER REMOTE BLOWER 600 CFM REMOTE BLOWER ...read this manual. This manual provides information for additional options. Contact Customer Service for two styles of THERMADOR PROFESSIONAL® custom insert hoods: • VCINxxJP - 22" (559 mm) in depth, and with THERMADOR ventilation hoods. All VCINxxJP hoods require the choice of 41½" (1,054 mm), 52½" (1,334 mm) or 58&#...
This model series features brushed stainlesssteel filters, halogen lights, hood liner, and a 1000CFM integral blower. Introduction Before using a 15 amp circuit breaker; Figure 1: Custom Insert BLOWER REMOTE BLOWER 600 CFM REMOTE BLOWER ...read this manual. This manual provides information for additional options. Contact Customer Service for two styles of THERMADOR PROFESSIONAL® custom insert hoods: • VCINxxJP - 22" (559 mm) in depth, and with THERMADOR ventilation hoods. All VCINxxJP hoods require the choice of 41½" (1,054 mm), 52½" (1,334 mm) or 58&#...


