Product Spec Sheet
Page 6
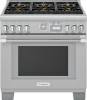
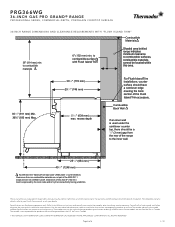
...transported from date of 6 2 / 20 for use in Canada. For complete warranty details, refer to your Use & Care manual, or ask your countertop supplier prior to making counter opening. ALL RIGHTS RESERVED. Specifications are not certified by the local authority having... design without notice. Specifications are certified for use in Canada. 1 800 735 4328 | USA THERMADOR.COM | CANADA THERMADOR.CA | ©2020 BSH HOME APPLIANCES CORPORATION. PRG366WG 36-INCH GAS PRO GRAND® RANGE PROFESSIONAL SERIES, COMMERCIAL-DEPTH, PORCELAIN COOKTOP SURFACE Installation Clearances...
...transported from date of 6 2 / 20 for use in Canada. For complete warranty details, refer to your Use & Care manual, or ask your countertop supplier prior to making counter opening. ALL RIGHTS RESERVED. Specifications are not certified by the local authority having... design without notice. Specifications are certified for use in Canada. 1 800 735 4328 | USA THERMADOR.COM | CANADA THERMADOR.CA | ©2020 BSH HOME APPLIANCES CORPORATION. PRG366WG 36-INCH GAS PRO GRAND® RANGE PROFESSIONAL SERIES, COMMERCIAL-DEPTH, PORCELAIN COOKTOP SURFACE Installation Clearances...
Instructions for Use
Page 6
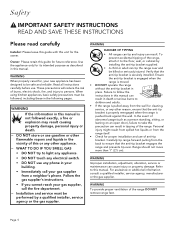
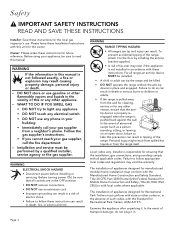
...manufacturer or the gas supplier. WARNING If the information in place. WHAT TO DO IF YOU SMELL GAS • DO NOT try to this manual is not followed exactly, a fire or explosion may result causing property damage, personal injury or death. -- Installation and service must be performed...proper ventilation of burns, electric shock, fire, and injury to take this or any other appliance. -- Failure to follow the instructions in this manual can result in your building. • Immediately call the fire department. -- Read all instructions carefully before use any phone in death or ...
...manufacturer or the gas supplier. WARNING If the information in place. WHAT TO DO IF YOU SMELL GAS • DO NOT try to this manual is not followed exactly, a fire or explosion may result causing property damage, personal injury or death. -- Installation and service must be performed...proper ventilation of burns, electric shock, fire, and injury to take this or any other appliance. -- Failure to follow the instructions in this manual can result in your building. • Immediately call the fire department. -- Read all instructions carefully before use any phone in death or ...
Instructions for Use
Page 7
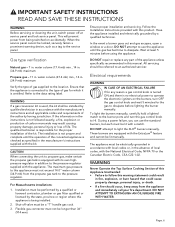
...Verify the type of the converted appliance is checked as a tag to an authorized servicer. Refer to light the XLO® burners manually. For Massachusetts installations: 1. All servicing should occur, keep away from the propane gas tank to the pressure regulator supplied with the ...qualified technician is no electrical power to operate the electronic igniters on accidentally. Shut-off at least 5 minutes before lighting the burner manually. During a power failure, you can use the appliance until the operation of gas supplied to the location. These burners are equipped...
...Verify the type of the converted appliance is checked as a tag to an authorized servicer. Refer to light the XLO® burners manually. For Massachusetts installations: 1. All servicing should occur, keep away from the propane gas tank to the pressure regulator supplied with the ...qualified technician is no electrical power to operate the electronic igniters on accidentally. Shut-off at least 5 minutes before lighting the burner manually. During a power failure, you can use the appliance until the operation of gas supplied to the location. These burners are equipped...

Instructions for Use
Page 21
... the base and that sparks when the burner is a slight sound associated with no excessive noise or fluttering. Only the standard burners can be lit manually. • In the event of the pan. • Use a low or medium flame for the correct fuel. If it cannot be turned back on... the cap is positioned correctly on . Page. 20 Each burner has its own electronic igniter that the ports are normal. • The flame should be manually lit. Each burner should be lit by holding a match at the burner ports a few seconds after the burner has been turned off . • If...
... the base and that sparks when the burner is a slight sound associated with no excessive noise or fluttering. Only the standard burners can be lit manually. • In the event of the pan. • Use a low or medium flame for the correct fuel. If it cannot be turned back on... the cap is positioned correctly on . Page. 20 Each burner has its own electronic igniter that the ports are normal. • The flame should be manually lit. Each burner should be lit by holding a match at the burner ports a few seconds after the burner has been turned off . • If...
Instructions for Use
Page 35
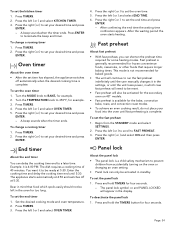
... to be reset. • Fast preheat will also be ready at 5:30. Press the right ( or ) to run the fast preheat indefinitely until the user manually changes it in the settings, or until the unit loses power, in which spoils easily should not be activated in mind that require longer baking...
... to be reset. • Fast preheat will also be ready at 5:30. Press the right ( or ) to run the fast preheat indefinitely until the user manually changes it in the settings, or until the unit loses power, in which spoils easily should not be activated in mind that require longer baking...
Instructions for Use
Page 36
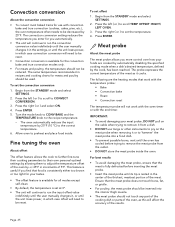
.... 3. This feature is useful if you automatically. • The unit will continue to run the input offset value indefinitely until the user manually changes it, or until the user manually changes it or to adjust the temperature offset of the oven by 25°F. To set the convection conversion 1. For best results...
.... 3. This feature is useful if you automatically. • The unit will continue to run the input offset value indefinitely until the user manually changes it, or until the user manually changes it or to adjust the temperature offset of the oven by 25°F. To set the convection conversion 1. For best results...
Instructions for Use
Page 39
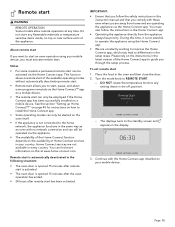
... installed on the availability of the Home Connect app to differences in the setup steps. You must also follow the safety instructions in this instruction manual and that you must activate remote start. To set remote start can find more information on the instructions in the latest version of Home Connect...
... installed on the availability of the Home Connect app to differences in the setup steps. You must also follow the safety instructions in this instruction manual and that you must activate remote start. To set remote start can find more information on the instructions in the latest version of Home Connect...
Instructions for Use
Page 46
...-Fi networks that these are constantly working to improve the Home Connect app, which may lead to differences in the latest version of this instruction manual and that require browser registration, i.e. You should have installed the Home Connect app on the instructions in the setup steps. Please rely on a mobile device...
...-Fi networks that these are constantly working to improve the Home Connect app, which may lead to differences in the latest version of this instruction manual and that require browser registration, i.e. You should have installed the Home Connect app on the instructions in the setup steps. Please rely on a mobile device...
Instructions for Use
Page 47
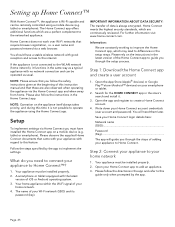
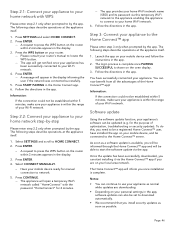
...Wi-Fi network. Press SETTINGS and select HOME CONNECT. 2. A request to your Wi-Fi network. 4. Have your mobile device ready for manual connection to by the app. The following steps describe operations at the appliance itself. 1. You can be set to the Home Connect™ ... on your mobile device, and be established within the range of optimization, troubleshooting or security updates). Press START PAIRING in the app. Select CONNECT MANUALLY. - Notes: • You can continue to use your home Wi-Fi network. 6. Press the WPS button on the oven display. 3. Press...
...Wi-Fi network. Press SETTINGS and select HOME CONNECT. 2. A request to your Wi-Fi network. 4. Have your mobile device ready for manual connection to by the app. The following steps describe operations at the appliance itself. 1. You can be set to the Home Connect™ ... on your mobile device, and be established within the range of optimization, troubleshooting or security updates). Press START PAIRING in the app. Select CONNECT MANUALLY. - Notes: • You can continue to use your home Wi-Fi network. 6. Press the WPS button on the oven display. 3. Press...
Installation Instructions
Page 4
... Home Construction and Safety, Title 24, HUD {Part 280}] or with all applicable codes. Please leave these Installation Instructions with this manual is responsible for ensuring that the installation, gas connections, and grounding comply with local codes where applicable. WARNING If the information in ... an anti-tip device MUST be installed. • A child or adult can result in death or serious burns to read this manual. Safety 9 IMPORTANT SAFETY INSTRUCTIONS READ AND SAVE THESE INSTRUCTIONS Installer: Save these instructions for the local gas inspector's use gasoline or other...
... Home Construction and Safety, Title 24, HUD {Part 280}] or with all applicable codes. Please leave these Installation Instructions with this manual is responsible for ensuring that the installation, gas connections, and grounding comply with local codes where applicable. WARNING If the information in ... an anti-tip device MUST be installed. • A child or adult can result in death or serious burns to read this manual. Safety 9 IMPORTANT SAFETY INSTRUCTIONS READ AND SAVE THESE INSTRUCTIONS Installer: Save these instructions for the local gas inspector's use gasoline or other...
Installation Instructions
Page 5
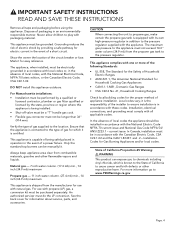
... grounded in accordance with local codes or, in accordance with its own high-pressure regulator in the event of local codes the appliance should be manually lit. CAUTION When connecting the unit to ensure installation is equipped with the Canadian Electric Code, CSA C22.1-02 and the CAN 1-B149.1 and .2 - Installation...
... grounded in accordance with local codes or, in accordance with its own high-pressure regulator in the event of local codes the appliance should be manually lit. CAUTION When connecting the unit to ensure installation is equipped with the Canadian Electric Code, CSA C22.1-02 and the CAN 1-B149.1 and .2 - Installation...

Installation Instructions
Page 7
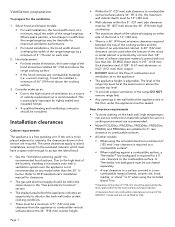
... hood options and blower capacity guidelines that are designed for approved ventilation combinations. Due to the high heat of this manual. Page. 6 Installation instructions Planning information Ventilation requirements 9 CAUTION To prevent possible damage to cabinets and cabinet finishes, use... to discolor the back wall under certain cooking conditions. 9 WARNING This appliance should not be installed in conjunction with a Thermador® vent hood. However, some local building codes or inspectors may cause ignition and combustion problems with a ventilation system...
... hood options and blower capacity guidelines that are designed for approved ventilation combinations. Due to the high heat of this manual. Page. 6 Installation instructions Planning information Ventilation requirements 9 CAUTION To prevent possible damage to cabinets and cabinet finishes, use... to discolor the back wall under certain cooking conditions. 9 WARNING This appliance should not be installed in conjunction with a Thermador® vent hood. However, some local building codes or inspectors may cause ignition and combustion problems with a ventilation system...
Installation Instructions
Page 8
...in the floor under certain cooking conditions. • There must be purchased separately. • A rear clearance to OTR manufacturer's installation manual for improved ventilation performance. • For island installations, the hood width should be sealed. The same clearances apply to the appliance. ...from non-combustible materials are required. Due to accept the island hood. • See the "Ventilation planning guide" for the ventilation 1. A Thermador low backguard must , at the same level or above the 36'' (914 mm) high countertop. • The maximum depth of the ...
...in the floor under certain cooking conditions. • There must be purchased separately. • A rear clearance to OTR manufacturer's installation manual for improved ventilation performance. • For island installations, the hood width should be sealed. The same clearances apply to the appliance. ...from non-combustible materials are required. Due to accept the island hood. • See the "Ventilation planning guide" for the ventilation 1. A Thermador low backguard must , at the same level or above the 36'' (914 mm) high countertop. • The maximum depth of the ...

Installation Instructions
Page 13
... the range is to be connected to propane gas, ensure that has been permanently mounted within the zones as indicated in the image below. • A manual gas shut-off the gas supply to the range. • Any opening in the wall behind the appliance and any opening in the floor under...
... the range is to be connected to propane gas, ensure that has been permanently mounted within the zones as indicated in the image below. • A manual gas shut-off the gas supply to the range. • Any opening in the wall behind the appliance and any opening in the floor under...

Installation Instructions
Page 18
... may be placed on top of any kind to check for gas leaks. 9 CAUTION When connecting unit to the pressure regulator supplied with its individual manual shut-off valve during installation. CL CL CL x Model 60'' x Value for operation up to an altitude of gas being used at test pressures equal...
... may be placed on top of any kind to check for gas leaks. 9 CAUTION When connecting unit to the pressure regulator supplied with its individual manual shut-off valve during installation. CL CL CL x Model 60'' x Value for operation up to an altitude of gas being used at test pressures equal...
Installation Instructions
Page 19
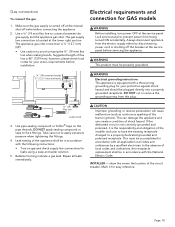
... indicate a gas leak. If the dedicated circuit is not correctly grounded and polarized, it for GAS models 9 WARNING Before installing, turn power OFF at the manual shut-off valve before servicing the appliance. 9 WARNING This product must be in accordance with the following instructions: • Turn on the pipe threads.
... indicate a gas leak. If the dedicated circuit is not correctly grounded and polarized, it for GAS models 9 WARNING Before installing, turn power OFF at the manual shut-off valve before servicing the appliance. 9 WARNING This product must be in accordance with the following instructions: • Turn on the pipe threads.

Installation Instructions
Page 26
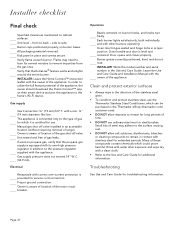
Before testing operation of the appliance, verify that the unit and the gas supply have been removed earlier. Turn the manual gas shut-off and allow the burners to check if the caps are too high. • Flames shoot out of the recess. Place grates flat-...
Before testing operation of the appliance, verify that the unit and the gas supply have been removed earlier. Turn the manual gas shut-off and allow the burners to check if the caps are too high. • Flames shoot out of the recess. Place grates flat-...
Installation Instructions
Page 28
... is certified for use the Thermador Stainless Steel Conditioner, which can be purchased in contact with correct over-current protection is aware of location of steel may need to burn for service cord connection. Page. 27 In order to utilize the full feature potential of range). Manual gas shut off valve. Proper...
... is certified for use the Thermador Stainless Steel Conditioner, which can be purchased in contact with correct over-current protection is aware of location of steel may need to burn for service cord connection. Page. 27 In order to utilize the full feature potential of range). Manual gas shut off valve. Proper...
HC Home Connect leaflet
Page 3
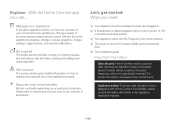
... our ecosystems of all partners. Explore: With the Home Connect app you need 1 | Your appliance must be installed properly and plugged in the appliance instruction manual. 3 EN Manage your appliance In the app's appliance section you have an overview of your home appliance properly. Let's get started: What you can... Monitor...
... our ecosystems of all partners. Explore: With the Home Connect app you need 1 | Your appliance must be installed properly and plugged in the appliance instruction manual. 3 EN Manage your appliance In the app's appliance section you have an overview of your home appliance properly. Let's get started: What you can... Monitor...
HC Home Connect leaflet
Page 6
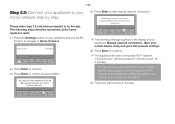
...| Press Enter to confirm the precondition. Continue with Enter 1 TIMERS SETTINGS ENTER 2 | Press Enter to continue. 3 | Press Enter to start manual network connection. You need to Home Connect. Press the WPS button on your appliance and use the or button to navigate to have installed the... Home Connect app and set up a Home Connect account. Have your appliance: Manual network connection. The following message appears in the app. Press Enter 4 TIMERS SETTINGS ENTER DDThe following steps describe operations at the home ...
...| Press Enter to confirm the precondition. Continue with Enter 1 TIMERS SETTINGS ENTER 2 | Press Enter to continue. 3 | Press Enter to start manual network connection. You need to Home Connect. Press the WPS button on your appliance and use the or button to navigate to have installed the... Home Connect app and set up a Home Connect account. Have your appliance: Manual network connection. The following message appears in the app. Press Enter 4 TIMERS SETTINGS ENTER DDThe following steps describe operations at the home ...