Installation Instructions
Page 1
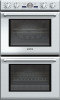
INSTALLATION MANUAL Built-in Ovens Models: M301 ME271 ME301 ME302 MED272 MED302 MEMC301 MEMCW271 MEMCW301 POD301 PODC302 PODM301 PODMW301
INSTALLATION MANUAL Built-in Ovens Models: M301 ME271 ME301 ME302 MED272 MED302 MEMC301 MEMCW271 MEMCW301 POD301 PODC302 PODM301 PODMW301
Installation Instructions
Page 2
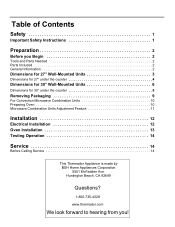
Huntington Beach, CA 92649 Questions? 1-800-735-4328 www.thermador.com We look forward to hearing from you Begin 2 Tools and Parts Needed 2 Parts Included 2 General Information 2 Dimensions for 27" Wall-Mounted Units...the counter 8 Removing Packaging 9 For Convection Microwave Combination Units 10 Preparing Oven 10 Microwave Combination Units Adjustment Feature 11 Installation 12 Electrical Installation 12 Oven Installation 13 Testing Operation 14 Service 14 Before Calling Service 14 This Thermador Appliance is made by BSH Home Appliances Corporation 5551 McFadden Ave. Table of...
Huntington Beach, CA 92649 Questions? 1-800-735-4328 www.thermador.com We look forward to hearing from you Begin 2 Tools and Parts Needed 2 Parts Included 2 General Information 2 Dimensions for 27" Wall-Mounted Units...the counter 8 Removing Packaging 9 For Convection Microwave Combination Units 10 Preparing Oven 10 Microwave Combination Units Adjustment Feature 11 Installation 12 Electrical Installation 12 Oven Installation 13 Testing Operation 14 Service 14 Before Calling Service 14 This Thermador Appliance is made by BSH Home Appliances Corporation 5551 McFadden Ave. Table of...

Installation Instructions
Page 4
Preparation Before you Begin Tools and Parts Needed • Phillips head screwdriver • Measuring tape • Drill with all applicable codes. Transport To avoid damage to the oven vent, use the transport method shown in accordance with bit (1/8") Parts Included • Phillips head screws (6) General Information Power Requirements The outlet must be properly grounded in the picture below. English 2
Preparation Before you Begin Tools and Parts Needed • Phillips head screwdriver • Measuring tape • Drill with all applicable codes. Transport To avoid damage to the oven vent, use the transport method shown in accordance with bit (1/8") Parts Included • Phillips head screws (6) General Information Power Requirements The outlet must be properly grounded in the picture below. English 2
Installation Instructions
Page 5
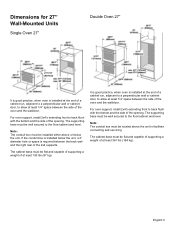
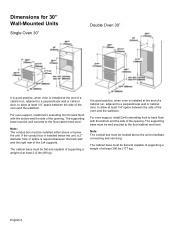
... box must be located above or below the unit, a 2" diameter hole or space is required between the back wall and the right rear of the oven and the wall/door. The cabinet base must be well secured to back flush with the bottom and the side of the opening . Note: The... facilitate connecting and servicing. If the conduit box is installed below the unit. Dimensions for 27" Wall-Mounted Units Single Oven 27" Double Oven 27" 27 1/16" (687mm) It is good practice, when oven is installed at the end of a cabinet run , adjacent to a perpendicular wall or cabinet door, to allow at ...
... box must be located above or below the unit, a 2" diameter hole or space is required between the back wall and the right rear of the oven and the wall/door. The cabinet base must be well secured to back flush with the bottom and the side of the opening . Note: The... facilitate connecting and servicing. If the conduit box is installed below the unit. Dimensions for 27" Wall-Mounted Units Single Oven 27" Double Oven 27" 27 1/16" (687mm) It is good practice, when oven is installed at the end of a cabinet run , adjacent to a perpendicular wall or cabinet door, to allow at ...
Installation Instructions
Page 6
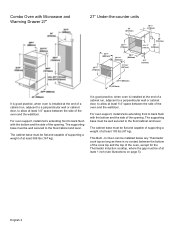
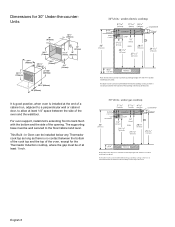
... cook top and the top of the oven, except for the Thermador Induction cooktop, where the gap must be installed below any Thermador cook top as long as there is ...installed at the end of a cabinet run , adjacent to a perpendicular wall or cabinet door, to allow at least 1/4" space between the side of the oven and the wall/door. This Built -In Oven...3" 20" (76mm) (508mm) 43/4" (121mm) 237/8" (606mm) 22" (559mm) It is good practice, when oven is installed at the end of a cabinet run , adjacent to a perpendicular wall or cabinet door, to allow at least...
... cook top and the top of the oven, except for the Thermador Induction cooktop, where the gap must be installed below any Thermador cook top as long as there is ...installed at the end of a cabinet run , adjacent to a perpendicular wall or cabinet door, to allow at least 1/4" space between the side of the oven and the wall/door. This Built -In Oven...3" 20" (76mm) (508mm) 43/4" (121mm) 237/8" (606mm) 22" (559mm) It is good practice, when oven is installed at the end of a cabinet run , adjacent to a perpendicular wall or cabinet door, to allow at least...
Installation Instructions
Page 7
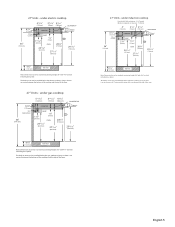
...Conduit 36" (914 mm) 415/16" (125 mm) 315/16" 4 3/16" (99mm) (106mm) COOKTOP SUMP 113/16" (47mm) 24 7/16" (621mm) 1/4" (7mm) OVEN 281/4" (718mm) 271/16" (687 mm) COUNTERTOP 3 "(76mm) 29 1/16" (738 mm) 43/4" (121mm) TOE KICK Note: Dimensions based on standard countertop height (36" ...3/4" (172 mm) Fitting / Conduit 36" (914 mm) 4" (102 mm) 3 1/8" (79mm) 4 3/16" (106 mm) COOKTOP SUMP 2 3/4" (70 mm) 11/16" (27 mm) OVEN 281/4" (718mm) 24 7/16" (621mm) 271/16" (687 mm) COUNTERTOP 3 "(76mm) 29 1/16" (738 mm) 43/4" (121mm) TOE KICK Note: Dimensions based on standard countertop...
...Conduit 36" (914 mm) 415/16" (125 mm) 315/16" 4 3/16" (99mm) (106mm) COOKTOP SUMP 113/16" (47mm) 24 7/16" (621mm) 1/4" (7mm) OVEN 281/4" (718mm) 271/16" (687 mm) COUNTERTOP 3 "(76mm) 29 1/16" (738 mm) 43/4" (121mm) TOE KICK Note: Dimensions based on standard countertop height (36" ...3/4" (172 mm) Fitting / Conduit 36" (914 mm) 4" (102 mm) 3 1/8" (79mm) 4 3/16" (106 mm) COOKTOP SUMP 2 3/4" (70 mm) 11/16" (27 mm) OVEN 281/4" (718mm) 24 7/16" (621mm) 271/16" (687 mm) COUNTERTOP 3 "(76mm) 29 1/16" (738 mm) 43/4" (121mm) TOE KICK Note: Dimensions based on standard countertop...
Installation Instructions
Page 8
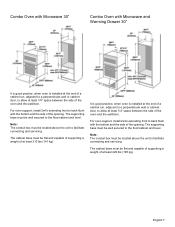
... located above or below the unit, a 2" diameter hole or space is required between the back wall and the right rear of the opening . For oven support, install 2x4's extending front to back flush with the bottom and the side of at least 212 lbs (96 kg). The supporting base must... 1/4" space between the side of at the end of a cabinet run , adjacent to a perpendicular wall or cabinet door, to facilitate connecting and servicing. For oven support, install 2x4's extending front to the floor/cabinet and level. The cabinet base must be well secured to back flush with the bottom and...
... located above or below the unit, a 2" diameter hole or space is required between the back wall and the right rear of the opening . For oven support, install 2x4's extending front to back flush with the bottom and the side of at least 212 lbs (96 kg). The supporting base must... 1/4" space between the side of at the end of a cabinet run , adjacent to a perpendicular wall or cabinet door, to facilitate connecting and servicing. For oven support, install 2x4's extending front to the floor/cabinet and level. The cabinet base must be well secured to back flush with the bottom and...
Installation Instructions
Page 9
... the floor/cabinet and level. The supporting base must be well secured to back flush with the bottom and the side of the opening . For oven support, install 2x4's extending front to allow at the end of a cabinet run , adjacent to a perpendicular wall or cabinet door, to back flush with the... to facilitate connecting and servicing. Note: The conduit box must be located above the unit to allow at least 1/4" space between the side of the oven and the wall/door. Note: The conduit box must be located above the unit to the floor/cabinet and level. It is good practice, when...
... the floor/cabinet and level. The supporting base must be well secured to back flush with the bottom and the side of the opening . For oven support, install 2x4's extending front to allow at the end of a cabinet run , adjacent to a perpendicular wall or cabinet door, to back flush with the... to facilitate connecting and servicing. Note: The conduit box must be located above the unit to allow at least 1/4" space between the side of the oven and the wall/door. Note: The conduit box must be located above the unit to the floor/cabinet and level. It is good practice, when...
Installation Instructions
Page 10
...bottom of the cooktop and the top of the oven. 30" Units - Dimensions for the Thermador Induction cooktop, where the gap must be of... the opening. The supporting base must be well secured to the floor/cabinet and level. The built-in oven can be installed below the gas cooktop as long as there is no contact between the side of the oven...315/16" 4 3/16" (99mm) (106mm) COOKTOP SUMP 113/16" (47mm) 24 7/16" (621mm) 1/4" (7mm) OVEN 281/4" (718mm) 271/16" (687 mm) COUNTERTOP 3 "(76mm) 29 1/16" (738 mm) 43/4" (121mm) TOE ...
...bottom of the cooktop and the top of the oven. 30" Units - Dimensions for the Thermador Induction cooktop, where the gap must be of... the opening. The supporting base must be well secured to the floor/cabinet and level. The built-in oven can be installed below the gas cooktop as long as there is no contact between the side of the oven...315/16" 4 3/16" (99mm) (106mm) COOKTOP SUMP 113/16" (47mm) 24 7/16" (621mm) 1/4" (7mm) OVEN 281/4" (718mm) 271/16" (687 mm) COUNTERTOP 3 "(76mm) 29 1/16" (738 mm) 43/4" (121mm) TOE ...
Installation Instructions
Page 11
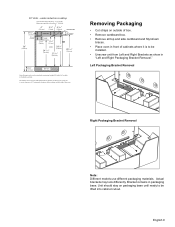
...of box. • Remove cardboard box. • Remove all top and side cardboard and Styrofoam braces. • Place oven in front of the oven. Left Packaging Bracket Removal Right Packaging Bracket Removal Note: Different models use different packaging materials. The built-in packaging base. ...mm) Fitting / Conduit 36" (914 mm) 4" (102 mm) 3 1/8" 4 3/16" (79mm) (106mm) COOKTOP COUNTERTOP 3 "(76mm) SUMP 2 3/4" (70 mm) 11/16" (27 mm) OVEN 281/4" (718mm) 24 7/16" (621mm) 271/16" (687 mm) 29 1/16" (738 mm) 43/4" (121mm) TOE KICK Note: Dimensions based on packaging base until ready...
...of box. • Remove cardboard box. • Remove all top and side cardboard and Styrofoam braces. • Place oven in front of the oven. Left Packaging Bracket Removal Right Packaging Bracket Removal Note: Different models use different packaging materials. The built-in packaging base. ...mm) Fitting / Conduit 36" (914 mm) 4" (102 mm) 3 1/8" 4 3/16" (79mm) (106mm) COOKTOP COUNTERTOP 3 "(76mm) SUMP 2 3/4" (70 mm) 11/16" (27 mm) OVEN 281/4" (718mm) 24 7/16" (621mm) 271/16" (687 mm) 29 1/16" (738 mm) 43/4" (121mm) TOE KICK Note: Dimensions based on packaging base until ready...
Installation Instructions
Page 12
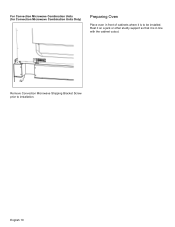
Remove Convection Microwave Shipping Bracket Screw prior to be installed. English 10 For Convection Microwave Combination Units (for Convection Microwave Combination Units Only) Preparing Oven Place oven in line with the cabinet cutout. Rest it on a jack or other sturdy support so that it is in front of cabinets where it is to installation.
Remove Convection Microwave Shipping Bracket Screw prior to be installed. English 10 For Convection Microwave Combination Units (for Convection Microwave Combination Units Only) Preparing Oven Place oven in line with the cabinet cutout. Rest it on a jack or other sturdy support so that it is in front of cabinets where it is to installation.

Installation Instructions
Page 14
...listed conduit connector must comply with all applicable local codes. installation, electrical connections and grounding must be connected to permit temporary removal of the oven. If local codes permit grounding through hole prepared in cabinet to attach to the bare ground electrical supply wire. Rotate conduit cable upward ...(or downward) and direct through the electrical supply neutral, connect both green ground wire and white wire from the oven to white (or gray) neutral wire in junction box. • Connect both the white neutral wire and the bare ground wire from...
...listed conduit connector must comply with all applicable local codes. installation, electrical connections and grounding must be connected to permit temporary removal of the oven. If local codes permit grounding through hole prepared in cabinet to attach to the bare ground electrical supply wire. Rotate conduit cable upward ...(or downward) and direct through the electrical supply neutral, connect both green ground wire and white wire from the oven to white (or gray) neutral wire in junction box. • Connect both the white neutral wire and the bare ground wire from...
Installation Instructions
Page 15
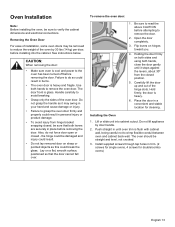
...; from hinge bracket snapping closed, be sure that the door cannot fall over. Hold firmly; Place the door in trim. (2 screws for single ovens, 4 screws for cleaning. Use both levers are securely in place before installing into cabinet cutout. Do not grasp the handle as this could break ...result. • Do not lay removed door on both sides and using both hands, close the door gently until oven trim is heavy. 6. Removing the Oven Door For ease of installation, some oven doors may swing in your hand and cause damage or injury. • Failure to crimp flexible conduit between...
...; from hinge bracket snapping closed, be sure that the door cannot fall over. Hold firmly; Place the door in trim. (2 screws for single ovens, 4 screws for cleaning. Use both levers are securely in place before installing into cabinet cutout. Do not grasp the handle as this could break ...result. • Do not lay removed door on both sides and using both hands, close the door gently until oven trim is heavy. 6. Removing the Oven Door For ease of installation, some oven doors may swing in your hand and cause damage or injury. • Failure to crimp flexible conduit between...
Installation Instructions
Page 16
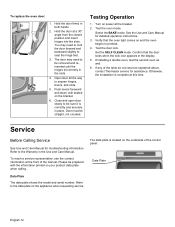
... 2. Open door all the way to preheat. 4. Select the BAKE mode. Test the door lock. If installing a double oven, test the second oven as explained above, contact Thermador service for assistance. If any of the control panel: Data Plate English 14 The door may need to the data plate on... the underside of the tests do not result as well. 6. Turn on and the oven begins to expose hinges, levers, ...
... 2. Open door all the way to preheat. 4. Select the BAKE mode. Test the door lock. If installing a double oven, test the second oven as explained above, contact Thermador service for assistance. If any of the control panel: Data Plate English 14 The door may need to the data plate on... the underside of the tests do not result as well. 6. Turn on and the oven begins to expose hinges, levers, ...
SP
Page 1
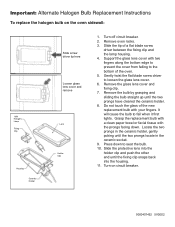
...ceramic holder. 8. Remove the glass lens cover and fixing clip. 7. Slide the tip of the oven. 5. Remove the bulb by grasping and sliding the bulb straight up until the fixing clip snaps ...into the housing. 11. It will cause the bulb to loosen the glass lens cover. 6. Remove oven racks. 3. Locate the two prongs in the ceramic holder, gently poking until the two prongs locate in... the ceramic socket. 9. Press down . Turn on the oven sidewall: 10W Halogen Lamp Fixing Clip Housing Ceramic Holder Slide screw driver tip here Loosen glass lens ...
...ceramic holder. 8. Remove the glass lens cover and fixing clip. 7. Slide the tip of the oven. 5. Remove the bulb by grasping and sliding the bulb straight up until the fixing clip snaps ...into the housing. 11. It will cause the bulb to loosen the glass lens cover. 6. Remove oven racks. 3. Locate the two prongs in the ceramic holder, gently poking until the two prongs locate in... the ceramic socket. 9. Press down . Turn on the oven sidewall: 10W Halogen Lamp Fixing Clip Housing Ceramic Holder Slide screw driver tip here Loosen glass lens ...
Design Guide
Page 1
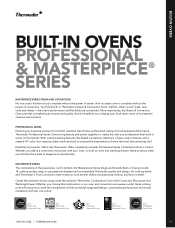
70 MODELS SHOWN: PODMW301J TRIPLE COMBINATION BUILT-IN OVEN AND DWHD651JFP DISHWASHER
70 MODELS SHOWN: PODMW301J TRIPLE COMBINATION BUILT-IN OVEN AND DWHD651JFP DISHWASHER
Design Guide
Page 2
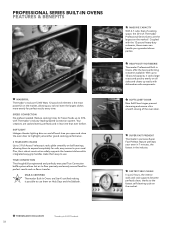
...culinary utopia with the exclusive Thermador Combination Oven with just one cutout. 2011 Steam and Convection Oven 2011 Steam and Convection Oven 2011 Steam and Convection Oven 2011 Steam and Convection Oven 2010 Masterpiece Series Oven 1.800.735.4328 | THERMADOR.COM 71 Whether you ...stainless steel knobs, professional styling and unsurpassed performance, Thermador Professional Series Ovens bring beauty and power together to -use graphical displays and incomparable Thermador quality and design. Six cooking levels and Thermador's True Convection make your food retain more of ...
...culinary utopia with the exclusive Thermador Combination Oven with just one cutout. 2011 Steam and Convection Oven 2011 Steam and Convection Oven 2011 Steam and Convection Oven 2011 Steam and Convection Oven 2010 Masterpiece Series Oven 1.800.735.4328 | THERMADOR.COM 71 Whether you ...stainless steel knobs, professional styling and unsurpassed performance, Thermador Professional Series Ovens bring beauty and power together to -use graphical displays and incomparable Thermador quality and design. Six cooking levels and Thermador's True Convection make your food retain more of ...
Design Guide
Page 3
...Convection system. SOFTCLOSE® DOOR New SoftClose hinges prevent slamming and ensure ultra smooth closing of cooking space, the 30-inch Thermador Professional Series Ovens are the largest on the market*. FASTEST SELF-CLEAN In just 2 hours, the interior walls and rack supports become perfectly ...grandest dinner parties. Your creations are Star-K certified making it cooks large roasts and poultry evenly on the market. STAR-K CERTIFIED Thermador Built-In Ovens are cooked evenly, perfectly and in the industry. SPEED CONVECTION No preheat needed. With up to 12-pound capacity, it ...
...Convection system. SOFTCLOSE® DOOR New SoftClose hinges prevent slamming and ensure ultra smooth closing of cooking space, the 30-inch Thermador Professional Series Ovens are the largest on the market*. FASTEST SELF-CLEAN In just 2 hours, the interior walls and rack supports become perfectly ...grandest dinner parties. Your creations are Star-K certified making it cooks large roasts and poultry evenly on the market. STAR-K CERTIFIED Thermador Built-In Ovens are cooked evenly, perfectly and in the industry. SPEED CONVECTION No preheat needed. With up to 12-pound capacity, it ...
Design Guide
Page 4
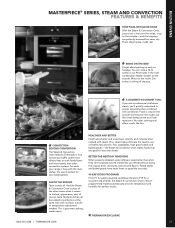
...DONE With the Steam & Convection Oven, pizza crust is moist on the inside . You can be cooked to perfection at a 5-star restaurant. Dry turkey is crisp on the outside and moist on the outside . THERMADOR EXCLUSIVE 1.800.735.4328 | THERMADOR.COM 73 Golden on holidays.... GOURMET TOOL If you ask a professional chef about getting up early on the outside - CONVECTION BEYOND CONVENTION The Steam & Convection Oven features Thermador's True Convection baffle system that are perfectly browned but never dry. HEALTHIER AND BETTER Food tastes better and loses fewer vitamins and minerals...
...DONE With the Steam & Convection Oven, pizza crust is moist on the inside . You can be cooked to perfection at a 5-star restaurant. Dry turkey is crisp on the outside and moist on the outside . THERMADOR EXCLUSIVE 1.800.735.4328 | THERMADOR.COM 73 Golden on holidays.... GOURMET TOOL If you ask a professional chef about getting up early on the outside - CONVECTION BEYOND CONVENTION The Steam & Convection Oven features Thermador's True Convection baffle system that are perfectly browned but never dry. HEALTHIER AND BETTER Food tastes better and loses fewer vitamins and minerals...
Design Guide
Page 5
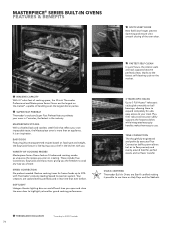
..., the EasyCook feature is like having a sous-chef in the kitchen with Thermador's industry-leading Speed Convection system. THERMADOR EXCLUSIVE *According to cook any way you open and close the oven door to expand completely for perfect results and no flavor transfer. MASTERPIECE STYLING...while integrated easy-grip handles make them to highlight yet another grand cooking performance. STAR-K CERTIFIED Thermador Built-In Ovens are Star-K certified making it possible to your oven in 7 minutes, the fastest in the industry. TRUE CONVECTION The thoughtfully engineered and perfectly ...
..., the EasyCook feature is like having a sous-chef in the kitchen with Thermador's industry-leading Speed Convection system. THERMADOR EXCLUSIVE *According to cook any way you open and close the oven door to expand completely for perfect results and no flavor transfer. MASTERPIECE STYLING...while integrated easy-grip handles make them to highlight yet another grand cooking performance. STAR-K CERTIFIED Thermador Built-In Ovens are Star-K certified making it possible to your oven in 7 minutes, the fastest in the industry. TRUE CONVECTION The thoughtfully engineered and perfectly ...


