Design Guide - Built-In Ovens
Page 4
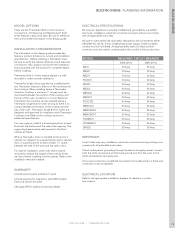
...Refer to the installation manual for complete details before installing into the cabinet. WARRANTY Limited warranty parts and labor (1 year) Limited warranty for additional warranty details. All built-in ovens below a Thermador induction Cooktop, a minimum 1" air gap must comply with the bottom and the side of...approved for installation with all applicable local codes. per door, before installing. MODEL M301 ME301 ME271 POD301 DM301 ME302 MED302 MED272 PODC302 MEMC301 MEMCW301 MEMCW271 PODM301 PODMW301 DM302 REQuIRED cIRcuIT bREAkER 240V, 60 Hz 208V, 60 Hz 30 Amp 25 Amp 30 Amp...
...Refer to the installation manual for complete details before installing into the cabinet. WARRANTY Limited warranty parts and labor (1 year) Limited warranty for additional warranty details. All built-in ovens below a Thermador induction Cooktop, a minimum 1" air gap must comply with the bottom and the side of...approved for installation with all applicable local codes. per door, before installing. MODEL M301 ME301 ME271 POD301 DM301 ME302 MED302 MED272 PODC302 MEMC301 MEMCW301 MEMCW271 PODM301 PODMW301 DM302 REQuIRED cIRcuIT bREAkER 240V, 60 Hz 208V, 60 Hz 30 Amp 25 Amp 30 Amp...
Installation Instructions
Page 2
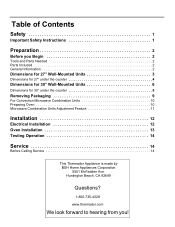
Huntington Beach, CA 92649 Questions? 1-800-735-4328 www.thermador.com We look forward to hearing from you Begin 2 Tools and Parts Needed 2 Parts Included 2 General Information 2 Dimensions for 27" Wall-Mounted Units 3 Dimensions for 27" under the counter 4 Dimensions for 30" Wall-Mounted...11 Installation 12 Electrical Installation 12 Oven Installation 13 Testing Operation 14 Service 14 Before Calling Service 14 This Thermador Appliance is made by BSH Home Appliances Corporation 5551 McFadden Ave. Table of Contents Safety 1 Important Safety Instructions 1 Preparation 2 Before...
Huntington Beach, CA 92649 Questions? 1-800-735-4328 www.thermador.com We look forward to hearing from you Begin 2 Tools and Parts Needed 2 Parts Included 2 General Information 2 Dimensions for 27" Wall-Mounted Units 3 Dimensions for 27" under the counter 4 Dimensions for 30" Wall-Mounted...11 Installation 12 Electrical Installation 12 Oven Installation 13 Testing Operation 14 Service 14 Before Calling Service 14 This Thermador Appliance is made by BSH Home Appliances Corporation 5551 McFadden Ave. Table of Contents Safety 1 Important Safety Instructions 1 Preparation 2 Before...
Installation Instructions
Page 3
... the OFF position. For example, do not remove leveling legs, panels, wire covers or anti-tip brackets/screws. WARNING: Do not repair or replace any part of Electric Fans • ANSI Z21.1, The American National Standard for easy reference. Refer to specific installations. Unit is properly installed and grounded by door...
... the OFF position. For example, do not remove leveling legs, panels, wire covers or anti-tip brackets/screws. WARNING: Do not repair or replace any part of Electric Fans • ANSI Z21.1, The American National Standard for easy reference. Refer to specific installations. Unit is properly installed and grounded by door...

Installation Instructions
Page 4
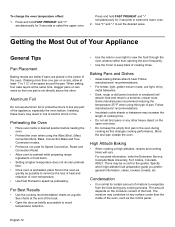
Preparation Before you Begin Tools and Parts Needed • Phillips head screwdriver • Measuring tape • Drill with bit (1/8") Parts Included • Phillips head screws (6) General Information Power Requirements The outlet must be properly grounded in the picture below. English 2 Transport To avoid damage to the oven vent, use the transport method shown in accordance with all applicable codes.
Preparation Before you Begin Tools and Parts Needed • Phillips head screwdriver • Measuring tape • Drill with bit (1/8") Parts Included • Phillips head screws (6) General Information Power Requirements The outlet must be properly grounded in the picture below. English 2 Transport To avoid damage to the oven vent, use the transport method shown in accordance with all applicable codes.
Quick Reference Guide
Page 1
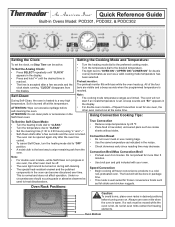
... is hot, do not let oven mitts contact hot heating 1 elements. 0 Oven Bottom ATTENTION: Do not clean parts or accessories in a cold, non-preheated oven. Quick Reference Guide Built-in Ovens Model: POD301, POD302, & PODC302 Setting the Clock: Setting the Cooking Mode and Temperature: To set the clock, no circumstances should scouring...
... is hot, do not let oven mitts contact hot heating 1 elements. 0 Oven Bottom ATTENTION: Do not clean parts or accessories in a cold, non-preheated oven. Quick Reference Guide Built-in Ovens Model: POD301, POD302, & PODC302 Setting the Clock: Setting the Cooking Mode and Temperature: To set the clock, no circumstances should scouring...
User Manual
Page 2
Baked Goods/Entrees . . . . 26 Cooking Chart-Meats . . . 28 This Thermador Appliance is Organized 1 Safety 2 Important Safety Instructions 2 Getting Started 4 Parts 4 Accessories 5 Control 7 Before Using the Oven for the Rotisserie 19 Cleaning and Maintenance 20 Cleaning 20 Self-Clean 20 Avoid These Cleaners ... 1 How This Manual is made by BSH Home Appliances Corporation 5551 McFadden Ave. Huntington Beach, CA 92649 Questions? 1-800-735-4328 www.thermador.com We look forward to Obtain Service or Parts 24 STATEMENT OF LIMITED PRODUCT WARRANTY 30 Convection Cooking Chart-
Baked Goods/Entrees . . . . 26 Cooking Chart-Meats . . . 28 This Thermador Appliance is Organized 1 Safety 2 Important Safety Instructions 2 Getting Started 4 Parts 4 Accessories 5 Control 7 Before Using the Oven for the Rotisserie 19 Cleaning and Maintenance 20 Cleaning 20 Self-Clean 20 Avoid These Cleaners ... 1 How This Manual is made by BSH Home Appliances Corporation 5551 McFadden Ave. Huntington Beach, CA 92649 Questions? 1-800-735-4328 www.thermador.com We look forward to Obtain Service or Parts 24 STATEMENT OF LIMITED PRODUCT WARRANTY 30 Convection Cooking Chart-
User Manual
Page 4
... you to the oven components and features. • The "Operation" section offers you with information on how to clean and care for the various oven parts. • The "Service" section includes your warranty and do-ityourself troubleshooting tips. • The "Cooking Charts" sections are removable guides for using the correct cooking...
... you to the oven components and features. • The "Operation" section offers you with information on how to clean and care for the various oven parts. • The "Service" section includes your warranty and do-ityourself troubleshooting tips. • The "Cooking Charts" sections are removable guides for using the correct cooking...
User Manual
Page 5
... intended for normal household use corrosive chemicals, vapors, flammables or nonfood products in this appliance. Never use the appliance for any part of the appliance unless specifically recommended in or near this manual. Proper Installation and Maintenance Have the installer show you have a ...and cared for, your new appliance has been designed to a factory authorized service center. Turn off the burner. Always have any part of the appliance, especially the oven bottom. When using kitchen appliances, basic safety precautions must be properly installed and grounded by a ...
... intended for normal household use corrosive chemicals, vapors, flammables or nonfood products in this appliance. Never use the appliance for any part of the appliance unless specifically recommended in or near this manual. Proper Installation and Maintenance Have the installer show you have a ...and cared for, your new appliance has been designed to a factory authorized service center. Turn off the burner. Always have any part of the appliance, especially the oven bottom. When using kitchen appliances, basic safety precautions must be properly installed and grounded by a ...

User Manual
Page 6
...heating elements. Wipe out excessive spillage before beginning. During self-clean, fumes are oven vent openings, surfaces near the unit. Do not clean parts or accessories in use this unit according to the instructions contained in the oven. After the release of oven until they have a CLASS ABC... or on hot surfaces may tip over, potentially causing severe injury. CAUTION: Items of pressure may be seriously injured. Children climbing on any part of potential exposure to such substances. When self-cleaning, confirm that it is still hot. If the door does not lock, stop self...
...heating elements. Wipe out excessive spillage before beginning. During self-clean, fumes are oven vent openings, surfaces near the unit. Do not clean parts or accessories in use this unit according to the instructions contained in the oven. After the release of oven until they have a CLASS ABC... or on hot surfaces may tip over, potentially causing severe injury. CAUTION: Items of pressure may be seriously injured. Children climbing on any part of potential exposure to such substances. When self-cleaning, confirm that it is still hot. If the door does not lock, stop self...

User Manual
Page 7
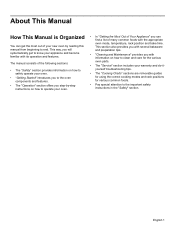
... vent, and condensation may vary slightly. Do not block the vent, since it is normal to see steam escaping from the oven vent. Getting Started Parts* Door Lock Door Gasket Door Hinge Control Panel Convection Fan 6 5 4 3 Rack Position Guides 2 with 7 Rack Positions 1 0 Oven Bottom Oven Vent *Picture shows double oven. English...
... vent, and condensation may vary slightly. Do not block the vent, since it is normal to see steam escaping from the oven vent. Getting Started Parts* Door Lock Door Gasket Door Hinge Control Panel Convection Fan 6 5 4 3 Rack Position Guides 2 with 7 Rack Positions 1 0 Oven Bottom Oven Vent *Picture shows double oven. English...

User Manual
Page 8
When the oven is operating in the selfclean oven. As a result the element is opened. Accessories Probe The probe can be used to line any part of the appliance, especially the oven bottom. See "Rotisserie" under "Getting the Most Out of electric shock or fire. Broil Pan and Grid Use for ...
When the oven is operating in the selfclean oven. As a result the element is opened. Accessories Probe The probe can be used to line any part of the appliance, especially the oven bottom. See "Rotisserie" under "Getting the Most Out of electric shock or fire. Broil Pan and Grid Use for ...

User Manual
Page 12
... on and off. NOTE: • To use the broil pan included with additional conveniences when cooking. The numbers flash. 2. Fast Preheat stays on the lower part of time. To set the timer: 1. If Fast Preheat is available for a maximum of 12 hours. The flash on the top... part of the display represents the upper oven, and the flash on until the flash appears for both ovens. Max Cook is not available for Bake, ...
... on and off. NOTE: • To use the broil pan included with additional conveniences when cooking. The numbers flash. 2. Fast Preheat stays on the lower part of time. To set the timer: 1. If Fast Preheat is available for a maximum of 12 hours. The flash on the top... part of the display represents the upper oven, and the flash on until the flash appears for both ovens. Max Cook is not available for Bake, ...
User Manual
Page 14
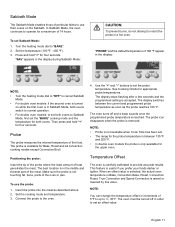
... current and programmed probe temperature as soon as described above. 2. When an offset value is selected, the actual oven temperature in the middle and thickest part of the meat. In Sabbath Mode, the oven continues to set Sabbath Mode: 1. Set the temperature (100 ºF - 450 ºF). 3....you prefer your foods darker or lighter. The display stops flashing after a few seconds and the programmed setting is not touching fat, bone, parts of the oven or pan. Temperature Offset The oven is reached. Set the cooking mode and temperature. 3. Positioning the probe: Insert the ...
... current and programmed probe temperature as soon as described above. 2. When an offset value is selected, the actual oven temperature in the middle and thickest part of the meat. In Sabbath Mode, the oven continues to set Sabbath Mode: 1. Set the temperature (100 ºF - 450 ºF). 3....you prefer your foods darker or lighter. The display stops flashing after a few seconds and the programmed setting is not touching fat, bone, parts of the oven or pan. Temperature Offset The oven is reached. Set the cooking mode and temperature. 3. Positioning the probe: Insert the ...
User Manual
Page 15
... or fire. There may result in the oven during any surface cooler than one pan is normal for 3 seconds to set broil pans or any part of pan.
... or fire. There may result in the oven during any surface cooler than one pan is normal for 3 seconds to set broil pans or any part of pan.

User Manual
Page 20
.... Cut off moisture and pat dry. Cut thin slices, 1/8" thick, drain well. 15-17 7-12 Leathery with water, shake off stem end. English 17 Orange part of skin thinly peeled from the top. Wash and towel dry. Remove membrane of orange. 11-15 Slightly pliable. 11-15 Slightly pliable. 10-15...
.... Cut off moisture and pat dry. Cut thin slices, 1/8" thick, drain well. 15-17 7-12 Leathery with water, shake off stem end. English 17 Orange part of skin thinly peeled from the top. Wash and towel dry. Remove membrane of orange. 11-15 Slightly pliable. 11-15 Slightly pliable. 10-15...
User Manual
Page 23
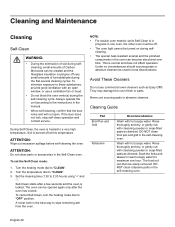
...to treat discolorations. ATTENTION: Wipe out excessive spillage before self-cleaning the oven. Turn the temperature dial to "CLEAN". 2. Cleaning Guide Part Broil Pan and Grid Rotisserie Recommendations Wash with cleansing powder or soap-filled pads as directed. Soak the forks and skewer in warm ... not affect operation. Under no circumstances should scouring pads or abrasive cleaners be easily removed. They may damage the oven finish or parts. English 20 Rinse thoroughly and dry, or gently rub with hot soapy water. Wash with cleansing powder or soap-filled pads as...
...to treat discolorations. ATTENTION: Wipe out excessive spillage before self-cleaning the oven. Turn the temperature dial to "CLEAN". 2. Cleaning Guide Part Broil Pan and Grid Rotisserie Recommendations Wash with cleansing powder or soap-filled pads as directed. Soak the forks and skewer in warm ... not affect operation. Under no circumstances should scouring pads or abrasive cleaners be easily removed. They may damage the oven finish or parts. English 20 Rinse thoroughly and dry, or gently rub with hot soapy water. Wash with cleansing powder or soap-filled pads as...

User Manual
Page 24
... in the self-cleaning oven. Then wipe off before replacing the light bulb(s). Avoid getting cleansing powder in the direction of vegetable oil. Part Stainless Steel Surfaces Plastic & Controls Probe Printed areas (words & numbers) Recommendations Always wipe or rub in the telescopic slides. Use a clean...and lights are made of the bulb. Use only 10 Watt, 12 Volt bi-pin halogen light bulbs. DO NOT CLEAN GASKET. Part Flat Rack Telescopic Rack Fiberglass Gasket Glass Painted Surfaces Porcelain Surfaces Recommendations Wash with soapy water, rinse and dry. When cool, clean...
... in the self-cleaning oven. Then wipe off before replacing the light bulb(s). Avoid getting cleansing powder in the direction of vegetable oil. Part Stainless Steel Surfaces Plastic & Controls Probe Printed areas (words & numbers) Recommendations Always wipe or rub in the telescopic slides. Use a clean...and lights are made of the bulb. Use only 10 Watt, 12 Volt bi-pin halogen light bulbs. DO NOT CLEAN GASKET. Part Flat Rack Telescopic Rack Fiberglass Gasket Glass Painted Surfaces Porcelain Surfaces Recommendations Wash with soapy water, rinse and dry. When cool, clean...
User Manual
Page 27
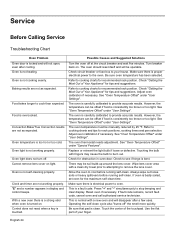
... the lens cover. The oven thermostat needs adjustment. If fault code remains, record fault code, cancel oven and call authorized service technician. Use the flat part of Your Appliance" for recommended rack position. Convection Bake/True Convection results are not as expected. Cannot remove lens cover on . Be sure oven temperature...
... the lens cover. The oven thermostat needs adjustment. If fault code remains, record fault code, cancel oven and call authorized service technician. Use the flat part of Your Appliance" for recommended rack position. Convection Bake/True Convection results are not as expected. Cannot remove lens cover on . Be sure oven temperature...
User Manual
Page 28
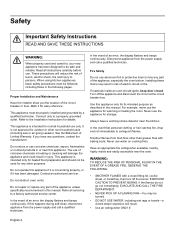
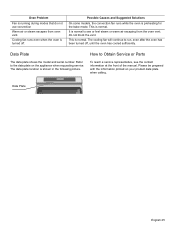
... modes that do not use convection Warm air or steam escapes from the oven vent. The data plate location is normal to Obtain Service or Parts The data plate shows the model and serial number. It is shown in the following picture. Data Plate English 25
... modes that do not use convection Warm air or steam escapes from the oven vent. The data plate location is normal to Obtain Service or Parts The data plate shows the model and serial number. It is shown in the following picture. Data Plate English 25

User Manual
Page 33
... and not for resale, or commercial use an un-authorized servicer; All removed parts and components shall become the property of its sole option. Thermador will have been made without success, then Thermador will repair your Product without charge to you (subject to repair the Product yourself... for customer service and technical ability (note that they agree to have responsibility, for the Product if it is to such parts. Thermador's sole liability and responsibility hereunder is the best way for an additional charge). while not necessary to effectuate warranty coverage, it...
... and not for resale, or commercial use an un-authorized servicer; All removed parts and components shall become the property of its sole option. Thermador will have been made without success, then Thermador will repair your Product without charge to you (subject to repair the Product yourself... for customer service and technical ability (note that they agree to have responsibility, for the Product if it is to such parts. Thermador's sole liability and responsibility hereunder is the best way for an additional charge). while not necessary to effectuate warranty coverage, it...

