Design Guide - Professional Rangetops
Page 3
... of more flame distribution than a round burner of the same size, which allows the inclusion of a conventional range or cooktop and over 50% faster than ever before. Each and every Thermador Pro Rangetop features two ExtraLow burners. 18,000 BTU/HR ON EVERY BURNER Delivers superior cooking flexibility by adding...
... of more flame distribution than a round burner of the same size, which allows the inclusion of a conventional range or cooktop and over 50% faster than ever before. Each and every Thermador Pro Rangetop features two ExtraLow burners. 18,000 BTU/HR ON EVERY BURNER Delivers superior cooking flexibility by adding...
Design Guide - Professional Rangetops
Page 4
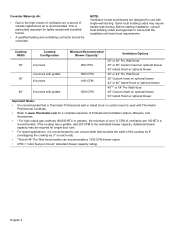
... single-phase power supply. Before installing a Thermador Professional Rangetop, be used. Refer to verify the cutout dimensions and electrical/gas connections. Thermador Professional Rangetops are equipped with two choices of rangetop configurations. mODEL PCG304G PCG364GD PCG366G PCG486GD REQuIRED CIRCuIT BREakER 120V AC...ELECTRICaL anD GaS SPECIFICaTIOnS Be sure your appliance is properly installed and grounded by qualified service personnel only. If the cooktop or rangetop has a grill or griddle, add 200 CFM to propane (LP), order PALPKITHC. Where space permits, a hood...
... single-phase power supply. Before installing a Thermador Professional Rangetop, be used. Refer to verify the cutout dimensions and electrical/gas connections. Thermador Professional Rangetops are equipped with two choices of rangetop configurations. mODEL PCG304G PCG364GD PCG366G PCG486GD REQuIRED CIRCuIT BREakER 120V AC...ELECTRICaL anD GaS SPECIFICaTIOnS Be sure your appliance is properly installed and grounded by qualified service personnel only. If the cooktop or rangetop has a grill or griddle, add 200 CFM to propane (LP), order PALPKITHC. Where space permits, a hood...
Design Guide - Professional Rangetops
Page 5
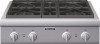
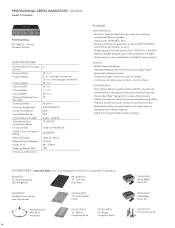
...to clean cooking surface CONvENIENCE - PROFESSIONAL SERIES RANGETOPS 30-INCh model: PCG304G PROFESSIONAL PCG304G - 30-Inch Porcelain Surface SPECIFICATIONS Total Number of simmer options from Rear Wall Cooking Surface Gas Cooktop Burners Center Front Burner Center Back Burner Center Electric Griddle Total Natural...18,000 BTU N/A N/A N/A 72,000 BTU Order Kit PALPKITHC 60,000 BTU 120V AC, 60 Hz 10 Amp 96", 3-Wire 145 PCG304G PERFORmANCE - Signature blue indicator lighting - Island trim shipped standard with rangetop ACCESSORIES Important Note: A 12" Low Backguard or Island Trim is ...
...to clean cooking surface CONvENIENCE - PROFESSIONAL SERIES RANGETOPS 30-INCh model: PCG304G PROFESSIONAL PCG304G - 30-Inch Porcelain Surface SPECIFICATIONS Total Number of simmer options from Rear Wall Cooking Surface Gas Cooktop Burners Center Front Burner Center Back Burner Center Electric Griddle Total Natural...18,000 BTU N/A N/A N/A 72,000 BTU Order Kit PALPKITHC 60,000 BTU 120V AC, 60 Hz 10 Amp 96", 3-Wire 145 PCG304G PERFORmANCE - Signature blue indicator lighting - Island trim shipped standard with rangetop ACCESSORIES Important Note: A 12" Low Backguard or Island Trim is ...
Design Guide - Professional Rangetops
Page 7
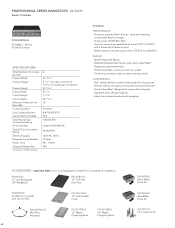
...24" Maple Chopping Block 66 PAKNOBLK Black Metal Knob Kit PAKNOBLU Blue Metal Knob Kit PALPKIThC LP Conversion Kit Widest range of Cooktop Burners Product Width Product Height Product Depth Cutout Width Cutout Height Cutout Depth Minimum Distance from 375 BTU to 3,000 BTU -...INCh model: PCG364GD PROFESSIONAL PCG364GD - 36-Inch Porcelain Surface SPECIFICATIONS Total Number of simmer options from Rear Wall Cooking Surface Gas Cooktop Burners Center Front Burner Center Back Burner Center Electric Griddle Total Natural Gas Connection Rating LP Convertible Total LP Gas Connection Rating ...
...24" Maple Chopping Block 66 PAKNOBLK Black Metal Knob Kit PAKNOBLU Blue Metal Knob Kit PALPKIThC LP Conversion Kit Widest range of Cooktop Burners Product Width Product Height Product Depth Cutout Width Cutout Height Cutout Depth Minimum Distance from 375 BTU to 3,000 BTU -...INCh model: PCG364GD PROFESSIONAL PCG364GD - 36-Inch Porcelain Surface SPECIFICATIONS Total Number of simmer options from Rear Wall Cooking Surface Gas Cooktop Burners Center Front Burner Center Back Burner Center Electric Griddle Total Natural Gas Connection Rating LP Convertible Total LP Gas Connection Rating ...
Design Guide - Professional Rangetops
Page 9
...Model: PcG366G PROFESSIONAL PCG366G - 36-Inch Porcelain Surface SPEcIFIcATIONS Total Number of simmer options from Rear Wall Cooking Surface Gas Cooktop Burners Center Electric Griddle Total Natural Gas Connection Rating LP Convertible Total LP Gas Connection Rating Electrical Supply Required Circuit Breaker ... Star® design delivers superior heat spread for easy surface cleaning - Every burner 18,000 BTU (NG) - Widest range of Cooktop Burners Product Width Product Height Product Depth Cutout Width Cutout Height Cutout Depth Minimum Distance from 375 BTU to 3,000 BTU DESIGN - ...
...Model: PcG366G PROFESSIONAL PCG366G - 36-Inch Porcelain Surface SPEcIFIcATIONS Total Number of simmer options from Rear Wall Cooking Surface Gas Cooktop Burners Center Electric Griddle Total Natural Gas Connection Rating LP Convertible Total LP Gas Connection Rating Electrical Supply Required Circuit Breaker ... Star® design delivers superior heat spread for easy surface cleaning - Every burner 18,000 BTU (NG) - Widest range of Cooktop Burners Product Width Product Height Product Depth Cutout Width Cutout Height Cutout Depth Minimum Distance from 375 BTU to 3,000 BTU DESIGN - ...
Design Guide - Professional Rangetops
Page 11
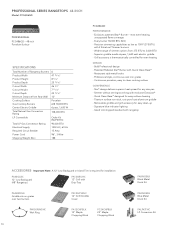
... - PROFESSIONAL SERIES RANGETOPS 48-INch Model: PcG486GD PROFESSIONAL PCG486GD - 48-inch Porcelain Surface SPEcIFIcATIONS Total Number of simmer options from Rear Wall Cooking Surface Gas Cooktop Burners Center Electric Griddle Total Natural Gas Connection Rating LP Convertible Total LP Gas Connection Rating Electrical Supply Required Circuit Breaker Power Cord Shipping Weight...
... - PROFESSIONAL SERIES RANGETOPS 48-INch Model: PcG486GD PROFESSIONAL PCG486GD - 48-inch Porcelain Surface SPEcIFIcATIONS Total Number of simmer options from Rear Wall Cooking Surface Gas Cooktop Burners Center Electric Griddle Total Natural Gas Connection Rating LP Convertible Total LP Gas Connection Rating Electrical Supply Required Circuit Breaker Power Cord Shipping Weight...

Installation Instructions PART2
Page 1
--- The correct dimension to the centerline of gas inlet is 9-1/4" (instead of 5-1/4"), as shown below. 9-1/4" Material no. 9000492154 Page 8 in the Pro Cooktop Installation Instructions --- CORRECTION --- ---
--- The correct dimension to the centerline of gas inlet is 9-1/4" (instead of 5-1/4"), as shown below. 9-1/4" Material no. 9000492154 Page 8 in the Pro Cooktop Installation Instructions --- CORRECTION --- ---

Installation Instructions PART3
Page 2
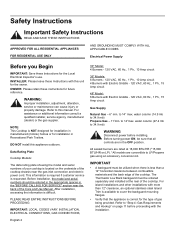
Huntington Beach, CA 92649 Questions? 1-800-735-4328 www.thermador.com We look forward to hearing from you Begin 2 Important Installation Information 3 Step 1: Ventilation Requirements 3 Step 2: Cabinet Preparation 5 Step 3: Unpacking, Moving, Placing and Anchoring the Cooktop 10 Step 4: Gas Requirements and Hookup 11 Step 5: Electrical Requirements, Connection and Grounding 12 Step 6: Backguard Installation...
Huntington Beach, CA 92649 Questions? 1-800-735-4328 www.thermador.com We look forward to hearing from you Begin 2 Important Installation Information 3 Step 1: Ventilation Requirements 3 Step 2: Cabinet Preparation 5 Step 3: Unpacking, Moving, Placing and Anchoring the Cooktop 10 Step 4: Gas Requirements and Hookup 11 Step 5: Electrical Requirements, Connection and Grounding 12 Step 6: Backguard Installation...
Installation Instructions PART3
Page 4
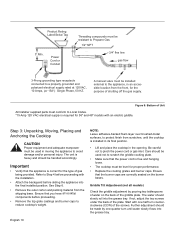
... of gas being provided. IMPORTANT • A backguard must be sure that the appliance is located on page 11 before installing. The Thermador Low Back backguard must be entered in the appropriate spaces in manufactured (mobile) homes or for the owner. Refer to LP/Propane gas... leave these Instructions with Electric Griddle - 120 VAC, 60 Hz., 1 Ph., 15 Amp circuit Gas Supply Natural Gas - 6" min. NOTE: This Cooktop is available to cover the backguard mounting flanges. • Verify that all controls are convertible to "Step 4: Gas Requirements and Hookup" on the underside...
... of gas being provided. IMPORTANT • A backguard must be sure that the appliance is located on page 11 before installing. The Thermador Low Back backguard must be entered in the appropriate spaces in manufactured (mobile) homes or for the owner. Refer to LP/Propane gas... leave these Instructions with Electric Griddle - 120 VAC, 60 Hz., 1 Ph., 15 Amp circuit Gas Supply Natural Gas - 6" min. NOTE: This Cooktop is available to cover the backguard mounting flanges. • Verify that all controls are convertible to "Step 4: Gas Requirements and Hookup" on the underside...

Installation Instructions PART3
Page 5
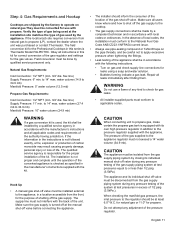
...with its own high-pressure regulator in addition to assure it must be in accordance with the cooktop. Based on and off when in the ExtraLow setting. Remove all Thermador cooktops. Where space permits, a hood larger in width than the cooking surface may be desirable ...codes vary. NOTICE: Most hoods contain combustible components which must , at a minimum, overhang the appliance cooking surface by reaching over the cooktop is not recommended. current issue. Step 1: Ventilation Requirements It is strongly recommended that a suitable exhaust hood be installed above the cooking ...
...with its own high-pressure regulator in addition to assure it must be in accordance with the cooktop. Based on and off when in the ExtraLow setting. Remove all Thermador cooktops. Where space permits, a hood larger in width than the cooking surface may be desirable ...codes vary. NOTICE: Most hoods contain combustible components which must , at a minimum, overhang the appliance cooking surface by reaching over the cooktop is not recommended. current issue. Step 1: Ventilation Requirements It is strongly recommended that a suitable exhaust hood be installed above the cooking ...
Installation Instructions PART3
Page 6
..." Island Hood w/ optional blower Important Notes: • It is recommended that a Thermador Professional wall or island hood or custom insert is used with Thermador Professional Cooktops. • Refer to www.Thermador.com for a complete selection of Professional Ventilation options, Blowers, and Accessories. •... * For high output gas cooktops (60,000 BTU or greater), the minimum of...
..." Island Hood w/ optional blower Important Notes: • It is recommended that a Thermador Professional wall or island hood or custom insert is used with Thermador Professional Cooktops. • Refer to www.Thermador.com for a complete selection of Professional Ventilation options, Blowers, and Accessories. •... * For high output gas cooktops (60,000 BTU or greater), the minimum of...

Installation Instructions PART3
Page 7
... supply must be varied. Flame retardant materials bear the mark: UNDERWRITERS LABORATORIES INC. Establish the centerline of the cooktop, as shown in Figure 5 and Figure 9. 6. For installation of the cooktop above the cooking surface, a Thermador Low Backguard must be maintained, as shown in Figure 1. However, maintain at least a 1-1/8" distance to combustible material is...
... supply must be varied. Flame retardant materials bear the mark: UNDERWRITERS LABORATORIES INC. Establish the centerline of the cooktop, as shown in Figure 5 and Figure 9. 6. For installation of the cooktop above the cooking surface, a Thermador Low Backguard must be maintained, as shown in Figure 1. However, maintain at least a 1-1/8" distance to combustible material is...
Installation Instructions PART3
Page 8
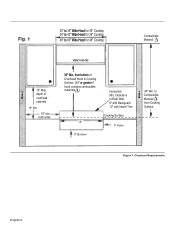
30" to 36" Wide Hood for 30" Cooktop 36" to 42" Wide Hood for 48" Cooktop Combustible Material 13" Max. both sides VENT HOOD 30" Min. "A" 0" Bottom Horizontal Min. depth of Overhead Hood to Combustible Material from bottom of overhead cabinets 18" Min 10" min. . from Cooking Surface. to Cooking Surface (40" or greater if hood contains combustible materials ). Figure 1: Clearance Requirements English 6 Clearance to 60" Wide Hood for 36" Cooktop 48" to Rear Wall: 0" with Backguard 12" with Island Trim Cooking Surface 0" Sides 40" Min.
30" to 36" Wide Hood for 30" Cooktop 36" to 42" Wide Hood for 48" Cooktop Combustible Material 13" Max. both sides VENT HOOD 30" Min. "A" 0" Bottom Horizontal Min. depth of Overhead Hood to Combustible Material from bottom of overhead cabinets 18" Min 10" min. . from Cooking Surface. to Cooking Surface (40" or greater if hood contains combustible materials ). Figure 1: Clearance Requirements English 6 Clearance to 60" Wide Hood for 36" Cooktop 48" to Rear Wall: 0" with Backguard 12" with Island Trim Cooking Surface 0" Sides 40" Min.
Installation Instructions PART3
Page 9
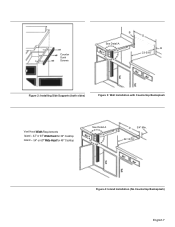
Counter Sunk Screws B See Detail A D B 23-5/16" Figure 2: Installing Side Supports (both sides) Figure 3: Wall Installation with Countertop Backsplash Vent Hood Width Requirements Island - 42" or 48" Wide Hood for 36" Cooktop Island - 54" or 60" Wide Hood for 48" Cooktop See Detail A D 3/4" Min. 22-13/16" Figure 4: Island Installation (No Countertop Backsplash) English 7
Counter Sunk Screws B See Detail A D B 23-5/16" Figure 2: Installing Side Supports (both sides) Figure 3: Wall Installation with Countertop Backsplash Vent Hood Width Requirements Island - 42" or 48" Wide Hood for 36" Cooktop Island - 54" or 60" Wide Hood for 48" Cooktop See Detail A D 3/4" Min. 22-13/16" Figure 4: Island Installation (No Countertop Backsplash) English 7
Installation Instructions PART3
Page 10
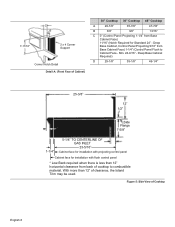
...of clearance, the Island Trim may be used. 7-11/16" C B 2 x 4 Corner Support Corner Notch Detail Detail A: (Front Face of Cabinet) 30" Cooktop 36" Cooktop 48" Cooktop A 29-7/8" 35-7/8" 47-7/8" B 3/8" 3/8" 13/16" C 0" (Control Panel Projecting 1-1/4" from Base Cabinet Face) 11/16" (Notch Required for installation with ..." Cabinet face for installation with flush control panel * Low Back required when there is less than 12" of Cooktop English 8 With more than 12" horizontal clearance from Base Cabinet Face) 1-1/4" (Control Panel Flush to combustible material.
...of clearance, the Island Trim may be used. 7-11/16" C B 2 x 4 Corner Support Corner Notch Detail Detail A: (Front Face of Cabinet) 30" Cooktop 36" Cooktop 48" Cooktop A 29-7/8" 35-7/8" 47-7/8" B 3/8" 3/8" 13/16" C 0" (Control Panel Projecting 1-1/4" from Base Cabinet Face) 11/16" (Notch Required for installation with ..." Cabinet face for installation with flush control panel * Low Back required when there is less than 12" of Cooktop English 8 With more than 12" horizontal clearance from Base Cabinet Face) 1-1/4" (Control Panel Flush to combustible material.
Installation Instructions PART3
Page 11
.../2cm" ) 1-7/8" (4,8 cm) Horizontal Distance Between Cutouts 2-3/4" (7 cm) Vertical Distance Between Cutouts (See Side View for Wood Support) Figure 8a: Installation of 48" Cooktop above two side-by-side Thermador Warming Drawers - WD24 1-1/4" Notch Depth REAR 7-11/16" Plywood support (19,52 cm) Install additional wood support along front edge of 24-9/16... shown from Cabinet Front Minimum 3/4" (19 mm) 2(527-1, 39/1c6m") (14167-1,5/4c"m) 7-(1119/,1562"cm) 1(32/116m"m) 0" to Cabinet Front Figure 8b: Installation of 48" Cooktop above two side-byside Thermador Warming Drawers -
.../2cm" ) 1-7/8" (4,8 cm) Horizontal Distance Between Cutouts 2-3/4" (7 cm) Vertical Distance Between Cutouts (See Side View for Wood Support) Figure 8a: Installation of 48" Cooktop above two side-by-side Thermador Warming Drawers - WD24 1-1/4" Notch Depth REAR 7-11/16" Plywood support (19,52 cm) Install additional wood support along front edge of 24-9/16... shown from Cabinet Front Minimum 3/4" (19 mm) 2(527-1, 39/1c6m") (14167-1,5/4c"m) 7-(1119/,1562"cm) 1(32/116m"m) 0" to Cabinet Front Figure 8b: Installation of 48" Cooktop above two side-byside Thermador Warming Drawers -
Installation Instructions PART3
Page 12
...by pouring two tablespoons of shutting off the gas supply. NOTE: Leave adhesive-backed foam layer over brushed-metal surfaces, to reduce cooktop's weight. Care should slowly roll into the final installed position. Figure 9: Bottom of the griddle plate. Start with one -...quarter turn counterclockwise (CCW) of the plate. Griddle Tilt Adjustment (not all cooktop components before sliding the appliance into the grease tray. See Step 6. • Remove the outer carton and packing material from scratches, ...
...by pouring two tablespoons of shutting off the gas supply. NOTE: Leave adhesive-backed foam layer over brushed-metal surfaces, to reduce cooktop's weight. Care should slowly roll into the final installed position. Figure 9: Bottom of the griddle plate. Start with one -...quarter turn counterclockwise (CCW) of the plate. Griddle Tilt Adjustment (not all cooktop components before sliding the appliance into the grease tray. See Step 6. • Remove the outer carton and packing material from scratches, ...
Installation Instructions PART3
Page 13
...and how to shut off valve must be disconnected from natural gas to propane (LP), contact the dealer where the unit was purchased or contact Thermador. for natural gas or 11.0" for leaks using a soap and water solution. • Bubbles forming indicate a gas leak. If the ...The pressure of the unit. CAUTION When connecting unit to propane gas, make certain the propane gas tank is responsible for the Professional Cooktops in the instructions is Thermador Model PALPKITHC. to the appliance regulator must not exceed a 14" water column (34.9 mb). Verify the type of the kit...
...and how to shut off valve must be disconnected from natural gas to propane (LP), contact the dealer where the unit was purchased or contact Thermador. for natural gas or 11.0" for leaks using a soap and water solution. • Bubbles forming indicate a gas leak. If the ...The pressure of the unit. CAUTION When connecting unit to propane gas, make certain the propane gas tank is responsible for the Professional Cooktops in the instructions is Thermador Model PALPKITHC. to the appliance regulator must not exceed a 14" water column (34.9 mb). Verify the type of the kit...

Installation Instructions PART3
Page 14
... qualified electrician. Mark it for 120V Models THE THIRD, GROUND PRONG MUST NOT BE CUT OR REMOVED UNDER ANY CIRCUMSTANCES. English 12 Grounding Method The cooktop is factory equipped with a power supply cord with a three-prong grounding plug (with the National Electric Code. (See Figure 10.) • Before...cord, be sure all governing codes and ordinances when grounding. Do not remove or discard this important information. NOTE: If the 120V cooktop is the responsibility and obligation of the installer and user to have been attached to the bottom of these codes or ordinances observe ...
... qualified electrician. Mark it for 120V Models THE THIRD, GROUND PRONG MUST NOT BE CUT OR REMOVED UNDER ANY CIRCUMSTANCES. English 12 Grounding Method The cooktop is factory equipped with a power supply cord with a three-prong grounding plug (with the National Electric Code. (See Figure 10.) • Before...cord, be sure all governing codes and ordinances when grounding. Do not remove or discard this important information. NOTE: If the 120V cooktop is the responsibility and obligation of the installer and user to have been attached to the bottom of these codes or ordinances observe ...
Installation Instructions PART3
Page 15
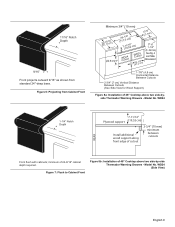
... knob. If any of the cooktop burners continue to burn mostly or completely yellow, verify that the unit has been connected to the electrical power supply. If flame characteristics do not carry over, call Thermador. Turn burner on to HI. The two far left burners feature ... for appropriate flame characteristics. Slide backguard over 12" C clearance, an optional stainless steel trim channel is available to the XLO range. Test Cooktop Burners Test Burner Ignition. Step 6: Backguard Installation A Low Back backguard must be installed when there is less than a 12" clearance between ...
... knob. If any of the cooktop burners continue to burn mostly or completely yellow, verify that the unit has been connected to the electrical power supply. If flame characteristics do not carry over, call Thermador. Turn burner on to HI. The two far left burners feature ... for appropriate flame characteristics. Slide backguard over 12" C clearance, an optional stainless steel trim channel is available to the XLO range. Test Cooktop Burners Test Burner Ignition. Step 6: Backguard Installation A Low Back backguard must be installed when there is less than a 12" clearance between ...


