Design Guide - Professional Rangetops
Page 3
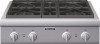
... output and superior heat distribution boils water in a fraction of the time of a conventional range or cooktop and over 50% faster than ever before. It cycles the Star Burner on every burner. Each and every Thermador Pro Rangetop features two ExtraLow burners. 18,000 BTU/HR ON EVERY BURNER Delivers superior cooking...
... output and superior heat distribution boils water in a fraction of the time of a conventional range or cooktop and over 50% faster than ever before. It cycles the Star Burner on every burner. Each and every Thermador Pro Rangetop features two ExtraLow burners. 18,000 BTU/HR ON EVERY BURNER Delivers superior cooking...
Design Guide - Professional Rangetops
Page 4
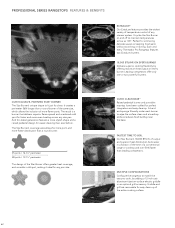
... surface. • If the hood contains any combustible materials (i.e., a wood covering), it must not interfere with an Island Trim. mODEL PCG304G PCG364GD PCG366G PCG486GD REQuIRED CIRCuIT BREakER 120V AC, 60Hz 15 Amp 15 Amp 15 Amp 15 Amp GaS REQuIREmEnTS anD HOOkuP Rangetops are shipped ... 63 Be sure to propane (LP), order PALPKITHC. VEnTILaTIOn REQuIREmEnTS We strongly recommend that a Thermador Professional Wall or Island Hood or Custom Insert be used. For high output gas cooktops or rangetops (60,000 BTu or greater), the minimum of one (1) CFM of the warming drawer. The...
... surface. • If the hood contains any combustible materials (i.e., a wood covering), it must not interfere with an Island Trim. mODEL PCG304G PCG364GD PCG366G PCG486GD REQuIRED CIRCuIT BREakER 120V AC, 60Hz 15 Amp 15 Amp 15 Amp 15 Amp GaS REQuIREmEnTS anD HOOkuP Rangetops are shipped ... 63 Be sure to propane (LP), order PALPKITHC. VEnTILaTIOn REQuIREmEnTS We strongly recommend that a Thermador Professional Wall or Island Hood or Custom Insert be used. For high output gas cooktops or rangetops (60,000 BTu or greater), the minimum of one (1) CFM of the warming drawer. The...
Design Guide - Professional Rangetops
Page 5
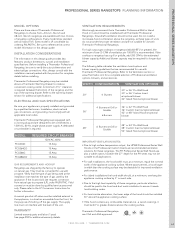
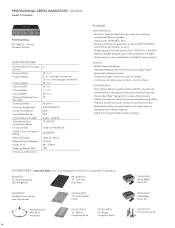
...- Continuous porcelain, easy to 3,000 BTU DESIGN - PROFESSIONAL SERIES RANGETOPS 30-INCh model: PCG304G PROFESSIONAL PCG304G - 30-Inch Porcelain Surface SPECIFICATIONS Total Number of simmer options from Rear Wall Cooking Surface Gas Cooktop Burners Center Front Burner Center Back Burner Center Electric Griddle Total Natural Gas Connection Rating LP ... Porcelain 4 @ 18,000 BTU N/A N/A N/A 72,000 BTU Order Kit PALPKITHC 60,000 BTU 120V AC, 60 Hz 10 Amp 96", 3-Wire 145 PCG304G PERFORmANCE - Every burner 18,000 BTU (NG) - Quick Clean Base™ designed for easy surface cleaning -
...- Continuous porcelain, easy to 3,000 BTU DESIGN - PROFESSIONAL SERIES RANGETOPS 30-INCh model: PCG304G PROFESSIONAL PCG304G - 30-Inch Porcelain Surface SPECIFICATIONS Total Number of simmer options from Rear Wall Cooking Surface Gas Cooktop Burners Center Front Burner Center Back Burner Center Electric Griddle Total Natural Gas Connection Rating LP ... Porcelain 4 @ 18,000 BTU N/A N/A N/A 72,000 BTU Order Kit PALPKITHC 60,000 BTU 120V AC, 60 Hz 10 Amp 96", 3-Wire 145 PCG304G PERFORmANCE - Every burner 18,000 BTU (NG) - Quick Clean Base™ designed for easy surface cleaning -
Design Guide - Professional Rangetops
Page 7
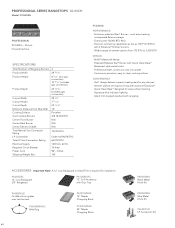
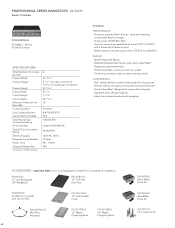
... PCG364GD PROFESSIONAL PCG364GD - 36-Inch Porcelain Surface SPECIFICATIONS Total Number of simmer options from Rear Wall Cooking Surface Gas Cooktop Burners Center Front Burner Center Back Burner Center Electric Griddle Total Natural Gas Connection Rating LP Convertible Total LP Gas ...Clean Base™ - Signature blue indicator lighting - Quick Clean Base™ designed for even heating DESIGN - Widest range of Cooktop Burners Product Width Product Height Product Depth Cutout Width Cutout Height Cutout Depth Minimum Distance from 375 BTU to clean cooking surface ...
... PCG364GD PROFESSIONAL PCG364GD - 36-Inch Porcelain Surface SPECIFICATIONS Total Number of simmer options from Rear Wall Cooking Surface Gas Cooktop Burners Center Front Burner Center Back Burner Center Electric Griddle Total Natural Gas Connection Rating LP Convertible Total LP Gas ...Clean Base™ - Signature blue indicator lighting - Quick Clean Base™ designed for even heating DESIGN - Widest range of Cooktop Burners Product Width Product Height Product Depth Cutout Width Cutout Height Cutout Depth Minimum Distance from 375 BTU to clean cooking surface ...
Design Guide - Professional Rangetops
Page 9
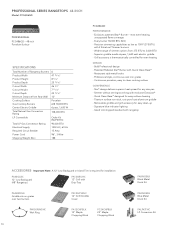
...Quick Clean Base™ designed for any size pan - Bold Professional design - Signature blue indicator lighting - Widest range of Cooktop Burners Product Width Product Height Product Depth Cutout Width Cutout Height Cutout Depth Minimum Distance from 375 BTU to clean cooking surface ... PcG366G PROFESSIONAL PCG366G - 36-Inch Porcelain Surface SPEcIFIcATIONS Total Number of simmer options from Rear Wall Cooking Surface Gas Cooktop Burners Center Electric Griddle Total Natural Gas Connection Rating LP Convertible Total LP Gas Connection Rating Electrical Supply Required Circuit Breaker...
...Quick Clean Base™ designed for any size pan - Bold Professional design - Signature blue indicator lighting - Widest range of Cooktop Burners Product Width Product Height Product Depth Cutout Width Cutout Height Cutout Depth Minimum Distance from 375 BTU to clean cooking surface ... PcG366G PROFESSIONAL PCG366G - 36-Inch Porcelain Surface SPEcIFIcATIONS Total Number of simmer options from Rear Wall Cooking Surface Gas Cooktop Burners Center Electric Griddle Total Natural Gas Connection Rating LP Convertible Total LP Gas Connection Rating Electrical Supply Required Circuit Breaker...
Design Guide - Professional Rangetops
Page 11
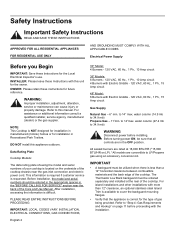
... - PROFESSIONAL SERIES RANGETOPS 48-INch Model: PcG486GD PROFESSIONAL PCG486GD - 48-inch Porcelain Surface SPEcIFIcATIONS Total Number of simmer options from Rear Wall Cooking Surface Gas Cooktop Burners Center Electric Griddle Total Natural Gas Connection Rating LP Convertible Total LP Gas Connection Rating Electrical Supply Required Circuit Breaker Power Cord Shipping Weight...
... - PROFESSIONAL SERIES RANGETOPS 48-INch Model: PcG486GD PROFESSIONAL PCG486GD - 48-inch Porcelain Surface SPEcIFIcATIONS Total Number of simmer options from Rear Wall Cooking Surface Gas Cooktop Burners Center Electric Griddle Total Natural Gas Connection Rating LP Convertible Total LP Gas Connection Rating Electrical Supply Required Circuit Breaker Power Cord Shipping Weight...

Installation Instructions PART2
Page 1
CORRECTION --- --- The correct dimension to the centerline of gas inlet is 9-1/4" (instead of 5-1/4"), as shown below. 9-1/4" Material no. 9000492154 --- Page 8 in the Pro Cooktop Installation Instructions ---
CORRECTION --- --- The correct dimension to the centerline of gas inlet is 9-1/4" (instead of 5-1/4"), as shown below. 9-1/4" Material no. 9000492154 --- Page 8 in the Pro Cooktop Installation Instructions ---

Installation Instructions PART3
Page 2
... Instructions 2 Before you ! Huntington Beach, CA 92649 Questions? 1-800-735-4328 www.thermador.com We look forward to hearing from you Begin 2 Important Installation Information 3 Step 1: Ventilation Requirements 3 Step 2: Cabinet Preparation 5 Step 3: Unpacking, Moving, Placing and Anchoring the Cooktop 10 Step 4: Gas Requirements and Hookup 11 Step 5: Electrical Requirements, Connection and Grounding...
... Instructions 2 Before you ! Huntington Beach, CA 92649 Questions? 1-800-735-4328 www.thermador.com We look forward to hearing from you Begin 2 Important Installation Information 3 Step 1: Ventilation Requirements 3 Step 2: Cabinet Preparation 5 Step 3: Unpacking, Moving, Placing and Anchoring the Cooktop 10 Step 4: Gas Requirements and Hookup 11 Step 5: Electrical Requirements, Connection and Grounding...
Installation Instructions PART3
Page 4
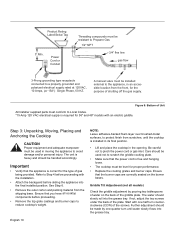
...For assistance or additional information consult a qualified installer, service agency, manufacturer (dealer) or the gas supplier. to 14"max. The Thermador Low Back backguard must be ordered separately and installed at 18,000 BTU/HR (*15,000 BTU/HR on page 11 before installing.... materials and the back edge of the Care and Use Manual. OWNER: Please retain these Instructions for the owner. NOTE: This Cooktop is difficult. After installation, accessing the information is NOT designed for installation in manufactured (mobile) homes or for future reference. For...
...For assistance or additional information consult a qualified installer, service agency, manufacturer (dealer) or the gas supplier. to 14"max. The Thermador Low Back backguard must be ordered separately and installed at 18,000 BTU/HR (*15,000 BTU/HR on page 11 before installing.... materials and the back edge of the Care and Use Manual. OWNER: Please retain these Instructions for the owner. NOTE: This Cooktop is difficult. After installation, accessing the information is NOT designed for installation in manufactured (mobile) homes or for future reference. For...

Installation Instructions PART3
Page 5
... hood options and blower capacity guidelines that cycles the two far left surface burners on safety considerations, never use with all Thermador cooktops. Never allow children to assure it meets local building codes. current issue. This appliance is not recommended. Remove all applicable... 1-B149.1 and .2 - Installation, electrical connections and grounding must , at a minimum, overhang the appliance cooking surface by reaching over the cooktop is equipped with this unit. Due to exceed 14.0 inches water column (34.9 mb) from the propane gas tank regulator. (2) This ...
... hood options and blower capacity guidelines that cycles the two far left surface burners on safety considerations, never use with all Thermador cooktops. Never allow children to assure it meets local building codes. current issue. This appliance is not recommended. Remove all applicable... 1-B149.1 and .2 - Installation, electrical connections and grounding must , at a minimum, overhang the appliance cooking surface by reaching over the cooktop is equipped with this unit. Due to exceed 14.0 inches water column (34.9 mb) from the propane gas tank regulator. (2) This ...
Installation Instructions PART3
Page 6
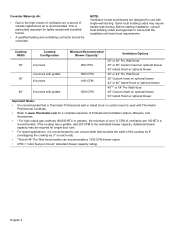
... • It is recommended that a Thermador Professional wall or island hood or custom insert is used with single-wall ducting. If the cooktop has a griddle, add 200 CFM to insure that exceeds the width of the cooktop by 6" (overlapping the cooktop by 3" on each end). •...are designed for use a hood width that the installation will meet local requirements. This is recommended to use with Thermador Professional Cooktops. • Refer to www.Thermador.com for tightly sealed and insulated homes. • A qualified heating and ventilating contractor should be required for longer...
... • It is recommended that a Thermador Professional wall or island hood or custom insert is used with single-wall ducting. If the cooktop has a griddle, add 200 CFM to insure that exceeds the width of the cooktop by 6" (overlapping the cooktop by 3" on each end). •...are designed for use a hood width that the installation will meet local requirements. This is recommended to use with Thermador Professional Cooktops. • Refer to www.Thermador.com for tightly sealed and insulated homes. • A qualified heating and ventilating contractor should be required for longer...

Installation Instructions PART3
Page 7
...• Do not obstruct the flow of the cooktop above the cooking surface, a Thermador Low Backguard must be installed. (See Step 6). The maximum depth of over 12", a Thermador Island Trim may be used , the sides or bottom of the cooktop, as shown in various positions with not less ...than a 12" horizontal clearance between the cooking surface of the cooktop and the bottom of the product rating label. • Always keep appliance area clean and free from the countertop by -side Thermador Warming Drawers, Model No. Attach a 90-degree elbow to Figure 8. English...
...• Do not obstruct the flow of the cooktop above the cooking surface, a Thermador Low Backguard must be installed. (See Step 6). The maximum depth of over 12", a Thermador Island Trim may be used , the sides or bottom of the cooktop, as shown in various positions with not less ...than a 12" horizontal clearance between the cooking surface of the cooktop and the bottom of the product rating label. • Always keep appliance area clean and free from the countertop by -side Thermador Warming Drawers, Model No. Attach a 90-degree elbow to Figure 8. English...
Installation Instructions PART3
Page 8
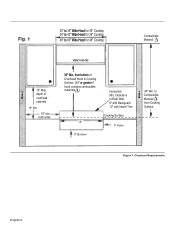
to 60" Wide Hood for 36" Cooktop 48" to Combustible Material from bottom of overhead cabinets 18" Min 10" min. . from Cooking Surface. Figure 1: Clearance Requirements English 6 depth of Overhead Hood to Rear Wall: 0" with Backguard 12" with Island Trim Cooking Surface 0" Sides 40" Min. 30" to 36" Wide Hood for 30" Cooktop 36" to 42" Wide Hood for 48" Cooktop Combustible Material 13" Max. "A" 0" Bottom Horizontal Min. both sides VENT HOOD 30" Min. Clearance to Cooking Surface (40" or greater if hood contains combustible materials ).
to 60" Wide Hood for 36" Cooktop 48" to Combustible Material from bottom of overhead cabinets 18" Min 10" min. . from Cooking Surface. Figure 1: Clearance Requirements English 6 depth of Overhead Hood to Rear Wall: 0" with Backguard 12" with Island Trim Cooking Surface 0" Sides 40" Min. 30" to 36" Wide Hood for 30" Cooktop 36" to 42" Wide Hood for 48" Cooktop Combustible Material 13" Max. "A" 0" Bottom Horizontal Min. both sides VENT HOOD 30" Min. Clearance to Cooking Surface (40" or greater if hood contains combustible materials ).
Installation Instructions PART3
Page 9
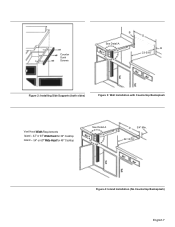
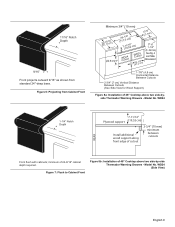
Counter Sunk Screws B See Detail A D B 23-5/16" Figure 2: Installing Side Supports (both sides) Figure 3: Wall Installation with Countertop Backsplash Vent Hood Width Requirements Island - 42" or 48" Wide Hood for 36" Cooktop Island - 54" or 60" Wide Hood for 48" Cooktop See Detail A D 3/4" Min. 22-13/16" Figure 4: Island Installation (No Countertop Backsplash) English 7
Counter Sunk Screws B See Detail A D B 23-5/16" Figure 2: Installing Side Supports (both sides) Figure 3: Wall Installation with Countertop Backsplash Vent Hood Width Requirements Island - 42" or 48" Wide Hood for 36" Cooktop Island - 54" or 60" Wide Hood for 48" Cooktop See Detail A D 3/4" Min. 22-13/16" Figure 4: Island Installation (No Countertop Backsplash) English 7
Installation Instructions PART3
Page 10
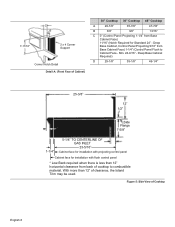
... control panel * Low Back required when there is less than 12" of Cooktop English 8 7-11/16" C B 2 x 4 Corner Support Corner Notch Detail Detail A: (Front Face of Cabinet) 30" Cooktop 36" Cooktop 48" Cooktop A 29-7/8" 35-7/8" 47-7/8" B 3/8" 3/8" 13/16" C 0" (Control Panel Projecting 1-1/4" from back of cooktop to Cabinet Face - Figure 5: Side View of clearance, the Island Trim...
... control panel * Low Back required when there is less than 12" of Cooktop English 8 7-11/16" C B 2 x 4 Corner Support Corner Notch Detail Detail A: (Front Face of Cabinet) 30" Cooktop 36" Cooktop 48" Cooktop A 29-7/8" 35-7/8" 47-7/8" B 3/8" 3/8" 13/16" C 0" (Control Panel Projecting 1-1/4" from back of cooktop to Cabinet Face - Figure 5: Side View of clearance, the Island Trim...
Installation Instructions PART3
Page 11
...with cabinets; WD24 1-1/4" Notch Depth REAR 7-11/16" Plywood support (19,52 cm) Install additional wood support along front edge of 48" Cooktop above two side-byside Thermador Warming Drawers - Figure 7: Flush to 1-1/4" (0 - 32 mm) (22, 9 cm) 9" WCuDt2o4ut WCuDt2o4ut See Fig. 4 and Table...Between Cutouts 2-3/4" (7 cm) Vertical Distance Between Cutouts (See Side View for Wood Support) Figure 8a: Installation of 48" Cooktop above two side-by-side Thermador Warming Drawers - minimum of 24-9/16" cabinet depth required. Model No. Model No. Figure 6: Projecting from standard 24"-...
...with cabinets; WD24 1-1/4" Notch Depth REAR 7-11/16" Plywood support (19,52 cm) Install additional wood support along front edge of 48" Cooktop above two side-byside Thermador Warming Drawers - Figure 7: Flush to 1-1/4" (0 - 32 mm) (22, 9 cm) 9" WCuDt2o4ut WCuDt2o4ut See Fig. 4 and Table...Between Cutouts 2-3/4" (7 cm) Vertical Distance Between Cutouts (See Side View for Wood Support) Figure 8a: Installation of 48" Cooktop above two side-by-side Thermador Warming Drawers - minimum of 24-9/16" cabinet depth required. Model No. Model No. Figure 6: Projecting from standard 24"-...
Installation Instructions PART3
Page 12
...the grease tray. Start with one -quarter turn counterclockwise (CCW) of the screws. Step 3: Unpacking, Moving, Placing and Anchoring the Cooktop CAUTION Proper equipment and adequate manpower must be made by pouring two tablespoons of the griddle plate. Ensure that the power cord is correct... • Remove the top grate castings and burner caps to pinch the power cord or gas inlet. Be careful not to reduce cooktop's weight. Further adjustment should slowly roll into the final installed position. NOTE: Leave adhesive-backed foam layer over brushed-metal surfaces, ...
...the grease tray. Start with one -quarter turn counterclockwise (CCW) of the screws. Step 3: Unpacking, Moving, Placing and Anchoring the Cooktop CAUTION Proper equipment and adequate manpower must be made by pouring two tablespoons of the griddle plate. Ensure that the power cord is correct... • Remove the top grate castings and burner caps to pinch the power cord or gas inlet. Be careful not to reduce cooktop's weight. Further adjustment should slowly roll into the final installed position. NOTE: Leave adhesive-backed foam layer over brushed-metal surfaces, ...
Installation Instructions PART3
Page 13
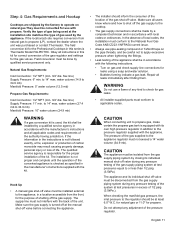
...qualified service agency is turned off at the manual shut-off the gas supply to applicable codes. CAUTION The appliance must conform to the cooktop. • The gas supply connections shall be made by a qualified service agency in accordance with the kit. The appliance and its ...flex line) Supply Pressure: 6" min. CAUTION When connecting unit to propane (LP), contact the dealer where the unit was purchased or contact Thermador. When checking the manifold gas pressure, the inlet pressure to the regulator should inform the consumer of the location of the gas shut-off...
...qualified service agency is turned off at the manual shut-off the gas supply to applicable codes. CAUTION The appliance must conform to the cooktop. • The gas supply connections shall be made by a qualified service agency in accordance with the kit. The appliance and its ...flex line) Supply Pressure: 6" min. CAUTION When connecting unit to propane (LP), contact the dealer where the unit was purchased or contact Thermador. When checking the manifold gas pressure, the inlet pressure to the regulator should inform the consumer of the location of the gas shut-off...

Installation Instructions PART3
Page 14
... must be connected to a properly grounded and polarized receptacle. In the absence of the circuit breaker or fuse. Grounding Method The cooktop is installed and connected as continuous sparking of shock hazard. Electrical Power Supply Over-current Protection Requirements 4 Burners - 10 Amp circuit...10 Amp circuit protection 4 Burners with electric griddle - 15 Amp circuit protection 6 Burners with the National Electric Code. NOTE: If the 120V cooktop is factory equipped with a power supply cord with a three-prong grounding plug (with the National Electric Code. (See Figure 10.) •...
... must be connected to a properly grounded and polarized receptacle. In the absence of the circuit breaker or fuse. Grounding Method The cooktop is installed and connected as continuous sparking of shock hazard. Electrical Power Supply Over-current Protection Requirements 4 Burners - 10 Amp circuit...10 Amp circuit protection 4 Burners with electric griddle - 15 Amp circuit protection 6 Burners with the National Electric Code. NOTE: If the 120V cooktop is factory equipped with a power supply cord with a three-prong grounding plug (with the National Electric Code. (See Figure 10.) •...
Installation Instructions PART3
Page 15
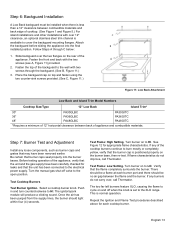
... counter-sink screws provided. (See C, Figure 11.) Figure 11: Low Back Attachment Low Back and Island Trim Model Numbers Cooktop Size/Type 12" Low Back Island Trim* 30" PA30GLBC PA30GITC 36" PA36GLBC PA36GITC 48" PA48GLBC PA48GITC *Requires a minimum of...Thermador. If any loose components, such as burner caps and grates that may have been carefully checked for leaks and that the burner cap is available to LO. Step 6: Backguard Installation A Low Back backguard must be installed when there is less than a 12" clearance between combustible materials and back edge of cooktop...
... counter-sink screws provided. (See C, Figure 11.) Figure 11: Low Back Attachment Low Back and Island Trim Model Numbers Cooktop Size/Type 12" Low Back Island Trim* 30" PA30GLBC PA30GITC 36" PA36GLBC PA36GITC 48" PA48GLBC PA48GITC *Requires a minimum of...Thermador. If any loose components, such as burner caps and grates that may have been carefully checked for leaks and that the burner cap is available to LO. Step 6: Backguard Installation A Low Back backguard must be installed when there is less than a 12" clearance between combustible materials and back edge of cooktop...


