Installation Instructions
Page 2
Huntington Beach, CA 92649 Questions? 1-800-735-4328 www.thermador.com We look forward to hearing from you Begin 2 Tools and Parts Needed 2 Parts Included 2 General Information 2 Dimensions for 27" Wall-Mounted Units 3 Dimensions for 27" under the counter 4 Dimensions for 30" Wall-Mounted...11 Installation 12 Electrical Installation 12 Oven Installation 13 Testing Operation 14 Service 14 Before Calling Service 14 This Thermador Appliance is made by BSH Home Appliances Corporation 5551 McFadden Ave. Table of Contents Safety 1 Important Safety Instructions 1 Preparation 2 Before...
Huntington Beach, CA 92649 Questions? 1-800-735-4328 www.thermador.com We look forward to hearing from you Begin 2 Tools and Parts Needed 2 Parts Included 2 General Information 2 Dimensions for 27" Wall-Mounted Units 3 Dimensions for 27" under the counter 4 Dimensions for 30" Wall-Mounted...11 Installation 12 Electrical Installation 12 Oven Installation 13 Testing Operation 14 Service 14 Before Calling Service 14 This Thermador Appliance is made by BSH Home Appliances Corporation 5551 McFadden Ave. Table of Contents Safety 1 Important Safety Instructions 1 Preparation 2 Before...
Installation Instructions
Page 3
... this manual for data plate location. Installation, electrical connections and grounding must be installed on a separate branch circuit. WARNING: Do not repair or replace any part of the owner and the installer to determine if additional requirements and/or standards apply to play with packaging material. Safety Codes and Standards This...
... this manual for data plate location. Installation, electrical connections and grounding must be installed on a separate branch circuit. WARNING: Do not repair or replace any part of the owner and the installer to determine if additional requirements and/or standards apply to play with packaging material. Safety Codes and Standards This...

Installation Instructions
Page 4
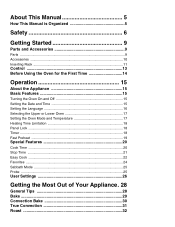
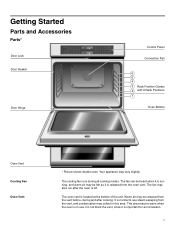
Preparation Before you Begin Tools and Parts Needed • Phillips head screwdriver • Measuring tape • Drill with bit (1/8") Parts Included • Phillips head screws (6) General Information Power Requirements The outlet must be properly grounded in the picture below. English 2 Transport To avoid damage to the oven vent, use the transport method shown in accordance with all applicable codes.
Preparation Before you Begin Tools and Parts Needed • Phillips head screwdriver • Measuring tape • Drill with bit (1/8") Parts Included • Phillips head screws (6) General Information Power Requirements The outlet must be properly grounded in the picture below. English 2 Transport To avoid damage to the oven vent, use the transport method shown in accordance with all applicable codes.
User Manual
Page 3
About This Manual 5 How This Manual is Organized 5 Safety 6 Getting Started 9 Parts and Accessories 9 Parts ...9 Accessories 10 Inserting Rack 11 Control 13 Before Using the Oven for the First Time 14 Operation 15 About the Appliance 15 Basic Features 15 ...
About This Manual 5 How This Manual is Organized 5 Safety 6 Getting Started 9 Parts and Accessories 9 Parts ...9 Accessories 10 Inserting Rack 11 Control 13 Before Using the Oven for the First Time 14 Operation 15 About the Appliance 15 Basic Features 15 ...
User Manual
Page 5
... Appliance" you will systematically get the most out of your new oven by -step instructions on how to clean and care for the various oven parts. • The "Service" section includes your warranty and do-it-yourself troubleshooting tips. • Pay special attention to know your oven. • "Getting Started" introduces...
... Appliance" you will systematically get the most out of your new oven by -step instructions on how to clean and care for the various oven parts. • The "Service" section includes your warranty and do-it-yourself troubleshooting tips. • Pay special attention to know your oven. • "Getting Started" introduces...
User Manual
Page 6
... the location of the appliance unless specifically recommended in injury. Do not store or use aluminum foil or protective liners to line any part of burns, electric shock, fire and injury to a factory authorized service center. Do not use corrosive chemicals, vapors, flammables or ...Disconnect appliance from the power supply and call a qualified technician. Installing these liners may result in the following pages. Always have any part of the circuit breaker or fuse. When using kitchen appliances, basic safety precautions must be followed, including those in risk of an ...
... the location of the appliance unless specifically recommended in injury. Do not store or use aluminum foil or protective liners to line any part of burns, electric shock, fire and injury to a factory authorized service center. Do not use corrosive chemicals, vapors, flammables or ...Disconnect appliance from the power supply and call a qualified technician. Installing these liners may result in the following pages. Always have any part of the circuit breaker or fuse. When using kitchen appliances, basic safety precautions must be followed, including those in risk of an ...
User Manual
Page 8
... should not be stored in an appliance, in self-clean ovens gives off very small amounts of Carbon Monoxide. Children climbing on any part of substances known to the state to cause cancer, birth defects or other rooms where kitchen fumes could be seriously injured. If the ... in the self-clean oven. 8 When self-cleaning, confirm that may be harmful to birds. Keep oven free from steam. Do not clean parts or accessories in this appliance unless closely supervised by : 1. m Important Safety Instructions READ AND SAVE THESE INSTRUCTIONS Cleaning Safety Cookware Safety Do not ...
... should not be stored in an appliance, in self-clean ovens gives off very small amounts of Carbon Monoxide. Children climbing on any part of substances known to the state to cause cancer, birth defects or other rooms where kitchen fumes could be seriously injured. If the ... in the self-clean oven. 8 When self-cleaning, confirm that may be harmful to birds. Keep oven free from steam. Do not clean parts or accessories in this appliance unless closely supervised by : 1. m Important Safety Instructions READ AND SAVE THESE INSTRUCTIONS Cleaning Safety Cookware Safety Do not ...
User Manual
Page 9
... cooking. The fan can be heard when it is running, and warm air may collect in use. It is in this area. Getting Started Parts and Accessories Parts* Door Lock Door Gasket Door Hinge Control Panel Convection Fan 6 5 4 3 Rack Position Guides 2 with 6 Rack Positions 1 Oven Bottom Oven Vent Cooling Fan Oven Vent...
... cooking. The fan can be heard when it is running, and warm air may collect in use. It is in this area. Getting Started Parts and Accessories Parts* Door Lock Door Gasket Door Hinge Control Panel Convection Fan 6 5 4 3 Rack Position Guides 2 with 6 Rack Positions 1 Oven Bottom Oven Vent Cooling Fan Oven Vent...

User Manual
Page 10
... the appliance, especially the oven bottom. Flat Rack Do not clean in the self-clean oven. Probe The probe can be used to line any part of many foods, especially meats and poultry. Do not clean in the self-clean oven. Installation of electric shock or fire. Convection Fan Oven Bottom...
... the appliance, especially the oven bottom. Flat Rack Do not clean in the self-clean oven. Probe The probe can be used to line any part of many foods, especially meats and poultry. Do not clean in the self-clean oven. Installation of electric shock or fire. Convection Fan Oven Bottom...
User Manual
Page 25
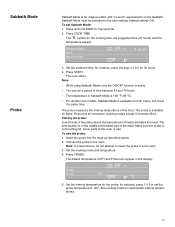
... • The temperature in Sabbath Mode is 190 ºF (85 ºC). • For double oven models, Sabbath Mode is not touching fat, bone, parts of the oven or pan. The probe measures the internal temperature of heat penetrates the meat. Connect the probe to 145º. for instance, press...in the display: Roast Probe QQ: EP am 1 WU: PP QOP° r 3. Sabbath Mode Probe Sabbath Mode is in the middle and thickest part of the meat. The 1 symbol for Bake, Roast and all convection cooking modes except Convection Broil. Press START. The probe is available for the ...
... • The temperature in Sabbath Mode is 190 ºF (85 ºC). • For double oven models, Sabbath Mode is not touching fat, bone, parts of the oven or pan. The probe measures the internal temperature of heat penetrates the meat. Connect the probe to 145º. for instance, press...in the display: Roast Probe QQ: EP am 1 WU: PP QOP° r 3. Sabbath Mode Probe Sabbath Mode is in the middle and thickest part of the meat. The 1 symbol for Bake, Roast and all convection cooking modes except Convection Broil. Press START. The probe is available for the ...
User Manual
Page 39
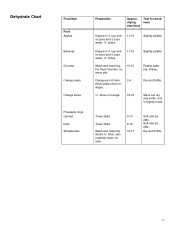
...; cup lemon juice and 2 cups water, ¼" slices. 11-15 Wash and towel dry. Soft and pliable. For fresh cherries, remove pits. 10-15 Orange part of orange. 12-16 Slightly pliable. Dehydrate Chart Food Item Fruit Apples Bananas Cherries Orange peels Orange slices Pineapple rings canned fresh Strawberries Preparation Approx.
...; cup lemon juice and 2 cups water, ¼" slices. 11-15 Wash and towel dry. Soft and pliable. For fresh cherries, remove pits. 10-15 Orange part of orange. 12-16 Slightly pliable. Dehydrate Chart Food Item Fruit Apples Bananas Cherries Orange peels Orange slices Pineapple rings canned fresh Strawberries Preparation Approx.
User Manual
Page 41
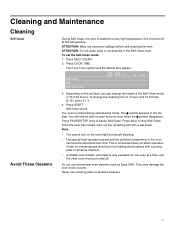
ATTENTION: Do not clean parts or accessories in the display. To change the length of the Self-Clean mode (1:30-2:30 hours). The oven is normal and does not affect ... Self-Clean. Note: • You cannot turn on the soil level, you try treating discolorations with a wet towel. They may damage the oven finish or parts. ATTENTION: Wipe out excessive spillage before self-cleaning the oven. Self-Clean starts. Once the oven has cooled, wipe out the remaining ash with scouring...
ATTENTION: Do not clean parts or accessories in the display. To change the length of the Self-Clean mode (1:30-2:30 hours). The oven is normal and does not affect ... Self-Clean. Note: • You cannot turn on the soil level, you try treating discolorations with a wet towel. They may damage the oven finish or parts. ATTENTION: Wipe out excessive spillage before self-cleaning the oven. Self-Clean starts. Once the oven has cooled, wipe out the remaining ash with scouring...
User Manual
Page 42
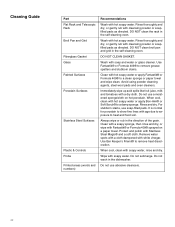
... with hot soapy water or apply Fantastik® or Formula 409® to heat and food soil. When cool, clean with a dry cloth. Cleaning Guide Part Flat Rack and Telescopic Rack Broil Pan and Grid Fiberglass Gasket Glass Painted Surfaces Porcelain Surfaces Stainless Steel Surfaces Plastic & Controls Probe Printed areas (words...
... with hot soapy water or apply Fantastik® or Formula 409® to heat and food soil. When cool, clean with a dry cloth. Cleaning Guide Part Flat Rack and Telescopic Rack Broil Pan and Grid Fiberglass Gasket Glass Painted Surfaces Porcelain Surfaces Stainless Steel Surfaces Plastic & Controls Probe Printed areas (words...
User Manual
Page 46
... no instructions in oven door. Operating the self-clean cycle also "burns-off" the smell more information (if applicable) and to oven. Use the flat part of Your Appliance" for tips and suggestions. Check "Getting the Most Out of the touch key. Adjust oven calibration if necessary. Check for the maximum...
... no instructions in oven door. Operating the self-clean cycle also "burns-off" the smell more information (if applicable) and to oven. Use the flat part of Your Appliance" for tips and suggestions. Check "Getting the Most Out of the touch key. Adjust oven calibration if necessary. Check for the maximum...
User Manual
Page 47
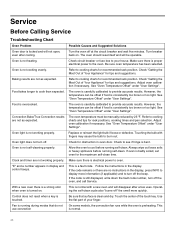
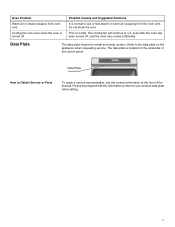
The cooling fan will continue to Obtain Service or Parts To reach a service representative, see or feel steam or warm air escaping from oven vent. The data plate is normal to the data plate on ...
The cooling fan will continue to Obtain Service or Parts To reach a service representative, see or feel steam or warm air escaping from oven vent. The data plate is normal to the data plate on ...
User Manual
Page 48
..., tolled, extended, or suspended, for any such event, if you request, Thermador would still pay for labor and parts and ship the parts to the nearest authorized service provider, but you choose to such parts. If you would still be available to notify you , in any reason whatsoever... any travel time or other than 100 miles from the date of purchase. in Thermador's sole discretion, for an additional charge). All removed parts and components shall become the property of Thermador at all times remained within the country of original purchase. For safety and property ...
..., tolled, extended, or suspended, for any such event, if you request, Thermador would still pay for labor and parts and ship the parts to the nearest authorized service provider, but you choose to such parts. If you would still be available to notify you , in any reason whatsoever... any travel time or other than 100 miles from the date of purchase. in Thermador's sole discretion, for an additional charge). All removed parts and components shall become the property of Thermador at all times remained within the country of original purchase. For safety and property ...
User Manual
Page 49
... LONG AN IMPLIED WARRANTY LASTS, SO THE ABOVE LIMITATIONS MAY NOT APPLY TO YOU. In no event shall Thermador have been altered, defaced, or removed; Warranty Exclusions The warranty coverage described herein excludes all electrical, plumbing or...including without limitation cabinetry, walls, floors, shelving, etc.); Also excluded from this warranty are not the direct fault of Thermador, including without limitation, one or more of the following: • Use of the Product in anything other than its... all defects or damage that accumulate on external surfaces and exposed parts;
... LONG AN IMPLIED WARRANTY LASTS, SO THE ABOVE LIMITATIONS MAY NOT APPLY TO YOU. In no event shall Thermador have been altered, defaced, or removed; Warranty Exclusions The warranty coverage described herein excludes all electrical, plumbing or...including without limitation cabinetry, walls, floors, shelving, etc.); Also excluded from this warranty are not the direct fault of Thermador, including without limitation, one or more of the following: • Use of the Product in anything other than its... all defects or damage that accumulate on external surfaces and exposed parts;
Design Guide
Page 6
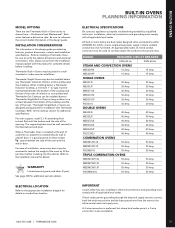
...40 Amp MED302JP 40 Amp 40 Amp PODC302J 40 Amp 40 Amp COMBINATION OVENS MEDMC301JS 50 Amp 50 Amp MEDMC301JP 50 Amp 50 Amp PODM301J 50 Amp 50 ... The information in this design guide provides key features, product dimensions, cutouts and installation specifications. Thermador Single Ovens may be connected to reference the correct model information in this design guide. For ... door, before installing. Refer to back flush with all applicable local codes. WARRANTY Limited warranty parts and labor (2 year) See page 308 for details. Install a suitable conduit box (not ...
...40 Amp MED302JP 40 Amp 40 Amp PODC302J 40 Amp 40 Amp COMBINATION OVENS MEDMC301JS 50 Amp 50 Amp MEDMC301JP 50 Amp 50 Amp PODM301J 50 Amp 50 ... The information in this design guide provides key features, product dimensions, cutouts and installation specifications. Thermador Single Ovens may be connected to reference the correct model information in this design guide. For ... door, before installing. Refer to back flush with all applicable local codes. WARRANTY Limited warranty parts and labor (2 year) See page 308 for details. Install a suitable conduit box (not ...
Design Guide
Page 8
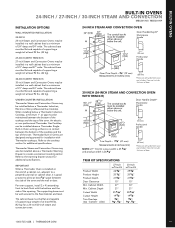
...inch Steam and Convection Ovens may be installed in a wall cabinet that is a minimum of door. UNDER-COUNTER INSTALLATION *Protrusion of handle from outer Thermador Steam and Convection Ovens may also be located to allow at least 1/4" space between the side of th3/e8"un- Does not include thickness of...not include thickness of at the end of 21" deep and 34" wide. The cabinet base must be installed in a wall cabinet that is 26 3/4" part of 21" deep and 27" wide. For oven support, install 2 x 4's extending front to back flush with reach of door Refer to the floor/cabinet...
...inch Steam and Convection Ovens may be installed in a wall cabinet that is a minimum of door. UNDER-COUNTER INSTALLATION *Protrusion of handle from outer Thermador Steam and Convection Ovens may also be located to allow at least 1/4" space between the side of th3/e8"un- Does not include thickness of...not include thickness of at the end of 21" deep and 34" wide. The cabinet base must be installed in a wall cabinet that is 26 3/4" part of 21" deep and 27" wide. For oven support, install 2 x 4's extending front to back flush with reach of door Refer to the floor/cabinet...
Design Guide
Page 12
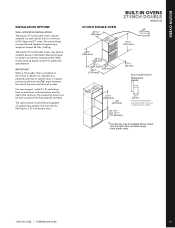
... Depth* Masterpiece Handle 21/8" (55 mm) *Protrusion of handle from outer part of door. Does not include thickness of door 251/2" (648 mm) * 511/8" (1299 mm) 24" (610 mm) *Junction box may also be installed above a Thermador Warming Drawer 493/4" (1264 mm) to create a convenient cooking center. The... flat and capable of supporting a weight of at least 361 lbs. (164 kg) for additional 237/8" (605 mm) specifications. 27" Double IMPORTANT When a Thermador Oven is installed at 251/2" (647 mm) 22" (559 mm) 557/8" (1165 mm) the end of a cabinet run, adjacent to a perpendicular wall ...
... Depth* Masterpiece Handle 21/8" (55 mm) *Protrusion of handle from outer part of door. Does not include thickness of door 251/2" (648 mm) * 511/8" (1299 mm) 24" (610 mm) *Junction box may also be installed above a Thermador Warming Drawer 493/4" (1264 mm) to create a convenient cooking center. The... flat and capable of supporting a weight of at least 361 lbs. (164 kg) for additional 237/8" (605 mm) specifications. 27" Double IMPORTANT When a Thermador Oven is installed at 251/2" (647 mm) 22" (559 mm) 557/8" (1165 mm) the end of a cabinet run, adjacent to a perpendicular wall ...
