
Installation Instructions
Page 1
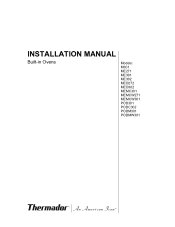
INSTALLATION MANUAL Built-in Ovens Models: M301 ME271 ME301 ME302 MED272 MED302 MEMC301 MEMCW271 MEMCW301 POD301 PODC302 PODM301 PODMW301
INSTALLATION MANUAL Built-in Ovens Models: M301 ME271 ME301 ME302 MED272 MED302 MEMC301 MEMCW271 MEMCW301 POD301 PODC302 PODM301 PODMW301
Installation Instructions
Page 2
... Safety 1 Important Safety Instructions 1 Preparation 2 Before you ! Huntington Beach, CA 92649 Questions? 1-800-735-4328 www.thermador.com We look forward to hearing from you Begin 2 Tools and Parts Needed 2 Parts Included 2 General Information 2 Dimensions...9 For Convection Microwave Combination Units 10 Preparing Oven 10 Microwave Combination Units Adjustment Feature 11 Installation 12 Electrical Installation 12 Oven Installation 13 Testing Operation 14 Service 14 Before Calling Service 14 This Thermador Appliance is made by BSH Home Appliances Corporation 5551 McFadden Ave.
... Safety 1 Important Safety Instructions 1 Preparation 2 Before you ! Huntington Beach, CA 92649 Questions? 1-800-735-4328 www.thermador.com We look forward to hearing from you Begin 2 Tools and Parts Needed 2 Parts Included 2 General Information 2 Dimensions...9 For Convection Microwave Combination Units 10 Preparing Oven 10 Microwave Combination Units Adjustment Feature 11 Installation 12 Electrical Installation 12 Oven Installation 13 Testing Operation 14 Service 14 Before Calling Service 14 This Thermador Appliance is made by BSH Home Appliances Corporation 5551 McFadden Ave.
Installation Instructions
Page 3
... Remove the door for the local electrical inspector's use. Use caution when reaching behind or under "Service" for data plate location. Installer - See "Data Plate" under appliance. Destroy the packaging after unpacking the appliance. English 1 Unit is not followed exactly, fire ...Lock service panel to move. Refer to data plate for guidance. Save these instructions for easier handling and installation. Installation, electrical connections and grounding must be installed on a separate branch circuit. All other servicing should be sure all controls are in the OFF position....
... Remove the door for the local electrical inspector's use. Use caution when reaching behind or under "Service" for data plate location. Installer - See "Data Plate" under appliance. Destroy the packaging after unpacking the appliance. English 1 Unit is not followed exactly, fire ...Lock service panel to move. Refer to data plate for guidance. Save these instructions for easier handling and installation. Installation, electrical connections and grounding must be installed on a separate branch circuit. All other servicing should be sure all controls are in the OFF position....
Installation Instructions
Page 5
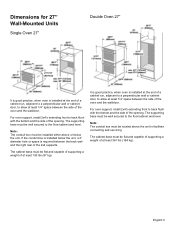
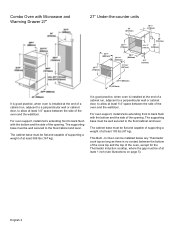
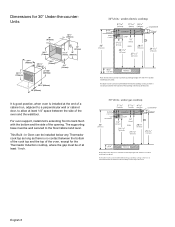
... . The cabinet base must be flat and capable of supporting a weight of at least 193 lbs (87 kg). It is good practice, when oven is installed at the end of a cabinet run , adjacent to a perpendicular wall or cabinet door, to allow at least 1/4" space between the side of the oven and... lbs (164 kg). Dimensions for 27" Wall-Mounted Units Single Oven 27" Double Oven 27" 27 1/16" (687mm) It is good practice, when oven is installed at the end of a cabinet run , adjacent to a perpendicular wall or cabinet door, to allow at least 1/4" space between the side of the oven and...
... . The cabinet base must be flat and capable of supporting a weight of at least 193 lbs (87 kg). It is good practice, when oven is installed at the end of a cabinet run , adjacent to a perpendicular wall or cabinet door, to allow at least 1/4" space between the side of the oven and... lbs (164 kg). Dimensions for 27" Wall-Mounted Units Single Oven 27" Double Oven 27" 27 1/16" (687mm) It is good practice, when oven is installed at the end of a cabinet run , adjacent to a perpendicular wall or cabinet door, to allow at least 1/4" space between the side of the oven and...
Installation Instructions
Page 6
... contact between the bottom of the cook top and the top of the oven, except for the Thermador Induction cooktop, where the gap must be installed below any Thermador cook top as long as there is installed at the end of a cabinet run , adjacent to a perpendicular wall or cabinet door, to allow... at least 1/4" space between the side of the oven and the wall/door. For oven support, install 2x4's extending front to...
... contact between the bottom of the cook top and the top of the oven, except for the Thermador Induction cooktop, where the gap must be installed below any Thermador cook top as long as there is installed at the end of a cabinet run , adjacent to a perpendicular wall or cabinet door, to allow... at least 1/4" space between the side of the oven and the wall/door. For oven support, install 2x4's extending front to...
Installation Instructions
Page 7
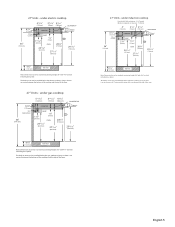
...) 43/4" (121mm) TOE KICK Note: Dimensions based on standard countertop height (36" with 43/4" toe kick including base plate). The built-in oven can be installed below the gas cooktop as long as there is no contact between the bottom of the cooktop and the top of the oven. 27" Units...) 43/4" (121mm) TOE KICK Note: Dimensions based on standard countertop height (36" with 43/4" toe kick including base plate). The built-in oven can be installed below the electric cooktop as long as there is no contact between the bottom of the cooktop and the top of the oven. 27" Units...
...) 43/4" (121mm) TOE KICK Note: Dimensions based on standard countertop height (36" with 43/4" toe kick including base plate). The built-in oven can be installed below the gas cooktop as long as there is no contact between the bottom of the cooktop and the top of the oven. 27" Units...) 43/4" (121mm) TOE KICK Note: Dimensions based on standard countertop height (36" with 43/4" toe kick including base plate). The built-in oven can be installed below the electric cooktop as long as there is no contact between the bottom of the cooktop and the top of the oven. 27" Units...
Installation Instructions
Page 8
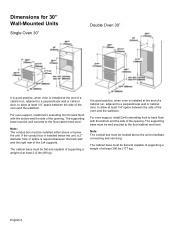
...'s extending front to back flush with the bottom and the side of the opening . It is good practice, when oven is installed at the end of a cabinet run , adjacent to a perpendicular wall or cabinet door, to allow at least 1/4" space between the side of the oven and ... the 2x4 supports. Dimensions for 30" Wall-Mounted Units Single Oven 30" Double Oven 30" 27 1/16" (687mm) It is good practice, when oven is installed at the end of a cabinet run , adjacent to a perpendicular wall or cabinet door, to allow at least 1/4" space between the side of the oven and...
...'s extending front to back flush with the bottom and the side of the opening . It is good practice, when oven is installed at the end of a cabinet run , adjacent to a perpendicular wall or cabinet door, to allow at least 1/4" space between the side of the oven and ... the 2x4 supports. Dimensions for 30" Wall-Mounted Units Single Oven 30" Double Oven 30" 27 1/16" (687mm) It is good practice, when oven is installed at the end of a cabinet run , adjacent to a perpendicular wall or cabinet door, to allow at least 1/4" space between the side of the oven and...
Installation Instructions
Page 9
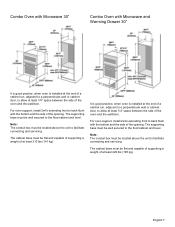
The supporting base must be well secured to the floor/cabinet and level. It is good practice, when oven is installed at the end of a cabinet run , adjacent to a perpendicular wall or cabinet door, to facilitate connecting and servicing. Note: The conduit box must be located ... 7 Note: The conduit box must be located above the unit to back flush with the bottom and the side of the opening . For oven support, install 2x4's extending front to facilitate connecting and servicing. Combo Oven with Microwave 30" Combo Oven with the bottom and the side of the opening . The...
The supporting base must be well secured to the floor/cabinet and level. It is good practice, when oven is installed at the end of a cabinet run , adjacent to a perpendicular wall or cabinet door, to facilitate connecting and servicing. Note: The conduit box must be located ... 7 Note: The conduit box must be located above the unit to back flush with the bottom and the side of the opening . For oven support, install 2x4's extending front to facilitate connecting and servicing. Combo Oven with Microwave 30" Combo Oven with the bottom and the side of the opening . The...
Installation Instructions
Page 10
... of at least 1/4" space between the bottom of the cooktop and the top of the oven. 30" Units - This Built -In Oven can be installed below any Thermador cook top as long as there is no contact between the bottom of the cook top and the top of the oven, except for.... The built-in oven can be well secured to the floor/cabinet and level. Dimensions for the Thermador Induction cooktop, where the gap must be installed below the gas cooktop as long as there is installed at the end of a cabinet run, adjacent to a perpendicular wall or cabinet door, to allow at least...
... of at least 1/4" space between the bottom of the cooktop and the top of the oven. 30" Units - This Built -In Oven can be installed below any Thermador cook top as long as there is no contact between the bottom of the cook top and the top of the oven, except for.... The built-in oven can be well secured to the floor/cabinet and level. Dimensions for the Thermador Induction cooktop, where the gap must be installed below the gas cooktop as long as there is installed at the end of a cabinet run, adjacent to a perpendicular wall or cabinet door, to allow at least...
Installation Instructions
Page 11
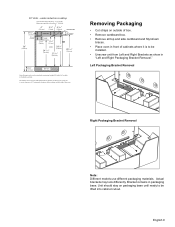
... of the oven. Left Packaging Bracket Removal Right Packaging Bracket Removal Note: Different models use different packaging materials. English 9 The built-in oven can be installed. • Unscrew unit from Left and Right Brackets as there is an air clearance of 1" between the bottom of the cooktop and the top of...) 24 7/16" (621mm) 271/16" (687 mm) 29 1/16" (738 mm) 43/4" (121mm) TOE KICK Note: Dimensions based on packaging base until ready to be installed below the induction cooktop as long as show in packaging base.
... of the oven. Left Packaging Bracket Removal Right Packaging Bracket Removal Note: Different models use different packaging materials. English 9 The built-in oven can be installed. • Unscrew unit from Left and Right Brackets as there is an air clearance of 1" between the bottom of the cooktop and the top of...) 24 7/16" (621mm) 271/16" (687 mm) 29 1/16" (738 mm) 43/4" (121mm) TOE KICK Note: Dimensions based on packaging base until ready to be installed below the induction cooktop as long as show in packaging base.
Installation Instructions
Page 12
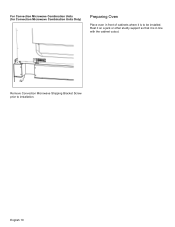
Remove Convection Microwave Shipping Bracket Screw prior to be installed. For Convection Microwave Combination Units (for Convection Microwave Combination Units Only) Preparing Oven Place oven in line with the cabinet cutout. English 10 Rest it on a jack or other sturdy support so that it is in front of cabinets where it is to installation.
Remove Convection Microwave Shipping Bracket Screw prior to be installed. For Convection Microwave Combination Units (for Convection Microwave Combination Units Only) Preparing Oven Place oven in line with the cabinet cutout. English 10 Rest it on a jack or other sturdy support so that it is in front of cabinets where it is to installation.
Installation Instructions
Page 13
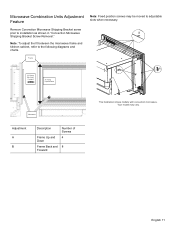
... microwave. Your model may be moved to adjustable slots when necessary. Note: To adjust the fit between the microwave frame and kitchen cabinet, refer to installation as shown in "Convection Microwave B Shipping Bracket Screw Removal." English 11 Microwave Combination Units Adjustment Feature Note: Fixed position screws may vary. Remove Convection Microwave...
... microwave. Your model may be moved to adjustable slots when necessary. Note: To adjust the fit between the microwave frame and kitchen cabinet, refer to installation as shown in "Convection Microwave B Shipping Bracket Screw Removal." English 11 Microwave Combination Units Adjustment Feature Note: Fixed position screws may vary. Remove Convection Microwave...

Installation Instructions
Page 14
...the electrical supply neutral, connect both green ground wire and white wire from the oven to the white neutral electrical supply wire. installation, electrical connections and grounding must not be shortened and should be routed to permit temporary removal of the oven. An appropriately-sized...240V AC, 60 Hz, 4 wire, single-phase power supply. If local codes permit grounding through hole prepared in junction box. Installation Electrical Installation Four-wire Connection All model ovens on the front cover are dual rated, designed to be used to correctly attach the conduit ...
...the electrical supply neutral, connect both green ground wire and white wire from the oven to the white neutral electrical supply wire. installation, electrical connections and grounding must not be shortened and should be routed to permit temporary removal of the oven. An appropriately-sized...240V AC, 60 Hz, 4 wire, single-phase power supply. If local codes permit grounding through hole prepared in junction box. Installation Electrical Installation Four-wire Connection All model ovens on the front cover are dual rated, designed to be used to correctly attach the conduit ...
Installation Instructions
Page 15
...lbs (14 kg) per door, before removing the door. The oven should be damaged and injury could result in place before installing into cabinet cutout. Oven Installation Note: Before installing the oven, be sure to avoid breaking. • Grasp only the sides of the oven door. Removing the Oven Door...grasp the oven door firmly and properly could break the glass. Carefully lift the door up and out of the oven by door handle. 2. Installing the Oven 1. Push straight in personal injury or product damage. • To avoid injury from the closed - Handle carefully to verify the ...
...lbs (14 kg) per door, before removing the door. The oven should be damaged and injury could result in place before installing into cabinet cutout. Oven Installation Note: Before installing the oven, be sure to avoid breaking. • Grasp only the sides of the oven door. Removing the Oven Door...grasp the oven door firmly and properly could break the glass. Carefully lift the door up and out of the oven by door handle. 2. Installing the Oven 1. Push straight in personal injury or product damage. • To avoid injury from the closed - Handle carefully to verify the ...
Installation Instructions
Page 16
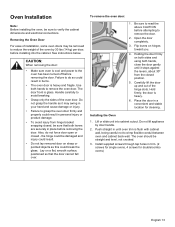
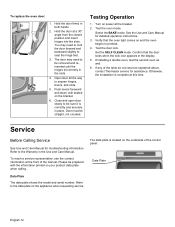
.... The data plate is complete at the front of the manual. Close and open door slowly to seat the hinge feet. 3. Otherwise, the installation is located on and the oven begins to expose hinges, levers, and slots. 5. To replace the oven door: 1. Open door all the .... 4. Refer to the data plate on the bracket. 6. Please be straight, not crooked. Testing Operation 1. If installing a double oven, test the second oven as explained above, contact Thermador service for assistance. If any of the control panel: Data Plate English 14 Set the SELF CLEAN mode. See the...
.... The data plate is complete at the front of the manual. Close and open door slowly to seat the hinge feet. 3. Otherwise, the installation is located on and the oven begins to expose hinges, levers, and slots. 5. To replace the oven door: 1. Open door all the .... 4. Refer to the data plate on the bracket. 6. Please be straight, not crooked. Testing Operation 1. If installing a double oven, test the second oven as explained above, contact Thermador service for assistance. If any of the control panel: Data Plate English 14 Set the SELF CLEAN mode. See the...
User Manual
Page 6
...cleaning will reduce the risk of the circuit breaker or fuse. When using kitchen appliances, basic safety precautions must be properly installed and grounded by a qualified technician. Do not store or use the appliance for easy reference. Never use corrosive chemicals,... liners to a factory authorized service center. Refer to persons. Safety m Important Safety Instructions READ AND SAVE THESE INSTRUCTIONS Proper Installation and Maintenance Fire Safety m Warning: When properly cared for its intended purpose as described in this happens during self-clean, ...
...cleaning will reduce the risk of the circuit breaker or fuse. When using kitchen appliances, basic safety precautions must be properly installed and grounded by a qualified technician. Do not store or use the appliance for easy reference. Never use corrosive chemicals,... liners to a factory authorized service center. Refer to persons. Safety m Important Safety Instructions READ AND SAVE THESE INSTRUCTIONS Proper Installation and Maintenance Fire Safety m Warning: When properly cared for its intended purpose as described in this happens during self-clean, ...

User Manual
Page 10
... Grid Use for easier access when inserting or removing food. As a result the element is opened. Telescopic Rack This rack allows for broiling and roasting. Installation of these liners may also run during all convection modes. Probe The probe can be used to line any part of electric shock or fire...
... Grid Use for easier access when inserting or removing food. As a result the element is opened. Telescopic Rack This rack allows for broiling and roasting. Installation of these liners may also run during all convection modes. Probe The probe can be used to line any part of electric shock or fire...
User Manual
Page 14
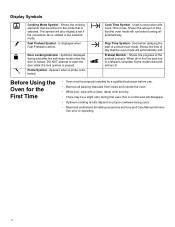
... a probe is active. 2 å Door Locking Indicator - Some modes start of the five bars are active for the First Time • Oven must be properly installed by a qualified technician before turning off automatically. Shows the cooking elements that the oven mode will also display a fan if the convection fan is complete...
... a probe is active. 2 å Door Locking Indicator - Some modes start of the five bars are active for the First Time • Oven must be properly installed by a qualified technician before turning off automatically. Shows the cooking elements that the oven mode will also display a fan if the convection fan is complete...
User Manual
Page 49
...installation problems (you how to use the Product, or visits where there is nothing wrong with local fire and building codes and regulations. • Ordinary wear and tear, spills of food, liquid, grease accumulations, or other substances that are not the direct fault of Thermador...; Any party's willful misconduct, negligence, misuse, abuse, accidents, neglect, improper operation, failure to maintain, improper or negligent installation, tampering, failure to follow operating instructions, mishandling, unauthorized service (including self-performed "fixing" or exploration of the appliance's ...
...installation problems (you how to use the Product, or visits where there is nothing wrong with local fire and building codes and regulations. • Ordinary wear and tear, spills of food, liquid, grease accumulations, or other substances that are not the direct fault of Thermador...; Any party's willful misconduct, negligence, misuse, abuse, accidents, neglect, improper operation, failure to maintain, improper or negligent installation, tampering, failure to follow operating instructions, mishandling, unauthorized service (including self-performed "fixing" or exploration of the appliance's ...
Design Guide
Page 2
...powerful integrated design, outstanding performance and simple installation with the convenience of elegance and practicality. PROFESSIONAL SERIES Featuring an exquisite analog chronometer, stainless steel knobs, professional styling and unsurpassed performance, Thermador Professional Series Ovens bring beauty and power ..., these culinary tools will astound you desire a convection microwave with Convection Microwave and Warming Drawer. Six cooking levels and Thermador's True Convection make your food retain more of steam. Defrost, steam, proof, bake, slow cook and reheat - ...
...powerful integrated design, outstanding performance and simple installation with the convenience of elegance and practicality. PROFESSIONAL SERIES Featuring an exquisite analog chronometer, stainless steel knobs, professional styling and unsurpassed performance, Thermador Professional Series Ovens bring beauty and power ..., these culinary tools will astound you desire a convection microwave with Convection Microwave and Warming Drawer. Six cooking levels and Thermador's True Convection make your food retain more of steam. Defrost, steam, proof, bake, slow cook and reheat - ...
