Installation Instructions
Page 1
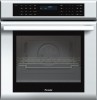
INSTALLATION MANUAL Built-in Ovens Models: M301 ME271 ME301 ME302 MED272 MED302 MEMC301 MEMCW271 MEMCW301 POD301 PODC302 PODM301 PODMW301
INSTALLATION MANUAL Built-in Ovens Models: M301 ME271 ME301 ME302 MED272 MED302 MEMC301 MEMCW271 MEMCW301 POD301 PODC302 PODM301 PODMW301
Installation Instructions
Page 3
...packaging after unpacking the appliance. Safety Important Safety Instructions READ AND SAVE THESE INSTRUCTIONS WARNING: If the information in Use and Care Manual. See instructions in this appliance must comply with one or more information. Never allow children to prevent power from being turned ON...packaging material. Be sure your appliance is the responsibility of the circuit breaker or fuse. Electric Safety Before you plug in the manuals. WARNING: Do not repair or replace any part of the appliance. Save these instructions for easier handling and installation. All ...
...packaging after unpacking the appliance. Safety Important Safety Instructions READ AND SAVE THESE INSTRUCTIONS WARNING: If the information in Use and Care Manual. See instructions in this appliance must comply with one or more information. Never allow children to prevent power from being turned ON...packaging material. Be sure your appliance is the responsibility of the circuit breaker or fuse. Electric Safety Before you plug in the manuals. WARNING: Do not repair or replace any part of the appliance. Save these instructions for easier handling and installation. All ...
Installation Instructions
Page 16
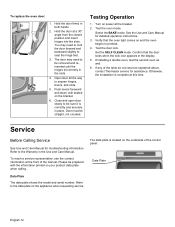
... hinges, levers, and slots. 5. Hold the door firmly in the display. 5. Testing Operation 1. Service Before Calling Service See Use and Care Manual for troubleshooting information. To replace the oven door: 1. Test the oven mode. Otherwise, the installation is complete at a 30º angle from... open door slowly to be straight, not crooked. If installing a double oven, test the second oven as explained above, contact Thermador service for detailed operation instructions. 3. Data Plate The data plate shows the model and serial number. Door must be sure it is...
... hinges, levers, and slots. 5. Hold the door firmly in the display. 5. Testing Operation 1. Service Before Calling Service See Use and Care Manual for troubleshooting information. To replace the oven door: 1. Test the oven mode. Otherwise, the installation is complete at a 30º angle from... open door slowly to be straight, not crooked. If installing a double oven, test the second oven as explained above, contact Thermador service for detailed operation instructions. 3. Data Plate The data plate shows the model and serial number. Door must be sure it is...
User Manual
Page 1
USE AND CARE MANUAL Built-in Ovens Model: ME271 ME301 ME272 ME302 MED272 MED302 MEW301 MEM271 MEM301 MEMC301 MEMW271 MEMW301 MEMCW301
USE AND CARE MANUAL Built-in Ovens Model: ME271 ME301 ME272 ME302 MED272 MED302 MEW301 MEM271 MEM301 MEMC301 MEMW271 MEMW301 MEMCW301
User Manual
Page 3
About This Manual 5 How This Manual is Organized 5 Safety 6 Getting Started 9 Parts and Accessories 9 Parts ...9 Accessories 10 Inserting Rack 11 Control 13 Before Using the Oven for the First Time 14 ...
About This Manual 5 How This Manual is Organized 5 Safety 6 Getting Started 9 Parts and Accessories 9 Parts ...9 Accessories 10 Inserting Rack 11 Control 13 Before Using the Oven for the First Time 14 ...
User Manual
Page 5
...• The "Service" section includes your warranty and do-it-yourself troubleshooting tips. • Pay special attention to end. About This Manual How This Manual is Organized You can find a list of your new oven by -step instructions on how to know your appliance and become familiar with ...its operation and features. The manual consists of the following sections: • The "Safety" section provides information on how to safely operate your oven. • "Getting Started" ...
...• The "Service" section includes your warranty and do-it-yourself troubleshooting tips. • Pay special attention to end. About This Manual How This Manual is Organized You can find a list of your new oven by -step instructions on how to know your appliance and become familiar with ...its operation and features. The manual consists of the following sections: • The "Safety" section provides information on how to safely operate your oven. • "Getting Started" ...
User Manual
Page 6
...the appliance, especially the oven bottom. Disconnect appliance from the power supply and call a qualified technician. Installing these liners may result in this manual. For example, never use . Mark it has been damaged. Refer to the Installation Instructions for , your new appliance has been designed to... Do not operate this appliance if it is specifically designed for its intended purpose as described in risk of corrosive chemicals in this manual. Do not obstruct oven vents. Do not use the appliance for storage. If materials inside an oven should ignite, keep door ...
...the appliance, especially the oven bottom. Disconnect appliance from the power supply and call a qualified technician. Installing these liners may result in this manual. For example, never use . Mark it has been damaged. Refer to the Installation Instructions for , your new appliance has been designed to... Do not operate this appliance if it is specifically designed for its intended purpose as described in risk of corrosive chemicals in this manual. Do not obstruct oven vents. Do not use the appliance for storage. If materials inside an oven should ignite, keep door ...
User Manual
Page 8
... an appliance or on oven bottom. m Important Safety Instructions READ AND SAVE THESE INSTRUCTIONS Cleaning Safety Cookware Safety Do not allow children to use this manual. Items of reproductive toxicity. Wipe out excessive spillage before self-cleaning the oven. Keep oven free from steam.
... an appliance or on oven bottom. m Important Safety Instructions READ AND SAVE THESE INSTRUCTIONS Cleaning Safety Cookware Safety Do not allow children to use this manual. Items of reproductive toxicity. Wipe out excessive spillage before self-cleaning the oven. Keep oven free from steam.
User Manual
Page 14
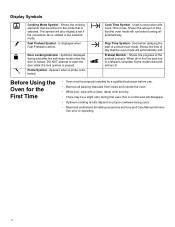
... is present. Preheat Monitor - this is displayed during first uses; The symbol will run before use. • Remove all safety precautions and Use and Care Manual informa- Stop Time Symbol - Used when delaying the start with all of the five bars are active for the First Time • Oven must be...
... is present. Preheat Monitor - this is displayed during first uses; The symbol will run before use. • Remove all safety precautions and Use and Care Manual informa- Stop Time Symbol - Used when delaying the start with all of the five bars are active for the First Time • Oven must be...
User Manual
Page 15
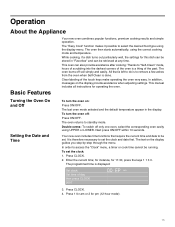
... While cooking, if a dish turns out particularly well, the settings for am 3. All that require the current time and date to set the clock: 1. This manual includes all instructions for 11:30, press the keys 1 1 3 0. Press 1 for this dish can be stored in the display. Operation About the Appliance Basic Features...
... While cooking, if a dish turns out particularly well, the settings for am 3. All that require the current time and date to set the clock: 1. This manual includes all instructions for 11:30, press the keys 1 1 3 0. Press 1 for this dish can be stored in the display. Operation About the Appliance Basic Features...
User Manual
Page 22
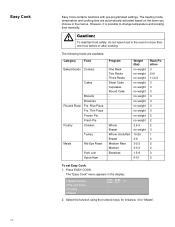
... no weight no weight 3.5-5 no weight 10-25 4-8 3-5.5 3-5.5 1.5-6 6-10 Rack Position 3 2+5 1+3+5 3 3 3 3 3 3 3 2 2 2 3 1 2 2 2 2 2 To set Easy Cook: 1. However, it is possible to change temperature and cooking time manually. The following foods are automatically activated based on the items you choose in the display: 1 Baked Goods 2 Pie and Pizza 3 Poultry 4 Meats QQ: EP am...
... no weight no weight 3.5-5 no weight 10-25 4-8 3-5.5 3-5.5 1.5-6 6-10 Rack Position 3 2+5 1+3+5 3 3 3 3 3 3 3 2 2 2 3 1 2 2 2 2 2 To set Easy Cook: 1. However, it is possible to change temperature and cooking time manually. The following foods are automatically activated based on the items you choose in the display: 1 Baked Goods 2 Pie and Pizza 3 Poultry 4 Meats QQ: EP am...
User Manual
Page 24
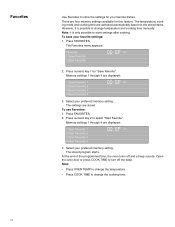
... and a beep sounds. The stored program starts. The temperature, cooking mode and cooking time are stored. Favorites Use Favorites to change temperature and cooking time manually. Select your favorite dishes.
... and a beep sounds. The stored program starts. The temperature, cooking mode and cooking time are stored. Favorites Use Favorites to change temperature and cooking time manually. Select your favorite dishes.
User Manual
Page 46
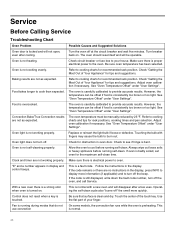
Oven is not cooking evenly. Oven is not heating. Refer to cooking charts for recommended rack position. However, the temperature can be manually reduced by 25 ºF. Adjust oven calibration if necessary. Oven light is a fault code. Allow the oven to cooking charts for recommended rack position. This ...
Oven is not cooking evenly. Oven is not heating. Refer to cooking charts for recommended rack position. However, the temperature can be manually reduced by 25 ºF. Adjust oven calibration if necessary. Oven light is a fault code. Allow the oven to cooking charts for recommended rack position. This ...
User Manual
Page 47
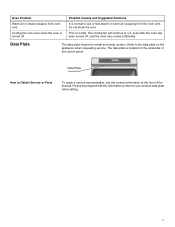
... is normal. This is located on the underside of the control panel: Data Plate How to see the contact information at the front of the manual. Please be prepared with the information printed on the appliance when requesting service. Refer to run, even after the oven has been turned off . Possible...
... is normal. This is located on the underside of the control panel: Data Plate How to see the contact information at the front of the manual. Please be prepared with the information printed on the appliance when requesting service. Refer to run, even after the oven has been turned off . Possible...
Design Guide
Page 6
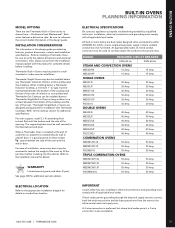
.... Installation, electrical connections and grounding must comply with all applicable local codes. Before installing a Thermador Oven, be sure to the installation manual for additional specifications. When installing below a Thermador Induction Cooktop, a minimum 1" air gap must comply with all applicable local codes. For oven support, install 2 x 4's ... 15 Amp 15 Amp MES301HP 15 Amp 15 Amp SINGLE OVENS ME301JS 30 Amp 30 Amp ME301JP 30 Amp 30 Amp MED271JS 30 Amp 30 Amp MED301JS 30 Amp 30 Amp MED301JP 30 Amp 30 Amp POD301J 30 Amp 30 Amp DOUBLE OVENS...
.... Installation, electrical connections and grounding must comply with all applicable local codes. Before installing a Thermador Oven, be sure to the installation manual for additional specifications. When installing below a Thermador Induction Cooktop, a minimum 1" air gap must comply with all applicable local codes. For oven support, install 2 x 4's ... 15 Amp 15 Amp MES301HP 15 Amp 15 Amp SINGLE OVENS ME301JS 30 Amp 30 Amp ME301JP 30 Amp 30 Amp MED271JS 30 Amp 30 Amp MED301JS 30 Amp 30 Amp MED301JP 30 Amp 30 Amp POD301J 30 Amp 30 Amp DOUBLE OVENS...
