
Design Guide - Induction Cooktops
Page 1
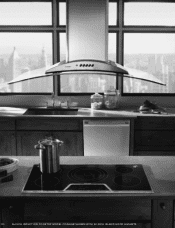
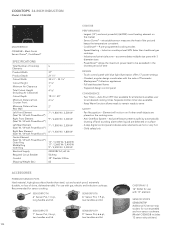
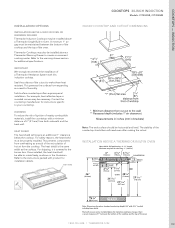
100 36-INCH INDUCTION COOKTOP MODEL CIS365GB SHOWN WITH 42-INCH ISLAND HOOD HGSI42TS
100 36-INCH INDUCTION COOKTOP MODEL CIS365GB SHOWN WITH 42-INCH ISLAND HOOD HGSI42TS
Design Guide - Induction Cooktops
Page 2
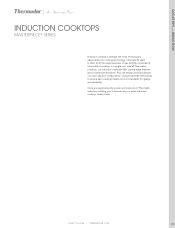
... manufacture our own induction components-using proprietary technology to ensure each cooktop meets our strict standards for quality and durability. Once you 'll discover why no other induction cooktop comes close. 1.800.735.4328 | THERMADOR.COM 101 Like all Thermador products, our induction cooktops offer cutting edge features and unrivaled performance. It offers both the...
... manufacture our own induction components-using proprietary technology to ensure each cooktop meets our strict standards for quality and durability. Once you 'll discover why no other induction cooktop comes close. 1.800.735.4328 | THERMADOR.COM 101 Like all Thermador products, our induction cooktops offer cutting edge features and unrivaled performance. It offers both the...
Design Guide - Induction Cooktops
Page 3
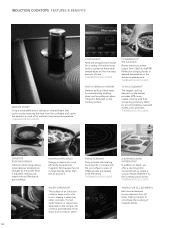
...to the touch, making it safer than the air around it as responsive and flexible as gas cooktops. THERMADOR EXCLUSIVE SAFER OPERATION The surface of multiple dishes. 102 THERMADOR EXCLUSIVE ANTI-OVERFLOW SYSTEM Detects spills and boil-overs by automatically shutting down and sounds an alarm. TRIPLE... oversized skillets, pots and pans. If small metal objects or utensils are heated more usable cooking area than competing cooktops. THERMADOR EXCLUSIVE TIMERS FOR ALL ELEMENTS Each burner features its own element shut-off to maintain the precise temperature. INDUCTION...
...to the touch, making it safer than the air around it as responsive and flexible as gas cooktops. THERMADOR EXCLUSIVE SAFER OPERATION The surface of multiple dishes. 102 THERMADOR EXCLUSIVE ANTI-OVERFLOW SYSTEM Detects spills and boil-overs by automatically shutting down and sounds an alarm. TRIPLE... oversized skillets, pots and pans. If small metal objects or utensils are heated more usable cooking area than competing cooktops. THERMADOR EXCLUSIVE TIMERS FOR ALL ELEMENTS Each burner features its own element shut-off to maintain the precise temperature. INDUCTION...
Design Guide - Induction Cooktops
Page 4
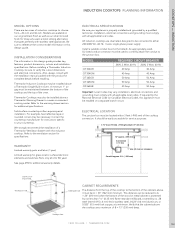
...electrical connections. INSTALLATION CONSIDERATIONS The information in Oven. Before installing a Thermador Induction Cooktop, be connected to the bottom of the cabinets above a Thermador Single Built-in this induction cooktop. A minimum 1" air gap must be necessary. Solid surface countertops ...All induction cooktops are available in this appliance must comply with this design guide provides key features, product dimensions, cutouts and installation specifications. Install a suitable conduit box (not furnished). MODEL CIT304GB CIT304GM CIT365GB CIT365GM CIS365GB ...
...electrical connections. INSTALLATION CONSIDERATIONS The information in Oven. Before installing a Thermador Induction Cooktop, be connected to the bottom of the cabinets above a Thermador Single Built-in this induction cooktop. A minimum 1" air gap must be necessary. Solid surface countertops ...All induction cooktops are available in this appliance must comply with this design guide provides key features, product dimensions, cutouts and installation specifications. Install a suitable conduit box (not furnished). MODEL CIT304GB CIT304GM CIT365GB CIT365GM CIS365GB ...
Design Guide - Induction Cooktops
Page 5
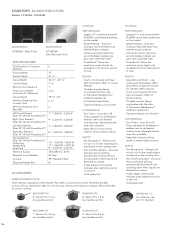
...market - SENSORPOT7 7" Sensor Pot, 3.6 qt., two handles and lid. Induction cooktops heat 50% faster than steel, cut and scratch proof, extremely durable, no loss of Thermador Masterpiece™ Collection appliances - Chiseled, angular design coordinates with 13" element SENSOR...63 CIS365GB PERFORMANCE - Two Timers - Pan Recognition - For use with the suite of shine, dishwasher-safe). retractable sensor measures the heat of Cooktop 5 Elements Product Width 37" Product Depth 21 1/4" Cutout Width 34 3/4" - 34 7/8" Cutout Height 3 1/8" Minimum Air Clearance 1" Total...
...market - SENSORPOT7 7" Sensor Pot, 3.6 qt., two handles and lid. Induction cooktops heat 50% faster than steel, cut and scratch proof, extremely durable, no loss of Thermador Masterpiece™ Collection appliances - Chiseled, angular design coordinates with 13" element SENSOR...63 CIS365GB PERFORMANCE - Two Timers - Pan Recognition - For use with the suite of shine, dishwasher-safe). retractable sensor measures the heat of Cooktop 5 Elements Product Width 37" Product Depth 21 1/4" Cutout Width 34 3/4" - 34 7/8" Cutout Height 3 1/8" Minimum Air Clearance 1" Total...
Design Guide - Induction Cooktops
Page 6
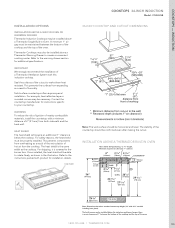
... the countertop manufacturer for installation details. HEAT SHIELD The heat shield will be maintained between the bottom of the cooktop and the top of a Thermador Ventilation System with 43/4" toe kick including base plate). For shipping, it is an air clearance of 1" ... Dimensions based on standard countertop height (36" with this induction cooktop. COOKTOPS - heat shield 36-INCH COOKTOP AND CUTOUT DIMENSIONS Note: The work surface should be installed above a Thermador Warming Drawer to rotate freely, as the cooktop. For safety reasons, the heat shield must be able to ...
... the countertop manufacturer for installation details. HEAT SHIELD The heat shield will be maintained between the bottom of the cooktop and the top of a Thermador Ventilation System with 43/4" toe kick including base plate). For shipping, it is an air clearance of 1" ... Dimensions based on standard countertop height (36" with this induction cooktop. COOKTOPS - heat shield 36-INCH COOKTOP AND CUTOUT DIMENSIONS Note: The work surface should be installed above a Thermador Warming Drawer to rotate freely, as the cooktop. For safety reasons, the heat shield must be able to ...
Design Guide - Induction Cooktops
Page 7
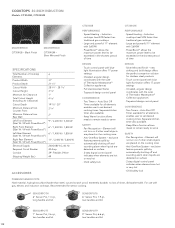
...W 9" / 2,200 W / 3,300 W 240/208V AC, 60 Hz 50 Amp 39" Flexible 3-Wire 61 ACCESSORIES PERFORMANCE - CIT365GM PERFORMANCE - COOKTOPS 36-INCH INDUCTION Models: CIT365GB, CIT365GM CIT365GB MASTERPIECE CIT365GB - Industry exclusive triple zone accommodates multiple size pans with 3 diameter sizes - PowerBoost™ allows the maximum power level...be exceeded in the shortest period of time DESIGN - Silver Mirrored Finish SPECIFICATIONS Total Number of Thermador Masterpiece™ Collection appliances - Child safety lock PREMIUM SENSOR POTS Hard material, high-gloss surface...
...W 9" / 2,200 W / 3,300 W 240/208V AC, 60 Hz 50 Amp 39" Flexible 3-Wire 61 ACCESSORIES PERFORMANCE - CIT365GM PERFORMANCE - COOKTOPS 36-INCH INDUCTION Models: CIT365GB, CIT365GM CIT365GB MASTERPIECE CIT365GB - Industry exclusive triple zone accommodates multiple size pans with 3 diameter sizes - PowerBoost™ allows the maximum power level...be exceeded in the shortest period of time DESIGN - Silver Mirrored Finish SPECIFICATIONS Total Number of Thermador Masterpiece™ Collection appliances - Child safety lock PREMIUM SENSOR POTS Hard material, high-gloss surface...

Design Guide - Induction Cooktops
Page 8
... clearance of 1" between the bottom of the cooktop and the top of the oven. Refer to your countertop. heat shield COOKTOPS 36-INCH INDUCTION Models: CIT365GB, CIT365GM 36-INCH COOKTOP AND CUTOUT DIMENSIONS Note: The work surface should be installed above a Thermador Single Built-in the illustration. Thermador Cooktops may be horizontal and level. Seal the surfaces...
... clearance of 1" between the bottom of the cooktop and the top of the oven. Refer to your countertop. heat shield COOKTOPS 36-INCH INDUCTION Models: CIT365GB, CIT365GM 36-INCH COOKTOP AND CUTOUT DIMENSIONS Note: The work surface should be installed above a Thermador Single Built-in the illustration. Thermador Cooktops may be horizontal and level. Seal the surfaces...
Design Guide - Induction Cooktops
Page 9
...Hard material, high-gloss surface (harder than steel, cut and scratch proof, extremely durable, no loss of Cooktop Elements Product Width Product Depth Cutout Width Cutout Height Minimum Air Clearance Total Cutout Height (Including Air Clearance) ... with PowerBoost™ ) Left Rear Element (Size/ W / W with PowerBoost™ ) Right Rear Element (Size/ W / W with the suite of Thermador Masterpiece™ Collection appliances - SENSORPOTH 6" Sensor Pot, 1.3 qt., long handle and lid. Silver Mirrored Finish SPECIFICATIONS Total Number of shine, dishwasher-safe). Separate kitchen...
...Hard material, high-gloss surface (harder than steel, cut and scratch proof, extremely durable, no loss of Cooktop Elements Product Width Product Depth Cutout Width Cutout Height Minimum Air Clearance Total Cutout Height (Including Air Clearance) ... with PowerBoost™ ) Left Rear Element (Size/ W / W with PowerBoost™ ) Right Rear Element (Size/ W / W with the suite of Thermador Masterpiece™ Collection appliances - SENSORPOTH 6" Sensor Pot, 1.3 qt., long handle and lid. Silver Mirrored Finish SPECIFICATIONS Total Number of shine, dishwasher-safe). Separate kitchen...
Design Guide - Induction Cooktops
Page 10
...of ignition of nearby combustible materials, install the countertop with a minimum distance of a Thermador Ventilation System with this induction cooktop. For shipping, it is screwed to make them heat resistant. INSTALLATION ABOVE A THERMADOR BUILT-IN OVEN Heat shield: Self positioning - 2 3/8" length, Minimum required air... ABOve A BUILT-IN OveN Or WArMING DrAWer Thermador Induction Cooktops may also be installed above a Thermador Single Built-in Oven. Seal the surfaces of the cutout to the burner box. Thermador Cooktops may be confirmed even after making ...
...of ignition of nearby combustible materials, install the countertop with a minimum distance of a Thermador Ventilation System with this induction cooktop. For shipping, it is screwed to make them heat resistant. INSTALLATION ABOVE A THERMADOR BUILT-IN OVEN Heat shield: Self positioning - 2 3/8" length, Minimum required air... ABOve A BUILT-IN OveN Or WArMING DrAWer Thermador Induction Cooktops may also be installed above a Thermador Single Built-in Oven. Seal the surfaces of the cutout to the burner box. Thermador Cooktops may be confirmed even after making ...
Installation Instructions
Page 2
Table of contents Important Safety Instructions 4 Before you begin 5 Tools and parts needed 5 Parts included 5 Preparation 6 Installation procedure 9 Installing the heat shield 9 Secure the cooktop to countertop 10 Electrical installation 11 Test the installation 12 Technical service 13 3
Table of contents Important Safety Instructions 4 Before you begin 5 Tools and parts needed 5 Parts included 5 Preparation 6 Installation procedure 9 Installing the heat shield 9 Secure the cooktop to countertop 10 Electrical installation 11 Test the installation 12 Technical service 13 3
Installation Instructions
Page 3
... reference. Never allow children to determine if additional requirements and standards apply in the cabinets over the surface units. Hidden surfaces may fit below the cooktop. Improper installation, technical service or maintenance can be reduced by installing a hood that may have a contact separation of burns or fire when touching hot surface...
... reference. Never allow children to determine if additional requirements and standards apply in the cabinets over the surface units. Hidden surfaces may fit below the cooktop. Improper installation, technical service or maintenance can be reduced by installing a hood that may have a contact separation of burns or fire when touching hot surface...
Installation Instructions
Page 7
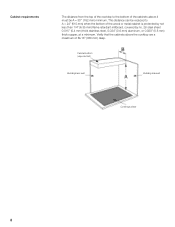
This distance can be A = 30" (762 mm) minimum. Verify that the cabinets above it must be reduced to the bottom of the cabinets above the cooktop are a maximum of the wood or metal cabinet is protected by not less than 1/4" (6.35 mm) flame retardant millboard, covered by no. 28 steel sheet 0...." (0.5 mm) thick copper, at a minimum. Cabinet bottom (unprotected) Building back wall Building side wall Cooking surface 8 Cabinet requirements The distance from the top of the cooktop to A = 24" (610 mm) when the bottom of B=13" (330 mm) deep.
This distance can be A = 30" (762 mm) minimum. Verify that the cabinets above it must be reduced to the bottom of the cabinets above the cooktop are a maximum of the wood or metal cabinet is protected by not less than 1/4" (6.35 mm) flame retardant millboard, covered by no. 28 steel sheet 0...." (0.5 mm) thick copper, at a minimum. Cabinet bottom (unprotected) Building back wall Building side wall Cooking surface 8 Cabinet requirements The distance from the top of the cooktop to A = 24" (610 mm) when the bottom of B=13" (330 mm) deep.
Installation Instructions
Page 8
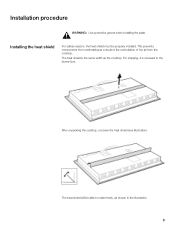
For shipping, it is the same width as the cooktop. This prevents components from the cooktop. The heat shield is screwed to rotate freely, as a result of the recirculation of hot air from overheating as shown in the illustration. 9 Installation procedure Installing the heat shield ř WARNING:ĄUse protective gloves when installing the plate. The heat shield will be properly installed. After unpacking the cooktop, unscrew the heat shield (see illustration). For safety reasons, the heat shield must be able to the burner box.
For shipping, it is the same width as the cooktop. This prevents components from the cooktop. The heat shield is screwed to rotate freely, as a result of the recirculation of hot air from overheating as shown in the illustration. 9 Installation procedure Installing the heat shield ř WARNING:ĄUse protective gloves when installing the plate. The heat shield will be properly installed. After unpacking the cooktop, unscrew the heat shield (see illustration). For safety reasons, the heat shield must be able to the burner box.
Installation Instructions
Page 9
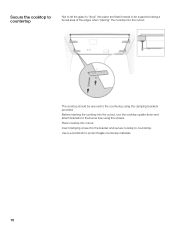
Insert clamping screw into the cutout. Use a wood block to countertop. Secure the cooktop to countertop Not to let the glass to drop" into place and that it needs to be secured to the countertop using the screws. Before inserting the cooktop into cutout. Place cooktop into the cutout, turn the cooktop upside down and attach brackets to the burner box using the clamping brackets provided. The cooktop should be supported along a broad area of the edges when placing" the cooktop into the bracket and secure cooktop to protect fragile countertop materials. 10
Insert clamping screw into the cutout. Use a wood block to countertop. Secure the cooktop to countertop Not to let the glass to drop" into place and that it needs to be secured to the countertop using the screws. Before inserting the cooktop into cutout. Place cooktop into the cutout, turn the cooktop upside down and attach brackets to the burner box using the clamping brackets provided. The cooktop should be supported along a broad area of the edges when placing" the cooktop into the bracket and secure cooktop to protect fragile countertop materials. 10
Installation Instructions
Page 10
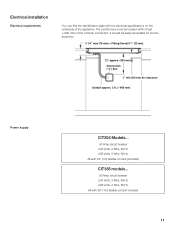
... models... 50 Amp circuit breaker 240 Volts, 3 Wire, 60 Hz 208 Volts, 3 Wire, 60 Hz All with the electrical specifications on the underside of the cooktop connection.
... models... 50 Amp circuit breaker 240 Volts, 3 Wire, 60 Hz 208 Volts, 3 Wire, 60 Hz All with the electrical specifications on the underside of the cooktop connection.
Installation Instructions
Page 11
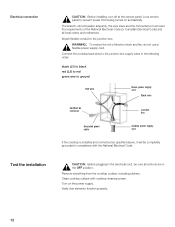
...accidentally. Electrical connection ř CAUTION:ĄBefore installing, turn off at the service panel. Lock service panel to prevent power from the cooktop surface, including stickers. Attach flexible conduit to ground Red wire House power supply cord Black wire Certified UL connector Junction box Grounded green cable...the wire sizes and the connections must meet the requirements of electric shock and fire, do not use a flexible power supply cord. Connect the cooktop lead wires to the junction box supply wires in the following order: black (L1) to black red (L2) to red green wire to...
...accidentally. Electrical connection ř CAUTION:ĄBefore installing, turn off at the service panel. Lock service panel to prevent power from the cooktop surface, including stickers. Attach flexible conduit to ground Red wire House power supply cord Black wire Certified UL connector Junction box Grounded green cable...the wire sizes and the connections must meet the requirements of electric shock and fire, do not use a flexible power supply cord. Connect the cooktop lead wires to the junction box supply wires in the following order: black (L1) to black red (L2) to red green wire to...


