
User Manual
Page 1
Voyage™ 200 Graphing Calculator 1
Voyage™ 200 Graphing Calculator 1

User Manual
Page 2
...harmful interference to provide reasonable protection against the use of the FCC rules. If this product. Voyage™ 200 Graphing Calculator Graphing Calculator 2 Important Information Texas Instruments makes no warranty, either express or implied, including but not limited to any implied warranties of ...materials available solely on a circuit different from that interference will not occur in a particular installation. In no event shall Texas Instruments be determined by one or more of the following measures: • Reorient or relocate the receiving antenna. • ...
...harmful interference to provide reasonable protection against the use of the FCC rules. If this product. Voyage™ 200 Graphing Calculator Graphing Calculator 2 Important Information Texas Instruments makes no warranty, either express or implied, including but not limited to any implied warranties of ...materials available solely on a circuit different from that interference will not occur in a particular installation. In no event shall Texas Instruments be determined by one or more of the following measures: • Reorient or relocate the receiving antenna. • ...

User Manual
Page 3
• Consult the dealer or an experienced radio/television technician for help. Voyage™ 200 Graphing Calculator Graphing Calculator 3 Caution: Any changes or modifications to this equipment not expressly approved by Texas Instruments may void your authority to operate the equipment. © 2005 Texas Instruments Incorporated Windows and Macintosh are trademarks of their respective owners.
• Consult the dealer or an experienced radio/television technician for help. Voyage™ 200 Graphing Calculator Graphing Calculator 3 Caution: Any changes or modifications to this equipment not expressly approved by Texas Instruments may void your authority to operate the equipment. © 2005 Texas Instruments Incorporated Windows and Macintosh are trademarks of their respective owners.
User Manual
Page 4
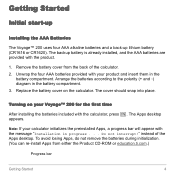
Turning on the calculator. Replace the battery cover on your Voyage™ 200 for the first time After installing the batteries included with the message "Installation in progress . . . The Apps desktop appears. instead of the calculator. 2. The cover ... batteries during initialization. (You can re-install Apps from the back of the Apps desktop. Getting Started Initial start-up Installing the AAA Batteries The Voyage™ 200 uses four AAA alkaline batteries and a back-up lithium battery (CR1616 or CR1620).
Turning on the calculator. Replace the battery cover on your Voyage™ 200 for the first time After installing the batteries included with the message "Installation in progress . . . The Apps desktop appears. instead of the calculator. 2. The cover ... batteries during initialization. (You can re-install Apps from the back of the Apps desktop. Getting Started Initial start-up Installing the AAA Batteries The Voyage™ 200 uses four AAA alkaline batteries and a back-up lithium battery (CR1616 or CR1620).

User Manual
Page 5
Adjusting the contrast • To lighten the display, press and hold 8 and tap C H A R «. Your installed Apps appear on your Voyage™ 200. The Apps desktop The Apps desktop is the starting point for easy access. From the Apps desktop, you can: • Open Apps. • Select and ...
Adjusting the contrast • To lighten the display, press and hold 8 and tap C H A R «. Your installed Apps appear on your Voyage™ 200. The Apps desktop The Apps desktop is the starting point for easy access. From the Apps desktop, you can: • Open Apps. • Select and ...
User Manual
Page 6
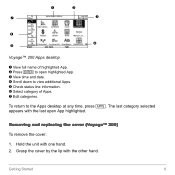
Removing and replacing the cover (Voyage™ 200) To remove the cover: 1. Grasp the cover by the lip with the last open highlighted App. Ì View time and date. Í Scroll down to ...; Select category of highlighted App. Ë Press ¸ to open App highlighted. Hold the unit with one hand. 2. Ê Ë Ð Ì Ï Î Í Voyage™ 200 Apps desktop Ê View full name of Apps. Ð Edit categories.
Removing and replacing the cover (Voyage™ 200) To remove the cover: 1. Grasp the cover by the lip with the last open highlighted App. Ì View time and date. Í Scroll down to ...; Select category of highlighted App. Ë Press ¸ to open App highlighted. Hold the unit with one hand. 2. Ê Ë Ð Ì Ï Î Í Voyage™ 200 Apps desktop Ê View full name of Apps. Ð Edit categories.
User Manual
Page 8
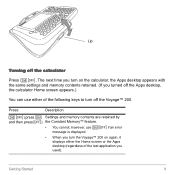
... the calculator, the Apps desktop appears with the same settings and memory contents retained. (If you turn off the Voyage™ 200. The next time you turned off the calculator Press 2 ®. Press: Description 2 ® (press 2 Settings and memory contents are retained by and then press ®) ...
... the calculator, the Apps desktop appears with the same settings and memory contents retained. (If you turn off the Voyage™ 200. The next time you turned off the calculator Press 2 ®. Press: Description 2 ® (press 2 Settings and memory contents are retained by and then press ®) ...
User Manual
Page 9
... waiting for a key press, APD will be exactly as before APD. • All settings and memory contents are exactly the same as you turn the Voyage™ 200 on again, it . If a program is paused. The calculator's Automatic Power Down™ (APD™) feature prolongs battery life by turning the calculator off...
... waiting for a key press, APD will be exactly as before APD. • All settings and memory contents are exactly the same as you turn the Voyage™ 200 on again, it . If a program is paused. The calculator's Automatic Power Down™ (APD™) feature prolongs battery life by turning the calculator off...
User Manual
Page 10
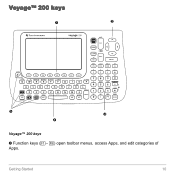
Getting Started 10 Voyage™ 200 keys Ê Ë Î Ì Í Voyage™ 200 keys Ê Function keys (ƒ- Š) open toolbar menus, access Apps, and edit categories of Apps.
Getting Started 10 Voyage™ 200 keys Ê Ë Î Ì Í Voyage™ 200 keys Ê Function keys (ƒ- Š) open toolbar menus, access Apps, and edit categories of Apps.
User Manual
Page 11
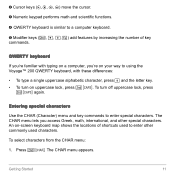
... special characters. Ë Cursor keys (A, B, C, D) move the cursor. Ì Numeric keypad performs math and scientific functions. Í QWERTY keyboard is similar to using the Voyage™ 200 QWERTY keyboard, with typing on your way to a computer keyboard. Î Modifier keys (2, 8, 7, 1) add features by increasing the number of shortcuts used characters. QWERTY keyboard...
... special characters. Ë Cursor keys (A, B, C, D) move the cursor. Ì Numeric keypad performs math and scientific functions. Í QWERTY keyboard is similar to using the Voyage™ 200 QWERTY keyboard, with typing on your way to a computer keyboard. Î Modifier keys (2, 8, 7, 1) add features by increasing the number of shortcuts used characters. QWERTY keyboard...
User Manual
Page 20
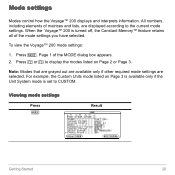
... mode settings are displayed according to the current mode settings. Press „ or ... to CUSTOM. Mode settings Modes control how the Voyage™ 200 displays and interprets information. When the Voyage™ 200 is set to display the modes listed on Page 3 is available only if the Unit System mode is turned off, the...
... mode settings are displayed according to the current mode settings. Press „ or ... to CUSTOM. Mode settings Modes control how the Voyage™ 200 displays and interprets information. When the Voyage™ 200 is set to display the modes listed on Page 3 is available only if the Unit System mode is turned off, the...
User Manual
Page 23
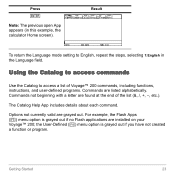
... previous open App appears (in the Language field. Options not currently valid are found at the end of Voyage™ 200 commands, including functions, instructions, and user-defined programs. Commands are installed on your Voyage™ 200; Commands not beginning with a letter are grayed out. For example, the Flash Apps ( ...) menu option is grayed...
... previous open App appears (in the Language field. Options not currently valid are found at the end of Voyage™ 200 commands, including functions, instructions, and user-defined programs. Commands are installed on your Voyage™ 200; Commands not beginning with a letter are grayed out. For example, the Flash Apps ( ...) menu option is grayed...
User Manual
Page 30
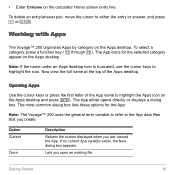
The App icons for the App: Note: The Voyage™ 200 uses the general term variable to refer to either opens directly or displays a dialog box. The App either the entry or answer, and press 0 or M. ... the first letter of the Apps desktop. Option Current Open Description Returns the screen displayed when you last viewed the App. Working with Apps The Voyage™ 200 organizes Apps by category on the calculator Home screen entry line. Getting Started 30 • Enter ClrHome on the Apps desktop. Now view the...
The App icons for the App: Note: The Voyage™ 200 uses the general term variable to refer to either opens directly or displays a dialog box. The App either the entry or answer, and press 0 or M. ... the first letter of the Apps desktop. Option Current Open Description Returns the screen displayed when you last viewed the App. Working with Apps The Voyage™ 200 organizes Apps by category on the calculator Home screen entry line. Getting Started 30 • Enter ClrHome on the Apps desktop. Now view the...
User Manual
Page 32
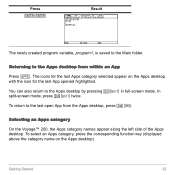
..., is saved to the Apps desktop from the Apps desktop, press 2 a. The icons for the last App opened highlighted. Selecting an Apps category On the Voyage™ 200, the Apps category names appear along the left side of the Apps desktop. Returning to the Main folder.
..., is saved to the Apps desktop from the Apps desktop, press 2 a. The icons for the last App opened highlighted. Selecting an Apps category On the Voyage™ 200, the Apps category names appear along the left side of the Apps desktop. Returning to the Main folder.
User Manual
Page 34
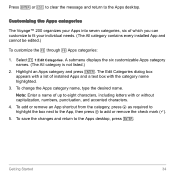
... message and return to fit your Apps into seven categories, six of which you can customize to the Apps desktop. Customizing the Apps categories The Voyage™ 200 organizes your individual needs. (The All category contains every installed App and cannot be edited.) To customize the ... Note: Enter a name of installed Apps...
... message and return to fit your Apps into seven categories, six of which you can customize to the Apps desktop. Customizing the Apps categories The Voyage™ 200 organizes your individual needs. (The All category contains every installed App and cannot be edited.) To customize the ... Note: Enter a name of installed Apps...
User Manual
Page 37
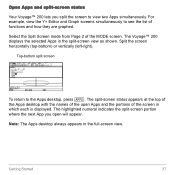
...the open will appear. Note: The Apps desktop always appears in the split-screen view as shown. Open Apps and split-screen status Your Voyage™ 200 lets you open Apps and the portions of the screen in which each is displayed. Top-bottom split screen To return to view two ... the next App you split the screen to the Apps desktop, press O. Split the screen horizontally (top-bottom) or vertically (left-right). The Voyage™ 200 displays the selected Apps in the full-screen view. Getting Started 37 Select the Split Screen mode from Page 2 of functions and how they are...
...the open will appear. Note: The Apps desktop always appears in the split-screen view as shown. Open Apps and split-screen status Your Voyage™ 200 lets you open Apps and the portions of the screen in which each is displayed. Top-bottom split screen To return to view two ... the next App you split the screen to the Apps desktop, press O. Split the screen horizontally (top-bottom) or vertically (left-right). The Voyage™ 200 displays the selected Apps in the full-screen view. Getting Started 37 Select the Split Screen mode from Page 2 of functions and how they are...
User Manual
Page 38
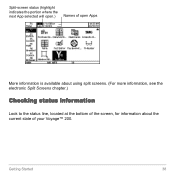
Split-screen status (highlight indicates the portion where the next App selected will open.) Names of open Apps More information is available about using split screens. (For more information, see the electronic Split Screens chapter.) Checking status information Look to the status line, located at the bottom of the screen, for information about the current state of your Voyage™ 200. Getting Started 38
Split-screen status (highlight indicates the portion where the next App selected will open.) Names of open Apps More information is available about using split screens. (For more information, see the electronic Split Screens chapter.) Checking status information Look to the status line, located at the bottom of the screen, for information about the current state of your Voyage™ 200. Getting Started 38
User Manual
Page 49
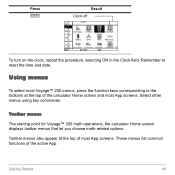
Toolbar menus also appear at the top of the calculator Home screen and most App screens. Using menus To select most Voyage™ 200 menus, press the function keys corresponding to reset the time and date. These menus list common functions of most App screens. Remember to the toolbars ... turn on the clock, repeat the procedure, selecting ON in the Clock field. Select other menus using key commands. Toolbar menus The starting point for Voyage™ 200 math operations, the calculator Home screen displays toolbar menus that let you choose math-related options.
Toolbar menus also appear at the top of the calculator Home screen and most App screens. Using menus To select most Voyage™ 200 menus, press the function keys corresponding to reset the time and date. These menus list common functions of most App screens. Remember to the toolbars ... turn on the clock, repeat the procedure, selecting ON in the Clock field. Select other menus using key commands. Toolbar menus The starting point for Voyage™ 200 math operations, the calculator Home screen displays toolbar menus that let you choose math-related options.
User Manual
Page 55
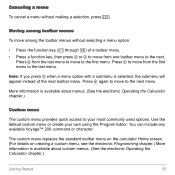
... custom menu provides quick access to your own using the Program Editor. Press B again to move to the last menu. You can include any available Voyage™ 200 command or character. More information is available about custom menus. (See the electronic Operating the Calculator chapter.) Getting Started 55 Press A to move from...
... custom menu provides quick access to your own using the Program Editor. Press B again to move to the last menu. You can include any available Voyage™ 200 command or character. More information is available about custom menus. (See the electronic Operating the Calculator chapter.) Getting Started 55 Press A to move from...
User Manual
Page 59
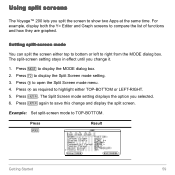
... bottom or left to display the Split Screen mode setting. 3. Press ¸. Press „ to right from the MODE dialog box. Using split screens The Voyage™ 200 lets you selected. 6.
... bottom or left to display the Split Screen mode setting. 3. Press ¸. Press „ to right from the MODE dialog box. Using split screens The Voyage™ 200 lets you selected. 6.


