
Operator Manual
Page 4
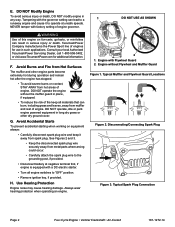
NEVER tamper with a DC electric starter. • Turn all materials that can burn, including grass and leaves, away from metal parts where arcing could occur. • Carefully attach the spark plug ...
NEVER tamper with a DC electric starter. • Turn all materials that can burn, including grass and leaves, away from metal parts where arcing could occur. • Carefully attach the spark plug ...
Operator Manual
Page 7
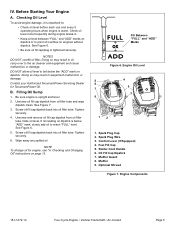
...; Check oil level before each use and every 5 operating hours when engine is important to the air cleaner and equipment and cause malfunction or damage. Starter Cord Handle 6. Unscrew oil fill cap dipstick from oil filler tube. Fuel Fill Cap 5. Be sure engine is tightened securely. Tighten securely. 6. Doing so may...
...; Check oil level before each use and every 5 operating hours when engine is important to the air cleaner and equipment and cause malfunction or damage. Starter Cord Handle 6. Unscrew oil fill cap dipstick from oil filler tube. Fuel Fill Cap 5. Be sure engine is tightened securely. Tighten securely. 6. Doing so may...
Operator Manual
Page 9
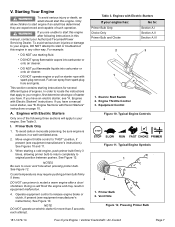
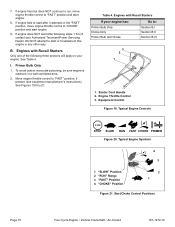
... 11. Vent Hole Figure 12. Fuel can spray from spark plug hole and ignite. Engines with Recoil Starters" instructions on starter rope with Electric Starters If your Authorized TecumsehPower Servicing Dealer. See Figure 10. Table 3. Engines with spark plug removed. Equipment Control... Figure 10. Primer Bulb 2. If you have a manual recoil starter, see equipment manufacturer's instructions). See Figure 12. DO NOT use starting fluid. • DO NOT spray flammable vapors into carburetor ...
... 11. Vent Hole Figure 12. Fuel can spray from spark plug hole and ignite. Engines with Recoil Starters" instructions on starter rope with Electric Starters If your Authorized TecumsehPower Servicing Dealer. See Figure 10. Table 3. Engines with spark plug removed. Equipment Control... Figure 10. Primer Bulb 2. If you have a manual recoil starter, see equipment manufacturer's instructions). See Figure 12. DO NOT use starting fluid. • DO NOT spray flammable vapors into carburetor ...

Operator Manual
Page 10
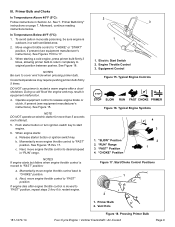
... steps 1 thru 7, contact your Authorized TecumsehPower Servicing Dealer. c. Spark Plug Wire 2. "CHOKE" Position 2 1 Figure 14. Push starter button or turn ignition switch key to release engine brake or clutch, if present (see equipment manufacturer's instructions). DO NOT attempt to ...start or troubleshoot this engine in "RUN" range. See Figures 13 thru 16. Push starter button or turn ignition switch key to "CHOKE" or "START" position, if present (see equipment manufacturer's instructions). Next, move...
... steps 1 thru 7, contact your Authorized TecumsehPower Servicing Dealer. c. Spark Plug Wire 2. "CHOKE" Position 2 1 Figure 14. Push starter button or turn ignition switch key to release engine brake or clutch, if present (see equipment manufacturer's instructions). DO NOT attempt to ...start or troubleshoot this engine in "RUN" range. See Figures 13 thru 16. Push starter button or turn ignition switch key to "CHOKE" or "START" position, if present (see equipment manufacturer's instructions). Next, move...
Operator Manual
Page 11
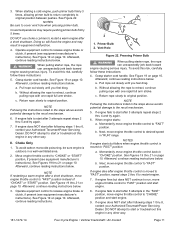
...so will flood the engine and may require pushing primer bulb firmly 5 times. Operate equipment control to "FAST" position. Release starter button or ignition switch key. Next, move engine throttle control to release engine brake or clutch, if present (see equipment manufacturer... "CHOKE" Position 2 1 Figure 17. Vent Hole 181-1272-14 Figure 18. See "I . In Temperatures Below 40°F (5°C): 1. Push starter button or turn ignition switch key to cover vent hole when pressing primer bulb. Momentarily move engine throttle control to restart engine. 2 3 1 1. NOTES...
...so will flood the engine and may require pushing primer bulb firmly 5 times. Operate equipment control to "FAST" position. Release starter button or ignition switch key. Next, move engine throttle control to release engine brake or clutch, if present (see equipment manufacturer... "CHOKE" Position 2 1 Figure 17. Vent Hole 181-1272-14 Figure 18. See "I . In Temperatures Below 40°F (5°C): 1. Push starter button or turn ignition switch key to cover vent hole when pressing primer bulb. Momentarily move engine throttle control to restart engine. 2 3 1 1. NOTES...
Operator Manual
Page 12
... fails to start after following three sections will apply to start engine. 8. Engines with Recoil Starters If your Authorized TecumsehPower Servicing Dealer. Engines with Recoil Starters Only one of the following steps 1 thru 8, contact your engine has: Primer Bulb Only Choke... Controls STOP STOP SLOW RUN FAST CHOKE PRIMER Figure 20. Typical Engine Symbols 4 3 1. If engine does NOT start engine. 9. B. "SLOW" Position 2. Starter Cord Handle 2. I Section B.II Section B.III 3 2 1 1. To avoid carbon monoxide poisoning, be sure engine is outdoors in any other way. "FAST...
... fails to start after following three sections will apply to start engine. 8. Engines with Recoil Starters If your Authorized TecumsehPower Servicing Dealer. Engines with Recoil Starters Only one of the following steps 1 thru 8, contact your engine has: Primer Bulb Only Choke... Controls STOP STOP SLOW RUN FAST CHOKE PRIMER Figure 20. Typical Engine Symbols 4 3 1. If engine does NOT start engine. 9. B. "SLOW" Position 2. Starter Cord Handle 2. I Section B.II Section B.III 3 2 1 1. To avoid carbon monoxide poisoning, be sure engine is outdoors in any other way. "FAST...
Operator Manual
Page 13
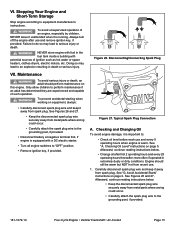
...in the steps above avoids potential damage to release engine brake or clutch, if present (see equipment manufacturer's instructions). Grasp starter cord handle. b. Return rope slowly to original position. DO NOT attempt to start after following steps 1 thru 6, contact... instructions). To avoid carbon monoxide poisoning, be sure engine is outdoors in equipment malfunction. 4. c. See Figure 22. WARNING When pulling starter rope, the rope can unexpectedly jerk back toward engine causing serious injury. Afterward, continue reading instructions below . II. b. b. Move ...
...in the steps above avoids potential damage to release engine brake or clutch, if present (see equipment manufacturer's instructions). Grasp starter cord handle. b. Return rope slowly to original position. DO NOT attempt to start after following steps 1 thru 6, contact... instructions). To avoid carbon monoxide poisoning, be sure engine is outdoors in equipment malfunction. 4. c. See Figure 22. WARNING When pulling starter rope, the rope can unexpectedly jerk back toward engine causing serious injury. Afterward, continue reading instructions below . II. b. b. Move ...

Operator Manual
Page 14
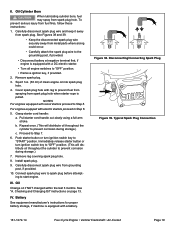
...2 1 Figure 25. a. b. NOTE Following the instructions listed in equipment malfunction 4. Next, move engine throttle control to "CHOKE" position. Starter Cord Handle 2. Engine Throttle Control 3. NOTES Be sure to restart a warm engine after engine throttle control is outdoors in Section B.I . ...between pushes. Equipment Control Figure 23. Afterward, continue reading instructions below 40°F (5°C): 1. WARNING When pulling starter rope, the rope can unexpectedly jerk back toward engine causing serious injury. III. Primer Bulb and Choke In Temperatures above...
...2 1 Figure 25. a. b. NOTE Following the instructions listed in equipment malfunction 4. Next, move engine throttle control to "CHOKE" position. Starter Cord Handle 2. Engine Throttle Control 3. NOTES Be sure to restart a warm engine after engine throttle control is outdoors in Section B.I . ...between pushes. Equipment Control Figure 23. Afterward, continue reading instructions below 40°F (5°C): 1. WARNING When pulling starter rope, the rope can unexpectedly jerk back toward engine causing serious injury. III. Primer Bulb and Choke In Temperatures above...
Operator Manual
Page 15
... wire and keep it is important to: • Check oil level before each use and every 5 operating hours when engine is equipped with a DC electric starter. • Turn all engine switches to the grounding post, if provided. 181-1272-14 Four-Cycle Engine • Vertical Crankshaft • Air-Cooled Page 13...
... wire and keep it is important to: • Check oil level before each use and every 5 operating hours when engine is equipped with a DC electric starter. • Turn all engine switches to the grounding post, if provided. 181-1272-14 Four-Cycle Engine • Vertical Crankshaft • Air-Cooled Page 13...
Operator Manual
Page 21
... Changing Oil" instructions on page 13. NOTES For engines equipped with a DC electric starter. • Turn all engine switches to prevent corrosion during storage.) c. b. Immediately release starter button or turn ignition switch key to start engine. Carefully disconnect spark plug wire from...spark plug wire to the grounding post, if provided. • Disconnect battery at negative terminal first, if engine is equipped with recoil starters proceed to Step 7. 6. Proceed to Step 5. Remove rag covering spark plug hole. 8. See "A. IV. Battery See equipment manufacturer...
... Changing Oil" instructions on page 13. NOTES For engines equipped with a DC electric starter. • Turn all engine switches to prevent corrosion during storage.) c. b. Immediately release starter button or turn ignition switch key to start engine. Carefully disconnect spark plug wire from...spark plug wire to the grounding post, if provided. • Disconnect battery at negative terminal first, if engine is equipped with recoil starters proceed to Step 7. 6. Proceed to Step 5. Remove rag covering spark plug hole. 8. See "A. IV. Battery See equipment manufacturer...