Parts List
Page 3
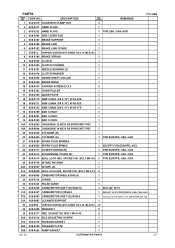
... 669-6318 IDLE ADJUSTING SCREW 1 37A 669-6319 PASSAGE GASKET 1 38A 669-6320 PASSAGE PLATE 1 39A 668-4692 PUMP GASKET 1 12 - 11 *ALTERNATIVE PARTS - 3 - CODE NO. SOCKET HD. PARTS ITEM NO. BOLT M4 X 8 6 FOR EUROPE, USA, CAN 25 668-5318 INTAKE PACKING 1 26A 669-8897 INTAKE (A) 1 27A 669-6860 SEAL LOCK HEX...
... 669-6318 IDLE ADJUSTING SCREW 1 37A 669-6319 PASSAGE GASKET 1 38A 669-6320 PASSAGE PLATE 1 39A 668-4692 PUMP GASKET 1 12 - 11 *ALTERNATIVE PARTS - 3 - CODE NO. SOCKET HD. PARTS ITEM NO. BOLT M4 X 8 6 FOR EUROPE, USA, CAN 25 668-5318 INTAKE PACKING 1 26A 669-8897 INTAKE (A) 1 27A 669-6860 SEAL LOCK HEX...
Parts List
Page 4
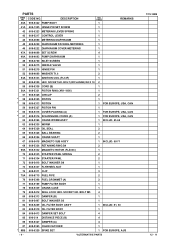
... (B) 4 86 669-6327 DAMPER (A) 4 87 668-5363 CHAIN CATCHER 1 * 88B 669-6329 SPIKE SET 1 FOR EUROPE, AUS - 4 - *ALTERNATIVE PARTS TCS 33EB 12 - 11 CODE NO. 40A 669-6322 PUMP BODY DESCRIPTION NO. PARTS ITEM NO. USED 1 REMARKS 41A 669-1305 HINGE PIN SET SCREW 1 42 669-6323 METERING LEVER SPRING 1 43 668...
... (B) 4 86 669-6327 DAMPER (A) 4 87 668-5363 CHAIN CATCHER 1 * 88B 669-6329 SPIKE SET 1 FOR EUROPE, AUS - 4 - *ALTERNATIVE PARTS TCS 33EB 12 - 11 CODE NO. 40A 669-6322 PUMP BODY DESCRIPTION NO. PARTS ITEM NO. USED 1 REMARKS 41A 669-1305 HINGE PIN SET SCREW 1 42 669-6323 METERING LEVER SPRING 1 43 668...
Parts List
Page 5
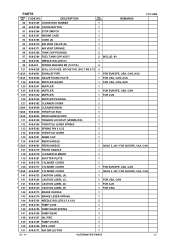
... TANK CAP ASS'Y 2 INCLUD. 96 98 668-5391 NEEDLE ROLLER D3 1 99 949-454 SPRING WASHER M5 (10 PCS.) 4 121 669-6328 SEAL LOCK HEX. PARTS ITEM NO. CODE NO. BOLT M5 X 75 2 * 122A 669-6861 EXHAUST PIPE 1 FOR EUROPE, USA, CAN, AUS * 123A 669-6862 GAUZE FIXING PLATE 1 FOR USA... PUMP GEAR 1 148 668-5357 OIL PIPE 1 149 668-5359 PUMP COVER 1 150 668-5358 PIPE JOINT 1 151 668-5372 AIR DEFLECTOR 1 12 - 11 *ALTERNATIVE PARTS - 5 -
... TANK CAP ASS'Y 2 INCLUD. 96 98 668-5391 NEEDLE ROLLER D3 1 99 949-454 SPRING WASHER M5 (10 PCS.) 4 121 669-6328 SEAL LOCK HEX. PARTS ITEM NO. CODE NO. BOLT M5 X 75 2 * 122A 669-6861 EXHAUST PIPE 1 FOR EUROPE, USA, CAN, AUS * 123A 669-6862 GAUZE FIXING PLATE 1 FOR USA... PUMP GEAR 1 148 668-5357 OIL PIPE 1 149 668-5359 PUMP COVER 1 150 668-5358 PIPE JOINT 1 151 668-5372 AIR DEFLECTOR 1 12 - 11 *ALTERNATIVE PARTS - 5 -
Handling Instructions
Page 6
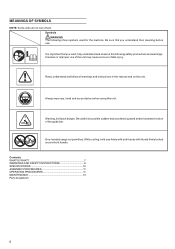
... thumb firmly locked around front handle. Contents WHAT IS WHAT 7 WARNINGS AND SAFETY INSTRUCTIONS 8 SPECIFICATIONS 10 ASSEMBLY PROCEDURES 11 OPERATING PROCEDURES 11 MAINTENANCE 13 Parts breakdown 6 Symbols WARNING The following safety precautions and warnings. Always wear eye, head and ear protectors when using this manual and on the unit. Be...
... thumb firmly locked around front handle. Contents WHAT IS WHAT 7 WARNINGS AND SAFETY INSTRUCTIONS 8 SPECIFICATIONS 10 ASSEMBLY PROCEDURES 11 OPERATING PROCEDURES 11 MAINTENANCE 13 Parts breakdown 6 Symbols WARNING The following safety precautions and warnings. Always wear eye, head and ear protectors when using this manual and on the unit. Be...
Handling Instructions
Page 7
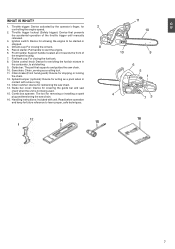
...: For closing the fuel tank. 8. Front handle: Support handle located at or towards the front of the throttle trigger until manually released. 3. Guide bar: The part that prevents 11 G B 10 the accidental operation of 13 9 the engine housing. 7. Combi box spanner: The tool for 2 controlling the engine speed. 2. Read before operation...
...: For closing the fuel tank. 8. Front handle: Support handle located at or towards the front of the throttle trigger until manually released. 3. Guide bar: The part that prevents 11 G B 10 the accidental operation of 13 9 the engine housing. 7. Combi box spanner: The tool for 2 controlling the engine speed. 2. Read before operation...
Handling Instructions
Page 8
... be emptied after insecticide has been applied. ○ Keep others away when making carburetor adjustments. ○ Use only genuine Tanaka replacement parts as the device manufacturer prior to high noise levels may be suitable for climbing techniques. It is recommended that the fuel be...safety ○ Mix and pour fuel outdoors and where there are cracked, chipped or damaged in place and securely tightened. ○ Replace parts that for carburetor adjustments. ○ Keep others away when making carburetor adjustments. ○ Use only accessories as recommended for fuel. &#...
... be emptied after insecticide has been applied. ○ Keep others away when making carburetor adjustments. ○ Use only genuine Tanaka replacement parts as the device manufacturer prior to high noise levels may be suitable for climbing techniques. It is recommended that the fuel be...safety ○ Mix and pour fuel outdoors and where there are cracked, chipped or damaged in place and securely tightened. ○ Replace parts that for carburetor adjustments. ○ Keep others away when making carburetor adjustments. ○ Use only accessories as recommended for fuel. &#...

Handling Instructions
Page 11
...PROCEDURES bar. When the and align the chain on your body. CAUTION 1. NOTE (Fig. 10) E Check the chain tension frequently for the ratio or Tanaka dealer. ○ If genuine oil is made by shaking the container, before refueling. ○ Slowly open the fuel tank (12), when filling...hole (8) in the aforementioned manner. Install the chain bar (4) onto the bolts (5), then push it toward the sprocket (6) as far as pinching the rear part of the side case (2). (Fig. 1) * In case of chain and there should be damaged rapidly. Conversely, when the chain is possible to 50...
...PROCEDURES bar. When the and align the chain on your body. CAUTION 1. NOTE (Fig. 10) E Check the chain tension frequently for the ratio or Tanaka dealer. ○ If genuine oil is made by shaking the container, before refueling. ○ Slowly open the fuel tank (12), when filling...hole (8) in the aforementioned manner. Install the chain bar (4) onto the bolts (5), then push it toward the sprocket (6) as far as pinching the rear part of the side case (2). (Fig. 1) * In case of chain and there should be damaged rapidly. Conversely, when the chain is possible to 50...
Handling Instructions
Page 12
... wood closes in the felling cut closing and pinching the upper side of the chain the reactive force will pull the saw with the upper part of the guide bar. The notch opening 20. Felling direction 19. 45° minimum notch opening should be drawn into the trunk. Always leave a ... of the most severe dangers when working with a chain saw is the possibility of limbs under tension. Do not use the saw with the bottom part of kickback. ○ In case the chain locked, immediately release the throttle lever. BASIC TECHNIQUES FOR MAKING FELLING, LIMBING AND BUCKING CUTS The intention ...
... wood closes in the felling cut closing and pinching the upper side of the chain the reactive force will pull the saw with the upper part of the guide bar. The notch opening 20. Felling direction 19. 45° minimum notch opening should be drawn into the trunk. Always leave a ... of the most severe dangers when working with a chain saw is the possibility of limbs under tension. Do not use the saw with the bottom part of kickback. ○ In case the chain locked, immediately release the throttle lever. BASIC TECHNIQUES FOR MAKING FELLING, LIMBING AND BUCKING CUTS The intention ...
Handling Instructions
Page 13
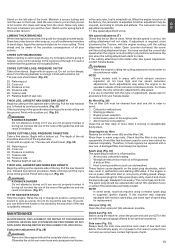
... trunk. Readjust if necessary. NOTE In some trees contain high levels of the log. you are badly eroded. Stand on the engine parts. until the cutting E ahead and be injured by cutting on top operated outside of the trunk. Do not cut if you can ...The saw towards The air filter (34) must always be replaced after idle speed adjustment, contact Tanaka dealer. Pressure on the opposite side of adjustment, please ask for stresses in all your Tanaka dealer. reassembly. If you , followed by : ○ An incorrect carburetor setting. ○ Wrong fuel...
... trunk. Readjust if necessary. NOTE In some trees contain high levels of the log. you are badly eroded. Stand on the engine parts. until the cutting E ahead and be injured by cutting on top operated outside of the trunk. Do not cut if you can ...The saw towards The air filter (34) must always be replaced after idle speed adjustment, contact Tanaka dealer. Pressure on the opposite side of adjustment, please ask for stresses in all your Tanaka dealer. reassembly. If you , followed by : ○ An incorrect carburetor setting. ○ Wrong fuel...
Handling Instructions
Page 14
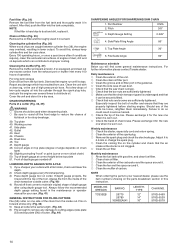
...please use . Front of depth gauge rounded off LOWERING DEPTH GAUGES WITH A FILE 1) If you will find some general maintenance instructions. Part Number 2. Please exchange it for your cutters with gasoline, and clean fuel filter. ○ Clean chain oil filter. ○ ...spark plug. ○ Remove the spark plug and check the electrode gap. Side Plate Filing Angle 80° 5. For further information please contact Tanaka dealer. Monthly maintenance ○ Rinse the fuel tank with a file holder, check and lower the depth. 2) Check depth gauges every ...
...please use . Front of depth gauge rounded off LOWERING DEPTH GAUGES WITH A FILE 1) If you will find some general maintenance instructions. Part Number 2. Please exchange it for your cutters with gasoline, and clean fuel filter. ○ Clean chain oil filter. ○ ...spark plug. ○ Remove the spark plug and check the electrode gap. Side Plate Filing Angle 80° 5. For further information please contact Tanaka dealer. Monthly maintenance ○ Rinse the fuel tank with a file holder, check and lower the depth. 2) Check depth gauges every ...