

Owner's Manual
Page 2
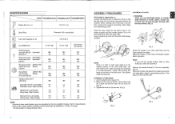
... instructions in this sign is more likely to your unit. If anyone approaches you read, fully understand and observe the following show symbols used for a trimmer head or semi-auto cutting head. This reaction is difficult to see the material to be worn when necessary, e.g., when assembling cutting equipment. Blade thrust...
... instructions in this sign is more likely to your unit. If anyone approaches you read, fully understand and observe the following show symbols used for a trimmer head or semi-auto cutting head. This reaction is difficult to see the material to be worn when necessary, e.g., when assembling cutting equipment. Blade thrust...
Owner's Manual
Page 4
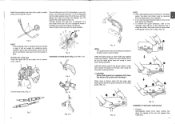
... on the drive shaft tube meets the clutch case. Some models may come off. (Fig. 2) 3. Adjust the location to the marked position on straight shaft trimmers or brush cutters, always use a barrier bar (6) and shoulder harness with four bolts lightly. Adjust to change without notice. Installation of tube and that the...
... on the drive shaft tube meets the clutch case. Some models may come off. (Fig. 2) 3. Adjust the location to the marked position on straight shaft trimmers or brush cutters, always use a barrier bar (6) and shoulder harness with four bolts lightly. Adjust to change without notice. Installation of tube and that the...
Owner's Manual
Page 5
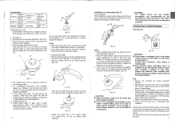
... the extension has a sharp line limiter, then push the four square tabs on the guard one in tool bag, onto swivel (15) (Fig. 8). When using a trimmer head with the parts installed. 12 11 15 16 10 Fig. 5 NOTE If the protection tube is set the protection tube apart from the handle...
... the extension has a sharp line limiter, then push the four square tabs on the guard one in tool bag, onto swivel (15) (Fig. 8). When using a trimmer head with the parts installed. 12 11 15 16 10 Fig. 5 NOTE If the protection tube is set the protection tube apart from the handle...
Owner's Manual
Page 6
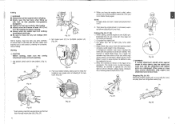
...ISO EGC GRADE). Mix (shake) the fuel-mix thoroughly before each time installed. (Fig. 19) 23 Fig. 20 WARNING • The trimmer is possible to tighten. Provide good ventilation, when fueling or handling fuel. 0 Fuel contains highly flammable and it is equipped with protection cover under... righthand-threaded. O Always mix fuel and oil in the bottom (18) of consumption. O Check the case and button for the ratio or Tanaka dealer. Installation (Fig. 15) O Install cutting head on the ground. Turn clockwise to loosen/ counterclockwise to get the serious personal injury when...
...ISO EGC GRADE). Mix (shake) the fuel-mix thoroughly before each time installed. (Fig. 19) 23 Fig. 20 WARNING • The trimmer is possible to tighten. Provide good ventilation, when fueling or handling fuel. 0 Fuel contains highly flammable and it is equipped with protection cover under... righthand-threaded. O Always mix fuel and oil in the bottom (18) of consumption. O Check the case and button for the ratio or Tanaka dealer. Installation (Fig. 15) O Install cutting head on the ground. Turn clockwise to loosen/ counterclockwise to get the serious personal injury when...
Owner's Manual
Page 7
... remove them. When grass or vines wrap around attachment, stop the engine and make sure the cutting attachment does not touch anything. O Always move the trimmer at over -pressure disappears. Pull recoil starter briskly, taking care to keep the handle in areas where it is well mixed by shaking the container...
... remove them. When grass or vines wrap around attachment, stop the engine and make sure the cutting attachment does not touch anything. O Always move the trimmer at over -pressure disappears. Pull recoil starter briskly, taking care to keep the handle in areas where it is well mixed by shaking the container...

