
Quick Installation Guide
Page 2
Add the Network Printer to your PC 8 Troubleshooting 11 Configure the Print Server 4 5. Prepare for Installation 1 2. Product Detail 2 3. Table of Contents English ...1 1. Hardware Installation 3 4.
Add the Network Printer to your PC 8 Troubleshooting 11 Configure the Print Server 4 5. Prepare for Installation 1 2. Product Detail 2 3. Table of Contents English ...1 1. Hardware Installation 3 4.

Quick Installation Guide
Page 3
... sure you need further technical support, please visit www.TRENDNET.com or call technical support by phone. Pentium 100Mhz or faster processor 2. 8MB RAM or more 3. All Rights Reserved. If you have everything in the box: TE100-P21 TE100-P21 2-port USB 2.0 and 1 port Parallel Print Server Quick Installation Guide Guide d'installation rapide du serveur... 95/98/NT/ME/2000/XP/2003, HP-UX, Sun O.S, Solaris, SCO Unix, AIX, Unixware, Linux, Mac O.S. 1 English Prepare for Installation Thank you for purchasing TRENDnet's TE100-P21 2-port USB 2.0 and 1 port Parallel Print Server.
... sure you need further technical support, please visit www.TRENDNET.com or call technical support by phone. Pentium 100Mhz or faster processor 2. 8MB RAM or more 3. All Rights Reserved. If you have everything in the box: TE100-P21 TE100-P21 2-port USB 2.0 and 1 port Parallel Print Server Quick Installation Guide Guide d'installation rapide du serveur... 95/98/NT/ME/2000/XP/2003, HP-UX, Sun O.S, Solaris, SCO Unix, AIX, Unixware, Linux, Mac O.S. 1 English Prepare for Installation Thank you for purchasing TRENDnet's TE100-P21 2-port USB 2.0 and 1 port Parallel Print Server.

Quick Installation Guide
Page 4
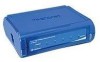
Parallel Port USB Ports Power Adapter Connector Reset Button RJ-45 Connector Power LED Network LED Printer LEDs 2 English 2. It also has five LEDS that indicate power, network activity, and printer activity. Product Detail The Print Server has a RJ-45 connector, two USB 2.0 slots, and one parallel port.
Parallel Port USB Ports Power Adapter Connector Reset Button RJ-45 Connector Power LED Network LED Printer LEDs 2 English 2. It also has five LEDS that indicate power, network activity, and printer activity. Product Detail The Print Server has a RJ-45 connector, two USB 2.0 slots, and one parallel port.

Quick Installation Guide
Page 5
Hardware Installation 1. 3. Power off the Print Server and Printers. 2. Plug the AC power adapter into the power connector on the printer. 3 4 2 3 English Connect the RJ45 cable to the LAN port and to the printers. 3. Power on the back of the Print Server. 5. Connect the Print Server's printer port to your network hub or switch. 4.
Hardware Installation 1. 3. Power off the Print Server and Printers. 2. Plug the AC power adapter into the power connector on the printer. 3 4 2 3 English Connect the RJ45 cable to the LAN port and to the printers. 3. Power on the back of the Print Server. 5. Connect the Print Server's printer port to your network hub or switch. 4.

Quick Installation Guide
Page 6
Click Install Utility. 3. For Windows Users 1. Click Next. 4 English Insert the TE100-P21 CD-ROM into your web browser to 192.168.0.X (where X is an available number from 1-253), and enter 192.168.0.1 in your computer's CD-ROM drive. 2. 4. Configure the Print Server NOTE: For MAC Users, change your computers IP address to access the Print Server's Web Utility.
Click Install Utility. 3. For Windows Users 1. Click Next. 4 English Insert the TE100-P21 CD-ROM into your web browser to 192.168.0.X (where X is an available number from 1-253), and enter 192.168.0.1 in your computer's CD-ROM drive. 2. 4. Configure the Print Server NOTE: For MAC Users, change your computers IP address to access the Print Server's Web Utility.

Quick Installation Guide
Page 8
Double-click PS-Utility icon. 8. The utility will detect any available Print Servers on the network. Type in the IP address that applies to configure and click Change IP Address. 9. 7. Type in the Default Gateway (i.e. your existing network. Select the Print Server you need to your router's local IP address). 6 English
Double-click PS-Utility icon. 8. The utility will detect any available Print Servers on the network. Type in the IP address that applies to configure and click Change IP Address. 9. 7. Type in the Default Gateway (i.e. your existing network. Select the Print Server you need to your router's local IP address). 6 English

Quick Installation Guide
Page 9
If you connected a Parallel printer, use the Printer Name that is now complete. Print Server's configuration is by the LPT3 heading in the web configuration utility. If you connected a USB printer to the USB1 slot, use the Printer Name that 's included on the CD-ROM. 7 English 10. Click Show Web Setup. 12. Please take note and write down the Server Name and the Printer Name. For detail information, please check the User's Guide that is by the USB1 heading in the web configuration utility. Click OK. 11.
If you connected a Parallel printer, use the Printer Name that is now complete. Print Server's configuration is by the LPT3 heading in the web configuration utility. If you connected a USB printer to the USB1 slot, use the Printer Name that 's included on the CD-ROM. 7 English 10. Click Show Web Setup. 12. Please take note and write down the Server Name and the Printer Name. For detail information, please check the User's Guide that is by the USB1 heading in the web configuration utility. Click OK. 11.

Quick Installation Guide
Page 13
... power outlet. Configure the Print Server) to locate your printer is properly connected to 253. If you are typing the correct printer name. Contact Technical Support Telephone: +1-310-626-6252 Fax: +1-310-626-6267 Website: www.TRENDNET.com E-mail: support@trendware.... cause harmful interference. (2) This device must accept any questions regarding the TE100-P21 2-port USB 2.0 and 1 port Parallel Print Server, please contact Trendware Technical Support Department. Q7: I configured my print server to access the web utility feature. Hardware Installation) Q2: I have ...
... power outlet. Configure the Print Server) to locate your printer is properly connected to 253. If you are typing the correct printer name. Contact Technical Support Telephone: +1-310-626-6252 Fax: +1-310-626-6267 Website: www.TRENDNET.com E-mail: support@trendware.... cause harmful interference. (2) This device must accept any questions regarding the TE100-P21 2-port USB 2.0 and 1 port Parallel Print Server, please contact Trendware Technical Support Department. Q7: I configured my print server to access the web utility feature. Hardware Installation) Q2: I have ...

