CD-RW890 Manual
Page 4
...on an amplifier/receiver. < Do not open the cabinet as this matter, consult an electrician. < Choose the installation location of heat. The CD-RW recorder is more sensitive to this manual in direct sunlight or close the disc tray. < Do not attempt to a source of your dealer or service company. < When removing the... the unit on the rear panel. Do NOT lift or move the unit during operation, always leave sufficient space around the unit for choosing TEAC. Doing so may damage the disc or the unit. Read this manual carefully to get into the unit, contact your unit carefully.
...on an amplifier/receiver. < Do not open the cabinet as this matter, consult an electrician. < Choose the installation location of heat. The CD-RW recorder is more sensitive to this manual in direct sunlight or close the disc tray. < Do not attempt to a source of your dealer or service company. < When removing the... the unit on the rear panel. Do NOT lift or move the unit during operation, always leave sufficient space around the unit for choosing TEAC. Doing so may damage the disc or the unit. Read this manual carefully to get into the unit, contact your unit carefully.
CD-RW890 Manual
Page 9
...track numbers. Main unit and Remote control unit Only on Remote control unit A POWER Press this button to finalize a CD-R/CD-RW disc. Hold down these buttons to pause playback or recording. L INPUT SELECT Use this button to search for a part of a track. c Search (m/,) Use these buttons...button to select a source to open and close the disc tray. Note: To simplify explanations, instructions in this button to be recorded. D OPEN/CLOSE (L) Use this manual refer to check the programmed contents. d TIME Use this button to the names of the disc, etc. K PHONES For private...
...track numbers. Main unit and Remote control unit Only on Remote control unit A POWER Press this button to finalize a CD-R/CD-RW disc. Hold down these buttons to pause playback or recording. L INPUT SELECT Use this button to search for a part of a track. c Search (m/,) Use these buttons...button to select a source to open and close the disc tray. Note: To simplify explanations, instructions in this button to be recorded. D OPEN/CLOSE (L) Use this manual refer to check the programmed contents. d TIME Use this button to the names of the disc, etc. K PHONES For private...
CD-RW890 Manual
Page 17
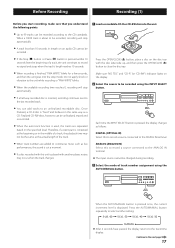
... the disc label side up, and then press the OPEN/CLOSE (L) button to select another player, noises may not be recorded using the AUTO/MANUAL button. Once finalized, a CD-R disc is "fixed" and behaves in the middle of the track. < When track numbers are separated based on the display. 2 Select the source to...
... the disc label side up, and then press the OPEN/CLOSE (L) button to select another player, noises may not be recorded using the AUTO/MANUAL button. Once finalized, a CD-R disc is "fixed" and behaves in the middle of the track. < When track numbers are separated based on the display. 2 Select the source to...
CD-RW890 Manual
Page 18
...manual describes "silence" as CD, MD, and DAT. To add track numbers manually, press the RECORD button. < The setting can be used during recording. There is usually no need to perform synchronous recording for ANALOG. < The setting is activated. In this case, deactivate the auto track function, and press the RECORD button while recording a track. The recording..., then press the RECORD button again. 5 If necessary, adjust the recording level using auto track when recording from the display. MANUAL (The track numbers are not automatically added) In MANUAL mode, the track numbers...
...manual describes "silence" as CD, MD, and DAT. To add track numbers manually, press the RECORD button. < The setting can be used during recording. There is usually no need to perform synchronous recording for ANALOG. < The setting is activated. In this case, deactivate the auto track function, and press the RECORD button while recording a track. The recording..., then press the RECORD button again. 5 If necessary, adjust the recording level using auto track when recording from the display. MANUAL (The track numbers are not automatically added) In MANUAL mode, the track numbers...
CD-RW890 Manual
Page 19
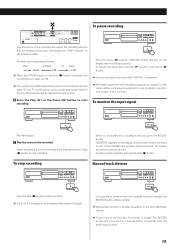
... the Pause (J ) button to start recording. The RECORD button will always be played with another CD player. Exit the monitor mode by pressing the RECORD button while recording. < Manual track division is not possible to record in the unit, press the RECORD button. To pause recording Play the source to be recorded and adjust the recording level so that every time...
... the Pause (J ) button to start recording. The RECORD button will always be played with another CD player. Exit the monitor mode by pressing the RECORD button while recording. < Manual track division is not possible to record in the unit, press the RECORD button. To pause recording Play the source to be recorded and adjust the recording level so that every time...
CD-RW890 Manual
Page 20
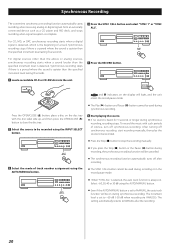
... 8 seconds. 5 Press the RECORD button. 1 Load a recordable CD-R or CD-RW disc into the unit. For CD, MD, or DAT, synchronous recording starts when a digital signal is detected, which is always on during synchronous recording, recording stops. After turning off synchronous recording, start recording manually, then play the source to be recorded. < Press the Stop (H) button to MANUAL after recording. < The SYNC 1/ALL button...
... 8 seconds. 5 Press the RECORD button. 1 Load a recordable CD-R or CD-RW disc into the unit. For CD, MD, or DAT, synchronous recording starts when a digital signal is detected, which is always on during synchronous recording, recording stops. After turning off synchronous recording, start recording manually, then play the source to be recorded. < Press the Stop (H) button to MANUAL after recording. < The SYNC 1/ALL button...

CD-RW890 Manual
Page 27
...CD-RW and CD-R for Digital audio (record and playback) CD (playback only) Frequency converter input sampling frequency 32 kHz, 44.1 kHz, 48 kHz Recording sampling frequency 44.1 kHz Frequency response 20 Hz to 20 kHz (playback: ±1.5 dB, recording: ±1.5 dB) Signal to noise ratio 90 dB (playback) 90 dB (digital recording... Remote control unit (RC-1275) x 1 Battery (AA, R6, SUM-3) x 2 RCA cable x 2 Optical digital cable x 1 Owner's manual x 1 Warranty card x 1 < Design and specifications are subject to change without notice. < Weight and dimensions are only valid in the European ...
...CD-RW and CD-R for Digital audio (record and playback) CD (playback only) Frequency converter input sampling frequency 32 kHz, 44.1 kHz, 48 kHz Recording sampling frequency 44.1 kHz Frequency response 20 Hz to 20 kHz (playback: ±1.5 dB, recording: ±1.5 dB) Signal to noise ratio 90 dB (playback) 90 dB (digital recording... Remote control unit (RC-1275) x 1 Battery (AA, R6, SUM-3) x 2 RCA cable x 2 Optical digital cable x 1 Owner's manual x 1 Warranty card x 1 < Design and specifications are subject to change without notice. < Weight and dimensions are only valid in the European ...


