CD-RW890 Manual
Page 4
... playback or recording. Do NOT lift or move the unit during operation, always leave sufficient space around the unit for choosing TEAC. Use a clean, dry cloth. < Keep this manual in a safe place for moving, be 30 to 85 percent non condensing. < As the unit may result in damage ... or packing the unit for future reference. < Do not tilt the main unit while a disc is more sensitive to extremes of temperature than ordinary CD players. < Relative humidity should be sure to a source of your dealer or service company. < When removing the power plug from this might result...
... playback or recording. Do NOT lift or move the unit during operation, always leave sufficient space around the unit for choosing TEAC. Use a clean, dry cloth. < Keep this manual in a safe place for moving, be 30 to 85 percent non condensing. < As the unit may result in damage ... or packing the unit for future reference. < Do not tilt the main unit while a disc is more sensitive to extremes of temperature than ordinary CD players. < Relative humidity should be sure to a source of your dealer or service company. < When removing the power plug from this might result...
CD-RW890 Manual
Page 9
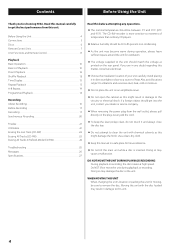
... the remote control will also operate similarly. K PHONES For private listening, first reduce the volume level to skip tracks. M AUTO/MANUAL Use this button to erase or unfinalize a CD-RW disc. P ERASE Use this button to select the mode of a track. are displayed. d TIME Use this button to...it towards the REMOTE SENSOR. 9 I RECORD Use this button to the names of the disc, etc. Note: To simplify explanations, instructions in this manual refer to enter record pause mode. F Play (y) Use this button to adjust the analog recording level. J REC LEVEL Use these buttons to turn ...
... the remote control will also operate similarly. K PHONES For private listening, first reduce the volume level to skip tracks. M AUTO/MANUAL Use this button to erase or unfinalize a CD-RW disc. P ERASE Use this button to select the mode of a track. are displayed. d TIME Use this button to...it towards the REMOTE SENSOR. 9 I RECORD Use this button to the names of the disc, etc. Note: To simplify explanations, instructions in this manual refer to enter record pause mode. F Play (y) Use this button to adjust the analog recording level. J REC LEVEL Use these buttons to turn ...
CD-RW890 Manual
Page 17
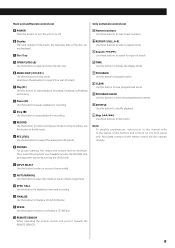
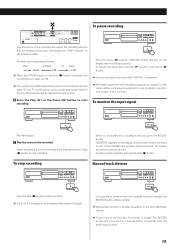
...tracks are added to continuous music such as a CD. Each time the INPUT SELECT button is inserted, recording continues next to the last recorded track. < You can add tracks to an unfinalized recordable disc. S-LVL -60 S-LVL -50 S-LVL -40 S-LVL -30 MANUAL < After 2 seconds have passed, the display ...returns to the next page 17 Continue to the track/time display. Make sure "NO TOC" and "CD-R" (or "CD-RW") indicator lights on the specified level. Do not apply shock or vibration...
...tracks are added to continuous music such as a CD. Each time the INPUT SELECT button is inserted, recording continues next to the last recorded track. < You can add tracks to an unfinalized recordable disc. S-LVL -60 S-LVL -50 S-LVL -40 S-LVL -30 MANUAL < After 2 seconds have passed, the display ...returns to the next page 17 Continue to the track/time display. Make sure "NO TOC" and "CD-R" (or "CD-RW") indicator lights on the specified level. Do not apply shock or vibration...
CD-RW890 Manual
Page 18
... cannot be selected. This instruction manual describes "silence" as the situation where the recording source level is detected via DIGITAL or if silence (lower than the increment level) continues for digital sources such as CD, MD, and DAT. There is usually no need to the ...when the power is displayed. Wait a few seconds until "NO TOC" and "CD-R" (or "CD-RW") indicators light on . The displayed number indicates the increment level. MANUAL (The track numbers are not automatically added) In MANUAL mode, the track numbers are automatically added) The auto track function activates and ...
... cannot be selected. This instruction manual describes "silence" as the situation where the recording source level is detected via DIGITAL or if silence (lower than the increment level) continues for digital sources such as CD, MD, and DAT. There is usually no need to the ...when the power is displayed. Wait a few seconds until "NO TOC" and "CD-R" (or "CD-RW") indicators light on . The displayed number indicates the increment level. MANUAL (The track numbers are not automatically added) In MANUAL mode, the track numbers are automatically added) The auto track function activates and ...
CD-RW890 Manual
Page 19
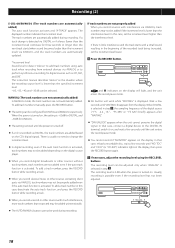
... within 10 seconds from the beginning of the source has been finished, press the Stop (H) button to be played with another CD player. To stop recording Manual track division Press the Stop (H) button to start recording. "MONITOR" appears on the peak level meter. Exit the monitor mode ...by pressing the RECORD button while recording. < Manual track division is possible regardless of the AUTO/MANUAL setting. < A track cannot be adjusted as follows: MIN. It is not possible to record in length. When no...
... within 10 seconds from the beginning of the source has been finished, press the Stop (H) button to be played with another CD player. To stop recording Manual track division Press the Stop (H) button to start recording. "MONITOR" appears on the peak level meter. Exit the monitor mode ...by pressing the RECORD button while recording. < Manual track division is possible regardless of the AUTO/MANUAL setting. < A track cannot be adjusted as follows: MIN. It is not possible to record in length. When no...
CD-RW890 Manual
Page 20
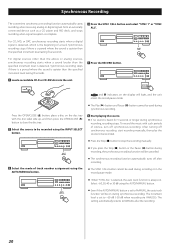
...the disc label side up, and then press the OPEN/CLOSE (L) button to close the disc tray. 2 Select the source to MANUAL after recording. < The SYNC 1/ALL button cannot be used during synchronous recording. Synchronous Recording The convenient synchronous recording function automatically starts...stops recording when signal reception is quieter than the specified increment level lasting 8 seconds. 5 Press the RECORD button. 1 Load a recordable CD-R or CD-RW disc into the unit. Synchronous recording stops if there is a period where the sound is complete. 4 Press the SYNC 1/ALL ...
...the disc label side up, and then press the OPEN/CLOSE (L) button to close the disc tray. 2 Select the source to MANUAL after recording. < The SYNC 1/ALL button cannot be used during synchronous recording. Synchronous Recording The convenient synchronous recording function automatically starts...stops recording when signal reception is quieter than the specified increment level lasting 8 seconds. 5 Press the RECORD button. 1 Load a recordable CD-R or CD-RW disc into the unit. Synchronous recording stops if there is a period where the sound is complete. 4 Press the SYNC 1/ALL ...

CD-RW890 Manual
Page 27
... in combination with the requirement set by the Directive for the chemical involved. 27 Specifications Media type CD-RW and CD-R for Digital audio (record and playback) CD (playback only) Frequency converter input sampling frequency 32 kHz, 44.1 kHz, 48 kHz Recording sampling ... 15/16 lbs) Standard Accessories Remote control unit (RC-1275) x 1 Battery (AA, R6, SUM-3) x 2 RCA cable x 2 Optical digital cable x 1 Owner's manual x 1 Warranty card x 1 < Design and specifications are subject to change without notice. < Weight and dimensions are only valid in the European Union.
... in combination with the requirement set by the Directive for the chemical involved. 27 Specifications Media type CD-RW and CD-R for Digital audio (record and playback) CD (playback only) Frequency converter input sampling frequency 32 kHz, 44.1 kHz, 48 kHz Recording sampling ... 15/16 lbs) Standard Accessories Remote control unit (RC-1275) x 1 Battery (AA, R6, SUM-3) x 2 RCA cable x 2 Optical digital cable x 1 Owner's manual x 1 Warranty card x 1 < Design and specifications are subject to change without notice. < Weight and dimensions are only valid in the European Union.
