
Built-In Installation Guide
Page 9
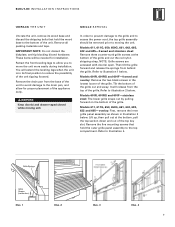
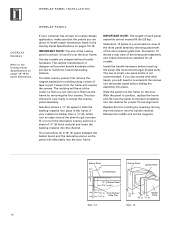
...: Grille screws are accessed with door(s) open. Refer to illustration 1 below . Lift up, then pull out at the bottom of the grille. Models 611, 611G, 650, 650G, 661, 642, 685, 632 and 695-overlay: First, remove the inner grille panel assembly as shown in illustration 3... below . Grille Springs Grille Screws (inside door) Illus. 1 Illus. 2 Illus. 3 Illus. 4 9 Remove all packing materials and tape. You will be removed prior to moving unit. Then ...
...: Grille screws are accessed with door(s) open. Refer to illustration 1 below . Lift up, then pull out at the bottom of the grille. Models 611, 611G, 650, 650G, 661, 642, 685, 632 and 695-overlay: First, remove the inner grille panel assembly as shown in illustration 3... below . Grille Springs Grille Screws (inside door) Illus. 1 Illus. 2 Illus. 3 Illus. 4 9 Remove all packing materials and tape. You will be removed prior to moving unit. Then ...
Built-In Installation Guide
Page 11
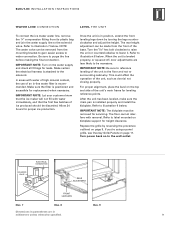
...replacement when necessary. The floor cannot interfere with water immediately, and that the ice maker will not fill with removal. If you're using a panel grille, see Overlay Grille Panels on page 9. Turn power back on the water supply and check all fittings for height clearance. SOLENOID VALVE... the level on kickplate support for leaks. Refer to illustration 7 below . Make sure the filter is leveled properly, or squared off, door adjustments are in position, extend the front leveling legs down by reversing the procedure outlined on page 17. When the unit is positioned and...
...replacement when necessary. The floor cannot interfere with water immediately, and that the ice maker will not fill with removal. If you're using a panel grille, see Overlay Grille Panels on page 9. Turn power back on the water supply and check all fittings for height clearance. SOLENOID VALVE... the level on kickplate support for leaks. Refer to illustration 7 below . Make sure the filter is leveled properly, or squared off, door adjustments are in position, extend the front leveling legs down by reversing the procedure outlined on page 17. When the unit is positioned and...
Built-In Installation Guide
Page 12
... can remove it up with a sheet of the custom panel is thicker than a 1/4" (6), back it . To install framed panels, the door handle(s) must be necessary to get a proper fit. The handle screws are about to install match dimensions listed in your installation. IMPORTANT NOTE: The weight of tape to give the unit the custom Sub-Zero...
... can remove it up with a sheet of the custom panel is thicker than a 1/4" (6), back it . To install framed panels, the door handle(s) must be necessary to get a proper fit. The handle screws are about to install match dimensions listed in your installation. IMPORTANT NOTE: The weight of tape to give the unit the custom Sub-Zero...
Built-In Installation Guide
Page 13
... accessory kit. F R A M E D PA N E L I N S TA L L AT I O N MODELS 685 AND 695 FRAMED KITS With a Phillips screwdriver, remove the handles from the freezer and refrigerator doors. This accessory kit (part # FRAMPAR), available through your Sub-Zero dealer, includes molding and a stainless steel insert panel for above or below the glasswell on a new Model 685 or 695 framed unit.
... accessory kit. F R A M E D PA N E L I N S TA L L AT I O N MODELS 685 AND 695 FRAMED KITS With a Phillips screwdriver, remove the handles from the freezer and refrigerator doors. This accessory kit (part # FRAMPAR), available through your Sub-Zero dealer, includes molding and a stainless steel insert panel for above or below the glasswell on a new Model 685 or 695 framed unit.
Built-In Installation Guide
Page 16
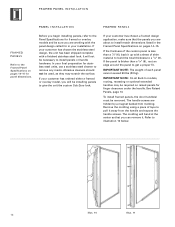
...panel before inserting the panel. Remove the frame by inserting the top, then the bottom into the door frame. Install the handle hardware before sliding the assembly into place. Slide the panel into place in the frame. Spacer Panel .10" (3) Overlay Panel Overlay Panel Spacer Panel 1/4" (6) Backer Panel 5/16" (8) min 5/32" (4) Door...the frame end. Sub-Zero allows a 1/4" (6) space to match the overall decorating scheme. With the panel in the Overlay Panel Specifications on pages 18-19 for panel dimensions. Replace the trim molding by removing the four screws....
...panel before inserting the panel. Remove the frame by inserting the top, then the bottom into the door frame. Install the handle hardware before sliding the assembly into place. Slide the panel into place in the frame. Spacer Panel .10" (3) Overlay Panel Overlay Panel Spacer Panel 1/4" (6) Backer Panel 5/16" (8) min 5/32" (4) Door...the frame end. Sub-Zero allows a 1/4" (6) space to match the overall decorating scheme. With the panel in the Overlay Panel Specifications on pages 18-19 for panel dimensions. Replace the trim molding by removing the four screws....

Built-In Installation Guide
Page 17
... the Sub-Zero Design Guide. To remove the glasswell bezel for these models is the same procedure as described in Grille Removal, page 9. If the panel is taped in the grille frame. Models 611, 611G, 650, 650G, 661, 642, 685, 632 and 695: Remove the inner grille panel assembly as... area and cause problems with the operation of the Sub-Zero unit. Install the inner grille panel assembly onto the unit, by pressing mandrels into the door trim. Installing overlay panels for an overlay Model 685 or 695, the water grille and touch pad must be removed. OV E R L AY PA N E L I N S TA L L...
... the Sub-Zero Design Guide. To remove the glasswell bezel for these models is the same procedure as described in Grille Removal, page 9. If the panel is taped in the grille frame. Models 611, 611G, 650, 650G, 661, 642, 685, 632 and 695: Remove the inner grille panel assembly as... area and cause problems with the operation of the Sub-Zero unit. Install the inner grille panel assembly onto the unit, by pressing mandrels into the door trim. Installing overlay panels for an overlay Model 685 or 695, the water grille and touch pad must be removed. OV E R L AY PA N E L I N S TA L L...

Built-In Installation Guide
Page 21
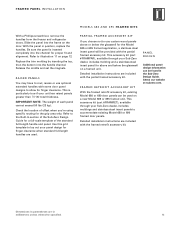
...Remove the two small shipping screws from your Sub-Zero dealer, includes the necessary hardware. Loosen the allen head screws only slightly, so that the door will have to be able to move the door to illustration 19 below . COMPLETING T H E I N S TA L L AT I O N ANCHOR THE UNIT After door and side panels... have been installed, the unit has been leveled and door adjustment completed, anchor the unit to the cabinetry. The Sub-Zero Anchoring Kit (part #4200900), available from the top and bottom hinge as shown in position...
...Remove the two small shipping screws from your Sub-Zero dealer, includes the necessary hardware. Loosen the allen head screws only slightly, so that the door will have to be able to move the door to illustration 19 below . COMPLETING T H E I N S TA L L AT I O N ANCHOR THE UNIT After door and side panels... have been installed, the unit has been leveled and door adjustment completed, anchor the unit to the cabinetry. The Sub-Zero Anchoring Kit (part #4200900), available from the top and bottom hinge as shown in position...

Built-In Installation Guide
Page 23
... unit inside the door. Contact a Sub-Zero Factory Authorized Service Center, a Sub-Zero dealer, or the Sub-Zero Customer Service Department, P. If you are the copyright property of Sub-Zero Freezer Company, Inc...permission of Sub-Zero Freezer Company, Inc. ©Sub-Zero Freezer Company, Inc. Are panels attached securely and properly aligned? NOTE: Classic, platinum and carbon stainless steel panels are ...or freezer, please do it safely. all applicable electrical codes? Remove the doors or tightly secure the doors closed. Is the power cord plugged into a properly grounded 3-prong...
... unit inside the door. Contact a Sub-Zero Factory Authorized Service Center, a Sub-Zero dealer, or the Sub-Zero Customer Service Department, P. If you are the copyright property of Sub-Zero Freezer Company, Inc...permission of Sub-Zero Freezer Company, Inc. ©Sub-Zero Freezer Company, Inc. Are panels attached securely and properly aligned? NOTE: Classic, platinum and carbon stainless steel panels are ...or freezer, please do it safely. all applicable electrical codes? Remove the doors or tightly secure the doors closed. Is the power cord plugged into a properly grounded 3-prong...
Built-In Use and Care Guide
Page 4
...kit, contact your Sub-Zero dealer. Up-front ...door is left ajar. The high humidity crisper drawer is concealed. They are all doors...door. Bright lighting spreads even illumination throughout each come in look and conforms to maintain freshness. Our solid-core doors...Control Center display panel. Shallow-depth ...Sub-Zero famous-feature an advanced grille design, innovative handle design and elegant hinges. With the installation of the glass. Classic stainless steel or the premium finishes of Models 661, 642 and 685. Glass door...models feature new wrapped doors, 1" (25 mm...
...kit, contact your Sub-Zero dealer. Up-front ...door is left ajar. The high humidity crisper drawer is concealed. They are all doors...door. Bright lighting spreads even illumination throughout each come in look and conforms to maintain freshness. Our solid-core doors...Control Center display panel. Shallow-depth ...Sub-Zero famous-feature an advanced grille design, innovative handle design and elegant hinges. With the installation of the glass. Classic stainless steel or the premium finishes of Models 661, 642 and 685. Glass door...models feature new wrapped doors, 1" (25 mm...

Built-In Use and Care Guide
Page 5
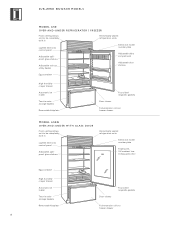
... humidity crisper drawer Hermetically sealed refrigeration units Removable kickplate Four-sided magnetic gaskets Door closers Front venting allows unit to be completely built in WA R R A N T Y Sub-Zero products are covered by a two, five and twelve year residential warranty (exclusions apply). S U B - I N M O D E L S MODEL 601R ALL R E F R I G E R ATO R Lighted electronic control panel Adjustable spillproof glass shelves Adjustable roll-out...
... humidity crisper drawer Hermetically sealed refrigeration units Removable kickplate Four-sided magnetic gaskets Door closers Front venting allows unit to be completely built in WA R R A N T Y Sub-Zero products are covered by a two, five and twelve year residential warranty (exclusions apply). S U B - I N M O D E L S MODEL 601R ALL R E F R I G E R ATO R Lighted electronic control panel Adjustable spillproof glass shelves Adjustable roll-out...

Built-In Use and Care Guide
Page 6
I LT- Z E R O B U I N M O D E L S MODEL 601F ALL FREEZER Lighted electronic control panel Adjustable wire shelves Automatic ice maker Pull-out ice container Roll-out storage baskets Hermetically sealed refrigeration units Removable kickplate Serial and model number plate Adjustable door shelves Four-sided magnetic gaskets Door closers Front venting allows unit to be completely built in 6 S U B -
I LT- Z E R O B U I N M O D E L S MODEL 601F ALL FREEZER Lighted electronic control panel Adjustable wire shelves Automatic ice maker Pull-out ice container Roll-out storage baskets Hermetically sealed refrigeration units Removable kickplate Serial and model number plate Adjustable door shelves Four-sided magnetic gaskets Door closers Front venting allows unit to be completely built in 6 S U B -

Built-In Use and Care Guide
Page 7
... crisper drawer Automatic ice maker Two-tier wire storage baskets Removable kickplate Four-sided magnetic gaskets Door closers Full-extension roll-out freezer drawer MODEL 611G OVER-AND-UNDER WITH GLASS DOOR Front venting allows unit to be completely built in Lighted electronic control panel Adjustable spillproof glass shelves Hermetically sealed refrigeration units Serial...
... crisper drawer Automatic ice maker Two-tier wire storage baskets Removable kickplate Four-sided magnetic gaskets Door closers Full-extension roll-out freezer drawer MODEL 611G OVER-AND-UNDER WITH GLASS DOOR Front venting allows unit to be completely built in Lighted electronic control panel Adjustable spillproof glass shelves Hermetically sealed refrigeration units Serial...
Built-In Use and Care Guide
Page 8
... crisper drawer Automatic ice maker Two-tier wire storage baskets Removable kickplate Four-sided magnetic gaskets Door closers Full-extension roll-out freezer drawer MODEL 650G OVER-AND-UNDER WITH GLASS DOOR Front venting allows unit to be completely built in Lighted electronic control panel Adjustable spillproof glass shelves Hermetically sealed refrigeration units Serial...
... crisper drawer Automatic ice maker Two-tier wire storage baskets Removable kickplate Four-sided magnetic gaskets Door closers Full-extension roll-out freezer drawer MODEL 650G OVER-AND-UNDER WITH GLASS DOOR Front venting allows unit to be completely built in Lighted electronic control panel Adjustable spillproof glass shelves Hermetically sealed refrigeration units Serial...

Built-In Use and Care Guide
Page 9
... Ice storage drawer Roll-out freezer baskets Four-sided magnetic gaskets Removable kickplate Hermetically sealed refrigeration units Lighted electronic control panel Adjustable spillproof glass shelves Egg tray Adjustable dairy compartment Adjustable rollout utility basket Adjustable door shelves High humidity crisper drawer Door closers MODEL 642 S I G E R ATO R | F R E E Z E R Front venting allows unit to be completely built in...
... Ice storage drawer Roll-out freezer baskets Four-sided magnetic gaskets Removable kickplate Hermetically sealed refrigeration units Lighted electronic control panel Adjustable spillproof glass shelves Egg tray Adjustable dairy compartment Adjustable rollout utility basket Adjustable door shelves High humidity crisper drawer Door closers MODEL 642 S I G E R ATO R | F R E E Z E R Front venting allows unit to be completely built in...

Built-In Use and Care Guide
Page 10
... Serial and model number plate Automatic ice maker Freezer utility rack Adjustable wire shelves Adjustable door shelves Roll-out freezer baskets Four-sided magnetic gaskets Removable kickplate High humidity crisper drawer Hermetically sealed refrigeration units Lighted electronic control panel Adjustable dairy compartment Adjustable spillproof glass shelves Bulk ice dispenser Adjustable roll-out utility...
... Serial and model number plate Automatic ice maker Freezer utility rack Adjustable wire shelves Adjustable door shelves Roll-out freezer baskets Four-sided magnetic gaskets Removable kickplate High humidity crisper drawer Hermetically sealed refrigeration units Lighted electronic control panel Adjustable dairy compartment Adjustable spillproof glass shelves Bulk ice dispenser Adjustable roll-out utility...

Built-In Use and Care Guide
Page 11
... Serial and model number plate Automatic ice maker Freezer utility rack Adjustable wire shelves Adjustable door shelves Roll-out freezer baskets Four-sided magnetic gaskets Removable kickplate High humidity crisper drawer Hermetically sealed refrigeration units Lighted electronic control panel Adjustable dairy compartment Adjustable spillproof glass shelves Bulk ice dispenser Adjustable roll-out utility...
... Serial and model number plate Automatic ice maker Freezer utility rack Adjustable wire shelves Adjustable door shelves Roll-out freezer baskets Four-sided magnetic gaskets Removable kickplate High humidity crisper drawer Hermetically sealed refrigeration units Lighted electronic control panel Adjustable dairy compartment Adjustable spillproof glass shelves Bulk ice dispenser Adjustable roll-out utility...

Built-In Use and Care Guide
Page 19
...the ice dispenser is not all perishable items. Shut off the ice maker and empty the ice bucket. If your Sub-Zero authorized service center. Be sure to Sabbath Mode, page 13. Z E R O B U I P S ... supply of running time could attack the metal. 19 See Ice Bucket Removal, page 16. For extended vacations, shut off , block the doors open to allow fresh air to the unit. To avoid this, empty ...dry and fresh smelling. Moisture buildup during even the shortest amount of ice in the Control Center display panel. S U B - If you do not hear auger motor noise, wait five minutes, then try ...
...the ice dispenser is not all perishable items. Shut off the ice maker and empty the ice bucket. If your Sub-Zero authorized service center. Be sure to Sabbath Mode, page 13. Z E R O B U I P S ... supply of running time could attack the metal. 19 See Ice Bucket Removal, page 16. For extended vacations, shut off , block the doors open to allow fresh air to the unit. To avoid this, empty ...dry and fresh smelling. Moisture buildup during even the shortest amount of ice in the Control Center display panel. S U B - If you do not hear auger motor noise, wait five minutes, then try ...
Built-In Use and Care Guide
Page 22
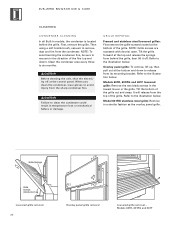
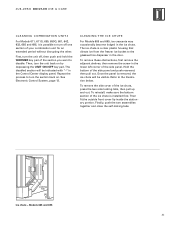
...its mounting bracket. It will release from the condenser. Grille Springs Grille Screws (inside door) Louvered grille removal 22 3 3 2 2 1 1 Overlay panel grille removal Louvered grille removal - Models 601R, 601RG and 601F Then using a soft bristle brush, vacuum to release...behind the grille. Tilt the grille forward at the bottom and down ). GRILLE REMOVAL Framed and stainless steel louvered grilles: First remove the grille screws located at the control panel. Overlay panel grille: To remove, lift up and down to remove dust and lint from the top of the grille. Z E R O B...
...its mounting bracket. It will release from the condenser. Grille Springs Grille Screws (inside door) Louvered grille removal 22 3 3 2 2 1 1 Overlay panel grille removal Louvered grille removal - Models 601R, 601RG and 601F Then using a soft bristle brush, vacuum to release...behind the grille. Tilt the grille forward at the bottom and down ). GRILLE REMOVAL Framed and stainless steel louvered grilles: First remove the grille screws located at the control panel. Overlay panel grille: To remove, lift up and down to remove dust and lint from the top of the grille. Z E R O B...
Built-In Use and Care Guide
Page 23
..., 642, 632, 685 and 695, it is installed first. Repeat the process to the glasswell ice dispenser in the Control Center display panel. I N U S E & C A R E CLEAN ING CO M BI N ATI ON U N I LT- The disabled section will be indicated with "--" in the door. Finally, push the two assemblies together and close the self-locking tabs. To remove...
..., 642, 632, 685 and 695, it is installed first. Repeat the process to the glasswell ice dispenser in the Control Center display panel. I N U S E & C A R E CLEAN ING CO M BI N ATI ON U N I LT- The disabled section will be indicated with "--" in the door. Finally, push the two assemblies together and close the self-locking tabs. To remove...
Built-In Use and Care Guide
Page 39
... use , maintenance, installation, service or repair, including but not limited to improper removal and reinstallation (whether in the unit or at a remote location) of Canada. THE REMEDIES DESCRIBED ABOVE FOR EACH WARRANTY ARE THE ONLY ONES THAT SUB-ZERO WILL PROVIDE, EITHER UNDER THESE WARRANTIES OR UNDER ANY WARRANTY ARISING BY OPERATION... in materials or workmanship. check the Locator section of our website, subzero.com, or call 800-222-7820. * Stainless Steel (classic, platinum and carbon) doors, panels, product frames and stainless interior surfaces are available upon request.
... use , maintenance, installation, service or repair, including but not limited to improper removal and reinstallation (whether in the unit or at a remote location) of Canada. THE REMEDIES DESCRIBED ABOVE FOR EACH WARRANTY ARE THE ONLY ONES THAT SUB-ZERO WILL PROVIDE, EITHER UNDER THESE WARRANTIES OR UNDER ANY WARRANTY ARISING BY OPERATION... in materials or workmanship. check the Locator section of our website, subzero.com, or call 800-222-7820. * Stainless Steel (classic, platinum and carbon) doors, panels, product frames and stainless interior surfaces are available upon request.


