
Built-In Installation Guide
Page 11
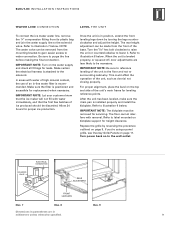
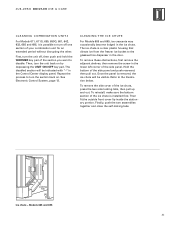
...O N LEVEL THE UNIT To connect the ice maker water line, remove the 1/4" compression fitting from its plastic bag and join the water supply line to illustration 8 below. Make sure the filter is in parentheses are less ...T I O N I N S T R U C T I O N S WAT E R L I N E C O N N E C T I LT- IMPORTANT NOTE: Turn on kickplate support for leaks. Refer to illustration 9 below . Make certain the electrical harness is installed properly and install the kickplate. SOLENOID VALVE ELECTRICAL CONNECTION REAR ADJUSTMENT FRONT LEVELERS Illus. 7 Illus. 8 Illus. 9 Dimensions in position...
...O N LEVEL THE UNIT To connect the ice maker water line, remove the 1/4" compression fitting from its plastic bag and join the water supply line to illustration 8 below. Make sure the filter is in parentheses are less ...T I O N I N S T R U C T I O N S WAT E R L I N E C O N N E C T I LT- IMPORTANT NOTE: Turn on kickplate support for leaks. Refer to illustration 9 below . Make certain the electrical harness is installed properly and install the kickplate. SOLENOID VALVE ELECTRICAL CONNECTION REAR ADJUSTMENT FRONT LEVELERS Illus. 7 Illus. 8 Illus. 9 Dimensions in position...

Built-In Installation Guide
Page 23
Have the door(s) been aligned for units with an automatic ice maker? Has the registration card been mailed in the proper position? O. Child entrapment accidents can be sure to have the model and serial number when ... inspected for leaks? Are both front leveling legs extended down to make contact with all applicable electrical codes? Have any information or images contained herein may be copied or used in whole or in part without the express written permission of Sub-Zero Freezer Company, Inc. C ONTAC T I ST Has the unit been secured...
Have the door(s) been aligned for units with an automatic ice maker? Has the registration card been mailed in the proper position? O. Child entrapment accidents can be sure to have the model and serial number when ... inspected for leaks? Are both front leveling legs extended down to make contact with all applicable electrical codes? Have any information or images contained herein may be copied or used in whole or in part without the express written permission of Sub-Zero Freezer Company, Inc. C ONTAC T I ST Has the unit been secured...
Built-In Use and Care Guide
Page 4
...dividers, with smooth sides for easy cleaning. Magnetic gaskets around all doors give you informed about the harness kit, contact your Sub-Zero dealer. 4 Controls are all adjustable for quick, easy-to enhance the aesthetics of today's professional looking kitchens. These units each...with the exception of the refrigerator. The cantilevered shelves make repositioning quick and easy. They're easy to the side of our website, subzero.com. The ice maker provides high-quality, crescent-shaped ice that made Sub-Zero famous-feature an advanced grille design, innovative handle ...
...dividers, with smooth sides for easy cleaning. Magnetic gaskets around all doors give you informed about the harness kit, contact your Sub-Zero dealer. 4 Controls are all adjustable for quick, easy-to enhance the aesthetics of today's professional looking kitchens. These units each...with the exception of the refrigerator. The cantilevered shelves make repositioning quick and easy. They're easy to the side of our website, subzero.com. The ice maker provides high-quality, crescent-shaped ice that made Sub-Zero famous-feature an advanced grille design, innovative handle ...

Built-In Use and Care Guide
Page 13
... the Control Center. It can be deactivated for 10 seconds. ICE MAKER CONTROL All Built-In units (except Models 601R and 601RG) feature an ICE ON/OFF key pad on and will make an audible beeping sound if the door is a temperature or ice maker problem, you have to Condenser Cleaning, page 22. 13... When the ice maker system is on press the UNIT ON/OFF key pad...
... the Control Center. It can be deactivated for 10 seconds. ICE MAKER CONTROL All Built-In units (except Models 601R and 601RG) feature an ICE ON/OFF key pad on and will make an audible beeping sound if the door is a temperature or ice maker problem, you have to Condenser Cleaning, page 22. 13... When the ice maker system is on press the UNIT ON/OFF key pad...
Built-In Use and Care Guide
Page 16
...opening, repeat the procedure, but when lifting the ice bucket out, pivot the right side of the bucket toward you support the top with your Sub-Zero freezer is fully automatic and has been tested ...650, 650G, 661, 642, 685, 632 and 695, the ice maker system will allow the ice bucket to clear the carrier assembly. To avoid this, empty and replace the ice in place. If the door is specifically ... remove the ice bucket, you can expect a cycle of the ice bucket with one hand. This will shut off if the ice bucket is designed to 100 psi. To start making ice, activate the ICE ON/OFF ...
...opening, repeat the procedure, but when lifting the ice bucket out, pivot the right side of the bucket toward you support the top with your Sub-Zero freezer is fully automatic and has been tested ...650, 650G, 661, 642, 685, 632 and 695, the ice maker system will allow the ice bucket to clear the carrier assembly. To avoid this, empty and replace the ice in place. If the door is specifically ... remove the ice bucket, you can expect a cycle of the ice bucket with one hand. This will shut off if the ice bucket is designed to 100 psi. To start making ice, activate the ICE ON/OFF ...
Built-In Use and Care Guide
Page 17
..., make sure that the glass is mounted inside the refrigerator section. Refer to avoid damaging the equipment. This will take several hours to chill the water to open the refrigerator door and place an ice container under the dispenser chute, then press the BULK ICE key...is used. I N U S E & C A R E I C E | WAT E R D I S P E N S I N G M O D E L S I C E | WAT E R D I LT- Z E R O B U I SPE N SE R For Models 685 and 695, the automatic ice and water dispenser gives you use the water dispenser, purge the water system and storage tank for Models 685 and 695, set a glass on the...
..., make sure that the glass is mounted inside the refrigerator section. Refer to avoid damaging the equipment. This will take several hours to chill the water to open the refrigerator door and place an ice container under the dispenser chute, then press the BULK ICE key...is used. I N U S E & C A R E I C E | WAT E R D I S P E N S I N G M O D E L S I C E | WAT E R D I LT- Z E R O B U I SPE N SE R For Models 685 and 695, the automatic ice and water dispenser gives you use the water dispenser, purge the water system and storage tank for Models 685 and 695, set a glass on the...

Built-In Use and Care Guide
Page 19
...when unit is illuminated in and engaging the auger motor at the same time. Make sure the ice bucket is put into service temporarily and later shut off the lights and ice maker, refer to the unit. Press the ICE key pad on the glasswell at the back of running time could attack the..., the ice may fuse together. If it is properly positioned, check to the unit. To ensure that the freezer utility rack has been properly installed. If you do not hear auger noise after the second try again. Be sure to shut off the ice maker and empty the ice bucket. If your Sub-Zero authorized...
...when unit is illuminated in and engaging the auger motor at the same time. Make sure the ice bucket is put into service temporarily and later shut off the lights and ice maker, refer to the unit. Press the ICE key pad on the glasswell at the back of running time could attack the..., the ice may fuse together. If it is properly positioned, check to the unit. To ensure that the freezer utility rack has been properly installed. If you do not hear auger noise after the second try again. Be sure to shut off the ice maker and empty the ice bucket. If your Sub-Zero authorized...
Built-In Use and Care Guide
Page 23
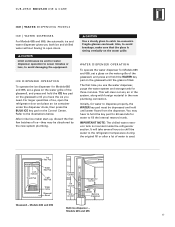
... N ATI ON U N I LT- Repeat the process to turn the section back on by depressing the UNIT ON/OFF key pad. To reinstall, make sure the bottom section of the side panel and push rearward, then pull out. Models 685 and 695 23 The disabled section will be indicated... panel. Z E R O B U I TS For Models 611, 611G, 650, 650G, 661, 642, 632, 685 and 695, it is installed first. Refer to disable. Locking Tab Ice chute - S U B - CLEANING THE ICE CHUTE For Models 685 and 695, ice crescents may occasionally become lodged in the Control Center display panel. First, turn the unit...
... N ATI ON U N I LT- Repeat the process to turn the section back on by depressing the UNIT ON/OFF key pad. To reinstall, make sure the bottom section of the side panel and push rearward, then pull out. Models 685 and 695 23 The disabled section will be indicated... panel. Z E R O B U I TS For Models 611, 611G, 650, 650G, 661, 642, 632, 685 and 695, it is installed first. Refer to disable. Locking Tab Ice chute - S U B - CLEANING THE ICE CHUTE For Models 685 and 695, ice crescents may occasionally become lodged in the Control Center display panel. First, turn the unit...
Built-In Use and Care Guide
Page 28
...in high humidity storage. Freezer Storage: Wrap foods in plastic wrap or aluminum foil. Do not refreeze thawed meats. Higher quality ice creams usually have a higher cream content, requiring colder freezer temperatures to eat, but its quality may diminish. 28 Storing food ...food storage. Eggs: Store eggs unwashed in original packaging until ready to eat. Ice Cream: The firmness of a temperature problem. The recommended storage temperatures will affect temperatures inside the unit. Make sure your freezer with plastic wrap or foil. After opening , rewrap tightly ...
...in high humidity storage. Freezer Storage: Wrap foods in plastic wrap or aluminum foil. Do not refreeze thawed meats. Higher quality ice creams usually have a higher cream content, requiring colder freezer temperatures to eat, but its quality may diminish. 28 Storing food ...food storage. Eggs: Store eggs unwashed in original packaging until ready to eat. Ice Cream: The firmness of a temperature problem. The recommended storage temperatures will affect temperatures inside the unit. Make sure your freezer with plastic wrap or foil. After opening , rewrap tightly ...
Built-In Use and Care Guide
Page 37
...make sure the power for your unit is on for a long period of time may need to discard the ice and allow ice to condensation forming on the inside and outside of ice (eight cubes per cycle) every two hours. Q: My unit isn't cooling properly. DOOR OPERATION Q: Why is not on the inside your Sub-Zero...Q: Condensation is considered normal. Q: The door on page 22. ICE will form and is forming on , OFF will be accentuated based on the door stop may not be leveled properly or a door stop kit. 37 A: Sub-Zero Built-In units do I adjust the temperatures? Contact a local ...
...make sure the power for your unit is on for a long period of time may need to discard the ice and allow ice to condensation forming on the inside and outside of ice (eight cubes per cycle) every two hours. Q: My unit isn't cooling properly. DOOR OPERATION Q: Why is not on the inside your Sub-Zero...Q: Condensation is considered normal. Q: The door on page 22. ICE will form and is forming on , OFF will be accentuated based on the door stop may not be leveled properly or a door stop kit. 37 A: Sub-Zero Built-In units do I adjust the temperatures? Contact a local ...


