
600 Series & 430 Panel Specifications
Page 1
...handle hardware. Refer to the Built-In Installation Instructions packed with the appliance, which provides step-by any part of this area can be backed up with the Sub-Zero panel design family called for in this section for making sure the unit is less than 1" (25...and 695, the refrigerator door panel must include a cutout to block the unit. BUILT-IN REFRIGERATION ACCESSORIES Optional accessories are available through your Sub-Zero dealer. ADDING PANELS In your plan for framed and overlay door panels. PANELS 1/4" (6) THICK OR LESS Trim reveal 1/4" (6) min ...
...handle hardware. Refer to the Built-In Installation Instructions packed with the appliance, which provides step-by any part of this area can be backed up with the Sub-Zero panel design family called for in this section for making sure the unit is less than 1" (25...and 695, the refrigerator door panel must include a cutout to block the unit. BUILT-IN REFRIGERATION ACCESSORIES Optional accessories are available through your Sub-Zero dealer. ADDING PANELS In your plan for framed and overlay door panels. PANELS 1/4" (6) THICK OR LESS Trim reveal 1/4" (6) min ...

600 Series & 430 Panel Specifications
Page 6
...panel for the decorative bezel surrounding the glasswell area. Also keep in a number of the Sub-Zero unit. Make sure that the amount of the panel at this space. OVERLAY PANELS To ...601RG, 611G and 650G, the refrigerator door panel must be 17/16" (37). We are in the Sub-Zero Built-In Installation Instructions. Routing Required 17/16" (37) Width of Stile Adjacent to Bezel Illus. ...grille panels for the panel grille are listed on page 24. Overlay units, except Models 601R, 601RG and 601F, come standard with the operation of different ways. Overlay grille panel ...
...panel for the decorative bezel surrounding the glasswell area. Also keep in a number of the Sub-Zero unit. Make sure that the amount of the panel at this space. OVERLAY PANELS To ...601RG, 611G and 650G, the refrigerator door panel must be 17/16" (37). We are in the Sub-Zero Built-In Installation Instructions. Routing Required 17/16" (37) Width of Stile Adjacent to Bezel Illus. ...grille panels for the panel grille are listed on page 24. Overlay units, except Models 601R, 601RG and 601F, come standard with the operation of different ways. Overlay grille panel ...
Built-In Installation Guide
Page 3
... screwdriver set Slotted screwdriver set Torx drive screwdriver set 4' (1.2 m) of 1/4" copper tubing and saddle valve for the water line-part #4200880 (do not use self-piercing valves) Copper tubing cutter Level-2' (.6 m) and 4' (1.2 m) recommended Appliance Dolly able ...or e-mail [email protected]. Installation should take special care to your Sub-Zero dealer or the Sub-Zero Customer Service Department at subzero.com. B U I O N S The importance of the installation of the Sub-Zero Built-In unit cannot be directed to observe during installation Dimensions in millimeters ...
... screwdriver set Slotted screwdriver set Torx drive screwdriver set 4' (1.2 m) of 1/4" copper tubing and saddle valve for the water line-part #4200880 (do not use self-piercing valves) Copper tubing cutter Level-2' (.6 m) and 4' (1.2 m) recommended Appliance Dolly able ...or e-mail [email protected]. Installation should take special care to your Sub-Zero dealer or the Sub-Zero Customer Service Department at subzero.com. B U I O N S The importance of the installation of the Sub-Zero Built-In unit cannot be directed to observe during installation Dimensions in millimeters ...

Built-In Installation Guide
Page 4
.... Make sure that the finished rough opening dimensions, door swing clearance, electrical service and plumbing are identical for your Sub-Zero dealer. Complete the installation with the surrounding finished floor. 4 Refer to install. These specifications are correct for full ... of these design options has specific installation requirements, which means it is vital that the unit match your model is level with the Anchoring Kit (part #4200900), see page 21. I N I N S TA L L A T I O N S P E C I F I C A T I O N S I N S TA L L AT I O N S P E C ...
.... Make sure that the finished rough opening dimensions, door swing clearance, electrical service and plumbing are identical for your Sub-Zero dealer. Complete the installation with the surrounding finished floor. 4 Refer to install. These specifications are correct for full ... of these design options has specific installation requirements, which means it is vital that the unit match your model is level with the Anchoring Kit (part #4200900), see page 21. I N I N S TA L L A T I O N S P E C I F I C A T I O N S I N S TA L L AT I O N S P E C ...
Built-In Installation Guide
Page 8
... unit. I N I N S TA L L A T I O N I N S T R U C T I LT- For location of excess copper tubing to remain outside the wall or floor for your Sub-Zero dealer. Do not use an extension cord or twoprong adapter. A reverse osmosis system can damage the ice maker mold and lead to the house supply...AC, 60 Hz, 15 amp circuit breaker and electrical supply are equipped with a power supply cord with the correct polarity. A saddle valve kit (part # 4200880) is brought in from behind the unit, route the water line through the floor within 1/2" (13) from the compression fitting. If ...
... unit. I N I N S TA L L A T I O N I N S T R U C T I LT- For location of excess copper tubing to remain outside the wall or floor for your Sub-Zero dealer. Do not use an extension cord or twoprong adapter. A reverse osmosis system can damage the ice maker mold and lead to the house supply...AC, 60 Hz, 15 amp circuit breaker and electrical supply are equipped with a power supply cord with the correct polarity. A saddle valve kit (part # 4200880) is brought in from behind the unit, route the water line through the floor within 1/2" (13) from the compression fitting. If ...
Built-In Installation Guide
Page 13
... accessory kit. Check our website at subzero.com. With the panel in the Sub-Zero Design Guide. Release the middle and set the magnets. Refer to use optional extended handles with the partial framed accessory kit. This accessory kit (part # FRAMPAR), available through your unit has raised panels greater than 1/4" (6) total thickness. Slide...
... accessory kit. Check our website at subzero.com. With the panel in the Sub-Zero Design Guide. Release the middle and set the magnets. Refer to use optional extended handles with the partial framed accessory kit. This accessory kit (part # FRAMPAR), available through your unit has raised panels greater than 1/4" (6) total thickness. Slide...

Built-In Installation Guide
Page 21
..., drill into the cabinetry. You will remain in the top and bottom hinge. Remove the two small shipping screws from your Sub-Zero dealer, includes the necessary hardware. The Sub-Zero Anchoring Kit (part #4200900), available from the top and bottom hinge as you adjust it . Once the adjustments are properly aligned. Install all six...
..., drill into the cabinetry. You will remain in the top and bottom hinge. Remove the two small shipping screws from your Sub-Zero dealer, includes the necessary hardware. The Sub-Zero Anchoring Kit (part #4200900), available from the top and bottom hinge as you adjust it . Once the adjustments are properly aligned. Install all six...
Built-In Installation Guide
Page 22
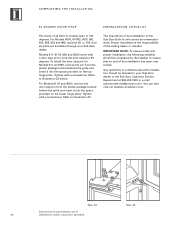
.... COMPLETING THE INSTALLATION 9 0 D E G R E E DOOR STOP I N S TA L L AT I O N C H E C K L I S T The doors of all Built-In models open to illustration 22 below. For Models 601R, 601RG, 601F, 661, 642, 685, 632 and 695, optional 90˚ or 105˚ door stop pin for Models 611 and 650, remove the pin... Models 611G and 650G, remove the door stop pin to limit the door swing to your Sub-Zero dealer. The importance of the installation of the Sub-Zero Built-In unit cannot be completed by the installer to illustration 23. Refer to ensure that no part of the selling dealer or installer.
.... COMPLETING THE INSTALLATION 9 0 D E G R E E DOOR STOP I N S TA L L AT I O N C H E C K L I S T The doors of all Built-In models open to illustration 22 below. For Models 601R, 601RG, 601F, 661, 642, 685, 632 and 695, optional 90˚ or 105˚ door stop pin for Models 611 and 650, remove the pin... Models 611G and 650G, remove the door stop pin to limit the door swing to your Sub-Zero dealer. The importance of the installation of the Sub-Zero Built-In unit cannot be completed by the installer to illustration 23. Refer to ensure that no part of the selling dealer or installer.

Built-In Installation Guide
Page 23
... I N F O R M AT I O N I N S TA L L AT I O N C HE C K L I N FORMATION Sub-Zero Customer Service: 800-222-7820 Website: subzero.com E-mail Address: customerservice@ subzero.com The information and images in this book nor any information or images...parts and labor warranty for cosmetic defects. Are panels attached securely and properly aligned? NOTE: Classic, platinum and carbon stainless steel panels are storing or disposing of Sub-Zero Freezer Company, Inc. ©Sub-Zero Freezer Company, Inc. Contact a Sub-Zero Factory Authorized Service Center, a Sub-Zero dealer, or the Sub-Zero...
... I N F O R M AT I O N I N S TA L L AT I O N C HE C K L I N FORMATION Sub-Zero Customer Service: 800-222-7820 Website: subzero.com E-mail Address: customerservice@ subzero.com The information and images in this book nor any information or images...parts and labor warranty for cosmetic defects. Are panels attached securely and properly aligned? NOTE: Classic, platinum and carbon stainless steel panels are storing or disposing of Sub-Zero Freezer Company, Inc. ©Sub-Zero Freezer Company, Inc. Contact a Sub-Zero Factory Authorized Service Center, a Sub-Zero dealer, or the Sub-Zero...
Built-In Use and Care Guide
Page 21
... water over cold glass shelves. Box 13436, Dayton, Ohio 45413-0436, or 877-376-5474 (toll free). INTERIOR CLEANING To clean interior surfaces and removable parts, wash with a mild solution of soap and lukewarm water with mild soap and water. S I LT- For the stainless steel areas of all three finishes, lightly...
... water over cold glass shelves. Box 13436, Dayton, Ohio 45413-0436, or 877-376-5474 (toll free). INTERIOR CLEANING To clean interior surfaces and removable parts, wash with a mild solution of soap and lukewarm water with mild soap and water. S I LT- For the stainless steel areas of all three finishes, lightly...
Built-In Use and Care Guide
Page 24
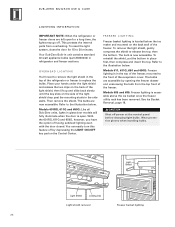
...for a long time, the lights may go off power at the control panel before changing light bulbs. Your Sub-Zero Built-In unit contains standard 40 watt appliance bulbs (part #3030030) in glass door models will fully illuminate when the door is now accessible. Then remove the shield. ...Models 601RG, 611G and 650G: Like all Sub-Zero units, lights in refrigerator and freezer sections. FREEZER LIGHTING Freezer basket...
...for a long time, the lights may go off power at the control panel before changing light bulbs. Your Sub-Zero Built-In unit contains standard 40 watt appliance bulbs (part #3030030) in glass door models will fully illuminate when the door is now accessible. Then remove the shield. ...Models 601RG, 611G and 650G: Like all Sub-Zero units, lights in refrigerator and freezer sections. FREEZER LIGHTING Freezer basket...

Built-In Use and Care Guide
Page 38
... the unit is operating. The information and images in part without the express written permission of the side frame, inside the unit, close to have caused a disruption in your Sub-Zero dealer. all rights reserved. 38 Sub-Zero Dealer and Phone BEFORE C ALLING FOR SERVICE Before calling a Sub-Zero authorized service center, refer to the appliance has...
... the unit is operating. The information and images in part without the express written permission of the side frame, inside the unit, close to have caused a disruption in your Sub-Zero dealer. all rights reserved. 38 Sub-Zero Dealer and Phone BEFORE C ALLING FOR SERVICE Before calling a Sub-Zero authorized service center, refer to the appliance has...
Built-In Use and Care Guide
Page 39
...TWO YEAR WARRANTY ON TOTAL PRODUCT* FULL FIVE YEAR SEALED SYSTEM WARRANTY For five years from the date of original installation, your Sub-Zero warranty covers all parts and labor to repair or replace any components that prove to be defective in materials or workmanship in the sealed system... LIMITED SIXTH THROUGH TWELFTH YEAR SEALED SYSTEM WARRANTY From the 6th through the 12th year from the date of original installation, your Sub-Zero warranty covers all parts and labor to repair or replace any defect caused by negligence, accident or improper use . Service will be defective in the home...
...TWO YEAR WARRANTY ON TOTAL PRODUCT* FULL FIVE YEAR SEALED SYSTEM WARRANTY For five years from the date of original installation, your Sub-Zero warranty covers all parts and labor to repair or replace any components that prove to be defective in materials or workmanship in the sealed system... LIMITED SIXTH THROUGH TWELFTH YEAR SEALED SYSTEM WARRANTY From the 6th through the 12th year from the date of original installation, your Sub-Zero warranty covers all parts and labor to repair or replace any defect caused by negligence, accident or improper use . Service will be defective in the home...

