
Built-In Installation Guide
Page 13
...Use this grid template to lay out your Sub-Zero dealer, includes moldings and stainless steel insert panels to illustration 11 on a framed unit. Detailed installation instructions are included with the partial framed accessory kit. Replace the trim molding by inserting the top, then...Be sure the panel is particularly true if your Sub-Zero dealer, includes molding and a stainless steel insert panel for finger clearance when standard full-length handles are in position, replace the handles. This accessory kit (part # FRAMPAR), available through your panel design for above...
...Use this grid template to lay out your Sub-Zero dealer, includes moldings and stainless steel insert panels to illustration 11 on a framed unit. Detailed installation instructions are included with the partial framed accessory kit. Replace the trim molding by inserting the top, then...Be sure the panel is particularly true if your Sub-Zero dealer, includes molding and a stainless steel insert panel for finger clearance when standard full-length handles are in position, replace the handles. This accessory kit (part # FRAMPAR), available through your panel design for above...
Built-In Use and Care Guide
Page 24
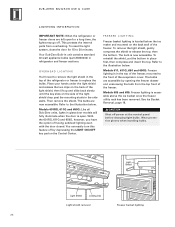
...the shield, put the bottom in refrigerator and freezer sections. Refer to the illustration below . Shut off . Your Sub-Zero Built-In unit contains standard 40 watt appliance bulbs (part #3030030) in place first, then compress and insert the top. Then remove the shield. Refer to the illustration below...replace the bulbs. OVERHEAD LIGHTING You'll need to remove the light shield in the top of the freezer, mounted to release the top, then the bottom. The bulbs are accessible by depressing the LIGHT ON/OFF key pad on the Control Center. Models 601RG, 611G and 650G: Like all Sub-Zero...
...the shield, put the bottom in refrigerator and freezer sections. Refer to the illustration below . Shut off . Your Sub-Zero Built-In unit contains standard 40 watt appliance bulbs (part #3030030) in place first, then compress and insert the top. Then remove the shield. Refer to the illustration below...replace the bulbs. OVERHEAD LIGHTING You'll need to remove the light shield in the top of the freezer, mounted to release the top, then the bottom. The bulbs are accessible by depressing the LIGHT ON/OFF key pad on the Control Center. Models 601RG, 611G and 650G: Like all Sub-Zero...
Built-In Use and Care Guide
Page 39
... may not apply to you , contact your Sub-Zero warranty covers all parts and labor to repair or replace any part of the product, that proves to be defective in materials or workmanship. To receive parts and/or service and the name of the Sub-Zero authorized service center nearest you . O. Service ...SYSTEM WARRANTY For five years from the date of original installation, your Sub-Zero warranty covers all parts and labor to repair or replace any components that prove to be defective in materials or workmanship in the sealed system (parts only). FULL TWO YEAR WARRANTY* For two years from the date...
... may not apply to you , contact your Sub-Zero warranty covers all parts and labor to repair or replace any part of the product, that proves to be defective in materials or workmanship. To receive parts and/or service and the name of the Sub-Zero authorized service center nearest you . O. Service ...SYSTEM WARRANTY For five years from the date of original installation, your Sub-Zero warranty covers all parts and labor to repair or replace any components that prove to be defective in materials or workmanship in the sealed system (parts only). FULL TWO YEAR WARRANTY* For two years from the date...


