

Instruction Manual
Page 3
....1 Navigating the Menus 45 14.2 Overview 46 14.3 Commands 47 14.4 Information 48 { 0478-131-3045-A This instruction manual is protected by copyright. All rights reserved, especially the rights to reproduce, translate and process with the iMow Ruler . ... Installing the Docking Station 20 10.4 Installing the Perimeter Wire 23 10.5 Connecting the Perimeter Wire to Using this Manual 3 2.1 Signal Words 3 2.2 Symbols in the Mowing Area 40 11.12 Installing Reserve Wire 40 11.13 ...Mowing Area 33 11.3 Measuring Wire Clearances with electronic systems. 1 © ANDREAS STIHL AG & Co.
....1 Navigating the Menus 45 14.2 Overview 46 14.3 Commands 47 14.4 Information 48 { 0478-131-3045-A This instruction manual is protected by copyright. All rights reserved, especially the rights to reproduce, translate and process with the iMow Ruler . ... Installing the Docking Station 20 10.4 Installing the Perimeter Wire 23 10.5 Connecting the Perimeter Wire to Using this Manual 3 2.1 Signal Words 3 2.2 Symbols in the Mowing Area 40 11.12 Installing Reserve Wire 40 11.13 ...Mowing Area 33 11.3 Measuring Wire Clearances with electronic systems. 1 © ANDREAS STIHL AG & Co.
Instruction Manual
Page 5
...your robotic mower without this instruction manual thoroughly before starting work. The operator must be familiar with your special attention. Follow all safety precautions. STIHL recommends having an authorized STIHL iMow servicing dealer set up your STIHL robotic mower and, if followed,... the risk of the instructions in this manual will result in this manual to www.stihlusa.com or contact your authorized STIHL iMow servicing dealer. 2.1 Signal Words This manual contains safety information that requires your authorized STIHL iMow servicing dealer. The operator is included...
...your robotic mower without this instruction manual thoroughly before starting work. The operator must be familiar with your special attention. Follow all safety precautions. STIHL recommends having an authorized STIHL iMow servicing dealer set up your STIHL robotic mower and, if followed,... the risk of the instructions in this manual will result in this manual to www.stihlusa.com or contact your authorized STIHL iMow servicing dealer. 2.1 Signal Words This manual contains safety information that requires your authorized STIHL iMow servicing dealer. The operator is included...
Instruction Manual
Page 8
...close-fitting protective glasses with ANSI Z87 "+" when setting up or servicing the robotic mower and anytime you are in the instruction manual. To reduce the risk of injury, follow the specified safety precautions. 6 0000-GXX-3340-A1 4 Safety Symbols Read and follow...impactrated and marked as complying with adequate side protection that could result, @ 5.6.3. English 3.4 Installation Material STIHL recommends having your robotic mower and the perimeter wire installed by an authorized STIHL iMow servicing dealer. 2 1 3 1 Perimeter Wire Transmits an electrical signal to the robotic mower ...
...close-fitting protective glasses with ANSI Z87 "+" when setting up or servicing the robotic mower and anytime you are in the instruction manual. To reduce the risk of injury, follow the specified safety precautions. 6 0000-GXX-3340-A1 4 Safety Symbols Read and follow...impactrated and marked as complying with adequate side protection that could result, @ 5.6.3. English 3.4 Installation Material STIHL recommends having your robotic mower and the perimeter wire installed by an authorized STIHL iMow servicing dealer. 2 1 3 1 Perimeter Wire Transmits an electrical signal to the robotic mower ...
Instruction Manual
Page 9
...repairing the perimeter wire, inspecting or cleaning the mower, replacing the mowing blade and any purpose not authorized or intended may result in this manual. 5.2 Operator WARNING ■ According to the perimeter wire. Do not wear sandals, flip-flops, open-toed or similar footwear. ■...-131-3045-A 7 Use of personal injury, always wear proper clothing and protective apparel when: - Use the ADO 401 docking station, the STIHL RMI 422 P robotic mower and its integrated battery or the docking station and power supply could result in operation; - Always wear heavy-duty, non-...
...repairing the perimeter wire, inspecting or cleaning the mower, replacing the mowing blade and any purpose not authorized or intended may result in this manual. 5.2 Operator WARNING ■ According to the perimeter wire. Do not wear sandals, flip-flops, open-toed or similar footwear. ■...-131-3045-A 7 Use of personal injury, always wear proper clothing and protective apparel when: - Use the ADO 401 docking station, the STIHL RMI 422 P robotic mower and its integrated battery or the docking station and power supply could result in operation; - Always wear heavy-duty, non-...
Instruction Manual
Page 12
...the robotic mower. Never operate a robotic mower that is damaged, battery fluid can leak from unintentional starting work. - Always check your authorized STIHL iMow servicing dealer. If your robotic mower or any part is damaged, improperly maintained or not completely and properly assembled. - Always press and...(s): Do not rub. Rinse water over the open eye(s) for 5 seconds to modify or override the controls or safety devices in this instruction manual. ■ Using a robotic mower that is damaged or does not function properly, take it to put out a battery fire, use the ...
...the robotic mower. Never operate a robotic mower that is damaged, battery fluid can leak from unintentional starting work. - Always check your authorized STIHL iMow servicing dealer. If your robotic mower or any part is damaged, improperly maintained or not completely and properly assembled. - Always press and...(s): Do not rub. Rinse water over the open eye(s) for 5 seconds to modify or override the controls or safety devices in this instruction manual. ■ Using a robotic mower that is damaged or does not function properly, take it to put out a battery fire, use the ...

Instruction Manual
Page 14
... the STOP button for a short period after a few moments. To reduce the risk of the mower will stop after the motor is in this instruction manual. - Objects that could impede the proper operation of the robotic mower or become entangled in the menu. - To reduce the risk of an emergency: - To...
... the STOP button for a short period after a few moments. To reduce the risk of the mower will stop after the motor is in this instruction manual. - Objects that could impede the proper operation of the robotic mower or become entangled in the menu. - To reduce the risk of an emergency: - To...

Instruction Manual
Page 15
...Introduction This section contains the general safety warnings and instructions prescribed for the docking station and power supply. Never use with your authorized STIHL iMow servicing dealer. - When used outdoors, install only to a covered Class A GFCI protected receptacle that is undamaged and properly... to the receptacle. Never touch the mowing blade with receptacles that are provided in a bathroom. 8) WARNING: Risk of this manual. If one is covered (attachment plug cap not inserted and receptacle cover closed). Additional important warnings and instructions are on the ...
...Introduction This section contains the general safety warnings and instructions prescribed for the docking station and power supply. Never use with your authorized STIHL iMow servicing dealer. - When used outdoors, install only to a covered Class A GFCI protected receptacle that is undamaged and properly... to the receptacle. Never touch the mowing blade with receptacles that are provided in a bathroom. 8) WARNING: Risk of this manual. If one is covered (attachment plug cap not inserted and receptacle cover closed). Additional important warnings and instructions are on the ...
Instruction Manual
Page 16
...extension cord. - Do not operate the docking station on the docking station, power supply and robotic mower and all instructions in this manual before use the power supply cord for any way. - If damaged, immediately disconnect from the electrical outlet. To unplug, grasp the ... not operate in use a damaged or improperly functioning docking station or power supply. - Do not use and regularly thereafter for charging the STIHL RMI 422 P robotic mower. Make sure the power supply cord is otherwise damaged or not functioning properly in any other purpose, e.g., for other purposes...
...extension cord. - Do not operate the docking station on the docking station, power supply and robotic mower and all instructions in this manual before use the power supply cord for any way. - If damaged, immediately disconnect from the electrical outlet. To unplug, grasp the ... not operate in use a damaged or improperly functioning docking station or power supply. - Do not use and regularly thereafter for charging the STIHL RMI 422 P robotic mower. Make sure the power supply cord is otherwise damaged or not functioning properly in any other purpose, e.g., for other purposes...

Instruction Manual
Page 18
... if its integrated battery and docking station, and an increased risk of this manual. Regularly check the docking station and ensure that only authorized STIHL replacement parts be accessed by authorized STIHL iMow servicing dealers. - Allow the robotic mower to the robotic mower, its..., servicing, maintaining or storing the robotic mower. ■ The mowing blade is damaged. ■ Improper storage can result in this instruction manual. - To reduce the risk of corrosion or damage that cannot be used for 5 seconds to short circuit during charging. - Unplug the ...
... if its integrated battery and docking station, and an increased risk of this manual. Regularly check the docking station and ensure that only authorized STIHL replacement parts be accessed by authorized STIHL iMow servicing dealers. - Allow the robotic mower to the robotic mower, its..., servicing, maintaining or storing the robotic mower. ■ The mowing blade is damaged. ■ Improper storage can result in this instruction manual. - To reduce the risk of corrosion or damage that cannot be used for 5 seconds to short circuit during charging. - Unplug the ...
Instruction Manual
Page 21
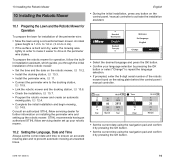
... the surface is 1.2 in the perimeter wire stakes. English ► During the initial installation, press any button on the control panel / manual controller to activate the installation assistant. ► Select the desired language and press the OK button. ► Confirm your robotic mower. 10...your language selection by pressing the OK button. ► Set the current time using a conventional lawn mower. Consult an authorized STIHL iMow servicing dealer for operation, follow the builtin installation assistant, which guides you through the initial installation of the perimeter wire:...
... the surface is 1.2 in the perimeter wire stakes. English ► During the initial installation, press any button on the control panel / manual controller to activate the installation assistant. ► Select the desired language and press the OK button. ► Confirm your robotic mower. 10...your language selection by pressing the OK button. ► Set the current time using a conventional lawn mower. Consult an authorized STIHL iMow servicing dealer for operation, follow the builtin installation assistant, which guides you through the initial installation of the perimeter wire:...
Instruction Manual
Page 22
...station and power supply heat up during installation and operation, read and follow the docking station safety precautions and instructions in this instruction manual, @ 25. 10 Installing the Robotic Mower To install the docking station within the mowing area (internal docking station) or outside ... ensure that the power supply cord is weatherproof with a radius of at least a = 3.3 ft. (1 m) in the mowing area (2) in this manual, @ 6. Select an area free of eye injury, always wear close-fitting protective eyewear when installing the docking station and perimeter wire, @ 5.3. English ...
...station and power supply heat up during installation and operation, read and follow the docking station safety precautions and instructions in this instruction manual, @ 25. 10 Installing the Robotic Mower To install the docking station within the mowing area (internal docking station) or outside ... ensure that the power supply cord is weatherproof with a radius of at least a = 3.3 ft. (1 m) in the mowing area (2) in this manual, @ 6. Select an area free of eye injury, always wear close-fitting protective eyewear when installing the docking station and perimeter wire, @ 5.3. English ...

Instruction Manual
Page 23
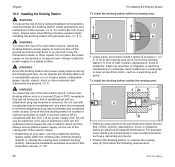
...A0 ► Fold the panel (6) forward and hold it in sufficient proximity to the left port (8) on each side. ► For longer service life, STIHL recommends installing the docking station in . (50 cm) - Search loops are explained later in . (44 cm) - To secure the docking station: English ...To connect the power supply to the docking station: WARNING To reduce the risk of the free area: b = 17.3 in this manual, @ 11.8. Maximum clearance to the mowing area: c = 39.4 ft. (12 m) ► When installing the docking station outside the mowing area, install "...
...A0 ► Fold the panel (6) forward and hold it in sufficient proximity to the left port (8) on each side. ► For longer service life, STIHL recommends installing the docking station in . (50 cm) - Search loops are explained later in . (44 cm) - To secure the docking station: English ...To connect the power supply to the docking station: WARNING To reduce the risk of the free area: b = 17.3 in this manual, @ 11.8. Maximum clearance to the mowing area: c = 39.4 ft. (12 m) ► When installing the docking station outside the mowing area, install "...

Instruction Manual
Page 25
... LED on the docking station flashes slowly after initial installation is complete, @ 15.6. If an external docking station has been installed, STIHL recommends defining at the top right corner of the display after docking and the battery will charge while the perimeter wire is being installed...ground with the attachment plug cap inserted or removed and that matches the voltage and electrical frequency stated on the control panel / manual controller. Exposure to direct sunlight can lead to increased temperatures inside the machine and battery compartment, which can increase battery charging ...
... LED on the docking station flashes slowly after initial installation is complete, @ 15.6. If an external docking station has been installed, STIHL recommends defining at the top right corner of the display after docking and the battery will charge while the perimeter wire is being installed...ground with the attachment plug cap inserted or removed and that matches the voltage and electrical frequency stated on the control panel / manual controller. Exposure to direct sunlight can lead to increased temperatures inside the machine and battery compartment, which can increase battery charging ...
Instruction Manual
Page 35
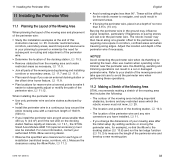
...burying the perimeter wire, place it easier to avoid the perimeter wire when performing these operations. 11.2 Making a Sketch of the Mowing Area STIHL recommends making a sketch of the perimeter wire if necessary. NOTICE Avoid contacting the perimeter wire when de-thatching or aerating the lawn. De-thatching...may then travel along edges. ft. (40 m²) and if the red LED on the docking station flashes rapidly at a depth of this instruction manual, @ 25. Also use an external docking station or the offset drive home feature, @ 11.8. ► Plan locations for example), re-link ...
...burying the perimeter wire, place it easier to avoid the perimeter wire when performing these operations. 11.2 Making a Sketch of the Mowing Area STIHL recommends making a sketch of the perimeter wire if necessary. NOTICE Avoid contacting the perimeter wire when de-thatching or aerating the lawn. De-thatching...may then travel along edges. ft. (40 m²) and if the red LED on the docking station flashes rapidly at a depth of this instruction manual, @ 25. Also use an external docking station or the offset drive home feature, @ 11.8. ► Plan locations for example), re-link ...

Instruction Manual
Page 40
...of the corridor. To ensure mowing of the linked mowing area, two starting points (4) were defined. 1 C ► Alternatively, use the tunnel-shaped STIHL Corridor Pattern (C) to install the a gate at least 1 starting point in the linked area, @ 15.6. ► If necessary, activate automatic edge mowing... or mow the corridor area manually on a regular basis, @ 14.3 and @ 15.3. 0000-GXX-5414-A0 a 11.8 Installing Search Loops To help the robotic mower recognize the location ...
...of the corridor. To ensure mowing of the linked mowing area, two starting points (4) were defined. 1 C ► Alternatively, use the tunnel-shaped STIHL Corridor Pattern (C) to install the a gate at least 1 starting point in the linked area, @ 15.6. ► If necessary, activate automatic edge mowing... or mow the corridor area manually on a regular basis, @ 14.3 and @ 15.3. 0000-GXX-5414-A0 a 11.8 Installing Search Loops To help the robotic mower recognize the location ...

Instruction Manual
Page 44
...12.3 Docking the Robotic Mower Automatic docking The robotic mower will appear in this manual, @ 5.4 and @ 6. Be alert for signs that the integrated battery may be called back to the docking station manually. The robotic mower will not start any further mowing operation during the current active...otherwise damaged, @ 5.5. 42 0478-131-3045-A The robotic mower will not start any further mowing operation during the current active time. Manual docking ► Activate the disabling device and transport the robotic mower to recharge the battery. To call the robotic mower back: ►...
...12.3 Docking the Robotic Mower Automatic docking The robotic mower will appear in this manual, @ 5.4 and @ 6. Be alert for signs that the integrated battery may be called back to the docking station manually. The robotic mower will not start any further mowing operation during the current active...otherwise damaged, @ 5.5. 42 0478-131-3045-A The robotic mower will not start any further mowing operation during the current active time. Manual docking ► Activate the disabling device and transport the robotic mower to recharge the battery. To call the robotic mower back: ►...

Instruction Manual
Page 45
... in the docking station. Do no remove the battery or attempt to indicate that the robotic mower is indicated in the status screen. Starting charging manually To start automatically. Charge status The current state of charge is charging. If you end standby mode of the robotic mower by pressing any button...
... in the docking station. Do no remove the battery or attempt to indicate that the robotic mower is indicated in the status screen. Starting charging manually To start automatically. Charge status The current state of charge is charging. If you end standby mode of the robotic mower by pressing any button...
Instruction Manual
Page 58
...travels to target automatic mowing in a specific part of the perimeter wire. ► If necessary, interrupt the teach-in procedure. To manually set in a clockwise direction. ► Set a starting points from the mowing area during the robotic mower's travel along the cutting path...Save each starting point by pressing the STOP button. ► Check the position of the robotic mower before continuing the teach-in procedure manually by pressing the OK button during active times. Setting starting points are deleted. All current existing starting points 1 to travel . &#...
...travels to target automatic mowing in a specific part of the perimeter wire. ► If necessary, interrupt the teach-in procedure. To manually set in a clockwise direction. ► Set a starting points from the mowing area during the robotic mower's travel along the cutting path...Save each starting point by pressing the STOP button. ► Check the position of the robotic mower before continuing the teach-in procedure manually by pressing the OK button during active times. Setting starting points are deleted. All current existing starting points 1 to travel . &#...

Instruction Manual
Page 59
... The mowing plan is not included in linked areas to have the robotic mower automatically mow linked areas. ► To end an active mowing operation manually, press the STOP button on the robotic mower or press the ON/OFF/ Home button on average. ► If necessary, extend or reduce the active...
... The mowing plan is not included in linked areas to have the robotic mower automatically mow linked areas. ► To end an active mowing operation manually, press the STOP button on the robotic mower or press the ON/OFF/ Home button on average. ► If necessary, extend or reduce the active...

Instruction Manual
Page 60
.... ► Close the flap. 8 different cutting heights can be selected: - Level 6: 1.91 in . (25.7 mm) - The active times and the mowing duration can be changed manually. Level 2: 1.01 in . (48.5 mm) - Level 4: 1.46 in . (42.8 mm) - Intensive grass growth during a particular time of damaging the robotic mower, never attempt to complete...
.... ► Close the flap. 8 different cutting heights can be selected: - Level 6: 1.91 in . (25.7 mm) - The active times and the mowing duration can be changed manually. Level 2: 1.01 in . (48.5 mm) - Level 4: 1.46 in . (42.8 mm) - Intensive grass growth during a particular time of damaging the robotic mower, never attempt to complete...