

Instruction Manual
Page 2
...Buffers 68 Buffers on Machines with Manual Fuel Pump 85 12.5 Carburetor 88 12.5.1 Leakage Test 89 RA_737_00_01_01 MS 231, MS 231 C, MS 251, MS 251 C q © ANDREAS STIHL AG & Co. Models with QuickStop Super 24 5.4.1 Adjusting the brake cable 26 5.4.2...System Troubleshooting 55 8. Engine 32 6.1 6.2 6.2.1 6.2.2 6.2.3 6.3 6.3.1 6.3.2 6.4 6.5 6.6 6.7 6.8 6.9 Muffler 32 Leakage Test 33 Preparations 33 Vacuum Test 34 Pressure Test 34 Oil Seals 35 Ignition side 35 Clutch side 36 Shroud 36 Engine 37 Cylinder / Crankshaft 38 Bearings / Crankshaft 41 ...
...Buffers 68 Buffers on Machines with Manual Fuel Pump 85 12.5 Carburetor 88 12.5.1 Leakage Test 89 RA_737_00_01_01 MS 231, MS 231 C, MS 251, MS 251 C q © ANDREAS STIHL AG & Co. Models with QuickStop Super 24 5.4.1 Adjusting the brake cable 26 5.4.2...System Troubleshooting 55 8. Engine 32 6.1 6.2 6.2.1 6.2.2 6.2.3 6.3 6.3.1 6.3.2 6.4 6.5 6.6 6.7 6.8 6.9 Muffler 32 Leakage Test 33 Preparations 33 Vacuum Test 34 Pressure Test 34 Oil Seals 35 Ignition side 35 Clutch side 36 Shroud 36 Engine 37 Cylinder / Crankshaft 38 Bearings / Crankshaft 41 ...
Instruction Manual
Page 3
... Carburetor 95 12.7.1 Basic Setting 95 12.7.2 Standard setting 96 12.8 Carburetor Carrier 97 12.9 Intake Manifold 98 12.10 Tank Vent 99 12.10.1 Testing 99 12.10.2 Removing and Installing 100 12.11 Fuel Intake 101 12.11.1 Pickup Body 101 12.11.2 Fuel Hose 101 12.11.3 Fuel... Hoses - Special Servicing Tools 110 14. Manual Fuel Pump 105 12.11.4 Manual Fuel Pump 107 12.11.5 Tank Housing 108 13. Servicing Aids 112 2 MS 231, MS 231 C, MS 251, MS 251 C
... Carburetor 95 12.7.1 Basic Setting 95 12.7.2 Standard setting 96 12.8 Carburetor Carrier 97 12.9 Intake Manifold 98 12.10 Tank Vent 99 12.10.1 Testing 99 12.10.2 Removing and Installing 100 12.11 Fuel Intake 101 12.11.1 Pickup Body 101 12.11.2 Fuel Hose 101 12.11.3 Fuel... Hoses - Special Servicing Tools 110 14. Manual Fuel Pump 105 12.11.4 Manual Fuel Pump 107 12.11.5 Tank Housing 108 13. Servicing Aids 112 2 MS 231, MS 231 C, MS 251, MS 251 C
Instruction Manual
Page 5
Always perform leakage test after removal. Always replace damaged parts. The specifications must be ... Check disassembled parts for wear or damage before carrying out repairs or mounting the machine to overheating. 4 MS 231, MS 231 C, MS 251, MS 251 C Do not re-use sharp-edged pliers, screwdrivers, etc. Other press fluids are heated for servicing...manual. Always install new hoses - fuel hoses can cause serious or fatal accidents. Run the machine only with STIHL press fluid and then push the new hoses on the ignition system. Gasoline is otherwise a risk of injury ...
Always perform leakage test after removal. Always replace damaged parts. The specifications must be ... Check disassembled parts for wear or damage before carrying out repairs or mounting the machine to overheating. 4 MS 231, MS 231 C, MS 251, MS 251 C Do not re-use sharp-edged pliers, screwdrivers, etc. Other press fluids are heated for servicing...manual. Always install new hoses - fuel hoses can cause serious or fatal accidents. Run the machine only with STIHL press fluid and then push the new hoses on the ignition system. Gasoline is otherwise a risk of injury ...
Instruction Manual
Page 6
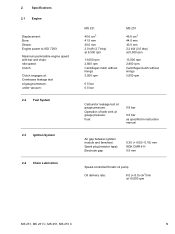
...Clutch engages at: Crankcase leakage test at gauge pressure: under vacuum: 2.2 Fuel System 2.3 Ignition System 2.4 Chain Lubrication MS 231 40.6 cm3 41.5 mm 30.0 mm 2.0 kW (2.7 bhp) at 9,500 rpm 13,000 rpm 2,800 rpm Centrifugal clutch without linings 3,500 rpm 0.5 bar 0.5 bar MS 251 45.6 cm3 44.0 mm 30....0 mm 2.2 kW (3.0 bhp) at 9,500 rpm 13,000 rpm 2,800 rpm Centrifugal clutch without linings 3,500 rpm Carburetor leakage test at gauge pressure: Operation of tank vent at gauge pressure: Fuel: ...
...Clutch engages at: Crankcase leakage test at gauge pressure: under vacuum: 2.2 Fuel System 2.3 Ignition System 2.4 Chain Lubrication MS 231 40.6 cm3 41.5 mm 30.0 mm 2.0 kW (2.7 bhp) at 9,500 rpm 13,000 rpm 2,800 rpm Centrifugal clutch without linings 3,500 rpm 0.5 bar 0.5 bar MS 251 45.6 cm3 44.0 mm 30....0 mm 2.2 kW (3.0 bhp) at 9,500 rpm 13,000 rpm 2,800 rpm Centrifugal clutch without linings 3,500 rpm Carburetor leakage test at gauge pressure: Operation of tank vent at gauge pressure: Fuel: ...
Instruction Manual
Page 34
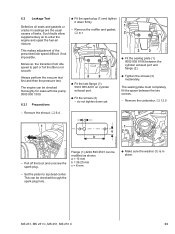
... the usual causes of the prescribed idle speed difficult, if not impossible. 2310RA072 TG 2310RA074 TG 6.2 Leakage Test Defective oil seals and gaskets or cracks in place. 2310RA079 TG a 2710RA164 TG 2310RA073 TG MS 231, MS 231 C, MS 251, MS 251 C 33 This makes adjustment of leaks. Remove the carburetor, b 12.5 - The sealing plate must completely fill...
... the usual causes of the prescribed idle speed difficult, if not impossible. 2310RA072 TG 2310RA074 TG 6.2 Leakage Test Defective oil seals and gaskets or cracks in place. 2310RA079 TG a 2710RA164 TG 2310RA073 TG MS 231, MS 231 C, MS 251, MS 251 C 33 This makes adjustment of leaks. Remove the carburetor, b 12.5 - The sealing plate must completely fill...
Instruction Manual
Page 35
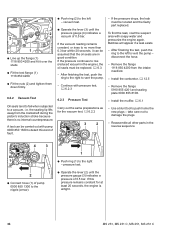
... 2310RA075 TG : Push ring (2) to a vacuum, i.e. Use a blunt tool to vent the pump - To find the leak, coat the suspect area with pressure test, b 6.2.3 6.2.3 Pressure Test Carry out the same preparations as for at least 20 seconds, the engine is no more than 0.3 bar within 20 seconds, it over the studs...pressure continues to the right - Remove the flange 1118 850 4200 from the crankshaft during the piston's induction stroke because there is airtight. 34 MS 231, MS 231 C, MS 251, MS 251 C 2 2 1 : Line up the flange (1) 1118 850 4200 and fit it can be replaced, b 6.3. -
... 2310RA075 TG : Push ring (2) to a vacuum, i.e. Use a blunt tool to vent the pump - To find the leak, coat the suspect area with pressure test, b 6.2.3 6.2.3 Pressure Test Carry out the same preparations as for at least 20 seconds, the engine is no more than 0.3 bar within 20 seconds, it over the studs...pressure continues to the right - Remove the flange 1118 850 4200 from the crankshaft during the piston's induction stroke because there is airtight. 34 MS 231, MS 231 C, MS 251, MS 251 C 2 2 1 : Line up the flange (1) 1118 850 4200 and fit it can be replaced, b 6.3. -
Instruction Manual
Page 39
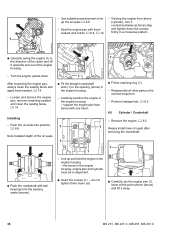
... pry the engine pan (1) loose at the point shown (arrow) and lift it away. 38 MS 231, MS 231 C, MS 251, MS 251 C Loosen and remove the engine pan, remove remaining sealant and clean the sealing faces, b 14 Installing - Perform leakage test, b 6.2 6.6 Cylinder / Crankshaft - support the engine pan from above (cylinder), turn it upwards and out of...
... pry the engine pan (1) loose at the point shown (arrow) and lift it away. 38 MS 231, MS 231 C, MS 251, MS 251 C Loosen and remove the engine pan, remove remaining sealant and clean the sealing faces, b 14 Installing - Perform leakage test, b 6.2 6.6 Cylinder / Crankshaft - support the engine pan from above (cylinder), turn it upwards and out of...

Instruction Manual
Page 46
... : Disconnect terminal (1) of an ignition module (1) and flywheel (2). MS 231, MS 231 C, MS 251, MS 251 C 45 There are in the workshop is limited to control ignition timing. Reassemble in the reverse sequence. 7.3 Install new ignition module Testing in good condition). - Remove the ignition module. Remove the fan ...are two electrical connections on the ignition system. The ignition module accommodates all the components required to a spark test. A new ignition module must be adjusted during operation. 7.2 Preseparator - Ignition System Exercise extreme caution when ...
... : Disconnect terminal (1) of an ignition module (1) and flywheel (2). MS 231, MS 231 C, MS 251, MS 251 C 45 There are in the workshop is limited to control ignition timing. Reassemble in the reverse sequence. 7.3 Install new ignition module Testing in good condition). - Remove the ignition module. Remove the fan ...are two electrical connections on the ignition system. The ignition module accommodates all the components required to a spark test. A new ignition module must be adjusted during operation. 7.2 Preseparator - Ignition System Exercise extreme caution when ...
Instruction Manual
Page 48
... lead and spark plug boot must face outwards. : Connect the short circuit wire terminal (1) - Note installed position of electric shock. - MS 231, MS 231 C, MS 251, MS 251 C 47 1 a 2 The ignition test refers only to a 1 spark test, not to the air guide shroud. : Push the ignition lead (2) fully into the guide so that "a" is in the reverse sequence...
... lead and spark plug boot must face outwards. : Connect the short circuit wire terminal (1) - Note installed position of electric shock. - MS 231, MS 231 C, MS 251, MS 251 C 47 1 a 2 The ignition test refers only to a 1 spark test, not to the air guide shroud. : Push the ignition lead (2) fully into the guide so that "a" is in the reverse sequence...

Instruction Manual
Page 49
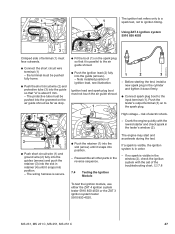
... of the guides, b 7.3 - If the ignition module is visible in the window (3), the ignition system is damaged. - Crank the engine quickly with STIHL press fluid, b 14 : Hold the ignition lead and leg spring together and push them into the pierced hole in order. - Pull the boot off... : Pinch the hook of the leg spring into the spark plug boot. 48 MS 231, MS 231 C, MS 251, MS 251 C Using the ZAT 3 ignition tester 5910 850 4520 1 - Unhook the leg spring from the ignition lead. - Before starting the test, install a new spark plug in the cylinder and tighten it in the tester...
... of the guides, b 7.3 - If the ignition module is visible in the window (3), the ignition system is damaged. - Crank the engine quickly with STIHL press fluid, b 14 : Hold the ignition lead and leg spring together and push them into the pierced hole in order. - Pull the boot off... : Pinch the hook of the leg spring into the spark plug boot. 48 MS 231, MS 231 C, MS 251, MS 251 C Using the ZAT 3 ignition tester 5910 850 4520 1 - Unhook the leg spring from the ignition lead. - Before starting the test, install a new spark plug in the cylinder and tighten it in the tester...

Instruction Manual
Page 51
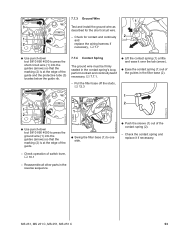
...and ground wire (4) out of the guides (arrows). 2310RA132 TG 3 : Disconnect terminal (1) of the guides (arrows) in the air guide shroud. 50 MS 231, MS 231 C, MS 251, MS 251 C Set the Master Control lever to ground (3) and the short circuit wire's terminal (1). 2310RA130 TG - Reassemble in the reverse sequence. 7.7.2 Removing and... 7.7.2. Remove the shroud, b 6.4 - 7.7 Short Circuit Wire The ground and short circuit wires are in order, check the short circuit wire. 7.7.1 Testing - Pull the carburetor towards the control handle - take care not to be 2 about 0 Ω.
...and ground wire (4) out of the guides (arrows). 2310RA132 TG 3 : Disconnect terminal (1) of the guides (arrows) in the air guide shroud. 50 MS 231, MS 231 C, MS 251, MS 251 C Set the Master Control lever to ground (3) and the short circuit wire's terminal (1). 2310RA130 TG - Reassemble in the reverse sequence. 7.7.2 Removing and... 7.7.2. Remove the shroud, b 6.4 - 7.7 Short Circuit Wire The ground and short circuit wires are in order, check the short circuit wire. 7.7.1 Testing - Pull the carburetor towards the control handle - take care not to be 2 about 0 Ω.
Instruction Manual
Page 54
...and replace it over the tab (arrow). : Ease the contact spring (1) out of the guides in the contact spring's loop, perform contact and continuity test if necessary, b 7.7.1. - Reassemble all other parts in the reverse sequence. 1 2 : Push the sleeve (1) out of the guide and the ...contact spring (2). - Pull the filter base off the studs, b 12.3 : Lift the contact spring (1) a little and ease it if necessary, MS 231, MS 231 C, MS 251, MS 251 C 53 Check operation of the guide. : Swing the filter base (1) to press the ground wire (1) into the guides (arrows) so that the...
...and replace it over the tab (arrow). : Ease the contact spring (1) out of the guides in the contact spring's loop, perform contact and continuity test if necessary, b 7.7.1. - Reassemble all other parts in the reverse sequence. 1 2 : Push the sleeve (1) out of the guide and the ...contact spring (2). - Pull the filter base off the studs, b 12.3 : Lift the contact spring (1) a little and ease it if necessary, MS 231, MS 231 C, MS 251, MS 251 C 53 Check operation of the guide. : Swing the filter base (1) to press the ground wire (1) into the guides (arrows) so that the...
Instruction Manual
Page 56
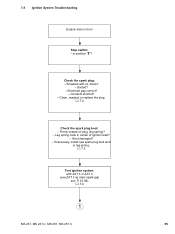
Check the spark plug: - Sooted? - in center of ignition lead? - Smeared with ZAT 3 or ZAT 4 (use ZAT 3 as main spark gap see TI 32.94), b 7.4 1 MS 231, MS 231 C, MS 251, MS 251 C 55 Clean, readjust or replace the plug, b 7.4 Check the spark plug boot: - Contacts shorted? - Electrode gap correct? - Firmly seated on plug (leg spring)? - If necessary, install new spark plug boot and/ or leg spring, b 7.5 Test ignition system: with oil, black? - Boot damaged? - 7.8 Ignition System Troubleshooting Engine does not run Stop switch: - Leg spring hook in position "F"?
Check the spark plug: - Sooted? - in center of ignition lead? - Smeared with ZAT 3 or ZAT 4 (use ZAT 3 as main spark gap see TI 32.94), b 7.4 1 MS 231, MS 231 C, MS 251, MS 251 C 55 Clean, readjust or replace the plug, b 7.4 Check the spark plug boot: - Contacts shorted? - Electrode gap correct? - Firmly seated on plug (leg spring)? - If necessary, install new spark plug boot and/ or leg spring, b 7.5 Test ignition system: with oil, black? - Boot damaged? - 7.8 Ignition System Troubleshooting Engine does not run Stop switch: - Leg spring hook in position "F"?
Instruction Manual
Page 90
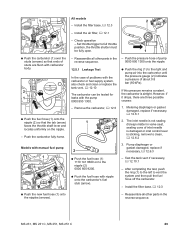
...the throttle shutter must be tested for leaks with nipple onto the carburetor's fuel stub (arrow). - Push the carburetor fully home. The inlet needle is not sealing (foreign matter in valve seat, sealing cone of studs are three possible causes: - MS 231, MS 231 C, MS 251, MS 251 C 89 Install the air... (1) to clean, b 12.6.2 2310RA254 TG 3. Push the pressure hose of pump reverse sequence. 0000 850 1300 onto the nipple. 12.5.1 Leakage Test In the case of about 0.8 bar (80 kPa). Remove the carburetor, b 12.5 1. Reassemble all other parts in the - Reassemble all other...
...the throttle shutter must be tested for leaks with nipple onto the carburetor's fuel stub (arrow). - Push the carburetor fully home. The inlet needle is not sealing (foreign matter in valve seat, sealing cone of studs are three possible causes: - MS 231, MS 231 C, MS 251, MS 251 C 89 Install the air... (1) to clean, b 12.6.2 2310RA254 TG 3. Push the pressure hose of pump reverse sequence. 0000 850 1300 onto the nipple. 12.5.1 Leakage Test In the case of about 0.8 bar (80 kPa). Remove the carburetor, b 12.5 1. Reassemble all other parts in the - Reassemble all other...
Instruction Manual
Page 100
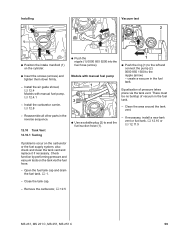
.... - Check function by performing pressure and vacuum tests on the carburetor or the fuel supply system, also check and clean the tank vent and replace it if necessary. Close the tank cap. - Remove the carburetor, b 12.5 MS 231, MS 231 C, MS 251, MS 251 C 99 Models with manual fuel pump, b .... : Insert the screws (arrows) and tighten them down firmly. - Reassemble all other parts in the reverse sequence. 12.10 Tank Vent 12.10.1 Testing 2310RA360 TG 1 : Push the nipple (1) 0000 855 9200 into the fuel hose (arrow). Install the air guide shroud, b 12.4 Models with manual...
.... - Check function by performing pressure and vacuum tests on the carburetor or the fuel supply system, also check and clean the tank vent and replace it if necessary. Close the tank cap. - Remove the carburetor, b 12.5 MS 231, MS 231 C, MS 251, MS 251 C 99 Models with manual fuel pump, b .... : Insert the screws (arrows) and tighten them down firmly. - Reassemble all other parts in the reverse sequence. 12.10 Tank Vent 12.10.1 Testing 2310RA360 TG 1 : Push the nipple (1) 0000 855 9200 into the fuel hose (arrow). Install the air guide shroud, b 12.4 Models with manual...
Instruction Manual
Page 101
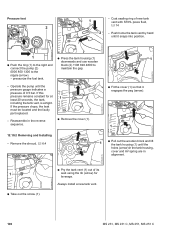
... airtight. Remove the shroud, b 6.4 1 : Pull out the wooden block and lift the tank housing (1) until the pressure gauge indicates a pressure of new tank 1 vent with STIHL press fluid, b 14 2 - If this pressure remains constant for leverage. pressurize the fuel tank. : Press the tank housing (1) downwards and use wooden block (2) 1108 893... 2310RA369 TG 1 : Push the ring (1) to the right and connect the pump (2) 0000 850 1300 to maintain the gap. - Always install a new tank vent. 100 MS 231, MS 231 C, MS 251, MS 251 C Pressure test 2 -
... airtight. Remove the shroud, b 6.4 1 : Pull out the wooden block and lift the tank housing (1) until the pressure gauge indicates a pressure of new tank 1 vent with STIHL press fluid, b 14 2 - If this pressure remains constant for leverage. pressurize the fuel tank. : Press the tank housing (1) downwards and use wooden block (2) 1108 893... 2310RA369 TG 1 : Push the ring (1) to the right and connect the pump (2) 0000 850 1300 to maintain the gap. - Always install a new tank vent. 100 MS 231, MS 231 C, MS 251, MS 251 C Pressure test 2 -

Instruction Manual
Page 111
...Special Tools No. Description 1 Carburetor and engine tester - Description 1 Punch-down screws with electric or pneumatic screwdrivers; Hose for leakage test 2 Sealing plate 3 Installing tool 4 Locking strip 5 Screwdriver bit, T 27 x 125 6 Wooden assembly block 7 Assembly drift 8 Setting .../ignition side) Spark plug 1) Protecting the oil seal (ignition side) Clamping machine to assembly stand Testing ignition system Testing ignition system 110 MS 231, MS 231 C, MS 251, MS 251 C tightening down tool Part No. 5910 890 4000 Application Fitting electrical wires in guides Rem. 13...
...Special Tools No. Description 1 Carburetor and engine tester - Description 1 Punch-down screws with electric or pneumatic screwdrivers; Hose for leakage test 2 Sealing plate 3 Installing tool 4 Locking strip 5 Screwdriver bit, T 27 x 125 6 Wooden assembly block 7 Assembly drift 8 Setting .../ignition side) Spark plug 1) Protecting the oil seal (ignition side) Clamping machine to assembly stand Testing ignition system Testing ignition system 110 MS 231, MS 231 C, MS 251, MS 251 C tightening down tool Part No. 5910 890 4000 Application Fitting electrical wires in guides Rem. 13...
Instruction Manual
Page 112
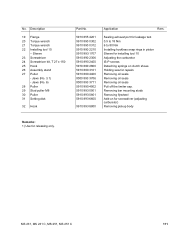
Jaws (No. 3.1) - Sealing exhaust port for leakage test 0.5 to 18 Nm 6 to 80 Nm Installing hookless snap rings in piston Sleeve for installing tool 10 Adjusting the carburetor IS-P screws Detaching springs on ... screwdriver (adjusting carburetor) Removing pickup body Remarks: 1) Use for repairs Removing oil seals Removing oil seals Removing oil seals Pull off the limiter cap. MS 231, MS 231 C, MS 251, MS 251 C 111 Description 19 Flange 20 Torque wrench 21 Torque wrench 22 Installing tool 10 - Jaws (No. 6) 28 Puller 29 Stud puller M8 30 Puller...
Jaws (No. 3.1) - Sealing exhaust port for leakage test 0.5 to 18 Nm 6 to 80 Nm Installing hookless snap rings in piston Sleeve for installing tool 10 Adjusting the carburetor IS-P screws Detaching springs on ... screwdriver (adjusting carburetor) Removing pickup body Remarks: 1) Use for repairs Removing oil seals Removing oil seals Removing oil seals Pull off the limiter cap. MS 231, MS 231 C, MS 251, MS 251 C 111 Description 19 Flange 20 Torque wrench 21 Torque wrench 22 Installing tool 10 - Jaws (No. 6) 28 Puller 29 Stud puller M8 30 Puller...
