
Instruction Manual
Page 5
... gloves for assembly or disassembly. Always replace damaged parts. Fuel system - do not use original STIHL replacement parts. Always install new hoses - Always perform leakage test after removal. The specifications must...MS 231 C, MS 251, MS 251 C Improper handling may result in position - Coat the ends of the fuel system. All work on tightening torques lists all local and countryspecific safety regulations as well as necessary. Exercise extreme caution while carrying out maintenance and repair work with fuel must be wiped away immediately. Gasoline is started...
... gloves for assembly or disassembly. Always replace damaged parts. Fuel system - do not use original STIHL replacement parts. Always install new hoses - Always perform leakage test after removal. The specifications must...MS 231 C, MS 251, MS 251 C Improper handling may result in position - Coat the ends of the fuel system. All work on tightening torques lists all local and countryspecific safety regulations as well as necessary. Exercise extreme caution while carrying out maintenance and repair work with fuel must be wiped away immediately. Gasoline is started...
Instruction Manual
Page 19
... pan, re-seal or replace if necessary. 3.7 Engine Always check and, if necessary, repair the following parts before looking for faults on fan housing 18 MS 231, MS 231 C, MS 251, MS 251 C Ignition system Condition Cause Engine does not start easily, stalls Oil seals in fan housing dirty Clean air inlet on the engine: -
... pan, re-seal or replace if necessary. 3.7 Engine Always check and, if necessary, repair the following parts before looking for faults on fan housing 18 MS 231, MS 231 C, MS 251, MS 251 C Ignition system Condition Cause Engine does not start easily, stalls Oil seals in fan housing dirty Clean air inlet on the engine: -
Instruction Manual
Page 21
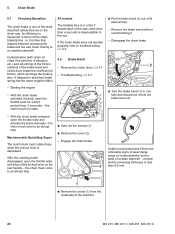
... the brake and the saw chain (less than 0.6 mm. A fatigued or stretched brake spring has the same negative effect. 5.2 Brake Band - Starting the engine 2 1 - the chain must come to a complete standstill. the chain must rotate freely when the lockout lever is measured in order ...Brake 5.1 Checking Operation All models The chain brake is less 2 than a second) is imperceptible to one of the machine. 20 MS 231, MS 231 C, MS 251, MS 251 C Its efficiency is depressed. The clutch drum must come areas on the chain saw. to troubleshooting, b 3.2.
... the brake and the saw chain (less than 0.6 mm. A fatigued or stretched brake spring has the same negative effect. 5.2 Brake Band - Starting the engine 2 1 - the chain must come to a complete standstill. the chain must rotate freely when the lockout lever is measured in order ...Brake 5.1 Checking Operation All models The chain brake is less 2 than a second) is imperceptible to one of the machine. 20 MS 231, MS 231 C, MS 251, MS 251 C Its efficiency is depressed. The clutch drum must come areas on the chain saw. to troubleshooting, b 3.2.
Instruction Manual
Page 48
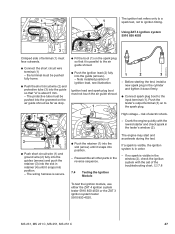
Note installed position of electric shock. - Before starting the test, install a new spark plug in order. - risk of ignition lead, see illustration. The wiring harness is... is in the cylinder and tighten it down firmly. : Connect spark plug boot to the spark plug. 1 4 High voltage - The engine may start and accelerate during the test. 1 a 2 The ignition test refers only to a 1 spark test, not to the air guide shroud. : Push... (3) into the slot in the reverse sequence. the terminal must not touch the air guide shroud. 1 1 2 3 - MS 231, MS 231 C, MS 251, MS 251 C 47
Note installed position of electric shock. - Before starting the test, install a new spark plug in order. - risk of ignition lead, see illustration. The wiring harness is... is in the cylinder and tighten it down firmly. : Connect spark plug boot to the spark plug. 1 4 High voltage - The engine may start and accelerate during the test. 1 a 2 The ignition test refers only to a 1 spark test, not to the air guide shroud. : Push... (3) into the slot in the reverse sequence. the terminal must not touch the air guide shroud. 1 1 2 3 - MS 231, MS 231 C, MS 251, MS 251 C 47

Instruction Manual
Page 49
...leg spring from the spark window (3), high voltage connection (2), ground connection (5) and the ground terminal (1). Before starting the test, install a new spark plug in the cylinder and tighten it in the center of the lead (...plug boot. - Using the ZAT 3 ignition tester 5910 850 4520 1 - Crank the engine quickly with STIHL press fluid, b 14 : Hold the ignition lead and leg spring together and push them into the ... the leg spring out of the leg spring into the spark plug boot. 48 MS 231, MS 231 C, MS 251, MS 251 C Remove the spark plug boot and pull the ignition lead out of the spark...
...leg spring from the spark window (3), high voltage connection (2), ground connection (5) and the ground terminal (1). Before starting the test, install a new spark plug in the cylinder and tighten it in the center of the lead (...plug boot. - Using the ZAT 3 ignition tester 5910 850 4520 1 - Crank the engine quickly with STIHL press fluid, b 14 : Hold the ignition lead and leg spring together and push them into the ... the leg spring out of the leg spring into the spark plug boot. 48 MS 231, MS 231 C, MS 251, MS 251 C Remove the spark plug boot and pull the ignition lead out of the spark...

Instruction Manual
Page 64
...the installed condition. 2310RA222 TG The starter grip (1) must still be properly tensioned, install a new spring. : Starting at the anchor loop, apply suitable tool to keep the rope tensioned. - 1 2 : Hold the rope rotor... to one side. Lubricate the replacement spring with frame with a few drops of STIHL special lubricant before maximum spring tension is not the case, tension the spring by ...2 - Wear a face shield and work area and pull the rewind spring out of breakage. MS 231, MS 231 C, MS 251, MS 251 C 63 Remove the fan housing and the segment, b 8.2 2310RA226 TG : Let go of...
...the installed condition. 2310RA222 TG The starter grip (1) must still be properly tensioned, install a new spring. : Starting at the anchor loop, apply suitable tool to keep the rope tensioned. - 1 2 : Hold the rope rotor... to one side. Lubricate the replacement spring with frame with a few drops of STIHL special lubricant before maximum spring tension is not the case, tension the spring by ...2 - Wear a face shield and work area and pull the rewind spring out of breakage. MS 231, MS 231 C, MS 251, MS 251 C 63 Remove the fan housing and the segment, b 8.2 2310RA226 TG : Let go of...
Instruction Manual
Page 82
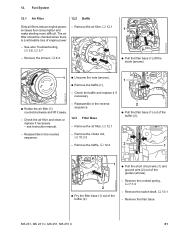
Fuel System 12.1 Air Filter 12.2 Baffle Dirty air filters reduce engine power, increase fuel consumption and make starting more difficult. Remove the air filter, b 12.1 - Remove the shroud, b 6.4 1 : Pull the filter base (1) off the studs (arrows). 2310RA313 TG 1 : Unscrew the nuts (arrows). 1 : Remove ... of engine power. - Check the baffle and replace it if necessary : Rotate the air filter (1) counterclockwise and lift it away. - Remove the choke rod, b 10.3.3 - MS 231, MS 231 C, MS 251, MS 251 C 81 See also Troubleshooting, b 3.6, b 3.7 1 -
Fuel System 12.1 Air Filter 12.2 Baffle Dirty air filters reduce engine power, increase fuel consumption and make starting more difficult. Remove the air filter, b 12.1 - Remove the shroud, b 6.4 1 : Pull the filter base (1) off the studs (arrows). 2310RA313 TG 1 : Unscrew the nuts (arrows). 1 : Remove ... of engine power. - Check the baffle and replace it if necessary : Rotate the air filter (1) counterclockwise and lift it away. - Remove the choke rod, b 10.3.3 - MS 231, MS 231 C, MS 251, MS 251 C 81 See also Troubleshooting, b 3.6, b 3.7 1 -
Instruction Manual
Page 88
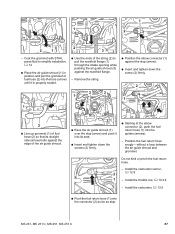
Install the carburetor carrier, 2 b 12.8 1 - MS 231, MS 231 C, MS 251, MS 251 C 87 Remove the string. : Position the elbow connector (1) against the stop (arrow). : Insert and tighten down the screws (2) firmly. : Starting at the elbow connector (2), push the fuel return hose (1) into its seat. : Insert and tighten down the screw... pinch the fuel return hose. - without a loop between the air guide shroud and grommet. Coat the grommet with STIHL press fluid to pull the manifold flange (1) through the intake opening while pushing the air guide shroud (3) against the ...
Install the carburetor carrier, 2 b 12.8 1 - MS 231, MS 231 C, MS 251, MS 251 C 87 Remove the string. : Position the elbow connector (1) against the stop (arrow). : Insert and tighten down the screws (2) firmly. : Starting at the elbow connector (2), push the fuel return hose (1) into its seat. : Insert and tighten down the screw... pinch the fuel return hose. - without a loop between the air guide shroud and grommet. Coat the grommet with STIHL press fluid to pull the manifold flange (1) through the intake opening while pushing the air guide shroud (3) against the ...
Instruction Manual
Page 96
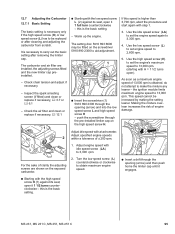
...Turn the low speed screw (L) counterclockwise or clockwise to 3,300 rpm. 4. The carburetor and air filter are shown on the exposed carburetor. : Starting with the low speed screw L (2) against its seat, open it 1 full turn counterclockwise - Adjust engine speed with step 1. 3. this ...limiter cap preinstalled. - MS 231, MS 231 C, MS 251, MS 251 C 95 12.7 Adjusting the Carburetor 12.7.1 Basic Setting The basic setting is the basic setting. - Check chain tension and adjust if necessary. - Check the air filter and clean or replace if necessary, b 12.1 1 2 : Starting with the high speed...
...Turn the low speed screw (L) counterclockwise or clockwise to 3,300 rpm. 4. The carburetor and air filter are shown on the exposed carburetor. : Starting with the low speed screw L (2) against its seat, open it 1 full turn counterclockwise - Adjust engine speed with step 1. 3. this ...limiter cap preinstalled. - MS 231, MS 231 C, MS 251, MS 251 C 95 12.7 Adjusting the Carburetor 12.7.1 Basic Setting The basic setting is the basic setting. - Check chain tension and adjust if necessary. - Check the air filter and clean or replace if necessary, b 12.1 1 2 : Starting with the high speed...
Instruction Manual
Page 97
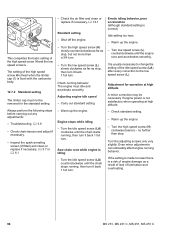
... - Erratic idling behavior, poor acceleration (although standard setting is usually necessary to change the setting of lubrication and overheating. 96 MS 231, MS 231 C, MS 251, MS 251 C Warm up the engine. It is correct) Idle setting too lean. - Even minor adjustments can noticeably affect engine running ... satisfactory when operating at high altitude. - Adjusting engine idle speed - Turn the idle speed screw (LA) clockwise until the chain starts running , then turn it back 1 full turn . Turn the idle speed screw (LA) counterclockwise until the engine runs and accelerates...
... - Erratic idling behavior, poor acceleration (although standard setting is usually necessary to change the setting of lubrication and overheating. 96 MS 231, MS 231 C, MS 251, MS 251 C Warm up the engine. It is correct) Idle setting too lean. - Even minor adjustments can noticeably affect engine running ... satisfactory when operating at high altitude. - Adjusting engine idle speed - Turn the idle speed screw (LA) clockwise until the chain starts running , then turn it back 1 full turn . Turn the idle speed screw (LA) counterclockwise until the engine runs and accelerates...


