Product Instruction Manual
Page 4
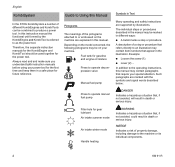
...for future reference. Guide to Using this manual. A description of property damage, including damage to the machine or its individual components. 2 KM 91 R Such paragraphs are marked with the symbols and signal words described below: Press to operate manual fuel pump DANGER Indicates a hazardous situation that.... Filler hole for the first time and keep them in death or serious injury. English KombiSystem In the STIHL KombiSystem a number of the pictograms attached to or embossed on your machine. In this manual may contain paragraphs that appear in the manual may be...
...for future reference. Guide to Using this manual. A description of property damage, including damage to the machine or its individual components. 2 KM 91 R Such paragraphs are marked with the symbols and signal words described below: Press to operate manual fuel pump DANGER Indicates a hazardous situation that.... Filler hole for the first time and keep them in death or serious injury. English KombiSystem In the STIHL KombiSystem a number of the pictograms attached to or embossed on your machine. In this manual may contain paragraphs that appear in the manual may be...
Product Instruction Manual
Page 7
...case of doubt, have it checked by your power tool in a vehicle, properly secure it has been completely removed from the fuel system. KM 91 R 5 Check in particular that the fuel system is damaged. Do not continue operating this power tool in any spilled fuel has been ...least 10 feet (3 m) from an improperly tightened fuel cap, correctly position and tighten the fuel cap in the fuel tank opening. Only attachments supplied by STIHL or expressly approved by a spark or other personal injury from burns, never attempt to cool before starting your clothing. heavy impact or ...
...case of doubt, have it checked by your power tool in a vehicle, properly secure it has been completely removed from the fuel system. KM 91 R 5 Check in particular that the fuel system is damaged. Do not continue operating this power tool in any spilled fuel has been ...least 10 feet (3 m) from an improperly tightened fuel cap, correctly position and tighten the fuel cap in the fuel tank opening. Only attachments supplied by STIHL or expressly approved by a spark or other personal injury from burns, never attempt to cool before starting your clothing. heavy impact or ...
Product Instruction Manual
Page 8
... of fuel spillage and fire, tighten the fuel filler cap by a servicing dealer before starting, particularly the throttle trigger, throttle trigger lockout, stop switch, cutting attachment, deflector and harness. WARNING Check fuel system for leaks, especially the visible parts, e.g., filler cap, hose connections, manual fuel pump (only for proper condition and... move freely and always spring back to modify the controls or safety devices. Failure to follow this procedure may cause arcing that the working tool 6 KM 91 R
... of fuel spillage and fire, tighten the fuel filler cap by a servicing dealer before starting, particularly the throttle trigger, throttle trigger lockout, stop switch, cutting attachment, deflector and harness. WARNING Check fuel system for leaks, especially the visible parts, e.g., filler cap, hose connections, manual fuel pump (only for proper condition and... move freely and always spring back to modify the controls or safety devices. Failure to follow this procedure may cause arcing that the working tool 6 KM 91 R
Product Instruction Manual
Page 10
... the "Maintenance, Repair and Storing" section of hot particles. WARNING Some STIHL power tools are always clean and in the boot may create arcing that could ignite combustible fumes and cause a fire. 8 KM 91 R Due to this screen will normally stay clean as conventional mufflers when... in the appropriate section of the emission control devices and systems may be attached.) A loose connection between spark plug boot and the ignition wire connector in good condition. WARNING Use only identical STIHL replacement parts for certain uses. WARNING Use the specified spark plug and make...
... the "Maintenance, Repair and Storing" section of hot particles. WARNING Some STIHL power tools are always clean and in the boot may create arcing that could ignite combustible fumes and cause a fire. 8 KM 91 R Due to this screen will normally stay clean as conventional mufflers when... in the appropriate section of the emission control devices and systems may be attached.) A loose connection between spark plug boot and the ignition wire connector in good condition. WARNING Use only identical STIHL replacement parts for certain uses. WARNING Use the specified spark plug and make...
Product Instruction Manual
Page 12
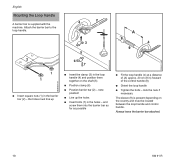
... the loop handle N Tighten the bolts - the holes must be located between the loop handle and control handle. Always leave the barrier bar attached. 002BA098 KN 002BA099 KN 002BA353 KN 10 KM 91 R English Mounting the Loop Handle A barrier bar is present depending on the shaft (5) N Position clamp (6) N Position barrier bar (2) - note position...
... the loop handle N Tighten the bolts - the holes must be located between the loop handle and control handle. Always leave the barrier bar attached. 002BA098 KN 002BA099 KN 002BA353 KN 10 KM 91 R English Mounting the Loop Handle A barrier bar is present depending on the shaft (5) N Position clamp (6) N Position barrier bar (2) - note position...
Product Instruction Manual
Page 18
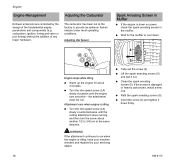
...mixture under most operating conditions. N Refit the spark arresting screen (5). Adjusting Idle Speed Spark Arresting Screen in the muffler. the attachment must not run when the engine is idling N Turn the idle speed screw (LA) slowly counterclockwise until the engine runs smoothly... or heavily carbonized, install a new one. N Insert the screw (4) and tighten it out. If the screen is down firmly. 16 KM 91 R English Engine Management Adjusting the Carburetor Exhaust emissions are controlled by your servicing dealer. N Clean the spark arresting screen (5). N Take out...
...mixture under most operating conditions. N Refit the spark arresting screen (5). Adjusting Idle Speed Spark Arresting Screen in the muffler. the attachment must not run when the engine is idling N Turn the idle speed screw (LA) slowly counterclockwise until the engine runs smoothly... or heavily carbonized, install a new one. N Insert the screw (4) and tighten it out. If the screen is down firmly. 16 KM 91 R English Engine Management Adjusting the Carburetor Exhaust emissions are controlled by your servicing dealer. N Clean the spark arresting screen (5). N Take out...
Product Instruction Manual
Page 20
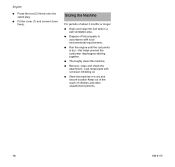
N Dispose of children and other unauthorized persons. 18 KM 91 R N Run the engine until the carburetor is dry - Storing the Machine For periods of about 3 months or longer N Drain and clean the fuel tank in a ... with corrosion inhibiting oil. Coat metal parts with local environmental requirements. English N Press the boot (2) firmly onto the spark plug. N Remove, clean and check the attachment. N Store the machine in a well ventilated area. this helps prevent the carburetor diaphragms sticking together. N Thoroughly clean the machine. N Fit the cover (1) and screw it...
N Dispose of children and other unauthorized persons. 18 KM 91 R N Run the engine until the carburetor is dry - Storing the Machine For periods of about 3 months or longer N Drain and clean the fuel tank in a ... with corrosion inhibiting oil. Coat metal parts with local environmental requirements. English N Press the boot (2) firmly onto the spark plug. N Remove, clean and check the attachment. N Store the machine in a well ventilated area. this helps prevent the carburetor diaphragms sticking together. N Thoroughly clean the machine. N Fit the cover (1) and screw it...
Product Instruction Manual
Page 21
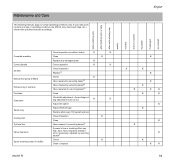
... servicing dealer2) Have checked by servicing dealer2) Have replaced by servicing dealer2) Check X Clean or replace KM 91 R X X X X X X X X X X X X X X X X X X X 19 Maintenance and Care The following intervals apply to normal operating conditions only. If your daily working /cutting attachment must not run X X Adjust idle speed Adjust electrode gap Replace after every 100 operating hours Visual...
... servicing dealer2) Have checked by servicing dealer2) Have replaced by servicing dealer2) Check X Clean or replace KM 91 R X X X X X X X X X X X X X X X X X X X 19 Maintenance and Care The following intervals apply to normal operating conditions only. If your daily working /cutting attachment must not run X X Adjust idle speed Adjust electrode gap Replace after every 100 operating hours Visual...
Product Instruction Manual
Page 24
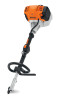
... the engine. 14 Throttle Trigger Lockout Must be depressed before the throttle trigger can be activated. 15 Throttle Trigger Controls the speed of the cutting attachment. 12 Carrying Ring Connects the unit to on the CARB-Air Index Label indicates the terms: Extended = 300 hours Intermediate = 125 hours Moderate = 50 hours... engine starting the engine. 4 Manual Fuel Pump Provides additional fuel feed for a cold start. 5 Cover Covers and protects the spark plug. 6 Muffler with mixture lubrication KM 91 R Displacement: Bore: Stroke: 28.4 cc (1.73 cu.in) 38 mm (1.5 in) 25 mm (0.98 in) 22...
... the engine. 14 Throttle Trigger Lockout Must be depressed before the throttle trigger can be activated. 15 Throttle Trigger Controls the speed of the cutting attachment. 12 Carrying Ring Connects the unit to on the CARB-Air Index Label indicates the terms: Extended = 300 hours Intermediate = 125 hours Moderate = 50 hours... engine starting the engine. 4 Manual Fuel Pump Provides additional fuel feed for a cold start. 5 Cover Covers and protects the spark plug. 6 Muffler with mixture lubrication KM 91 R Displacement: Bore: Stroke: 28.4 cc (1.73 cu.in) 38 mm (1.5 in) 25 mm (0.98 in) 22...


