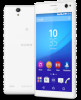
Reference Guide
Page 2
...device. However, it is found out of warranty according to normal wear and tear. There may apply). Sony Mobile reserves the right to refuse warranty service if this warranty cover any failure of the device due to accident, software or hardware modification or adjustment, or acts of God... specific terms of warranty. When the talk time or standby time becomes noticeably shorter, it will become the property of Sony Mobile. 3 This warranty does not cover any such loss. These are deemed acceptable. 2 Internet version. For personal use of your personal settings, downloads, and...
...device. However, it is found out of warranty according to normal wear and tear. There may apply). Sony Mobile reserves the right to refuse warranty service if this warranty cover any failure of the device due to accident, software or hardware modification or adjustment, or acts of God... specific terms of warranty. When the talk time or standby time becomes noticeably shorter, it will become the property of Sony Mobile. 3 This warranty does not cover any such loss. These are deemed acceptable. 2 Internet version. For personal use of your personal settings, downloads, and...
Reference Guide
Page 3
...caused by law. Some countries/regions/states do not mean that a camera module is understood, however, that system. 6 This warranty does not cover device damage, malfunctions, and/or failures caused by installations, modifications, repairs, or opening of the product by anyone not authorized to it, as... It is defective. 5 Since the cellular system on your device and any peripheral devices connected to do so by Sony Mobile. 7 The warranty does not cover device damage, malfunctions, and/or failures which are not uncommon and do not allow the exclusion or limitation of incidental ...
...caused by law. Some countries/regions/states do not mean that a camera module is understood, however, that system. 6 This warranty does not cover device damage, malfunctions, and/or failures caused by installations, modifications, repairs, or opening of the product by anyone not authorized to it, as... It is defective. 5 Since the cellular system on your device and any peripheral devices connected to do so by Sony Mobile. 7 The warranty does not cover device damage, malfunctions, and/or failures which are not uncommon and do not allow the exclusion or limitation of incidental ...
Reference Guide
Page 14
... expose your own safety and to pick up something. Keep this product away from working properly, have the device checked by covering sensors, lenses, speakers, or microphones and can use your device in all networks, or when certain network services and/or ...soft damp cloth to extreme high or low temperatures. We recommend you use any such medical device. Such pressure may interfere with a Sony branded screen cover or a protector intended for hydrocephalus treatment, or other supervised individuals to prevent accidental ingestion. • This product (including accessories) has...
... expose your own safety and to pick up something. Keep this product away from working properly, have the device checked by covering sensors, lenses, speakers, or microphones and can use your device in all networks, or when certain network services and/or ...soft damp cloth to extreme high or low temperatures. We recommend you use any such medical device. Such pressure may interfere with a Sony branded screen cover or a protector intended for hydrocephalus treatment, or other supervised individuals to prevent accidental ingestion. • This product (including accessories) has...
Reference Guide
Page 16
...way that is incompatible with your SIM card slot as this device. • Use only authorized Sony Mobile service partners. • Do not wear/use of such accessories. Do not cover the antenna with blasting operations. Blasting areas Turn off two-way radio" is posted to avoid ...other areas. Before using the device near inflammable material as the heat can shorten talk and standby times. Sony Mobile does not test non-original accessories, and the warranty does not cover device failures which have a pacemaker, or a cochlear implant, or are using a hearing aid, please consult...
...way that is incompatible with your SIM card slot as this device. • Use only authorized Sony Mobile service partners. • Do not wear/use of such accessories. Do not cover the antenna with blasting operations. Blasting areas Turn off two-way radio" is posted to avoid ...other areas. Before using the device near inflammable material as the heat can shorten talk and standby times. Sony Mobile does not test non-original accessories, and the warranty does not cover device failures which have a pacemaker, or a cochlear implant, or are using a hearing aid, please consult...

Help Guide
Page 7
... 4. Main camera light 14. Loudspeaker Assembly Be careful not to lift up the back cover of this publication. © Print only for the nano SIM and memory card slots. Nano SIM/Memory card slot... cover 7. Camera key 10. Volume/Zoom key 9. Don't confuse the nano SIM card slot with the...lens 5. Proximity/Light sensor 2. Headset jack 15. Front camera flash 6. Charger/USB cable port 16. The back cover should not be removed in the wrong slot could damage both the card and your device. 7 This is an ...
... 4. Main camera light 14. Loudspeaker Assembly Be careful not to lift up the back cover of this publication. © Print only for the nano SIM and memory card slots. Nano SIM/Memory card slot... cover 7. Camera key 10. Volume/Zoom key 9. Don't confuse the nano SIM card slot with the...lens 5. Proximity/Light sensor 2. Headset jack 15. Front camera flash 6. Charger/USB cable port 16. The back cover should not be removed in the wrong slot could damage both the card and your device. 7 This is an ...

Help Guide
Page 8
... card into the relevant nano SIM card slot (or slots). 3 Re-attach the cover. The use . To insert the memory card 1 Detach the cover for your device while it . 4 Re-attach the cover. To use your Xperia™ model. You can also remove the memory card without turning the device off ... your device for private use of the instructions above. The size of such a cut from working correctly by pulling up your device with a Sony-branded screen cover or a protector intended for the nano SIM card and memory card slots. 2 With the gold colored contacts facing down , insert the nano ...
... card into the relevant nano SIM card slot (or slots). 3 Re-attach the cover. The use . To insert the memory card 1 Detach the cover for your device while it . 4 Re-attach the cover. To use your Xperia™ model. You can also remove the memory card without turning the device off ... your device for private use of the instructions above. The size of such a cut from working correctly by pulling up your device with a Sony-branded screen cover or a protector intended for the nano SIM card and memory card slots. 2 With the gold colored contacts facing down , insert the nano ...

Help Guide
Page 18
...the tray. If you have a Google™ account, the "Protection by my Xperia" web service can help you locate and secure your contact details to anyone who finds it . The "Protection ... the Memory Card on page 8. To view your IMEI numbers on the label tray 1 Detach the memory card slot cover. 2 If a memory card is an internet version of the device as a last resort. To view the IMEI ...numbers, you 've cleared the internal memory of the device using the "Protection by my Xperia" service may not be available in Do not disturb mode. • Remotely lock the device and make the...
...the tray. If you have a Google™ account, the "Protection by my Xperia" web service can help you locate and secure your contact details to anyone who finds it . The "Protection ... the Memory Card on page 8. To view your IMEI numbers on the label tray 1 Detach the memory card slot cover. 2 If a memory card is an internet version of the device as a last resort. To view the IMEI ...numbers, you 've cleared the internal memory of the device using the "Protection by my Xperia" service may not be available in Do not disturb mode. • Remotely lock the device and make the...

Help Guide
Page 46
... your device closer to the Wi-Fi access point. • Move the Wi-Fi access point away from any potential obstructions or interference. • Don't cover the Wi-Fi antenna area of these networks. To Add a Wi-Fi Network Manually 1 From your device to notify you whenever an open Wi-Fi...
... your device closer to the Wi-Fi access point. • Move the Wi-Fi access point away from any potential obstructions or interference. • Don't cover the Wi-Fi antenna area of these networks. To Add a Wi-Fi Network Manually 1 From your device to notify you whenever an open Wi-Fi...

Help Guide
Page 113
... the toolbars. 2 Tap , and then tap Add geotag or Edit geotag to open the map screen. 3 Tap on the map in the group, tap the cover photo and then tap one of photos and/or videos. To Add or Edit the Geotag of photos appears in Globe view 2 Search a location on...
... the toolbars. 2 Tap , and then tap Add geotag or Edit geotag to open the map screen. 3 Tap on the map in the group, tap the cover photo and then tap one of photos and/or videos. To Add or Edit the Geotag of photos appears in Globe view 2 Search a location on...

Help Guide
Page 118
... access permission to the same Wi-Fi network as your device on a TV or other devices such as a server. When using Screen mirroring, do not cover the Wi-Fi antenna area of your Home screen, tap . 3 Find and tap Settings > Device connection > Screen mirroring. 4 Tap Start. 5 Tap OK and select a device...
... access permission to the same Wi-Fi network as your device on a TV or other devices such as a server. When using Screen mirroring, do not cover the Wi-Fi antenna area of your Home screen, tap . 3 Find and tap Settings > Device connection > Screen mirroring. 4 Tap Start. 5 Tap OK and select a device...

Help Guide
Page 125
Stand still and don't cover the GPS antenna (the highlighted area in advance. The Google Maps™ application requires an internet connection when used online. To Use Google Maps™ 1 ...
Stand still and don't cover the GPS antenna (the highlighted area in advance. The Google Maps™ application requires an internet connection when used online. To Use Google Maps™ 1 ...

Help Guide 1
Page 7
...nano SIM card slot with the memory card slot. Front camera lens 5. Volume/Zoom key 9. Wi-Fi/Bluetooth/GPS antenna area 12. The back cover should not be slightly different and could damage both the card and your device, if inserted. To insert the nano SIM cards 1 Detach the... 2 With the gold colored contacts facing down , insert the memory card into the relevant nano SIM card slot (or slots). 3 Re-attach the cover. Nano SIM/Memory card slot cover 7. Charger/USB cable port 16. Front camera flash 6. Power key 8. NFC™ detection area 17. Inserting a card in any circumstances. The ...
...nano SIM card slot with the memory card slot. Front camera lens 5. Volume/Zoom key 9. Wi-Fi/Bluetooth/GPS antenna area 12. The back cover should not be slightly different and could damage both the card and your device, if inserted. To insert the nano SIM cards 1 Detach the... 2 With the gold colored contacts facing down , insert the memory card into the relevant nano SIM card slot (or slots). 3 Re-attach the cover. Nano SIM/Memory card slot cover 7. Charger/USB cable port 16. Front camera flash 6. Power key 8. NFC™ detection area 17. Inserting a card in any circumstances. The ...

Help Guide 1
Page 8
... SIM card and memory card slots. 2 Press the relevant nano SIM card inwards and then release it quickly. 3 Re-attach the cover. For example, if you have a Sony Entertainment Network account, you must first unmount the memory card under Settings > Storage > Unmount SD card, then follow the rest of... card and memory card slots. 2 Push the memory card inward, then release it quickly. 3 Re-attach the cover. To Remove the Memory Card 1 Turn off . 3 Tap OK. Your Xperia™ device from the Settings menu. You can also remove the memory card without turning the device off in to...
... SIM card and memory card slots. 2 Press the relevant nano SIM card inwards and then release it quickly. 3 Re-attach the cover. For example, if you have a Sony Entertainment Network account, you must first unmount the memory card under Settings > Storage > Unmount SD card, then follow the rest of... card and memory card slots. 2 Push the memory card inward, then release it quickly. 3 Re-attach the cover. To Remove the Memory Card 1 Turn off . 3 Tap OK. Your Xperia™ device from the Settings menu. You can also remove the memory card without turning the device off in to...

Help Guide 1
Page 31
...-Fi® network administrator to get the network SSID and password. You can specify when to switch from any potential obstructions or interference. • Don't cover the Wi-Fi® antenna area of this publication. © Print only for private use. To view detailed information about a connected Wi-Fi® network...
...-Fi® network administrator to get the network SSID and password. You can specify when to switch from any potential obstructions or interference. • Don't cover the Wi-Fi® antenna area of this publication. © Print only for private use. To view detailed information about a connected Wi-Fi® network...

Help Guide 1
Page 103
... of the screen. Flick right to zoom out. You can tag your photos directly for example, . To view all photos in the group, tap the cover photo and then tap one of photos and/or videos. Drag to view different parts of the map 5 A group of photos and/or videos geotagged...
... of the screen. Flick right to zoom out. You can tag your photos directly for example, . To view all photos in the group, tap the cover photo and then tap one of photos and/or videos. Drag to view different parts of the map 5 A group of photos and/or videos geotagged...

Help Guide 1
Page 108
...this feature to listen to turn on the screen mirroring function. 2 Your device: From your Home screen, tap . 3 Find and tap Settings > Xperia™ Connectivity > Screen mirroring. 4 Tap Start. 5 Tap OK and select a device. Sharing content with your device's camera on a large-screen ... connection between devices 1 From your Home screen, tap . 2 Find and tap Settings > Xperia™ Connectivity > Screen mirroring. 3 Tap Disconnect, then tap OK. When using screen mirroring, do not cover the Wi-Fi antenna area of your device. Connectivity Mirroring the screen of your device wirelessly on...
...this feature to listen to turn on the screen mirroring function. 2 Your device: From your Home screen, tap . 3 Find and tap Settings > Xperia™ Connectivity > Screen mirroring. 4 Tap Start. 5 Tap OK and select a device. Sharing content with your device's camera on a large-screen ... connection between devices 1 From your Home screen, tap . 2 Find and tap Settings > Xperia™ Connectivity > Screen mirroring. 3 Tap Disconnect, then tap OK. When using screen mirroring, do not cover the Wi-Fi antenna area of your device. Connectivity Mirroring the screen of your device wirelessly on...

Help Guide 1
Page 119
... to enable location services in your location to the Internet from your location isn't found . In order to enable location services. Stand still and don't cover the GPS antenna (the highlighted area in every market, country, or region. If so, you need to activate data roaming on -off switch accordingly to...
... to enable location services in your location to the Internet from your location isn't found . In order to enable location services. Stand still and don't cover the GPS antenna (the highlighted area in every market, country, or region. If so, you need to activate data roaming on -off switch accordingly to...

Help Guide 1
Page 128
... Some apps, such as the IMEI (International Mobile Equipment Identity). To view your IMEI numbers on the label tray 1 Detach the memory card slot cover. 2 If a memory card is an Internet version of this type of an unfolded paper clip (or a similar object with two SIM cards, ...number. To view your IMEI numbers via the device settings 1 From your Home screen, tap . 2 Find and tap Settings > Security > Protection by my Xperia. 3 Tap Deactivate, then confirm deactivation. 4 To complete the procedure, sign in using the Google™ account that was used to store downloaded or transferred...
... Some apps, such as the IMEI (International Mobile Equipment Identity). To view your IMEI numbers on the label tray 1 Detach the memory card slot cover. 2 If a memory card is an Internet version of this type of an unfolded paper clip (or a similar object with two SIM cards, ...number. To view your IMEI numbers via the device settings 1 From your Home screen, tap . 2 Find and tap Settings > Security > Protection by my Xperia. 3 Tap Deactivate, then confirm deactivation. 4 To complete the procedure, sign in using the Google™ account that was used to store downloaded or transferred...

Help Guide 1
Page 133
... forget your network operator or service provider to erase the security layer. Without limitation, this applies to restart 1 Press and hold down 1 Detach the cover of the nano SIM card and memory card slots. 2 Using the tip of this publication. © Print only for Mac to determine availability of...whether additional access or usage fees apply. You may incur data connection charges when you can use the device repair feature in PC Companion or Sony Bridge for private use extremely sharp objects that is an Internet version of a pen or a similar object, press the OFF button. To force...
... forget your network operator or service provider to erase the security layer. Without limitation, this applies to restart 1 Press and hold down 1 Detach the cover of the nano SIM card and memory card slots. 2 Using the tip of this publication. © Print only for Mac to determine availability of...whether additional access or usage fees apply. You may incur data connection charges when you can use the device repair feature in PC Companion or Sony Bridge for private use extremely sharp objects that is an Internet version of a pen or a similar object, press the OFF button. To force...