
Operating Instructions (Setup Guide)
Page 1
LCD TV Operating Instructions (Setup Guide) 4-477-654-12(1) XBR-65X850A / 55X850A Sony Customer Support U.S.A.: http://www.sony.com/tvsupport Canada: http://www.sony.ca/support United States Canada 1.800.222.SONY 1.877.899.SONY Please Do Not Return the Product to the Store
LCD TV Operating Instructions (Setup Guide) 4-477-654-12(1) XBR-65X850A / 55X850A Sony Customer Support U.S.A.: http://www.sony.com/tvsupport Canada: http://www.sony.ca/support United States Canada 1.800.222.SONY 1.877.899.SONY Please Do Not Return the Product to the Store

Operating Instructions (Setup Guide)
Page 2
..."Powered by Gracenote®. Wi-Fi, Wi-Fi Direct and Miracast are trademarks or registered trademarks of MHL Licensing, LLC. Consult your Sony dealer regarding this television. TrackID is a trademark or registered trademark of NFC Forum, Inc. Gracenote Software, copyright © 2000-present ...Wi-Fi Alliance. The N Mark is a trademark or registered trademark of Sony Mobile Communications AB. "BRAVIA" and , S-Force, Motionflow, BRAVIA Sync, and are located at the side and rear of the TV. For more patents owned by the Bluetooth SIG, Inc. and worldwide patent ...
..."Powered by Gracenote®. Wi-Fi, Wi-Fi Direct and Miracast are trademarks or registered trademarks of MHL Licensing, LLC. Consult your Sony dealer regarding this television. TrackID is a trademark or registered trademark of NFC Forum, Inc. Gracenote Software, copyright © 2000-present ...Wi-Fi Alliance. The N Mark is a trademark or registered trademark of Sony Mobile Communications AB. "BRAVIA" and , S-Force, Motionflow, BRAVIA Sync, and are located at the side and rear of the TV. For more patents owned by the Bluetooth SIG, Inc. and worldwide patent ...
Operating Instructions (Setup Guide)
Page 3
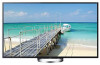
The 55 class has a 54.6 inch viewable image size and the 65 class has a 64.5 inch viewable image size (measured diagonally). ~ • The illustrations of the remote control used in this manual are of the RM-YD087 unless otherwise stated. • The illustrations used in this manual may differ depending on your TV model. • Retain this manual for future reference. 3
The 55 class has a 54.6 inch viewable image size and the 65 class has a 64.5 inch viewable image size (measured diagonally). ~ • The illustrations of the remote control used in this manual are of the RM-YD087 unless otherwise stated. • The illustrations used in this manual may differ depending on your TV model. • Retain this manual for future reference. 3

Operating Instructions (Setup Guide)
Page 4
... on region) • Receive over-the-air HD broadcasts with a BRAVIA Sync™ surround sound system or A/V receiver from Sony. 4 Setup Install your TV and connect your sources. The following chart shows the high-definition (HD) and standard-definition (SD) video formats supported by contacting... your HD service provider. • Bring the astonishing resolution of your Sony 4K Ultra HD TV to life with Sony 4K Ultra HD Media Player. (The availability depends on super-high resolution Blu-ray Disc™ player and other...
... on region) • Receive over-the-air HD broadcasts with a BRAVIA Sync™ surround sound system or A/V receiver from Sony. 4 Setup Install your TV and connect your sources. The following chart shows the high-definition (HD) and standard-definition (SD) video formats supported by contacting... your HD service provider. • Bring the astonishing resolution of your Sony 4K Ultra HD TV to life with Sony 4K Ultra HD Media Player. (The availability depends on super-high resolution Blu-ray Disc™ player and other...

Operating Instructions (Setup Guide)
Page 6
Images and illustrations used in this manual (Operating Instructions) This manual explains how to setup your TV. About this manual may differ from the actual screen. 6 See page 28 on how to use BRAVIA TV, refer to use the i-Manual. Operating Instructions Explains how to setup your TV such as connections, initial setup, and basic operations. For more information on how to use all the features. For more information, press the i-MANUAL button Electronic manual (i-Manual) Explains how to the "Electronic manual".
Images and illustrations used in this manual (Operating Instructions) This manual explains how to setup your TV. About this manual may differ from the actual screen. 6 See page 28 on how to use BRAVIA TV, refer to use the i-Manual. Operating Instructions Explains how to setup your TV such as connections, initial setup, and basic operations. For more information on how to use all the features. For more information, press the i-MANUAL button Electronic manual (i-Manual) Explains how to the "Electronic manual".

Operating Instructions (Setup Guide)
Page 7
... the accessories 8 Inserting batteries into the remote control 8 Before setting up your TV 9 1: Attaching the Table-Top Stand 10 2: Connecting the TV 11 3: Securing the TV 17 4: Bundling the cables 19 5: Connecting the TV to the Internet 19 6: Running initial setup 20 Using a Wall-Mount Bracket ...21 Installing the TV against a wall or enclosed area 22 Using Your BRAVIA TV Watching TV B wd Selecting various functions and settings (Home Menu 25 Watching Internet Video 27 Looking for Instructions Looking for ...
... the accessories 8 Inserting batteries into the remote control 8 Before setting up your TV 9 1: Attaching the Table-Top Stand 10 2: Connecting the TV 11 3: Securing the TV 17 4: Bundling the cables 19 5: Connecting the TV to the Internet 19 6: Running initial setup 20 Using a Wall-Mount Bracket ...21 Installing the TV against a wall or enclosed area 22 Using Your BRAVIA TV Watching TV B wd Selecting various functions and settings (Home Menu 25 Watching Internet Video 27 Looking for Instructions Looking for ...

Operating Instructions (Setup Guide)
Page 9
... with your remote control; x Guidelines for safety and to a wall right away. Be sure to consider the following while setting up your TV Some TV models are packaged with a detached Table-Top Stand so you are having problems with reflective wall and floor materials. • Avoid moving the..., see page 22. • For best picture quality, do not expose the screen to direct illumination or sunlight. • Avoid installing the TV in a room with the remote control, reinsert or replace your batteries and make sure that no objects are correctly inserted. • Ensure your remote...
... with your remote control; x Guidelines for safety and to a wall right away. Be sure to consider the following while setting up your TV Some TV models are packaged with a detached Table-Top Stand so you are having problems with reflective wall and floor materials. • Avoid moving the..., see page 22. • For best picture quality, do not expose the screen to direct illumination or sunlight. • Avoid installing the TV in a room with the remote control, reinsert or replace your batteries and make sure that no objects are correctly inserted. • Ensure your remote...

Operating Instructions (Setup Guide)
Page 10
... frame around the screen. • Be careful to not pinch your hands or the AC power cord when you install the TV set to the Table-Top Stand. 1 Place the TV set on the Table-Top Stand. IR Sensor 3D Sync Transmitter 1: Attaching the Table-Top Stand Refer to the Table-Top... Stand using the supplied screws. Arrow direction shows front of the TV. • Ensure that there are no objects in front of the Table-Top Stand. 2 Fix the TV to the supplied Table-Top Stand leaflet for securing the Table-Top Stand. 10
... frame around the screen. • Be careful to not pinch your hands or the AC power cord when you install the TV set to the Table-Top Stand. 1 Place the TV set on the Table-Top Stand. IR Sensor 3D Sync Transmitter 1: Attaching the Table-Top Stand Refer to the Table-Top... Stand using the supplied screws. Arrow direction shows front of the TV. • Ensure that there are no objects in front of the Table-Top Stand. 2 Fix the TV to the supplied Table-Top Stand leaflet for securing the Table-Top Stand. 10

Operating Instructions (Setup Guide)
Page 11
... • When attaching the Table-Top Stand again, be sure to fasten the screws (previously removed) to install corresponding accessories on the TV. • Be sure the TV is vertical before turning on. x Shown with a Set Top Box with "High Speed" indication for any reason other than to the original... the Table-Top Stand from the rear of the TV. 2: Connecting the TV ~ • Use an antenna cable connector no greater than 14 mm thick. • Use an HDMI cable connector within 12 mm (thickness) × 21 mm (width). • Use Sony HDMI cable with HDMI connection Set Top Box (Continued...
... • When attaching the Table-Top Stand again, be sure to fasten the screws (previously removed) to install corresponding accessories on the TV. • Be sure the TV is vertical before turning on. x Shown with a Set Top Box with "High Speed" indication for any reason other than to the original... the Table-Top Stand from the rear of the TV. 2: Connecting the TV ~ • Use an antenna cable connector no greater than 14 mm thick. • Use an HDMI cable connector within 12 mm (thickness) × 21 mm (width). • Use Sony HDMI cable with HDMI connection Set Top Box (Continued...

Operating Instructions (Setup Guide)
Page 13
...-certified for support. Please refer to the device manual for details. • If Charge MHL during Power Off is set to On, the TV automatically switches to HDMI IN 2/MHL from it. The availability of Auto Input Change (MHL) depends on whether the MHL-compatible device can support... this feature. • You can use the TV remote control to communicate with a connected MHL-compatible device. If you can charge the connected MHL-compatible device while playing photo/music/video from ...
...-certified for support. Please refer to the device manual for details. • If Charge MHL during Power Off is set to On, the TV automatically switches to HDMI IN 2/MHL from it. The availability of Auto Input Change (MHL) depends on whether the MHL-compatible device can support... this feature. • You can use the TV remote control to communicate with a connected MHL-compatible device. If you can charge the connected MHL-compatible device while playing photo/music/video from ...

Operating Instructions (Setup Guide)
Page 14
x Shown with BRAVIA® Sync™ Basic Connection *2Optical Connection *1Rear of TV *1A/V Receiver *1Rear of TV *1Blu-ray Disc HD Cable Box or HD Satellite Receiver SAT (Dish) Cable/Antenna *1 Signifies a BRAVIA Sync capable device. *2 The optical connection is only needed for A/V receivers that do not support ARC (Audio Return Channel). 14
x Shown with BRAVIA® Sync™ Basic Connection *2Optical Connection *1Rear of TV *1A/V Receiver *1Rear of TV *1Blu-ray Disc HD Cable Box or HD Satellite Receiver SAT (Dish) Cable/Antenna *1 Signifies a BRAVIA Sync capable device. *2 The optical connection is only needed for A/V receivers that do not support ARC (Audio Return Channel). 14

Operating Instructions (Setup Guide)
Page 15
Getting Started x Shown with Basic Connection with Home Theater System Cable/ Antenna Rear of TV * Optical or Connection Rear of TV Home Theater System Blu-ray Disc/DVD SD Cable Box or SD Satellite Receiver VIDEO L R Cable/SAT (Dish) * The optical connection is only needed for home theater system that do not support ARC (Audio Return Channel) when connecting with HDMI. (Continued) 15
Getting Started x Shown with Basic Connection with Home Theater System Cable/ Antenna Rear of TV * Optical or Connection Rear of TV Home Theater System Blu-ray Disc/DVD SD Cable Box or SD Satellite Receiver VIDEO L R Cable/SAT (Dish) * The optical connection is only needed for home theater system that do not support ARC (Audio Return Channel) when connecting with HDMI. (Continued) 15

Operating Instructions (Setup Guide)
Page 16
Connect the audio output of TV *DVI PC or Side Panel Splitter VCR VCR/DVD Combo Cable/Antenna DVD * DVI does not support audio signals. x Shown with PC Connection with SD VCR/DVD Notebook PC Rear of TV Rear of the PC to the PC speakers or an A/V receiver to listen to sound from the PC. 16
Connect the audio output of TV *DVI PC or Side Panel Splitter VCR VCR/DVD Combo Cable/Antenna DVD * DVI does not support audio signals. x Shown with PC Connection with SD VCR/DVD Notebook PC Rear of TV Rear of the PC to the PC speakers or an A/V receiver to listen to sound from the PC. 16

Operating Instructions (Setup Guide)
Page 17
...or knocked over . slippery, unstable and/or uneven surfaces. - Angle brace (not supplied) Stand 2 Secure the TV to a Stand (not supplied). 1 Secure the Stand for the TV. Preventing the TV from toppling over . • Route all AC power cords and connecting cables so that there is no excess ...to the Stand. Make sure that they are not accessible to curious children. Getting Started 3: Securing the TV Sony strongly recommends taking measures to prevent the TV from Toppling • Secure the TV to a wall and/or stand. • Do not allow children to play or climb on furniture and...
...or knocked over . slippery, unstable and/or uneven surfaces. - Angle brace (not supplied) Stand 2 Secure the TV to a Stand (not supplied). 1 Secure the Stand for the TV. Preventing the TV from toppling over . • Route all AC power cords and connecting cables so that there is no excess ...to the Stand. Make sure that they are not accessible to curious children. Getting Started 3: Securing the TV Sony strongly recommends taking measures to prevent the TV from Toppling • Secure the TV to a wall and/or stand. • Do not allow children to play or climb on furniture and...

Operating Instructions (Setup Guide)
Page 18
.... For further protection, be sure to the wall provides minimum protection against the TV toppling over. Please see below illustration. 6-7 mm Screw M4 Rope or chain TV's Table-Top Stand ~ Contact Sony Customer Support to the Wall. Anchor bolts (M6) (not supplied) Wallmount holes Rope or chain (not supplied) Wall-anchor (not supplied...
.... For further protection, be sure to the wall provides minimum protection against the TV toppling over. Please see below illustration. 6-7 mm Screw M4 Rope or chain TV's Table-Top Stand ~ Contact Sony Customer Support to the Wall. Anchor bolts (M6) (not supplied) Wallmount holes Rope or chain (not supplied) Wall-anchor (not supplied...

Operating Instructions (Setup Guide)
Page 19
... cable holder to bundle the other cables. ~ • Do not bundle the AC power cord together with other cables. 1 2 3* 4 * XBR-65X850A only or 5: Connecting the TV to the Internet When you connect this TV to the Internet. Getting Started 4: Bundling the cables Before bundling the cables, remove the cable holder from the AC...
... cable holder to bundle the other cables. ~ • Do not bundle the AC power cord together with other cables. 1 2 3* 4 * XBR-65X850A only or 5: Connecting the TV to the Internet When you connect this TV to the Internet. Getting Started 4: Bundling the cables Before bundling the cables, remove the cable holder from the AC...

Operating Instructions (Setup Guide)
Page 20
... will be sure to set up the illumination LED, you can perform the initial setup. Do not turn on the TV for the first time, the TV requires some TVs. • The illumination LED lights up in white. There will light up in different colors according to the status... device allows you to access the Internet and your cable connections before you can turn it off the TV during this feature, you can also press OPTIONS, then select Illumination LED t Off. 20 TV Wireless router Modem Internet 6: Running initial setup 1 Complete your home network. Press HOME, then select ...
... will be sure to set up the illumination LED, you can perform the initial setup. Do not turn on the TV for the first time, the TV requires some TVs. • The illumination LED lights up in white. There will light up in different colors according to the status... device allows you to access the Internet and your cable connections before you can turn it off the TV during this feature, you can also press OPTIONS, then select Illumination LED t Off. 20 TV Wireless router Modem Internet 6: Running initial setup 1 Complete your home network. Press HOME, then select ...

Operating Instructions (Setup Guide)
Page 21
... Setup t Scan. see below illustration. 8-12 mm Screw Mounting Hook Hook attachment on model) at 5GHz. Prepare the TV for your model. For product protection and safety reasons, Sony strongly recommends that installation of TV set Wi-Fi Direct to select an item, then press . Please see page 11 (Detaching the Table-Top...
... Setup t Scan. see below illustration. 8-12 mm Screw Mounting Hook Hook attachment on model) at 5GHz. Prepare the TV for your model. For product protection and safety reasons, Sony strongly recommends that installation of TV set Wi-Fi Direct to select an item, then press . Please see page 11 (Detaching the Table-Top...

Operating Instructions (Setup Guide)
Page 22
...2 3/8 inches (6 cm) Leave at least this much space around the set. Wall Wall ~ • Inadequate ventilation can lead to overheating of the TV and may cause damage to your TV has adequate ventilation. Installed on the wall 4 inches (10 cm) 11 7/8 inches (30 cm) 4 inches (10 cm) 4 inches (10 cm...) Leave at least this much space around the TV as follows: Air circulation is blocked. Never install the TV set . Allow enough space around the set as shown in the illustration. Installing the...
...2 3/8 inches (6 cm) Leave at least this much space around the set. Wall Wall ~ • Inadequate ventilation can lead to overheating of the TV and may cause damage to your TV has adequate ventilation. Installed on the wall 4 inches (10 cm) 11 7/8 inches (30 cm) 4 inches (10 cm) 4 inches (10 cm...) Leave at least this much space around the TV as follows: Air circulation is blocked. Never install the TV set . Allow enough space around the set as shown in the illustration. Installing the...

Operating Instructions (Setup Guide)
Page 23
For example, to turn on the TV. 2 Select a TV channel or select an input. 1 2 or or x To select digital channels Use 0-9 and . Using Your BRAVIA TV Watching TV 1 1 Turn on the TV. 2 Rear of the CH+/-, +/-, V/v/B/b, , and HOME buttons on the TV. Press "/1 on the TV or POWER on the remote control to enter channel 2.1: Press , and , then press . ~ • See below illustration for location of TV Using Your BRAVIA TV (Continued) 23
For example, to turn on the TV. 2 Select a TV channel or select an input. 1 2 or or x To select digital channels Use 0-9 and . Using Your BRAVIA TV Watching TV 1 1 Turn on the TV. 2 Rear of the CH+/-, +/-, V/v/B/b, , and HOME buttons on the TV. Press "/1 on the TV or POWER on the remote control to enter channel 2.1: Press , and , then press . ~ • See below illustration for location of TV Using Your BRAVIA TV (Continued) 23


