User Guide
Page 2
......12 About the Indicator Lights ...25 Connecting a Power Source ...27 Using the Battery Pack ...29 Shutting Down Your Computer Safely ...34 Using Your VAIO Computer ...35 Using the Keyboard ...36 Using the Touch Pad ...38 Using Special-function Buttons ...39 Using the Built-in MOTION EYE Camera...41 Using the Optical Disc...
......12 About the Indicator Lights ...25 Connecting a Power Source ...27 Using the Battery Pack ...29 Shutting Down Your Computer Safely ...34 Using Your VAIO Computer ...35 Using the Keyboard ...36 Using the Touch Pad ...38 Using Special-function Buttons ...39 Using the Built-in MOTION EYE Camera...41 Using the Optical Disc...
User Guide
Page 19
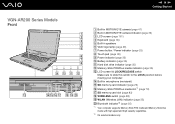
VGN-AR200 Series Models Front n 19 N Getting Started A Built-in MOTION EYE camera (page 41) B Built-in MOTION EYE camera indicator (page 25) C LCD screen (page 161) D Keyboard (page 36) E Built-in microphone (monaural) O SD memory card indicator (page 25) P Memory Stick PRO/Duo media slot*1 (page 78) Q SD memory card slot (page 83...only. N Built-in speakers F VAIO logo lamp (page 39) G Power button / Power indicator (page 25) H Touch pad (page 38) I Power indicator (page 25) J Battery indicator (page 25) K Hard disk drive indicator (page 25) L Memory Stick PRO/Duo media indicator (page 25) M ...
VGN-AR200 Series Models Front n 19 N Getting Started A Built-in MOTION EYE camera (page 41) B Built-in MOTION EYE camera indicator (page 25) C LCD screen (page 161) D Keyboard (page 36) E Built-in microphone (monaural) O SD memory card indicator (page 25) P Memory Stick PRO/Duo media slot*1 (page 78) Q SD memory card slot (page 83...only. N Built-in speakers F VAIO logo lamp (page 39) G Power button / Power indicator (page 25) H Touch pad (page 38) I Power indicator (page 25) J Battery indicator (page 25) K Hard disk drive indicator (page 25) L Memory Stick PRO/Duo media indicator (page 25) M ...
User Guide
Page 35
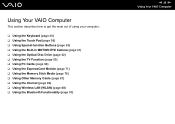
Using Your VAIO Computer This section describes how to get the most out of using your computer. ❑ Using the Keyboard (page 36) ❑ Using the Touch Pad (page 38) ❑ Using Special-function Buttons (page 39) ❑ Using the Built-in MOTION EYE Camera (page ... (page 81) ❑ Using the Internet (page 86) ❑ Using Wireless LAN (WLAN) (page 88) ❑ Using the Bluetooth Functionality (page 97) n 35 N Using Your VAIO Computer
Using Your VAIO Computer This section describes how to get the most out of using your computer. ❑ Using the Keyboard (page 36) ❑ Using the Touch Pad (page 38) ❑ Using Special-function Buttons (page 39) ❑ Using the Built-in MOTION EYE Camera (page ... (page 81) ❑ Using the Internet (page 86) ❑ Using Wireless LAN (WLAN) (page 88) ❑ Using the Bluetooth Functionality (page 97) n 35 N Using Your VAIO Computer
User Guide
Page 36
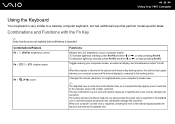
n 36 N Using Your VAIO Computer Using the Keyboard Your keyboard is launched. Combinations and Functions with the Fn Key ✍ Some functions are not available before Windows is very similar to a desktop computer keyboard, but has additional keys that perform model-specific tasks. To decrease lightness intensity, press Fn+F5 and then m or To increase...
n 36 N Using Your VAIO Computer Using the Keyboard Your keyboard is launched. Combinations and Functions with the Fn Key ✍ Some functions are not available before Windows is very similar to a desktop computer keyboard, but has additional keys that perform model-specific tasks. To decrease lightness intensity, press Fn+F5 and then m or To increase...
User Guide
Page 38
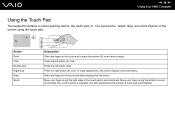
... menu. Action Point Click Double-click Right-click Drag Scroll Description Slide one finger on an item or object. n 38 N Using Your VAIO Computer Using the Touch Pad The keyboard contains a cursor-pointing device, the touch pad (1). You can point to scroll vertically. Press the right button (4) once. Move your finger along...
... menu. Action Point Click Double-click Right-click Drag Scroll Description Slide one finger on an item or object. n 38 N Using Your VAIO Computer Using the Touch Pad The keyboard contains a cursor-pointing device, the touch pad (1). You can point to scroll vertically. Press the right button (4) once. Move your finger along...
User Guide
Page 172
... encounter when using your computer. Try these suggestions before visiting the Sony online support Web site at http://esupport.sony.com/EN/VAIO/ for customers in USA, at http://www.sony.ca/support for customers in Canada, or at http://esupport.sony.com/ES/VAIO/ for customers in Latin American countries or areas. ❑ Computer (...Display (page 202) ❑ Printing (page 206) ❑ Microphone (page 207) ❑ Mouse (page 208) ❑ Speakers (page 209) ❑ Touch Pad (page 210) ❑ Keyboard (page 211) ❑ Floppy Disks (page 212) Many problems have simple solutions.
... encounter when using your computer. Try these suggestions before visiting the Sony online support Web site at http://esupport.sony.com/EN/VAIO/ for customers in USA, at http://www.sony.ca/support for customers in Canada, or at http://esupport.sony.com/ES/VAIO/ for customers in Latin American countries or areas. ❑ Computer (...Display (page 202) ❑ Printing (page 206) ❑ Microphone (page 207) ❑ Mouse (page 208) ❑ Speakers (page 209) ❑ Touch Pad (page 210) ❑ Keyboard (page 211) ❑ Floppy Disks (page 212) Many problems have simple solutions.
User Guide
Page 197
...On Handling Discs (page 166) for dirt or damage. Follow these steps: 1 Restart the computer by VAIO Power Management, the substitute drive eject button on the optical disc drive will take a while to read ...Off Computer, and Restart. 2 Eject the disc from the shortcut menu. ❑ If none of the keyboard. Use the disc drive eject button located to clean it will not work , click Start and then ... ❑ Make sure your computer is on. ❑ On VGN-FE700 Series models, press the drive eject button. ❑ On VGN-AR200 Series models, if power supply to read may be dirty or...
...On Handling Discs (page 166) for dirt or damage. Follow these steps: 1 Restart the computer by VAIO Power Management, the substitute drive eject button on the optical disc drive will take a while to read ...Off Computer, and Restart. 2 Eject the disc from the shortcut menu. ❑ If none of the keyboard. Use the disc drive eject button located to clean it will not work , click Start and then ... ❑ Make sure your computer is on. ❑ On VGN-FE700 Series models, press the drive eject button. ❑ On VGN-AR200 Series models, if power supply to read may be dirty or...


