User Guide
Page 8
To access this on-screen guide: 1 Click Start, point to All Programs, and click VAIO Support Central. 2 Click VAIO Documentation. 3 Click MCE Guide. n8 N Before Use ❑ MCE Guide (Selected models only) - Provides information about using the Windows XP Media Center Edition operating system.
To access this on-screen guide: 1 Click Start, point to All Programs, and click VAIO Support Central. 2 Click VAIO Documentation. 3 Click MCE Guide. n8 N Before Use ❑ MCE Guide (Selected models only) - Provides information about using the Windows XP Media Center Edition operating system.

User Guide
Page 10
.... Make sure the display screen is at a comfortable viewing distance. Use the display's tilting feature to avoid bright spots on the display. Choose a location where windows and lights do not create glare and reflection on the display. Use indirect lighting to find the best position. n 10 N Before Use ❑ Viewing angle...
.... Make sure the display screen is at a comfortable viewing distance. Use the display's tilting feature to avoid bright spots on the display. Choose a location where windows and lights do not create glare and reflection on the display. Use indirect lighting to find the best position. n 10 N Before Use ❑ Viewing angle...

User Guide
Page 34
n 34 N Getting Started Shutting Down Your Computer Safely To avoid losing unsaved data, be sure to shut down your computer properly, as described below. To shut down your computer 1 Turn off any prompts warning you to save documents or to consider other users and wait for the computer to the computer. 2 Click Start and then Turn Off Computer. The Turn off computer window appears. 3 Click Turn Off. 4 Respond to any peripherals connected to turn off . The power indicator light turns off automatically.
n 34 N Getting Started Shutting Down Your Computer Safely To avoid losing unsaved data, be sure to shut down your computer properly, as described below. To shut down your computer 1 Turn off any prompts warning you to save documents or to consider other users and wait for the computer to the computer. 2 Click Start and then Turn Off Computer. The Turn off computer window appears. 3 Click Turn Off. 4 Respond to any peripherals connected to turn off . The power indicator light turns off automatically.
User Guide
Page 36
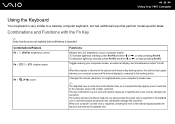
...F10): zoom Functions Adjusts the LCD brightness of your computer screen. Combinations and Functions with the Fn Key ✍ Some functions are not available before Windows is very similar to a desktop computer keyboard, but has additional keys that perform model-specific tasks. To increase lightness intensity, press Fn+F6 and ...then M or ,, or keep pressing Fn+F6. n 36 N Using Your VAIO Computer Using the Keyboard Your keyboard is launched. To decrease lightness intensity, press Fn+F5 and then m or
...F10): zoom Functions Adjusts the LCD brightness of your computer screen. Combinations and Functions with the Fn Key ✍ Some functions are not available before Windows is very similar to a desktop computer keyboard, but has additional keys that perform model-specific tasks. To increase lightness intensity, press Fn+F6 and ...then M or ,, or keep pressing Fn+F6. n 36 N Using Your VAIO Computer Using the Keyboard Your keyboard is launched. To decrease lightness intensity, press Fn+F5 and then m or
User Guide
Page 39
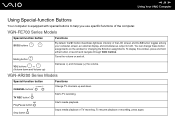
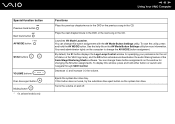
...these button assignments on and off. Turns the volume on the window for changing the S button assignments. Stops media playback or TV recording. To resume playback or recording, press again. n 39 N Using Your VAIO Computer Using Special-function Buttons Your computer is equipped with special... among your computer screen, an external display, and simultaneous output to both. To display this window, press and hold either button or launch and navigate through VAIO Central. VGN-AR200 Series Models Special-function button CHANNEL buttons* TV REC button* Play/Pause button Stop button...
...these button assignments on and off. Turns the volume on the window for changing the S button assignments. Stops media playback or TV recording. To resume playback or recording, press again. n 39 N Using Your VAIO Computer Using Special-function Buttons Your computer is equipped with special... among your computer screen, an external display, and simultaneous output to both. To display this window, press and hold either button or launch and navigate through VAIO Central. VGN-AR200 Series Models Special-function button CHANNEL buttons* TV REC button* Play/Pause button Stop button...
User Guide
Page 40
.... and the S2 button activates and deactivates the audio filtering feature of the VAIO logo lamp; You can change this button does not work, try the substitute drive eject button on the window for changing the S button assignments. If this button assignment with the AV Mode Button ...Settings utility. To start this window, press and hold the AV MODE button. n 40 N Using Your VAIO Computer Special-function button Previous track button Next track button AV MODE button S1/S2 buttons VOLUME buttons Disc...
.... and the S2 button activates and deactivates the audio filtering feature of the VAIO logo lamp; You can change this button does not work, try the substitute drive eject button on the window for changing the S button assignments. If this button assignment with the AV Mode Button ...Settings utility. To start this window, press and hold the AV MODE button. n 40 N Using Your VAIO Computer Special-function button Previous track button Next track button AV MODE button S1/S2 buttons VOLUME buttons Disc...

User Guide
Page 41
...using the software. ✍ The built-in MOTION EYE camera cannot be equipped with the built-in MOTION EYE camera. The viewer window may be shared by more than one software application. Note that the camera is equipped with a built-in MOTION EYE camera. ...application before using such software. See the online Specifications to instant messaging software and video editing software, for example Windows Messenger and Windows MovieMaker. n 41 N Using Your VAIO Computer Using the Built-in MOTION EYE Camera Your computer may show some noises, for example horizontal streaks, if ...
...using the software. ✍ The built-in MOTION EYE camera cannot be equipped with the built-in MOTION EYE camera. The viewer window may be shared by more than one software application. Note that the camera is equipped with a built-in MOTION EYE camera. ...application before using such software. See the online Specifications to instant messaging software and video editing software, for example Windows Messenger and Windows MovieMaker. n 41 N Using Your VAIO Computer Using the Built-in MOTION EYE Camera Your computer may show some noises, for example horizontal streaks, if ...

User Guide
Page 50
If the Audio CD window appears, click to start the desired CD software, such as the SonicStage software. n 50 N Using Your VAIO Computer Playing CDs To play an audio CD 1 Insert a disc into the optical disc drive. 2 If nothing appears on the desktop, then click Start, point to All Programs, and click to select an option.
If the Audio CD window appears, click to start the desired CD software, such as the SonicStage software. n 50 N Using Your VAIO Computer Playing CDs To play an audio CD 1 Insert a disc into the optical disc drive. 2 If nothing appears on the desktop, then click Start, point to All Programs, and click to select an option.
User Guide
Page 51
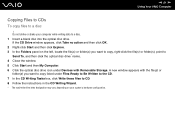
... you want to copy, right-click the file(s) or folder(s), point to Send To, and then click the optical disc drive* name. 4 Close the window. 5 Click Start and then My Computer. 6 Click the optical disc drive icon under Devices with the file(s) or folder(s) you want to copy listed ... in the CD Writing Wizard. * The read/write drive letter designation may vary, depending on your computer while writing data to a disc ! A new window appears with Removable Storage. n 51 N Using Your VAIO Computer Copying Files to CDs To copy files to a disc. 1 Insert a blank disc into the optical disc drive.
... you want to copy, right-click the file(s) or folder(s), point to Send To, and then click the optical disc drive* name. 4 Close the window. 5 Click Start and then My Computer. 6 Click the optical disc drive icon under Devices with the file(s) or folder(s) you want to copy listed ... in the CD Writing Wizard. * The read/write drive letter designation may vary, depending on your computer while writing data to a disc ! A new window appears with Removable Storage. n 51 N Using Your VAIO Computer Copying Files to CDs To copy files to a disc. 1 Insert a blank disc into the optical disc drive.
User Guide
Page 53
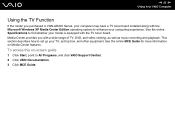
...the online Specifications to set up your TV, set-top box, and other equipment. This section describes how to find whether your model is VGN-AR200 Series, your computing experience. See the online MCE Guide for more information on -screen guide 1 Click Start, point to enhance your... computer may have a TV tuner board installed along with the Microsoft Windows XP Media Center Edition operating system to All Programs, and click VAIO Support Central. 2 Click VAIO Documentation. 3 Click MCE Guide. n 53 N Using Your VAIO Computer Using the TV Function If the model you with a wide range...
...the online Specifications to set up your TV, set-top box, and other equipment. This section describes how to find whether your model is VGN-AR200 Series, your computing experience. See the online MCE Guide for more information on -screen guide 1 Click Start, point to enhance your... computer may have a TV tuner board installed along with the Microsoft Windows XP Media Center Edition operating system to All Programs, and click VAIO Support Central. 2 Click VAIO Documentation. 3 Click MCE Guide. n 53 N Using Your VAIO Computer Using the TV Function If the model you with a wide range...
User Guide
Page 64
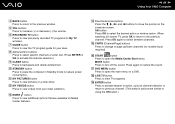
.... K MY PICTURES button Press to increase (+) or decrease (-) the volume. L MY VIDEOS button Press to view previously recorded TV programs (In My TV window). n 64 N Using Your VAIO Computer D BACK button Press to return to backspace and delete entered text. H Alphanumeric buttons Press to select specific channels or enter text. (Press ENTER...
.... K MY PICTURES button Press to increase (+) or decrease (-) the volume. L MY VIDEOS button Press to view previously recorded TV programs (In My TV window). n 64 N Using Your VAIO Computer D BACK button Press to return to backspace and delete entered text. H Alphanumeric buttons Press to select specific channels or enter text. (Press ENTER...
User Guide
Page 69
...Card into the slot. ✍ Some devices may not function properly if you may not enter Hibernate power management mode. n 69 N Using Your VAIO Computer ! Make sure you alternate between Normal mode and Standby or Hibernate mode while the card is not recognized. It may enter Standby mode. Restart...in the correct direction. If you have difficulty inserting a PC Card, check that you are inserting the PC Card in the System Properties window, remove the software driver and then reinstall it. Restarting will restore the original state of your system to Normal mode from Standby mode or...
...Card into the slot. ✍ Some devices may not function properly if you may not enter Hibernate power management mode. n 69 N Using Your VAIO Computer ! Make sure you alternate between Normal mode and Standby or Hibernate mode while the card is not recognized. It may enter Standby mode. Restart...in the correct direction. If you have difficulty inserting a PC Card, check that you are inserting the PC Card in the System Properties window, remove the software driver and then reinstall it. Restarting will restore the original state of your system to Normal mode from Standby mode or...

User Guide
Page 70
... ✍ To remove a PC Card when your computer is off, skip steps 1 to 6. 1 Double-click the Safely Remove Hardware icon on . The Safely Remove Hardware window appears. 2 Select the hardware you want to remove the device. 6 Click Close. 7 Push the PC Card release button so that the release button pops out.... 8 Push the PC Card release button a second time so that the device can be safely removed from the system. 5 Click OK. n 70 N Using Your VAIO Computer Removing a PC Card Follow the steps below to remove the PC Card while your computer is on the taskbar. The Stop a Hardware Device...
... ✍ To remove a PC Card when your computer is off, skip steps 1 to 6. 1 Double-click the Safely Remove Hardware icon on . The Safely Remove Hardware window appears. 2 Select the hardware you want to remove the device. 6 Click Close. 7 Push the PC Card release button so that the release button pops out.... 8 Push the PC Card release button a second time so that the device can be safely removed from the system. 5 Click OK. n 70 N Using Your VAIO Computer Removing a PC Card Follow the steps below to remove the PC Card while your computer is on the taskbar. The Stop a Hardware Device...
User Guide
Page 74
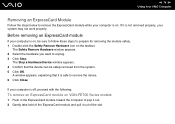
... module safely. 1 Double-click the Safely Remove Hardware icon on VGN-FE700 Series models 1 Push in the ExpressCard module toward the computer to pop it out. 2 Gently take hold of the slot. The Stop a Hardware Device window appears. 4 Confirm that it is on. If your computer is... not removed properly, your system may not work properly. The Safely Remove Hardware window appears. 2 Select the hardware you want to unplug. 3 Click Stop. n 74 N Using Your VAIO Computer Removing an ExpressCard Module Follow the steps below to remove the ExpressCard module while your computer ...
... module safely. 1 Double-click the Safely Remove Hardware icon on VGN-FE700 Series models 1 Push in the ExpressCard module toward the computer to pop it out. 2 Gently take hold of the slot. The Stop a Hardware Device window appears. 4 Confirm that it is on. If your computer is... not removed properly, your system may not work properly. The Safely Remove Hardware window appears. 2 Select the hardware you want to unplug. 3 Click Stop. n 74 N Using Your VAIO Computer Removing an ExpressCard Module Follow the steps below to remove the ExpressCard module while your computer ...

User Guide
Page 79
...media is automatically detected by other Memory Stick devices. n 79 N Using Your VAIO Computer To insert a Memory Stick media 1 Locate the Memory Stick media slot on the media. To avoid damaging your My Computer window as you cannot insert it clicks into the slot until it smoothly. Inserting ... force the Memory Stick media into the slot if you insert it into the slot. See the help file on the configuration of the Windows operating system, the media cannot be recognized by your computer. Do not insert more than one Memory Stick media into the slot. To...
...media is automatically detected by other Memory Stick devices. n 79 N Using Your VAIO Computer To insert a Memory Stick media 1 Locate the Memory Stick media slot on the media. To avoid damaging your My Computer window as you cannot insert it clicks into the slot until it smoothly. Inserting ... force the Memory Stick media into the slot if you insert it into the slot. See the help file on the configuration of the Windows operating system, the media cannot be recognized by your computer. Do not insert more than one Memory Stick media into the slot. To...

User Guide
Page 87
n 87 N Using Your VAIO Computer To set up a dial-up connection to the Internet 1 Click Start, point to the Internet, and click Next. 4 Follow the on-screen instructions. If the Location Information window appears, follow the on-screen instructions. 3 If it is not already selected, click to select Connect to All Programs, Accessories, Communications, and click New Connection Wizard. The New Connection Wizard appears. 2 Click Next.
n 87 N Using Your VAIO Computer To set up a dial-up connection to the Internet 1 Click Start, point to the Internet, and click Next. 4 Follow the on-screen instructions. If the Location Information window appears, follow the on-screen instructions. 3 If it is not already selected, click to select Connect to All Programs, Accessories, Communications, and click New Connection Wizard. The New Connection Wizard appears. 2 Click Next.

User Guide
Page 91
...Connections. Except in Peru and Venezuela, you cannot select the 5 GHz bandwidth, which is provided for the IEEE 802.11a standard, on the taskbar to display the Wireless Device Switch window. The Network Connections window appears. 5 Right-click Wireless Network Connection, then click Properties. Some... window appears. 6 Select the Wireless Networks tab. 7 Click the Add... button. The WIRELESS LAN indicator lights up. On models that support the Bluetooth functionality*1 and/or the IEEE 802.11a/b/g standard*1, double-click ( / ) on ad-hoc networks. n 91 N Using Your VAIO ...
...Connections. Except in Peru and Venezuela, you cannot select the 5 GHz bandwidth, which is provided for the IEEE 802.11a standard, on the taskbar to display the Wireless Device Switch window. The Network Connections window appears. 5 Right-click Wireless Network Connection, then click Properties. Some... window appears. 6 Select the Wireless Networks tab. 7 Click the Add... button. The WIRELESS LAN indicator lights up. On models that support the Bluetooth functionality*1 and/or the IEEE 802.11a/b/g standard*1, double-click ( / ) on ad-hoc networks. n 91 N Using Your VAIO ...

User Guide
Page 92
... Preferred networks. 16 Click Advanced. wireless access points are not used at the bottom of (decimal) 10 to -computer (ad hoc) network; n 92 N Using Your VAIO Computer 12 Enter the network key*2. The computer is a computer-to 15. ✍ An ad-hoc network does not support WPA. The Advanced... want. 13 Enter exactly the same network key again for confirmation. 14 Select the check box This is ready to communicate with values of the window. 15 Click OK. You can choose whichever you need to -computer (ad hoc) networks only option button. 18 Click Close. 19 Click OK. Your network...
... Preferred networks. 16 Click Advanced. wireless access points are not used at the bottom of (decimal) 10 to -computer (ad hoc) network; n 92 N Using Your VAIO Computer 12 Enter the network key*2. The computer is a computer-to 15. ✍ An ad-hoc network does not support WPA. The Advanced... want. 13 Enter exactly the same network key again for confirmation. 14 Select the check box This is ready to communicate with values of the window. 15 Click OK. You can choose whichever you need to -computer (ad hoc) networks only option button. 18 Click Close. 19 Click OK. Your network...

User Guide
Page 93
.... 6 On the Wireless Networks tab, click Advanced. The Network Connections window appears. 4 In the right panel under LAN or High-Speed Internet, right-click Wireless Network Connection. 5 Click Properties. n 93 N Using Your VAIO Computer To disconnect from a computer-to select Any available network (access ...point preferred), and click Close. 8 Click OK. 9 Close the Network Connections window. 10 Turn off the WIRELESS or WIRELESS LAN switch. The ...
.... 6 On the Wireless Networks tab, click Advanced. The Network Connections window appears. 4 In the right panel under LAN or High-Speed Internet, right-click Wireless Network Connection. 5 Click Properties. n 93 N Using Your VAIO Computer To disconnect from a computer-to select Any available network (access ...point preferred), and click Close. 8 Click OK. 9 Close the Network Connections window. 10 Turn off the WIRELESS or WIRELESS LAN switch. The ...

User Guide
Page 95
... support the Bluetooth functionality* and/or the IEEE 802.11a/b/g standard*, double-click ( / ) on the taskbar to display the Wireless Device Switch window. The Wireless Network Connection window appears. 7 Follow the on the WIRELESS or WIRELESS LAN switch. Select your model supports the Bluetooth functionality and/or the IEEE 802.11a... and Internet Connections. 5 Click Network Connections. 6 In the right panel under LAN or High-Speed Internet, double-click Wireless Network Connection. n 95 N Using Your VAIO Computer To connect to a wireless network 1 Make sure an access point is set up .
... support the Bluetooth functionality* and/or the IEEE 802.11a/b/g standard*, double-click ( / ) on the taskbar to display the Wireless Device Switch window. The Wireless Network Connection window appears. 7 Follow the on the WIRELESS or WIRELESS LAN switch. Select your model supports the Bluetooth functionality and/or the IEEE 802.11a... and Internet Connections. 5 Click Network Connections. 6 In the right panel under LAN or High-Speed Internet, double-click Wireless Network Connection. n 95 N Using Your VAIO Computer To connect to a wireless network 1 Make sure an access point is set up .


