
Operating Instructions
Page 3
Center speaker SS-CNP700 - RL + + RL CENTER FRONT Area code Any differences in operation, according to ... or similar names as those on the lower right portion of the receiver you purchased is shown on the remote. Surround speakers SS-SRP700 - "Dolby", "Pro Logic" and the double-D symbol are trademarks of Dolby Laboratories. ** "DTS" and "DTS.... About This Manual • The instructions in this manual describe the controls on the supplied remote. Sub woofer SS-WP700 About area codes The area code of the rear panel (see the illustration below). In this manual, models...
Center speaker SS-CNP700 - RL + + RL CENTER FRONT Area code Any differences in operation, according to ... or similar names as those on the lower right portion of the receiver you purchased is shown on the remote. Surround speakers SS-SRP700 - "Dolby", "Pro Logic" and the double-D symbol are trademarks of Dolby Laboratories. ** "DTS" and "DTS.... About This Manual • The instructions in this manual describe the controls on the supplied remote. Sub woofer SS-WP700 About area codes The area code of the rear panel (see the illustration below). In this manual, models...

Operating Instructions
Page 4
... the antennas 18 5: Preparing the receiver and the remote .....19 6: Calibrating the appropriate settings automatically (AUTO CALIBRATION 20 7: Adjusting the speaker levels and balance (TEST TONE 23 Playback Selecting a component 25 Listening/Watching a component 26 Amplifier Operations Navigating through menus 28 Adjusting the... Digital and DTS Surround sound (AUTO FORMAT DIRECT 37 Selecting a pre-programmed sound field .... 39 Using only the front speakers and sub woofer (2CH STEREO 42 Resetting sound fields to the initial settings 42 Tuner Operations Listening to FM/AM radio ...
... the antennas 18 5: Preparing the receiver and the remote .....19 6: Calibrating the appropriate settings automatically (AUTO CALIBRATION 20 7: Adjusting the speaker levels and balance (TEST TONE 23 Playback Selecting a component 25 Listening/Watching a component 26 Amplifier Operations Navigating through menus 28 Adjusting the... Digital and DTS Surround sound (AUTO FORMAT DIRECT 37 Selecting a pre-programmed sound field .... 39 Using only the front speakers and sub woofer (2CH STEREO 42 Resetting sound fields to the initial settings 42 Tuner Operations Listening to FM/AM radio ...
Operating Instructions
Page 5
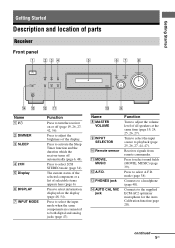
Press to adjust the volume level of all speakers at the same time (page 19, 24, 25, 26, 27). Press to select information displayed on or off automatically (page 6, 48). M PHONES jack N AUTO CAL ...
Press to adjust the volume level of all speakers at the same time (page 19, 24, 25, 26, 27). Press to select information displayed on or off automatically (page 6, 48). M PHONES jack N AUTO CAL ...
Operating Instructions
Page 8
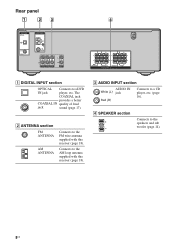
... supplied with this receiver (page 18). C AUDIO INPUT section AUDIO IN White (L) jack Red (R) Connects to the speakers and sub woofer (page 14). 8US Connects to a DVD IN jack player, etc. D SPEAKER section Connects to a CD player, etc. (page 16). Rear panel 1 23 4 DIGITAL OPTICAL VIDEO 2 IN ...DVD IN COAXIAL ANTENNA AM L L R R AUDIO IN AUDIO IN AUDIO IN S DVD VIDEO 2 L R AUDIO IN VIDEO 1 RL RL + ++ + SUB WOOFER RL SURROUND SPEAKERS CENTER RL FRONT A DIGITAL INPUT section OPTICAL Connects to the AM loop antenna supplied with this receiver (page 18).
... supplied with this receiver (page 18). C AUDIO INPUT section AUDIO IN White (L) jack Red (R) Connects to the speakers and sub woofer (page 14). 8US Connects to a DVD IN jack player, etc. D SPEAKER section Connects to a CD player, etc. (page 16). Rear panel 1 23 4 DIGITAL OPTICAL VIDEO 2 IN ...DVD IN COAXIAL ANTENNA AM L L R R AUDIO IN AUDIO IN AUDIO IN S DVD VIDEO 2 L R AUDIO IN VIDEO 1 RL RL + ++ + SUB WOOFER RL SURROUND SPEAKERS CENTER RL FRONT A DIGITAL INPUT section OPTICAL Connects to the AM loop antenna supplied with this receiver (page 18).

Operating Instructions
Page 10
... the control buttons to perform menu operations. Press to select the settings. Press to search tracks in recording standby.) Press to skips tracks of all speakers at the same time to activate the buttons with components in the forward/backward direction of the DVD player on the TV screen. J DVD MENU...
... the control buttons to perform menu operations. Press to select the settings. Press to search tracks in recording standby.) Press to skips tracks of all speakers at the same time to activate the buttons with components in the forward/backward direction of the DVD player on the TV screen. J DVD MENU...
Operating Instructions
Page 12
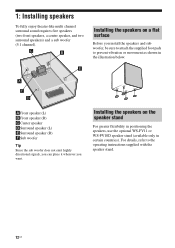
... (available only in the illustration below. Installing the speakers on a flat surface Before you want. 1: Installing speakers To fully enjoy theater-like multi channel surround sound requires five speakers (two front speakers, a center speaker, and two surround speakers) and a sub woofer (5.1 channel). AFront speaker (L) BFront speaker (R) CCenter speaker DSurround speaker (L) ESurround speaker (R) FSub woofer Tip Since the sub woofer does not...
... (available only in the illustration below. Installing the speakers on a flat surface Before you want. 1: Installing speakers To fully enjoy theater-like multi channel surround sound requires five speakers (two front speakers, a center speaker, and two surround speakers) and a sub woofer (5.1 channel). AFront speaker (L) BFront speaker (R) CCenter speaker DSurround speaker (L) ESurround speaker (R) FSub woofer Tip Since the sub woofer does not...

Operating Instructions
Page 13
... regarding the wall material or screws to be used. • Sony is especially fragile, attach the screws securely to a beam and fasten them to 9/32 inch. 3 Hang the speakers on the screws. Install the speakers on the back of the speaker 2 Fasten the screws to 9/32 inch 13US Hole on the ...the illustrations below. As a plaster board wall is not responsible for the wall material and strength. Getting Started Installing the speakers on the wall You can install your front and surround speakers on the wall. 1 Prepare screws (not supplied) that are suitable for the hole on the back of the...
... regarding the wall material or screws to be used. • Sony is especially fragile, attach the screws securely to a beam and fasten them to 9/32 inch. 3 Hang the speakers on the screws. Install the speakers on the back of the speaker 2 Fasten the screws to 9/32 inch 13US Hole on the ...the illustrations below. As a plaster board wall is not responsible for the wall material and strength. Getting Started Installing the speakers on the wall You can install your front and surround speakers on the wall. 1 Prepare screws (not supplied) that are suitable for the hole on the back of the...
Operating Instructions
Page 14
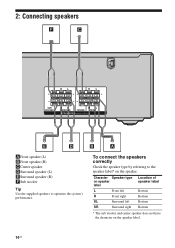
... woofer and center speaker does not have the character on the speaker. To connect the speakers correctly Check the speaker type by referring to optimize the system's performance. 2: Connecting speakers F C RL RL + ++ + SUB WOOFER RL SURROUND SPEAKERS CENTER RL FRONT E D B A AFront speaker (L) BFront speaker (R) CCenter speaker DSurround speaker (L) ESurround speaker (R) FSub woofer Tip Use the supplied speakers to the speaker label* on the...
... woofer and center speaker does not have the character on the speaker. To connect the speakers correctly Check the speaker type by referring to optimize the system's performance. 2: Connecting speakers F C RL RL + ++ + SUB WOOFER RL SURROUND SPEAKERS CENTER RL FRONT E D B A AFront speaker (L) BFront speaker (R) CCenter speaker DSurround speaker (L) ESurround speaker (R) FSub woofer Tip Use the supplied speakers to the speaker label* on the...
Operating Instructions
Page 16
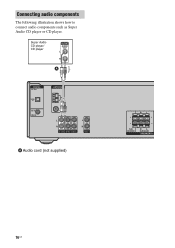
Super Audio CD player/ CD player A DIGITAL OPTICAL VIDEO 2 IN DVD IN COAXIAL ANTENNA AM L L R R AUDIO IN AUDIO IN AUDIO IN SA-CD/CD DVD VIDEO 2 L R AUDIO IN VIDEO 1 A Audio cord (not supplied) RL + + SUB WOOFER RL SURROUND SPEAKERS 16US Connecting audio components The following illustration shows how to connect audio components such as Super Audio CD player or CD player.
Super Audio CD player/ CD player A DIGITAL OPTICAL VIDEO 2 IN DVD IN COAXIAL ANTENNA AM L L R R AUDIO IN AUDIO IN AUDIO IN SA-CD/CD DVD VIDEO 2 L R AUDIO IN VIDEO 1 A Audio cord (not supplied) RL + + SUB WOOFER RL SURROUND SPEAKERS 16US Connecting audio components The following illustration shows how to connect audio components such as Super Audio CD player or CD player.

Operating Instructions
Page 17
... DVD IN COAXIAL A ANTENNA AM A L L R R AUDIO IN AUDIO IN AUDIO IN SA-CD/CD DVD VIDEO 2 L R AUDIO IN VIDEO 1 RL RL + ++ + SUB WOOFER RL SURROUND SPEAKERS CENTER RL FRONT C A DVD player/ DVD recorder A Audio cord (not supplied) B Optical digital cord (not supplied) C Coaxial digital cord (supplied) Notes • To input multi...
... DVD IN COAXIAL A ANTENNA AM A L L R R AUDIO IN AUDIO IN AUDIO IN SA-CD/CD DVD VIDEO 2 L R AUDIO IN VIDEO 1 RL RL + ++ + SUB WOOFER RL SURROUND SPEAKERS CENTER RL FRONT C A DVD player/ DVD recorder A Audio cord (not supplied) B Optical digital cord (not supplied) C Coaxial digital cord (supplied) Notes • To input multi...

Operating Instructions
Page 18
... IN VIDEO 1 * The shape of the connector varies depending on the area code of this receiver. AM loop antenna (supplied) RL + + SUB WOOFER RL SURROUND SPEAKERS 18US 4: Connecting the antennas Connect the supplied AM loop antenna and FM wire antenna.
... IN VIDEO 1 * The shape of the connector varies depending on the area code of this receiver. AM loop antenna (supplied) RL + + SUB WOOFER RL SURROUND SPEAKERS 18US 4: Connecting the antennas Connect the supplied AM loop antenna and FM wire antenna.

Operating Instructions
Page 20
...conditions, the batteries should last for an extended period of time, remove the batteries to your listening position. 3 Place the speakers so that the speakers are facing the optimizer microphone. 20US Observe the correct polarity when installing batteries. Notes • Do not leave the remote ...balance (TEST TONE)" (page 23) Before you to perform automatic calibration as follows: • Check the connection between each speaker and the receiver. • Adjust the speaker level. • Measure the distance of batteries. • Do not expose the remote sensor to the AUTO CAL MIC ...
...conditions, the batteries should last for an extended period of time, remove the batteries to your listening position. 3 Place the speakers so that the speakers are facing the optimizer microphone. 20US Observe the correct polarity when installing batteries. Notes • Do not leave the remote ...balance (TEST TONE)" (page 23) Before you to perform automatic calibration as follows: • Check the connection between each speaker and the receiver. • Adjust the speaker level. • Measure the distance of batteries. • Do not expose the remote sensor to the AUTO CAL MIC ...

Operating Instructions
Page 21
... [4] t A.CAL [3] t A.CAL [2] t A.CAL [1] The table below shows the display when measurement starts. Measurement for Environment noise level Speaker connection Speaker level Speaker distance Display NOISE.CHK MEASURE and SP DET. Press ?/1, input buttons or MUTING. - Getting Started Tips • You can also fix the ... the sub woofer settings will be canceled when you do the following appears on the display and the settings are output from the speakers and the listening position to avoid measurement failure. CLEAR D.TUNING 89 D.SKIP MEMORY DVD MENU 0/10 ENTER DISPLAY TOOLS MUTING F...
... [4] t A.CAL [3] t A.CAL [2] t A.CAL [1] The table below shows the display when measurement starts. Measurement for Environment noise level Speaker connection Speaker level Speaker distance Display NOISE.CHK MEASURE and SP DET. Press ?/1, input buttons or MUTING. - Getting Started Tips • You can also fix the ... the sub woofer settings will be canceled when you do the following appears on the display and the settings are output from the speakers and the listening position to avoid measurement failure. CLEAR D.TUNING 89 D.SKIP MEMORY DVD MENU 0/10 ENTER DISPLAY TOOLS MUTING F...

Operating Instructions
Page 22
... on the receiver and perform Auto Calibration again (page 21). ERROR 11 The speakers are not speakers detected or only connection. ERROR 21 Only one Check the surround surround speaker speakers is quiet during Auto Calibration, an error code will appear on the display cyclically...Warning code t blank display t (warning code t blank display)b) t PUSH t blank display t ENTER b)Appears when there are more than one front speaker is too noisy. You can also change the settings manually 1 Record down the error code. 2 Press the control button. 3 Press ?/1 to turn...
... on the receiver and perform Auto Calibration again (page 21). ERROR 11 The speakers are not speakers detected or only connection. ERROR 21 Only one Check the surround surround speaker speakers is quiet during Auto Calibration, an error code will appear on the display cyclically...Warning code t blank display t (warning code t blank display)b) t PUSH t blank display t ENTER b)Appears when there are more than one front speaker is too noisy. You can also change the settings manually 1 Record down the error code. 2 Press the control button. 3 Press ?/1 to turn...
Operating Instructions
Page 23
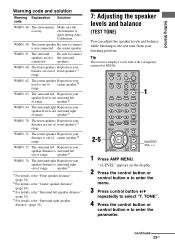
... to enter the menu. 3 Press control button V/v repeatedly to enter the parameter. Make sure the environment is noisy. the center speaker. speaker.f) c)For details, refer "Front speaker distance" (page 34). CLEAR DISPLAY G DUAL MONO 23 FM MODE 56 D.TUNING 89 D.SKIP MEMORY DVD MENU 0/10 ENTER TOOLS... code Solution WARN. 40 The environment is quiet during Auto Calibration. WARN. 50 The center speaker Be sure to the test tone from your speaker level is out of range. speaker.e) WARN. 64 The surround right Reposition your listening position. Tip The receiver employs a test ...
... to enter the menu. 3 Press control button V/v repeatedly to enter the parameter. Make sure the environment is noisy. the center speaker. speaker.f) c)For details, refer "Front speaker distance" (page 34). CLEAR DISPLAY G DUAL MONO 23 FM MODE 56 D.TUNING 89 D.SKIP MEMORY DVD MENU 0/10 ENTER TOOLS... code Solution WARN. 40 The environment is quiet during Auto Calibration. WARN. 50 The center speaker Be sure to the test tone from your speaker level is out of range. speaker.e) WARN. 64 The surround right Reposition your listening position. Tip The receiver employs a test ...
Operating Instructions
Page 24
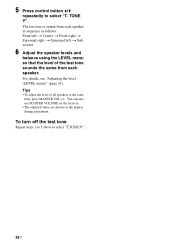
... also use MASTER VOLUME on the receiver. • The adjusted value are shown on the display during adjustment. The test tone is output from each speaker. For details, see "Adjusting the level (LEVEL menu)" (page 31). Tips • To adjust the level of the test tone sounds the same from ...each speaker in sequence as follows: Front left t Center t Front right t Surround right t Surround left t Sub woofer 6 Adjust the speaker levels and balance using the LEVEL menu so that the level of all...
... also use MASTER VOLUME on the receiver. • The adjusted value are shown on the display during adjustment. The test tone is output from each speaker. For details, see "Adjusting the level (LEVEL menu)" (page 31). Tips • To adjust the level of the test tone sounds the same from ...each speaker in sequence as follows: Front left t Center t Front right t Surround right t Surround left t Sub woofer 6 Adjust the speaker levels and balance using the LEVEL menu so that the level of all...
Operating Instructions
Page 25
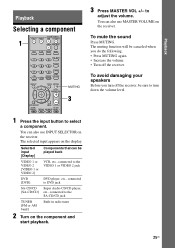
... component and start playback. 3 Press MASTER VOL +/- The muting function will be canceled when you turn down the volume level. 25US To avoid damaging your speakers Before you do the following. • Press MUTING again. • Increase the volume. • Turn off the receiver, be played back VIDEO 1 or VIDEO 2 [VIDEO...
... component and start playback. 3 Press MASTER VOL +/- The muting function will be canceled when you turn down the volume level. 25US To avoid damaging your speakers Before you do the following. • Press MUTING again. • Increase the volume. • Turn off the receiver, be played back VIDEO 1 or VIDEO 2 [VIDEO...

Operating Instructions
Page 26
You can listen to the sound that was recorded in the 2 channel format from all speakers (multi channel). REPLAY ADVANCE PRESET + .< > < TUNING - Refer to a Super Audio CD/CD TV/VIDEO AUTO SLEEP CAL AV ?/1 TV ?/1 ?/1 SYSTEM STANDBY VIDEO 1 VIDEO 2 DVD SA-... the Super Audio CD player or CD player. MOVIE MUSIC PHONES DISPLAY INPUT MODE INPUT SELECTOR MASTER VOLUME 5 3 Notes • The operation is described for a Sony Super Audio CD player. • Refer to page 37 for details. Tips • You can select the sound field to the Super Audio CD/CD...
You can listen to the sound that was recorded in the 2 channel format from all speakers (multi channel). REPLAY ADVANCE PRESET + .< > < TUNING - Refer to a Super Audio CD/CD TV/VIDEO AUTO SLEEP CAL AV ?/1 TV ?/1 ?/1 SYSTEM STANDBY VIDEO 1 VIDEO 2 DVD SA-... the Super Audio CD player or CD player. MOVIE MUSIC PHONES DISPLAY INPUT MODE INPUT SELECTOR MASTER VOLUME 5 3 Notes • The operation is described for a Sony Super Audio CD player. • Refer to page 37 for details. Tips • You can select the sound field to the Super Audio CD/CD...

Operating Instructions
Page 29
... VIDEO 1, HALL, JAZZ, CONCERT VIDEO 2, DVD, SA-CD/CD, TUNER EFCT. STD, EFCT. MAX EFCT. TONE] Front speaker balancea) [FRT BAL] Center speaker level [CNT LVL] Surround left speaker level [SL LVL] Surround right speaker level [SR LVL] Sub woofer level [SW LVL] Dynamic range compressora) [D. STD, COMP. RANGE] Front... speaker bass level [BASS LVL] Front speaker treble level [TRE LVL] Sound field selectiona) [S.F. SELCT] Effect levela) [EFFECT] FM station receiving modea) [FM MODE] Naming preset ...
... VIDEO 1, HALL, JAZZ, CONCERT VIDEO 2, DVD, SA-CD/CD, TUNER EFCT. STD, EFCT. MAX EFCT. TONE] Front speaker balancea) [FRT BAL] Center speaker level [CNT LVL] Surround left speaker level [SL LVL] Surround right speaker level [SR LVL] Sub woofer level [SW LVL] Dynamic range compressora) [D. STD, COMP. RANGE] Front... speaker bass level [BASS LVL] Front speaker treble level [TRE LVL] Sound field selectiona) [S.F. SELCT] Effect levela) [EFFECT] FM station receiving modea) [FM MODE] Naming preset ...

Operating Instructions
Page 30
... a) [FRT DIST.] DIST. 3 ft. step) Surround right speaker distance a) DIST. 3 ft. step) Surround speaker position a) [SUR POS.] SIDE/LO, SIDE/HI, BEHD/LO, BEHD/HI Brightness of the displaya) [DIMMER] 0% dim, 40% dim, 70% dim Auto calibration a) [.../LO 0% dim A.CAL NO a)For details, refer to DIST. 23 ft. [SL DIST. ] (1 ft. PRI.] Settings DEC. step) Center speaker distance a) [CNT DIST.] DIST. 3 ft. DIST. 10 ft. step) Surround left speaker distance a) DIST. 3 ft. to the page in the parentheses. 30US Y, A.V.SYNC. DIST. 10 ft. CAL (37) [7 - to DIST....
... a) [FRT DIST.] DIST. 3 ft. step) Surround right speaker distance a) DIST. 3 ft. step) Surround speaker position a) [SUR POS.] SIDE/LO, SIDE/HI, BEHD/LO, BEHD/HI Brightness of the displaya) [DIMMER] 0% dim, 40% dim, 70% dim Auto calibration a) [.../LO 0% dim A.CAL NO a)For details, refer to DIST. 23 ft. [SL DIST. ] (1 ft. PRI.] Settings DEC. step) Center speaker distance a) [CNT DIST.] DIST. 3 ft. DIST. 10 ft. step) Surround left speaker distance a) DIST. 3 ft. to the page in the parentheses. 30US Y, A.V.SYNC. DIST. 10 ft. CAL (37) [7 - to DIST....


