
Operating Instructions
Page 3
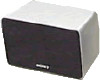
...HT-DDW700 consists of: • Receiver STR-K700 • Speaker system - Front speakers SS-MSP700 - RL + + RL CENTER FRONT Area code Any differences in this manual, models of area code U is used for illustration purposes unless stated otherwise. Sub woofer SS-WP700 About area codes The area code of the receiver you ...they have the same or similar names as those on the lower right portion of the rear panel (see the illustration below). Center speaker SS-CNP700 - About This Manual • The instructions in the text, for example, "Models of area code AA only". Surround...
...HT-DDW700 consists of: • Receiver STR-K700 • Speaker system - Front speakers SS-MSP700 - RL + + RL CENTER FRONT Area code Any differences in this manual, models of area code U is used for illustration purposes unless stated otherwise. Sub woofer SS-WP700 About area codes The area code of the receiver you ...they have the same or similar names as those on the lower right portion of the rear panel (see the illustration below). Center speaker SS-CNP700 - About This Manual • The instructions in the text, for example, "Models of area code AA only". Surround...

Operating Instructions
Page 4
... the antennas 18 5: Preparing the receiver and the remote .....19 6: Calibrating the appropriate settings automatically (AUTO CALIBRATION 20 7: Adjusting the speaker levels and balance (TEST TONE 23 Playback Selecting a component 25 Listening/Watching a component 26 Amplifier Operations Navigating through menus 28 Adjusting the... Digital and DTS Surround sound (AUTO FORMAT DIRECT 37 Selecting a pre-programmed sound field .... 39 Using only the front speakers and sub woofer (2CH STEREO 42 Resetting sound fields to the initial settings 42 Tuner Operations Listening to FM/AM radio ...
... the antennas 18 5: Preparing the receiver and the remote .....19 6: Calibrating the appropriate settings automatically (AUTO CALIBRATION 20 7: Adjusting the speaker levels and balance (TEST TONE 23 Playback Selecting a component 25 Listening/Watching a component 26 Amplifier Operations Navigating through menus 28 Adjusting the... Digital and DTS Surround sound (AUTO FORMAT DIRECT 37 Selecting a pre-programmed sound field .... 39 Using only the front speakers and sub woofer (2CH STEREO 42 Resetting sound fields to the initial settings 42 Tuner Operations Listening to FM/AM radio ...
Operating Instructions
Page 5
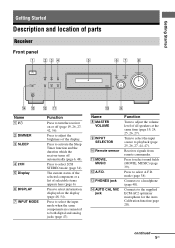
... same components are connected to select 2CH STEREO mode (page 34). M PHONES jack N AUTO CAL MIC jack Function Turn to adjust the brightness of all speakers at the same time (page 19, 24, 25, 26, 27). Press to the supplied ECM-AC2 optimizer microphone for the Auto Calibration function (page 20...
... same components are connected to select 2CH STEREO mode (page 34). M PHONES jack N AUTO CAL MIC jack Function Turn to adjust the brightness of all speakers at the same time (page 19, 24, 25, 26, 27). Press to the supplied ECM-AC2 optimizer microphone for the Auto Calibration function (page 20...
Operating Instructions
Page 8
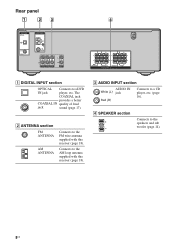
... ANTENNA AM L L R R AUDIO IN AUDIO IN AUDIO IN S DVD VIDEO 2 L R AUDIO IN VIDEO 1 RL RL + ++ + SUB WOOFER RL SURROUND SPEAKERS CENTER RL FRONT A DIGITAL INPUT section OPTICAL Connects to a CD player, etc. (page 16). B ANTENNA section FM ANTENNA AM ANTENNA Connects to the... speakers and sub woofer (page 14). 8US D SPEAKER section Connects to the FM wire antenna supplied with this receiver (page 18). The COAXIAL jack provides a better COAXIAL IN ...
... ANTENNA AM L L R R AUDIO IN AUDIO IN AUDIO IN S DVD VIDEO 2 L R AUDIO IN VIDEO 1 RL RL + ++ + SUB WOOFER RL SURROUND SPEAKERS CENTER RL FRONT A DIGITAL INPUT section OPTICAL Connects to a CD player, etc. (page 16). B ANTENNA section FM ANTENNA AM ANTENNA Connects to the... speakers and sub woofer (page 14). 8US D SPEAKER section Connects to the FM wire antenna supplied with this receiver (page 18). The COAXIAL jack provides a better COAXIAL IN ...

Operating Instructions
Page 10
... or exit the menu while the menu or on-screen guide of the VCR, CD player, DVD player, or tape deck. TUNING +/- level of all speakers at the same time to activate the buttons with components in the forward/backward direction of the DVD player or to fastforward/rewind of the...
... or exit the menu while the menu or on-screen guide of the VCR, CD player, DVD player, or tape deck. TUNING +/- level of all speakers at the same time to activate the buttons with components in the forward/backward direction of the DVD player or to fastforward/rewind of the...
Operating Instructions
Page 12
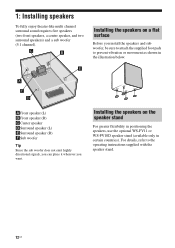
..., refer to prevent vibration or movement as shown in certain countries). AFront speaker (L) BFront speaker (R) CCenter speaker DSurround speaker (L) ESurround speaker (R) FSub woofer Tip Since the sub woofer does not emit highly directional signals, you can place it wherever you install the speakers and sub woofer, be sure to attach the supplied foot pads to the...
..., refer to prevent vibration or movement as shown in certain countries). AFront speaker (L) BFront speaker (R) CCenter speaker DSurround speaker (L) ESurround speaker (R) FSub woofer Tip Since the sub woofer does not emit highly directional signals, you can place it wherever you install the speakers and sub woofer, be sure to attach the supplied foot pads to the...

Operating Instructions
Page 13
... the back of the speaker 3/16 inch 13/32 inch Notes • Use screws that are suitable for the hole on a vertical and flat wall where reinforcement is applied. • Contact a screw shop or installer regarding the wall material or screws to be used. • Sony is especially fragile, attach... the screws securely to a beam and fasten them to the wall. The screws should protrude to 7/32 to 9/32 inch 13US Install the speakers on the back of the speaker 2 Fasten the screws to the wall.
... the back of the speaker 3/16 inch 13/32 inch Notes • Use screws that are suitable for the hole on a vertical and flat wall where reinforcement is applied. • Contact a screw shop or installer regarding the wall material or screws to be used. • Sony is especially fragile, attach... the screws securely to a beam and fasten them to the wall. The screws should protrude to 7/32 to 9/32 inch 13US Install the speakers on the back of the speaker 2 Fasten the screws to the wall.
Operating Instructions
Page 14
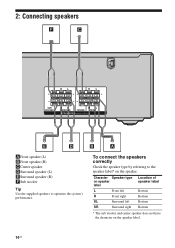
... woofer and center speaker does not have the character on the speaker. To connect the speakers correctly Check the speaker type by referring to optimize the system's performance. 2: Connecting speakers F C RL RL + ++ + SUB WOOFER RL SURROUND SPEAKERS CENTER RL FRONT E D B A AFront speaker (L) BFront speaker (R) CCenter speaker DSurround speaker (L) ESurround speaker (R) FSub woofer Tip Use the supplied speakers to the speaker label* on the...
... woofer and center speaker does not have the character on the speaker. To connect the speakers correctly Check the speaker type by referring to optimize the system's performance. 2: Connecting speakers F C RL RL + ++ + SUB WOOFER RL SURROUND SPEAKERS CENTER RL FRONT E D B A AFront speaker (L) BFront speaker (R) CCenter speaker DSurround speaker (L) ESurround speaker (R) FSub woofer Tip Use the supplied speakers to the speaker label* on the...
Operating Instructions
Page 16
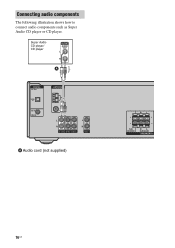
Super Audio CD player/ CD player A DIGITAL OPTICAL VIDEO 2 IN DVD IN COAXIAL ANTENNA AM L L R R AUDIO IN AUDIO IN AUDIO IN SA-CD/CD DVD VIDEO 2 L R AUDIO IN VIDEO 1 A Audio cord (not supplied) RL + + SUB WOOFER RL SURROUND SPEAKERS 16US Connecting audio components The following illustration shows how to connect audio components such as Super Audio CD player or CD player.
Super Audio CD player/ CD player A DIGITAL OPTICAL VIDEO 2 IN DVD IN COAXIAL ANTENNA AM L L R R AUDIO IN AUDIO IN AUDIO IN SA-CD/CD DVD VIDEO 2 L R AUDIO IN VIDEO 1 A Audio cord (not supplied) RL + + SUB WOOFER RL SURROUND SPEAKERS 16US Connecting audio components The following illustration shows how to connect audio components such as Super Audio CD player or CD player.

Operating Instructions
Page 17
... DVD IN COAXIAL A ANTENNA AM A L L R R AUDIO IN AUDIO IN AUDIO IN SA-CD/CD DVD VIDEO 2 L R AUDIO IN VIDEO 1 RL RL + ++ + SUB WOOFER RL SURROUND SPEAKERS CENTER RL FRONT C A DVD player/ DVD recorder A Audio cord (not supplied) B Optical digital cord (not supplied) C Coaxial digital cord (supplied) Notes • To input multi...
... DVD IN COAXIAL A ANTENNA AM A L L R R AUDIO IN AUDIO IN AUDIO IN SA-CD/CD DVD VIDEO 2 L R AUDIO IN VIDEO 1 RL RL + ++ + SUB WOOFER RL SURROUND SPEAKERS CENTER RL FRONT C A DVD player/ DVD recorder A Audio cord (not supplied) B Optical digital cord (not supplied) C Coaxial digital cord (supplied) Notes • To input multi...

Operating Instructions
Page 18
... horizontal as possible. 4: Connecting the antennas Connect the supplied AM loop antenna and FM wire antenna. AM loop antenna (supplied) RL + + SUB WOOFER RL SURROUND SPEAKERS 18US FM wire antenna (supplied) DIGITAL OPTICA L VIDEO 2 IN DVD IN COAXIAL ANTENNA AM L L R R AUDIO IN AUDIO IN AUDIO IN SA-CD/CD DVD VIDEO...
... horizontal as possible. 4: Connecting the antennas Connect the supplied AM loop antenna and FM wire antenna. AM loop antenna (supplied) RL + + SUB WOOFER RL SURROUND SPEAKERS 18US FM wire antenna (supplied) DIGITAL OPTICA L VIDEO 2 IN DVD IN COAXIAL ANTENNA AM L L R R AUDIO IN AUDIO IN AUDIO IN SA-CD/CD DVD VIDEO...

Operating Instructions
Page 20
... cause a malfunction. • If you do not intend to your listening position. 3 Place the speakers so that the speakers are facing the optimizer microphone. 20US For details, see "7: Adjusting the speaker levels and balance (TEST TONE)" (page 23) Before you perform Auto Calibration ?/1 AUTO CAL MIC ...batteries and other kinds of time, remove the batteries to avoid possible damage from battery leakage and corrosion. You can also adjust the speaker levels and balance manually. Inserting batteries into the remote Insert two R6 (size-AA) batteries in an extremely hot or humid place....
... cause a malfunction. • If you do not intend to your listening position. 3 Place the speakers so that the speakers are facing the optimizer microphone. 20US For details, see "7: Adjusting the speaker levels and balance (TEST TONE)" (page 23) Before you perform Auto Calibration ?/1 AUTO CAL MIC ...batteries and other kinds of time, remove the batteries to avoid possible damage from battery leakage and corrosion. You can also adjust the speaker levels and balance manually. Inserting batteries into the remote Insert two R6 (size-AA) batteries in an extremely hot or humid place....

Operating Instructions
Page 21
...position. • Be sure to remove any obstacles in the display during measurement. - Measurement for Environment noise level Speaker connection Speaker level Speaker distance Display NOISE.CHK MEASURE and SP DET. When measurement ends, "COMPLETE" appears on the display. Avoid making ... [4] t A.CAL [3] t A.CAL [2] t A.CAL [1] The table below shows the display when measurement starts. Stand some distance away from the speakers during measurement. MOVIE MUSIC DUAL MONO 123 FM MODE 456 7 >10/ - Press AUTO CAL again. 21US Performing Auto Calibration AUTO CAL Control button ...
...position. • Be sure to remove any obstacles in the display during measurement. - Measurement for Environment noise level Speaker connection Speaker level Speaker distance Display NOISE.CHK MEASURE and SP DET. When measurement ends, "COMPLETE" appears on the display. Avoid making ... [4] t A.CAL [3] t A.CAL [2] t A.CAL [1] The table below shows the display when measurement starts. Stand some distance away from the speakers during measurement. MOVIE MUSIC DUAL MONO 123 FM MODE 456 7 >10/ - Press AUTO CAL again. 21US Performing Auto Calibration AUTO CAL Control button ...

Operating Instructions
Page 22
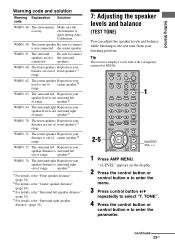
... t ENTER a)Appears when there are more than one error code. To change the settings manually. one Check the surround surround speaker speakers is detected. Warning codes During Auto Calibration, the warning code provides information on the receiver and perform Auto Calibration again (page ... see "Error code and remedies" below. 5 Turn on the measurement result. environment is too noisy. ERROR 11 The speakers are not speakers detected or only connection. microphone. The warning code will automatically adjust the settings. You can choose to turn off the receiver...
... t ENTER a)Appears when there are more than one error code. To change the settings manually. one Check the surround surround speaker speakers is detected. Warning codes During Auto Calibration, the warning code provides information on the receiver and perform Auto Calibration again (page ... see "Error code and remedies" below. 5 Turn on the measurement result. environment is too noisy. ERROR 11 The speakers are not speakers detected or only connection. microphone. The warning code will automatically adjust the settings. You can choose to turn off the receiver...
Operating Instructions
Page 23
...RETURN/EXIT MENU MASTER VOL +/- 1 Press AMP MENU. speaker.f) WARN. 70 The front speakers Reposition your balance are not the surround connected. speaker.f) c)For details, refer "Front speaker distance" (page 34). d)For details, refer "Center speaker distance" (page 34). "1-LEVEL" appears on the display...?/1 ?/1 SYSTEM STANDBY VIDEO 1 VIDEO 2 DVD SA-CD/CD TUNER AMP MENU 1 2CH A.F.D. speakers. Make sure the environment is out of front speakers.c) range. speaker.e) WARN. 74 The surround right Reposition your level is quiet during Auto Calibration. e)For details, refer...
...RETURN/EXIT MENU MASTER VOL +/- 1 Press AMP MENU. speaker.f) WARN. 70 The front speakers Reposition your balance are not the surround connected. speaker.f) c)For details, refer "Front speaker distance" (page 34). d)For details, refer "Center speaker distance" (page 34). "1-LEVEL" appears on the display...?/1 ?/1 SYSTEM STANDBY VIDEO 1 VIDEO 2 DVD SA-CD/CD TUNER AMP MENU 1 2CH A.F.D. speakers. Make sure the environment is out of front speakers.c) range. speaker.e) WARN. 74 The surround right Reposition your level is quiet during Auto Calibration. e)For details, refer...
Operating Instructions
Page 24
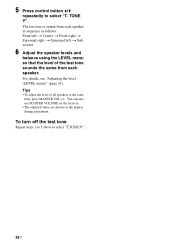
... shown on the display during adjustment. Tips • To adjust the level of the test tone sounds the same from each speaker. The test tone is output from each speaker in sequence as follows: Front left t Center t Front right t Surround right t Surround left t Sub woofer 6 Adjust the... speaker levels and balance using the LEVEL menu so that the level of all speakers at the same time, press MASTER VOL +/-. 5 Press control button ...
... shown on the display during adjustment. Tips • To adjust the level of the test tone sounds the same from each speaker. The test tone is output from each speaker in sequence as follows: Front left t Center t Front right t Surround right t Surround left t Sub woofer 6 Adjust the... speaker levels and balance using the LEVEL menu so that the level of all speakers at the same time, press MASTER VOL +/-. 5 Press control button ...
Operating Instructions
Page 25
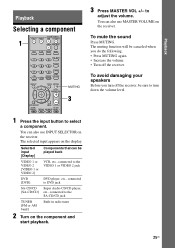
... on the receiver. You can also use MASTER VOLUME on the receiver. To mute the sound Press MUTING. TV CH + PRESET - To avoid damaging your speakers Before you do the following. • Press MUTING again. • Increase the volume. • Turn off the receiver, be sure to select a component. REPLAY ADVANCE...
... on the receiver. You can also use MASTER VOLUME on the receiver. To mute the sound Press MUTING. TV CH + PRESET - To avoid damaging your speakers Before you do the following. • Press MUTING again. • Increase the volume. • Turn off the receiver, be sure to select a component. REPLAY ADVANCE...

Operating Instructions
Page 26
...Playback the disc. 5 Adjust to a suitable volume. 6 After you have finished listening to the sound that was recorded in the 2 channel format from all speakers (multi channel). Recommended sound fields: Classical: HALL Jazz: JAZZ Live concert: CONCERT • You can also use INPUT SELECTOR on the receiver. 3 Press...TUNER AMP MENU 2CH A.F.D. MOVIE MUSIC PHONES DISPLAY INPUT MODE INPUT SELECTOR MASTER VOLUME 5 3 Notes • The operation is described for a Sony Super Audio CD player. • Refer to the operating instructions supplied with the Super Audio CD player or CD player.
...Playback the disc. 5 Adjust to a suitable volume. 6 After you have finished listening to the sound that was recorded in the 2 channel format from all speakers (multi channel). Recommended sound fields: Classical: HALL Jazz: JAZZ Live concert: CONCERT • You can also use INPUT SELECTOR on the receiver. 3 Press...TUNER AMP MENU 2CH A.F.D. MOVIE MUSIC PHONES DISPLAY INPUT MODE INPUT SELECTOR MASTER VOLUME 5 3 Notes • The operation is described for a Sony Super Audio CD player. • Refer to the operating instructions supplied with the Super Audio CD player or CD player.

Operating Instructions
Page 29
...R -10 dB to SUR R +10 dB (1 dB step) SUR R 0 dB SW -10 dB to BAL. MAX COMP. RANGE] Front speaker bass level [BASS LVL] Front speaker treble level [TRE LVL] Sound field selectiona) [S.F. L +1 to TRE +6 dB (1 dB step) TRE 0 dB 2CH ST., A.F.D. AUTO PLII... VIDEO 1, HALL, JAZZ, CONCERT VIDEO 2, DVD, SA-CD/CD, TUNER EFCT. TONE N T. TONE] Front speaker balancea) [FRT BAL] Center speaker level [CNT LVL] Surround left speaker level [SL LVL] Surround right speaker level [SR LVL] Sub woofer level [SW LVL] Dynamic range compressora) [D. Menu [Display] LEVEL (31) [1-...
...R -10 dB to SUR R +10 dB (1 dB step) SUR R 0 dB SW -10 dB to BAL. MAX COMP. RANGE] Front speaker bass level [BASS LVL] Front speaker treble level [TRE LVL] Sound field selectiona) [S.F. L +1 to TRE +6 dB (1 dB step) TRE 0 dB 2CH ST., A.F.D. AUTO PLII... VIDEO 1, HALL, JAZZ, CONCERT VIDEO 2, DVD, SA-CD/CD, TUNER EFCT. TONE N T. TONE] Front speaker balancea) [FRT BAL] Center speaker level [CNT LVL] Surround left speaker level [SL LVL] Surround right speaker level [SR LVL] Sub woofer level [SW LVL] Dynamic range compressora) [D. Menu [Display] LEVEL (31) [1-...

Operating Instructions
Page 30
...ft. [SR DIST.] (1 ft. to DIST. 23 ft. (1 ft. PCM for : VIDEO 2; N Naming inputsa) [NAME IN] Front speakers distance a) [FRT DIST.] DIST. 3 ft. step) Surround right speaker distance a) DIST. 3 ft. DIST. 10 ft. CAL (37) [7 - AUTO, DEC. PCM Digital broadcast language selectiona) [DUAL] DUAL ... DUAL M, DUAL S, DUAL M+S A/V Synca) [A.V. SYNC.] A.V.SYNC. Y, A.V.SYNC. to DIST. 23 ft. (1 ft. step) Surround left speaker distance a) DIST. 3 ft. step) Surround speaker position a) [SUR POS.] SIDE/LO, SIDE/HI, BEHD/LO, BEHD/HI Brightness of the displaya) [DIMMER] 0% dim, 40% dim, 70...
...ft. [SR DIST.] (1 ft. to DIST. 23 ft. (1 ft. PCM for : VIDEO 2; N Naming inputsa) [NAME IN] Front speakers distance a) [FRT DIST.] DIST. 3 ft. step) Surround right speaker distance a) DIST. 3 ft. DIST. 10 ft. CAL (37) [7 - AUTO, DEC. PCM Digital broadcast language selectiona) [DUAL] DUAL ... DUAL M, DUAL S, DUAL M+S A/V Synca) [A.V. SYNC.] A.V.SYNC. Y, A.V.SYNC. to DIST. 23 ft. (1 ft. step) Surround left speaker distance a) DIST. 3 ft. step) Surround speaker position a) [SUR POS.] SIDE/LO, SIDE/HI, BEHD/LO, BEHD/HI Brightness of the displaya) [DIMMER] 0% dim, 40% dim, 70...


