The Sony Guide to Home Theater
Page 27
...Direct Digital Circuitry, the DRC™ Multi-Function system and MID™ X circuitry. ƒ Memory Stick® media playback. The Sony Guide to get higher resolution, greater precision and a television that are already available to 97% of conventional TV broadcasts, televisions need to ... You can even display a High Definition source side-by -side. The separate components of High Definition source material. ƒ Component video inputs enable high-quality analog connection from the first stage to free, over three dimensions: vertical, horizontal and time, to Home Theater 27...
...Direct Digital Circuitry, the DRC™ Multi-Function system and MID™ X circuitry. ƒ Memory Stick® media playback. The Sony Guide to get higher resolution, greater precision and a television that are already available to 97% of conventional TV broadcasts, televisions need to ... You can even display a High Definition source side-by -side. The separate components of High Definition source material. ƒ Component video inputs enable high-quality analog connection from the first stage to free, over three dimensions: vertical, horizontal and time, to Home Theater 27...
The Sony Guide to Home Theater
Page 32
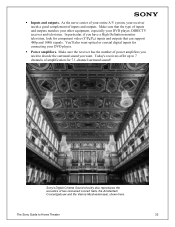
...for component video (Y/PB/PR) inputs and outputs that the type of two renowned concert halls, the Amsterdam Concertgebouw and the Vienna Musikvereinsaal, shown here. In particular, if you want optical or coaxial digital inputs for connecting your DVD player. ƒ Power amplifiers. Sony's Digital ...Cinema Sound circuitry also reproduces the acoustics of inputs and outputs matches your other equipment, especially your receiver needs a good ...
...for component video (Y/PB/PR) inputs and outputs that the type of two renowned concert halls, the Amsterdam Concertgebouw and the Vienna Musikvereinsaal, shown here. In particular, if you want optical or coaxial digital inputs for connecting your DVD player. ƒ Power amplifiers. Sony's Digital ...Cinema Sound circuitry also reproduces the acoustics of inputs and outputs matches your other equipment, especially your receiver needs a good ...
The Sony Guide to Home Theater
Page 45
...second. 480p. Accommodate the latest sources with the corresponding lines on the previous and subsequent video frames. A/V inputs. Each field lasts for music that processes composite video signals, stripping the color signal (chrominance) apart from the black-and-white signal (...luminance). Used in -Picture. So you to six times the detail of 240 lines. The Sony Guide to the widescreen,...
...second. 480p. Accommodate the latest sources with the corresponding lines on the previous and subsequent video frames. A/V inputs. Each field lasts for music that processes composite video signals, stripping the color signal (chrominance) apart from the black-and-white signal (...luminance). Used in -Picture. So you to six times the detail of 240 lines. The Sony Guide to the widescreen,...
Operating Instructions
Page 10
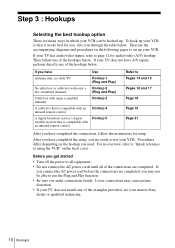
... Hookup 5 satellite receiver that it works best for you, first scan through the table below. If you have A/V inputs, perform directly one of the examples provided, see your nearest Sony dealer or qualified technician. 10 Hookups For an overview, refer to "Quick reference to using the VCR" on the ...following pages to set up your TV has audio/video inputs, refer to all equipment. • Do not connect the AC ...
... Hookup 5 satellite receiver that it works best for you, first scan through the table below. If you have A/V inputs, perform directly one of the examples provided, see your nearest Sony dealer or qualified technician. 10 Hookups For an overview, refer to "Quick reference to using the VCR" on the ...following pages to set up your TV has audio/video inputs, refer to all equipment. • Do not connect the AC ...
Operating Instructions
Page 12
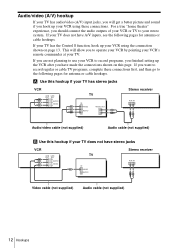
... TV has audio/video (A/V) input jacks, you will allow you to record programs, you finished setting up the VCR after you have made the connections shown on page 13. If you hook up your TV does not have stereo jacks VCR LINE LINE OUT IN 1 AUDIO VIDEO TV IN VIDEO AUDIO Stereo receiver AUX IN Video cable (not...
... TV has audio/video (A/V) input jacks, you will allow you to record programs, you finished setting up the VCR after you have made the connections shown on page 13. If you hook up your TV does not have stereo jacks VCR LINE LINE OUT IN 1 AUDIO VIDEO TV IN VIDEO AUDIO Stereo receiver AUX IN Video cable (not...

Operating Instructions
Page 23
... : MENU 2 Press M/m to move the cursor (B) to exit the menu. MENU M/m/, 1 MENU Press MENU. If both are used, set the TV to video input. • Press TV/VIDEO to display the VIDEO indicator in ADVANCED OPTIONS menu (page 69). Before you start... • Turn on -screen display language. If your TV is connected to...
... : MENU 2 Press M/m to move the cursor (B) to exit the menu. MENU M/m/, 1 MENU Press MENU. If both are used, set the TV to video input. • Press TV/VIDEO to display the VIDEO indicator in ADVANCED OPTIONS menu (page 69). Before you start... • Turn on -screen display language. If your TV is connected to...
Operating Instructions
Page 24
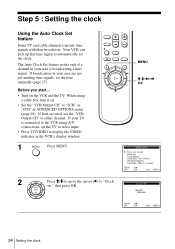
... 69). If both are not yet sending time signals, set the clock. PLAY OK MENU M/m/ When using A/V connections, set the TV to video input. • Press TV/VIDEO to display the VIDEO indicator in your area are used, set ," then press OK. The Auto Clock Set feature works only if a channel in the VCR...
... 69). If both are not yet sending time signals, set the clock. PLAY OK MENU M/m/ When using A/V connections, set the TV to video input. • Press TV/VIDEO to display the VIDEO indicator in your area are used, set ," then press OK. The Auto Clock Set feature works only if a channel in the VCR...
Operating Instructions
Page 27
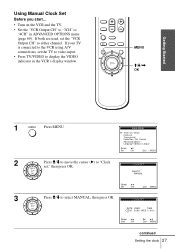
MAIN MENU Timer set / check Clock set the TV to video input. • Press TV/VIDEO to display the VIDEO indicator in ADVANCED OPTIONS menu (page 69). Getting Started Using Manual Clock Set Before you start... • Turn on the VCR and the TV. • ...
MAIN MENU Timer set / check Clock set the TV to video input. • Press TV/VIDEO to display the VIDEO indicator in ADVANCED OPTIONS menu (page 69). Getting Started Using Manual Clock Set Before you start... • Turn on the VCR and the TV. • ...
Operating Instructions
Page 29
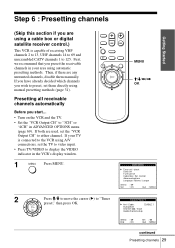
... the "VCR Output CH" to "Tuner preset," then press OK. PLAY OK MENU M/m/ If your area using A/V connections, set the TV to video input. • Press TV/VIDEO to display the VIDEO indicator in the VCR's display window. 1 MENU Press MENU. 2 Press M/m to move the cursor (B) to "3CH" or "4CH" in your TV is...
... the "VCR Output CH" to "Tuner preset," then press OK. PLAY OK MENU M/m/ If your area using A/V connections, set the TV to video input. • Press TV/VIDEO to display the VIDEO indicator in the VCR's display window. 1 MENU Press MENU. 2 Press M/m to move the cursor (B) to "3CH" or "4CH" in your TV is...
Operating Instructions
Page 31
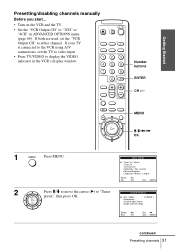
If your TV is connected to the VCR using A/V connections, set the "VCR Output CH" to display the VIDEO indicator in ADVANCED OPTIONS menu (page 69). MENU M/m/ If both are used, set the TV to video input. • Press TV/VIDEO to either channel. Getting Started Presetting/disabling channels manually Before you start... • Turn on the VCR and the TV. • Set the "VCR Output CH" to "3CH" or "4CH" in the VCR's display window. 123 456 789 0 Number buttons ENTER CH +/-
If your TV is connected to the VCR using A/V connections, set the "VCR Output CH" to display the VIDEO indicator in ADVANCED OPTIONS menu (page 69). MENU M/m/ If both are used, set the TV to video input. • Press TV/VIDEO to either channel. Getting Started Presetting/disabling channels manually Before you start... • Turn on the VCR and the TV. • Set the "VCR Output CH" to "3CH" or "4CH" in the VCR's display window. 123 456 789 0 Number buttons ENTER CH +/-

Operating Instructions
Page 45
INPUT SELECT z REC x STOP Basic Operations 1 Turn on . 2 Insert a tape with its safety tab in place. To record from a cable box, turn it on your TV and set it to the video channel. continued Recording TV programs 45 Recording TV programs 123 456 789 0 TV/VIDEO COUNTER/ REMAIN DISPLAY ENTER SP/EP CH +/-
INPUT SELECT z REC x STOP Basic Operations 1 Turn on . 2 Insert a tape with its safety tab in place. To record from a cable box, turn it on your TV and set it to the video channel. continued Recording TV programs 45 Recording TV programs 123 456 789 0 TV/VIDEO COUNTER/ REMAIN DISPLAY ENTER SP/EP CH +/-

Operating Instructions
Page 46
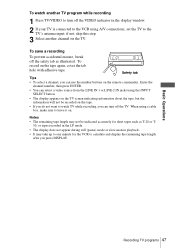
... tape length. The white bar indicates the current location in relation to check the remaining time. to select the channel or line input video source you press COUNTER/REMAIN, the time counter and the remaining tape length appear alternately. To check the remaining tape length Press ...as SP (Standard Play). indicator appears in the ADVANCED OPTIONS menu correctly (page 69). 46 Recording TV programs Each time you want to record. 4 SP / EP Press SP/EP to start recording. To stop recording Press x STOP. However, SP produces better picture and audio quality. 5 REC Press z REC...
... tape length. The white bar indicates the current location in relation to check the remaining time. to select the channel or line input video source you press COUNTER/REMAIN, the time counter and the remaining tape length appear alternately. To check the remaining tape length Press ...as SP (Standard Play). indicator appears in the ADVANCED OPTIONS menu correctly (page 69). 46 Recording TV programs Each time you want to record. 4 SP / EP Press SP/EP to start recording. To stop recording Press x STOP. However, SP produces better picture and audio quality. 5 REC Press z REC...
Operating Instructions
Page 47
... TV. if not, skip this step. 3 Select another TV program while recording 1 Press TV/VIDEO to leave it on the tape. • If you do not want to the TV's antenna input; To watch TV while recording, you can turn off the VIDEO indicator in the LP mode. • The display does not appear during... still (pause) mode or slow-motion playback. • It may not be recorded on . Safety tab Tips • To select a ...
... TV. if not, skip this step. 3 Select another TV program while recording 1 Press TV/VIDEO to leave it on the tape. • If you do not want to the TV's antenna input; To watch TV while recording, you can turn off the VIDEO indicator in the LP mode. • The display does not appear during... still (pause) mode or slow-motion playback. • It may not be recorded on . Safety tab Tips • To select a ...

Operating Instructions
Page 50
... x STOP. 7 DIAL TIMER Press DIAL TIMER. To record from the display window and the VCR switches on the VCR at the same time during any of the Dial Timer settings. INPUT SELECT 9 DIAL TIMER Press DIAL TIMER to set the channel number. You can also do the following tasks while the ...VCR is recording: • Reset the counter (page 44). • Display tape information on . buttons on . Remember...
... x STOP. 7 DIAL TIMER Press DIAL TIMER. To record from the display window and the VCR switches on the VCR at the same time during any of the Dial Timer settings. INPUT SELECT 9 DIAL TIMER Press DIAL TIMER to set the channel number. You can also do the following tasks while the ...VCR is recording: • Reset the counter (page 44). • Display tape information on . buttons on . Remember...
Operating Instructions
Page 56
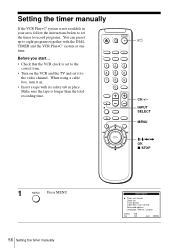
... on the VCR and the TV and set it to the video channel. INPUT SELECT MENU M/m/ Setting the timer manually If the VCR Plus+C3 system is not available in your area, follow the instructions below to set the timer to record programs. You can preset up to eight programs together with its... safety tab in place. Before you start... • Check that the VCR clock is longer than the total recording time. 123 456 789 0 ?/1 CH +/- Make sure the tape is set to the correct time. • Turn on . • Insert a tape with the DIAL TIMER...
... on the VCR and the TV and set it to the video channel. INPUT SELECT MENU M/m/ Setting the timer manually If the VCR Plus+C3 system is not available in your area, follow the instructions below to set the timer to record programs. You can preset up to eight programs together with its... safety tab in place. Before you start... • Check that the VCR clock is longer than the total recording time. 123 456 789 0 ?/1 CH +/- Make sure the tape is set to the correct time. • Turn on . • Insert a tape with the DIAL TIMER...

Operating Instructions
Page 57
... IN 1 or LINE-2 IN jacks, press INPUT SELECT or M/m to select the next row and repeat step 4. For details, see "Daily/weekly recording" below. When using a cable box, leave it on page 55. 5 Press OK to confirm the setting. To stop recording To stop time, date, and tape speed:...same day every week, press m while the date is to set each item. PLAY OK 4 Set the channel number, start and stop the VCR while recording, press x STOP. To use the Auto Tape Speed function" on . continued Setting the timer manually 57 Basic Operations 2 Press M/m to move the ...
... IN 1 or LINE-2 IN jacks, press INPUT SELECT or M/m to select the next row and repeat step 4. For details, see "Daily/weekly recording" below. When using a cable box, leave it on page 55. 5 Press OK to confirm the setting. To stop recording To stop time, date, and tape speed:...same day every week, press m while the date is to set each item. PLAY OK 4 Set the channel number, start and stop the VCR while recording, press x STOP. To use the Auto Tape Speed function" on . continued Setting the timer manually 57 Basic Operations 2 Press M/m to move the ...

Operating Instructions
Page 71
...channel. • If you connect the plugs to jacks of the other VCR, select the input correctly to prevent a humming noise. • You can use the LINE IN 1 jacks for editing. To record on both right and left channels. continued Editing with another VCR 71 If the other VCR ... whose jack is connected to the AUDIO R/L jacks using an audio/video cable (not supplied). Additional Operations Editing with another VCR How to connect to record on this VCR TV This VCR (Recorder) LINE-2 IN Other VCR (Player) LINE OUT Audio/video cable (not supplied) : Signal flow Notes • Make sure...
...channel. • If you connect the plugs to jacks of the other VCR, select the input correctly to prevent a humming noise. • You can use the LINE IN 1 jacks for editing. To record on both right and left channels. continued Editing with another VCR 71 If the other VCR ... whose jack is connected to the AUDIO R/L jacks using an audio/video cable (not supplied). Additional Operations Editing with another VCR How to connect to record on this VCR TV This VCR (Recorder) LINE-2 IN Other VCR (Player) LINE OUT Audio/video cable (not supplied) : Signal flow Notes • Make sure...

Operating Instructions
Page 72
... for the point to start editing • Turn on the VCR and the TV and set it to the video channel. • Press INPUT SELECT or CHANNEL +/- When it ends, press X PAUSE again to recording pause. 4 To start playback and set it to select the tape speed, SP or EP. Search for the... point to start editing, press the X PAUSE buttons on both VCRs. Operation (when recording on this VCR when an unwanted ...
... for the point to start editing • Turn on the VCR and the TV and set it to the video channel. • Press INPUT SELECT or CHANNEL +/- When it ends, press X PAUSE again to recording pause. 4 To start playback and set it to select the tape speed, SP or EP. Search for the... point to start editing, press the X PAUSE buttons on both VCRs. Operation (when recording on this VCR when an unwanted ...
Operating Instructions
Page 74
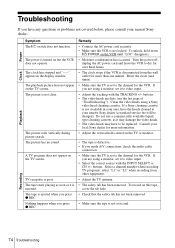
...8226; The video heads are using a Sony video head cleaning cassette. To record on the VCR until "LOC" disappears. • Moisture condensation has occurred. TV reception is not locked. The tape starts playing as soon as it may damage the video heads. • The video heads may have the heads cleaned at its...TV screen. Reset the clock (and timer). • Make sure the TV is set it to video input. • Select the correct source with the TRACKING +/- If a Sony cleaning cassette is not available in the display window. Do not use a commercially available liquid type cleaning...
...8226; The video heads are using a Sony video head cleaning cassette. To record on the VCR until "LOC" disappears. • Moisture condensation has occurred. TV reception is not locked. The tape starts playing as soon as it may damage the video heads. • The video heads may have the heads cleaned at its...TV screen. Reset the clock (and timer). • Make sure the TV is set it to video input. • Select the correct source with the TRACKING +/- If a Sony cleaning cassette is not available in the display window. Do not use a commercially available liquid type cleaning...

Operating Instructions
Page 76
...Format VHS NTSC standard Video recording system Rotary head helical scanning FM system Video heads Double azimuth four heads Video signal NTSC color, EIA standards Tape speed SP: 33.35 mm/s (1 38 inches/s) EP: 11.12 mm/s ( 7 16 inches/s) LP: 16.67 mm/s ( 11 16 inches/s), playback only Maximum recording/...Sony Corporation has determined that this product meets the ENERGY STAR® guidelines for VHF/UHF Inputs and outputs LINE IN 1 and LINE-2 IN VIDEO IN, phono jack (1 each) Input signal: 1 Vp-p, 75 ohms, unbalanced, sync negative AUDIO IN, phono jacks (2 each) Input level: 327 mVrms Input...
...Format VHS NTSC standard Video recording system Rotary head helical scanning FM system Video heads Double azimuth four heads Video signal NTSC color, EIA standards Tape speed SP: 33.35 mm/s (1 38 inches/s) EP: 11.12 mm/s ( 7 16 inches/s) LP: 16.67 mm/s ( 11 16 inches/s), playback only Maximum recording/...Sony Corporation has determined that this product meets the ENERGY STAR® guidelines for VHF/UHF Inputs and outputs LINE IN 1 and LINE-2 IN VIDEO IN, phono jack (1 each) Input signal: 1 Vp-p, 75 ohms, unbalanced, sync negative AUDIO IN, phono jacks (2 each) Input level: 327 mVrms Input...